
Monitoring Greenhouse Climate, Humidor Control, and Weather Station Data with AOSONG’s DHT11 or DHT22 Temperature and Humidity Sensor
Looking to keep track of your greenhouse’s climate, control a humidor, or collect temperature and humidity data for a weather station project? AOSONG’s DHT11 or DHT22 Temperature and Humidity Sensor might be the ideal solution!
These sensors come pre-calibrated from the factory, eliminating the need for external components. With just a few connections and some Arduino code, you can quickly start measuring relative humidity and temperature.
Accurate to one decimal place, these sensors provide reliable temperature and humidity readings. The only slight drawback is their data update frequency of approximately one to two seconds. However, considering their affordability and performance, it’s difficult to find any major faults.
Parts Required
| Component Name | Buy Now |
| Arduino Uno REV3 | Amazon |
| DHT11 Temperature Humidity Sensor Module | Amazon |
| DHT22 Temperature And Humidity Sensor Module | Amazon |
| I2C 1602 LCD Display Module | Amazon |
| Breadboard | Amazon |
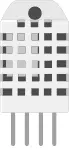
DHT11 vs DHT22
Comparing the DHT11 and DHT22 Sensors: Specifications and Distinctions
The DHT11 and DHT22 sensors are two popular members of the DHTxx series. They may appear similar and have identical pinouts, but their specifications differ.
Between the two, the DHT22 boasts superior specifications, albeit at a higher cost. It can measure temperatures from -40°C to +125°C with an accuracy of ±0.5°C, whereas the DHT11 can measure temperatures from 0°C to 50°C with an accuracy of ±2°C. Additionally, the DHT22 can measure relative humidity from 0% to 100% with an accuracy of 2-5%, while the DHT11 can only measure relative humidity from 20% to 80% with an accuracy of 5%.
Specifications Overview:
 |  | |
| DHT11 | DHT22 | |
| Operating Voltage | 3 to 5V | 3 to 5V |
| Max Operating Current | 2.5mA max | 2.5mA max |
| Humidity Range | 20-80% / 5% | 0-100% / 2-5% |
| Temperature Range | 0-50°C / ± 2°C | -40 to 80°C / ± 0.5°C |
| Sampling Rate | 1 Hz (reading every second) | 0.5 Hz (reading every 2 seconds) |
| Body size | 15.5mm x 12mm x 5.5mm | 15.1mm x 25mm x 7.7mm |
| Advantage | Ultra low cost | More Accurate |
Despite the DHT22’s greater accuracy, precision, and ability to operate across a wider range of temperature and humidity, the DHT11 excels in three areas – it is more cost-effective, compact, and offers a higher sampling rate. The DHT11 performs readings at a frequency of once per second (1Hz sampling rate), whereas the DHT22 takes readings once every two seconds (0.5Hz sampling rate).
Despite these disparities, both sensors operate within a voltage range of 3 to 5 volts, with a maximum current of 2.5mA during conversion. Importantly, the DHT11 and DHT22 sensors are interchangeable, allowing for easy replacement. While some code adjustments may be necessary, the wiring remains the same!
Exploring the Inner Workings of the DHT Sensor
Upon opening the casing of the sensor, you will discover an NTC thermistor and a humidity sensing component nestled inside.
The humidity sensing component consists of two electrodes separated by a moisture-absorbing substrate, often composed of a salt or conductive plastic polymer. As humidity levels increase, the substrate absorbs water vapor, causing the release of ions and a decrease in resistance between the electrodes. This change in resistance is directly proportional to the humidity, enabling the estimation of relative humidity.

The sensor also incorporates an NTC thermistor to measure temperature. A thermistor is a specialized resistor whose resistance varies with temperature.
Technically, all resistors exhibit some degree of thermistor behavior, as their resistance slightly alters with temperature. However, this change is typically minimal and challenging to measure accurately.
Thermistors are specifically designed to exhibit a significant change in resistance relative to temperature, often by 100 ohms or more per degree. The term “NTC” stands for “Negative Temperature Coefficient,” indicating that the resistance decreases as the temperature rises.

In addition, the sensor features an 8-bit SOIC-14 packaged IC. This integrated circuit measures and processes the analog signal using preloaded calibration coefficients, converts the analog signal to digital form, and outputs a digital signal containing temperature and humidity information.
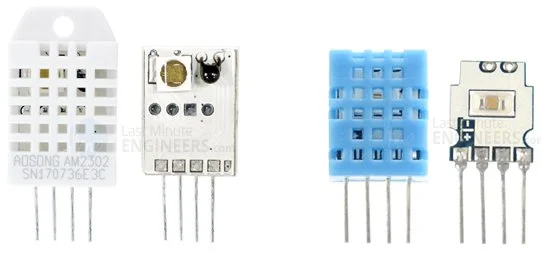
DHT11 and DHT22 Pinout
Connecting the DHT11 and DHT22 sensors is a straightforward process. These sensors have four pins with specific functions:
VCC: This pin is responsible for providing power to the sensor. While the supply voltage can range from 3.3V to 5.5V, it is recommended to use a 5V power supply. With a 5V power source, the sensor can be positioned up to 20 meters away. However, if a 3.3V supply voltage is used, the sensor’s maximum distance reduces to 1 meter due to potential measurement errors caused by line voltage drop.
Data: The data pin is used for communication between the sensor and the microcontroller.
NC (Not connected): This pin does not have any specific connection or function.
GND: The ground pin serves as the reference point for the electrical circuit.
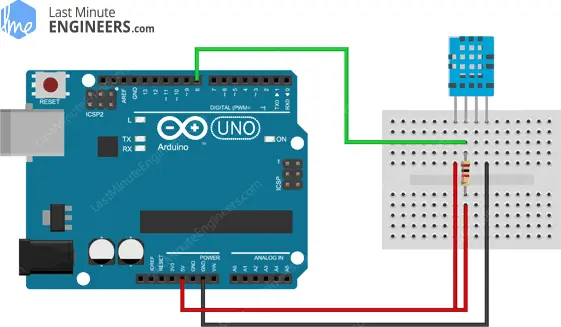
Wiring DHT11 and DHT22 Sensors to an Arduino
Let’s now proceed with connecting the sensor to the Arduino!
The wiring process for DHT sensors and Arduino is quite simple. These sensors come with pins that have a standard 0.1” pitch, making them compatible with most breadboards. Begin by connecting the VCC pin of the sensor to the 5V pin on the Arduino, and connect the GND pin to the ground (GND) pin on the Arduino. Lastly, establish a connection between the Data pin of the sensor and digital pin #8 on the Arduino.
To ensure smooth communication between the sensor and the microcontroller (MCU), it is important to include a 10K pull-up resistor between the Data line and VCC. This resistor helps in maintaining a stable HIGH signal level. However, if you are using a breakout board specifically designed for the sensor, there is no need to add an external pull-up resistor, as it is already integrated on the board.
With the hardware connections in place, you are now ready to upload your code and witness the sensor in action.
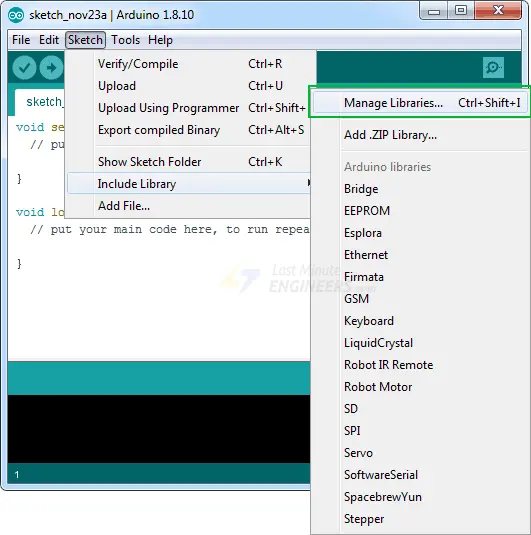
Installing the Library
The DHTxx sensors utilize their own unique single-wire data transfer protocol, which involves precise timing. Fortunately, we can simplify the process by using the DHTlib library, which takes care of most of the work for us.
To install the library, follow these steps:
Go to Sketch > Include Library > Manage Libraries…
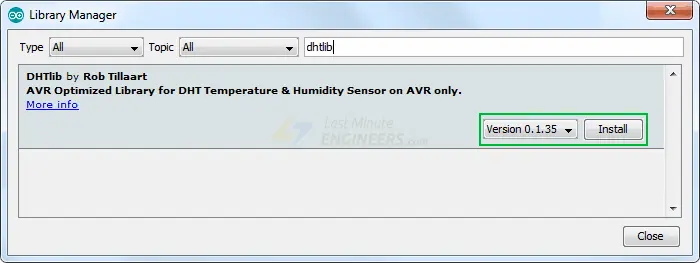
Wait for the Library Manager to download the libraries index and update the list of installed libraries.
In the search bar, enter ‘dhtlib’ to filter the results.
You should see a single entry for the library. Finally, click the Install button to complete the installation process.
Arduino Example 1 – Displaying Readings on Serial Monitor
Once you have successfully installed the library, you can proceed with the following steps:
Copy and paste the provided sketch into the Arduino IDE. This test sketch will allow you to view the temperature and relative humidity values on the serial monitor. Upload the sketch to your Arduino board and open the serial monitor.
#include <dht.h>
#define dataPin 8 // Defines pin number to which the sensor is connected
dht DHT; // Creats a DHT object

void setup()
{
	Serial.begin(9600);
}
void loop()
{
	//Uncomment whatever type you're using!
	int readData = DHT.read22(dataPin); // DHT22/AM2302
	//int readData = DHT.read11(dataPin); // DHT11

	float t = DHT.temperature; // Gets the values of the temperature
	float h = DHT.humidity; // Gets the values of the humidity

	// Printing the results on the serial monitor
	Serial.print("Temperature = ");
	Serial.print(t);
	Serial.print(" ");
	Serial.print((char)176);//shows degrees character
	Serial.print("C | ");
	Serial.print((t * 9.0) / 5.0 + 32.0);//print the temperature in Fahrenheit
	Serial.print(" ");
	Serial.print((char)176);//shows degrees character
	Serial.println("F ");
	Serial.print("Humidity = ");
	Serial.print(h);
	Serial.println(" % ");
	Serial.println("");

	delay(2000); // Delays 2 secods
}
Take note of the displayed temperature and relative humidity readings.
Later, we will review the sketch in more detail to understand how it works.

Code Explanation:
The provided sketch includes the necessary code to read temperature and humidity values from the DHT sensor and display them on the serial monitor. Let’s go through the code in detail:
First, the DHT library is included, and the Arduino pin number to which the sensor’s Data pin is connected is defined. Then, a DHT object is created.
#include <dht.h>
#define dataPin 8 // Defines pin number to which the sensor is connected
dht DHT; // Creates a DHT object
In the setup() function, the serial communication is initialized.
void setup() {
  Serial.begin(9600);
}
Inside the loop() function, the read22(dataPin) function is used to read data from the DHT22 sensor. If you are using the DHT11 sensor instead, you should uncomment the second line and comment out the first line.
int readData = DHT.read22(dataPin); // DHT22/AM2302
//int readData = DHT.read11(dataPin); // DHT11
After reading the sensor data, the temperature and humidity values are obtained by accessing the properties of the DHT object using dot notation.
float t = DHT.temperature; // Gets the value of the temperature
float h = DHT.humidity; // Gets the value of the humidity
Note that the temperature is in degrees Celsius (°C). If you want to display the temperature in Fahrenheit (°F), you can use the conversion formula provided in the comment.
// Print the temperature in Fahrenheit
Serial.print((t * 9.0) / 5.0 + 32.0);
By uploading and running this sketch, you will be able to see the temperature readings in Fahrenheit on the serial monitor.
Arduino Example 2 – Displaying Readings on LCD
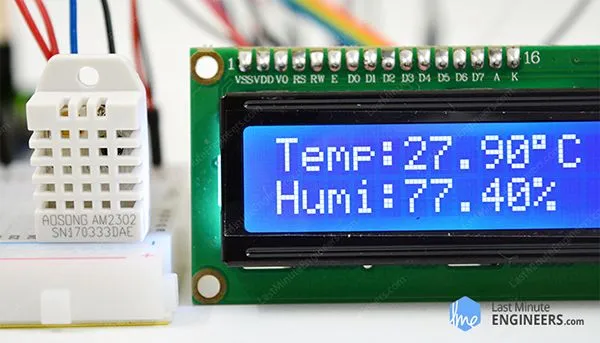
If you’re working on a project like an incubator that requires a display to show temperature and humidity readings, you can use a 16×2 character LCD alongside the DHT11 or DHT22 sensors. In this example, we will connect the LCD to the Arduino to visualize the data.
Here’s an example of what the output will look like on the LCD:
If you’re new to working with 16×2 character LCDs, it’s recommended to go through a tutorial to familiarize yourself with the setup.
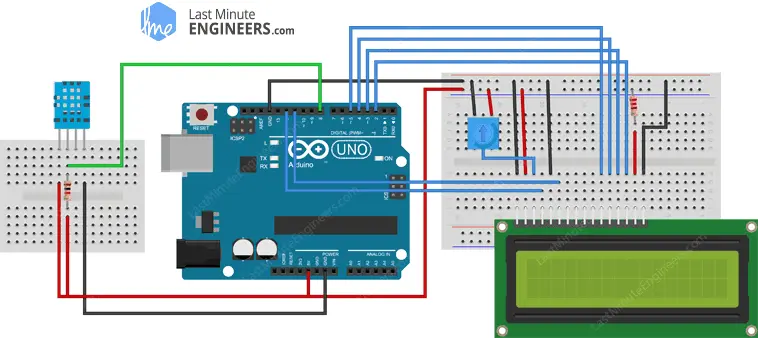
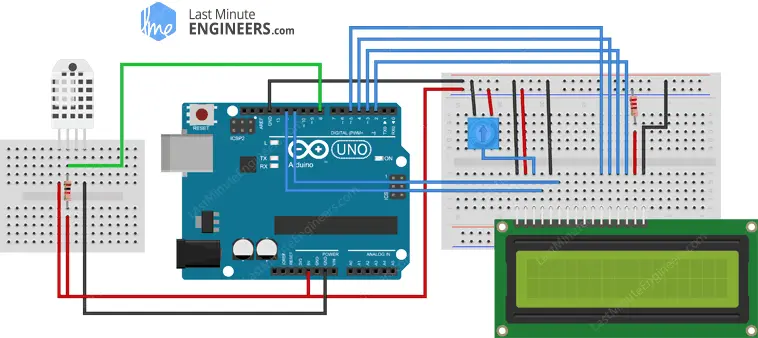
Wiring:
To connect the LCD, follow the wiring diagram shown below:
Arduino Code:
The following sketch will retrieve the temperature and humidity values and display them on the 16×2 character LCD. It’s similar to the previous example, but the values are now printed on the LCD instead of the serial monitor.
#include <LiquidCrystal.h> // includes the LiquidCrystal Library
#include <dht.h>
#define dataPin 8

LiquidCrystal lcd(12, 11, 5, 4, 3, 2); // Creates an LCD object. Parameters: (rs, enable, d4, d5, d6, d7)
dht DHT;
bool showcelciusorfarenheit = false;

void setup()
{
	lcd.begin(16,2); // Initializes the interface to the LCD screen, and specifies the dimensions (width and height) of the display
}

void loop()
{
	int readData = DHT.read22(dataPin);
	float t = DHT.temperature;
	float h = DHT.humidity;
	lcd.setCursor(0,0); // Sets the location at which subsequent text written to the LCD will be displayed
	lcd.print("Temp.: "); // Prints string "Temp." on the LCD

	//Print temperature value in Celcius and Fahrenheit every alternate cycle
	if(showcelciusorfarenheit)
	{
		lcd.print(t); // Prints the temperature value from the sensor
		lcd.print(" ");
		lcd.print((char)223);//shows degrees character
		lcd.print("C");
		showcelciusorfarenheit = false;
	}
	else
	{
		lcd.print((t * 9.0) / 5.0 + 32.0); // print the temperature in Fahrenheit
		lcd.print(" ");
		lcd.print((char)223);//shows degrees character
		lcd.print("F");
		showcelciusorfarenheit = true;
	}

	lcd.setCursor(0,1);
	lcd.print("Humi.: ");
	lcd.print(h);
	lcd.print(" %");
	delay(5000);
}
Related article
- Understanding the Operation of HC-SR04 Ultrasonic Sensor and Connecting it to Arduino
- Arduino Soil NPK Sensor: Maximizing Plant Nutrition
- Step-by-Step: Connecting Reed Switch to Arduino
- Track Heart Rate: A Guide to Pulse Sensor and Arduino Integration
- Using TMP36 Temperature Sensor: Arduino Interfacing Guide


