
This guide demonstrates the process of configuring an ESP8266 board to gather data from numerous ESP8266 boards through the ESP-NOW communication protocol in a many-to-one setup. This setup is perfect for consolidating data from multiple sensor nodes onto a single ESP8266 board. Programming for the boards will be done using the Arduino IDE.
Project Overview
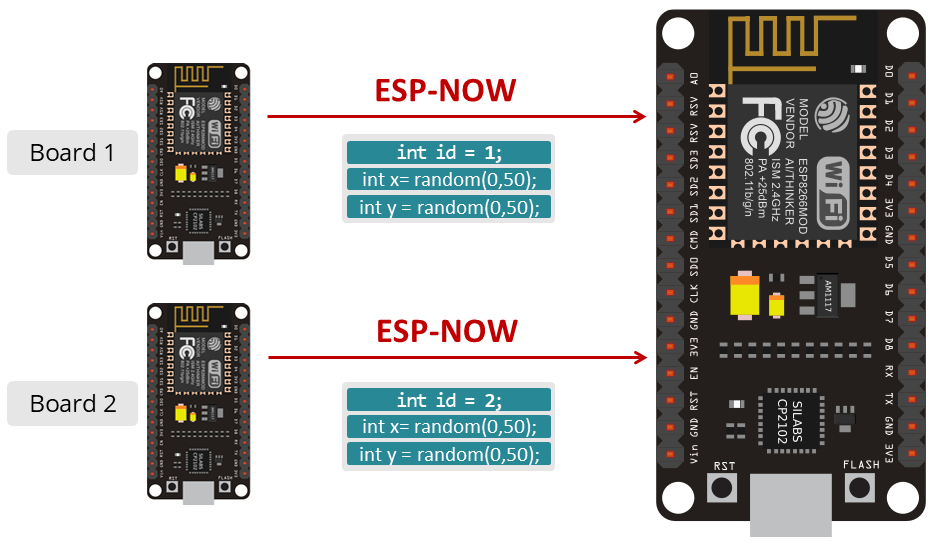
This tutorial illustrates the process of configuring an ESP8266 board to gather data from multiple ESP8266 boards via the ESP-NOW communication protocol, specifically in a many-to-one configuration as depicted in the following diagram.

- One ESP8266 board functions as a receiver/slave.
- Multiple ESP8266 boards operate as senders/masters. For this demonstration, we’ll utilize two senders, but you can expand your setup to include more boards.
- Each sender board receives an acknowledgment message indicating whether the transmission was successful or not.
- The ESP8266 receiver board receives messages from all senders and identifies the origin of each message.
- In this example, we’ll exchange random values between the boards. You can customize this example to transmit commands or sensor readings.
Parts Required
| Component Name | Buy Now |
| ESP8266 NodeMCU CP2102 | Amazon |
Retrieving the MAC Address of the Receiver Board
To transmit messages via ESP-NOW, you must obtain the MAC address of the receiver board. Each board possesses a unique MAC address (learn how to Obtain and Modify the ESP8266 MAC Address).
Upload the provided code to your ESP8266 receiver board to retrieve its MAC address.
#ifdef ESP32
  #include <WiFi.h>
#else
  #include <ESP8266WiFi.h>
#endif

void setup(){
  Serial.begin(115200);
  Serial.println();
  Serial.print("ESP Board MAC Address:  ");
  Serial.println(WiFi.macAddress());
}

void loop(){

}
After uploading the code, press the RST/EN button, and the MAC address should appear on the Serial Monitor.

ESP8266 NodeMCU Sender Code (ESP-NOW)
Although the receiver can distinguish each sender by its unique MAC address, managing different MAC addresses on the receiver side to identify which board sent which message can be somewhat complex.
To simplify this process, we’ll assign a unique number (ID) to each board, starting from 1. For instance, if you have three boards, one will be assigned ID number 1, another number 2, and the last one number 3. This ID will be transmitted to the receiver along with other variables.
In this example, we’ll exchange a structure containing the board’s ID number and two random numbers, x and y, as depicted in the figure below.
Upload the provided code to each of your sender boards, ensuring to increment the ID number for each sender board.
#include <ESP8266WiFi.h>
#include <espnow.h>

// REPLACE WITH RECEIVER MAC Address
uint8_t broadcastAddress[] = {0xFF, 0xFF, 0xFF, 0xFF, 0xFF, 0xFF};

// Set your Board ID (ESP32 Sender #1 = BOARD_ID 1, ESP32 Sender #2 = BOARD_ID 2, etc)
#define BOARD_ID 2

// Structure example to send data
// Must match the receiver structure
typedef struct struct_message {
    int id;
    int x;
    int y;
} struct_message;

// Create a struct_message called test to store variables to be sent
struct_message myData;

unsigned long lastTime = 0;
unsigned long timerDelay = 10000;

// Callback when data is sent
void OnDataSent(uint8_t *mac_addr, uint8_t sendStatus) {
  Serial.print("\r\nLast Packet Send Status: ");
  if (sendStatus == 0){
    Serial.println("Delivery success");
  }
  else{
    Serial.println("Delivery fail");
  }
}

void setup() {
  // Init Serial Monitor
  Serial.begin(115200);

  // Set device as a Wi-Fi Station
  WiFi.mode(WIFI_STA);
  WiFi.disconnect();

  // Init ESP-NOW
  if (esp_now_init() != 0) {
    Serial.println("Error initializing ESP-NOW");
    return;
  }
  // Set ESP-NOW role
  esp_now_set_self_role(ESP_NOW_ROLE_CONTROLLER);

  // Once ESPNow is successfully init, we will register for Send CB to
  // get the status of Trasnmitted packet
  esp_now_register_send_cb(OnDataSent);

  // Register peer
  esp_now_add_peer(broadcastAddress, ESP_NOW_ROLE_SLAVE, 1, NULL, 0);

}

void loop() {
  if ((millis() - lastTime) > timerDelay) {
    // Set values to send
    myData.id = BOARD_ID;
    myData.x = random(1, 50);
    myData.y = random(1, 50);

    // Send message via ESP-NOW
    esp_now_send(0, (uint8_t *) &myData, sizeof(myData));
    lastTime = millis();
  }
}
Code Explanation
Include the ESP8266WiFi and espnow libraries.
#include <ESP8266WiFi.h>
#include <espnow.h>
Insert the receiver’s MAC address on the following line.
uint8_t broadcastAddress[] = {0x5C, 0xCF, 0x7F, 0x99, 0xA1, 0x70};
Set the board ID on the BOARD_ID variable. Don’t forget to change this variable for each of your sender boards.
// Set your Board ID (ESP8266 Sender #1 = BOARD_ID 1, ESP8266 Sender #2 = BOARD_ID 2, etc)
#define BOARD_ID 2
Then, create a structure that contains the data we want to send. We called this structure struct_message and it contains three integer variables: the board id, x and y. You can change this to send whatever variable types you want (but don’t forget to change that on the receiver side too).
typedef struct struct_message {
    int id;
    int x;
    int y;
} struct_message;
Create a new variable of type struct_message that is called myData that will store the variables values.
struct_message myData;
OnDataSent() callback function
Next, define the OnDataSent() function. This is a callback function that will be executed when a message is sent. In this case, this function prints if the message was successfully delivered or not.
void OnDataSent(uint8_t *mac_addr, uint8_t sendStatus) {
  Serial.print("\r\nLast Packet Send Status: ");
  if (sendStatus == 0){
    Serial.println("Delivery success");
  }
  else{
    Serial.println("Delivery fail");
  }
}
setup()
In the setup(), initialize the serial monitor for debugging purposes:
Serial.begin(115200);
Set the device as a Wi-Fi station and disconnect Wi-Fi:
WiFi.mode(WIFI_STA);
WiFi.disconnect();
Initialize ESP-NOW:
if (esp_now_init() != 0) {
  Serial.println("Error initializing ESP-NOW");
  return;
}
Set the board role. This is a sender board, so we’ll set it to ESP_NOW_ROLE_CONTROLLER.
esp_now_set_self_role(ESP_NOW_ROLE_CONTROLLER);
After successfully initializing ESP-NOW, register the callback function that will be called when a message is sent. In this case, register for the OnDataSent() function created previously.
esp_now_register_send_cb(OnDataSent);
Add peer device
To send data to another board (the receiver), you need to pair it as a peer. The following line registers a new peer.
esp_now_add_peer(broadcastAddress, ESP_NOW_ROLE_SLAVE, 1, NULL, 0);
The esp_now_add_peer() function accepts the following arguments, in this order: mac address, peer role, wi-fi channel, key, and key length.
loop()
In the loop(), we’ll send a message via ESP-NOW every 10 seconds (you can change this delay time in the timerDelay variable).
Assign a value to each variable.
myData.id = BOARD_ID;
myData.x = random(1, 50);
myData.y = random(1, 50);
Don’t forget to change the id for each sender board.
Remember that myData is a structure. Here assign the values that you want to send inside the structure. In this case, we’re just sending the id and random values x and y. In a practical application these should be replaced with commands or sensor readings, for example.
Send ESP-NOW message
Finally, send the message via ESP-NOW.
esp_now_send(0, (uint8_t *) &myData, sizeof(myData));
ESP8266 NodeMCU Receiver Code (ESP-NOW)
Please upload the provided code to your ESP8266 receiver board. This code is configured to receive data from two distinct boards. You can readily adjust the code to accommodate a different number of boards.
#include <ESP8266WiFi.h>
#include <espnow.h>

// Structure example to receive data
// Must match the sender structure
typedef struct struct_message {
    int id;
    int x;
    int y;
} struct_message;

// Create a struct_message called myData
struct_message myData;

// Create a structure to hold the readings from each board
struct_message board1;
struct_message board2;

// Create an array with all the structures
struct_message boardsStruct[2] = {board1, board2};

// Callback function that will be executed when data is received
void OnDataRecv(uint8_t * mac_addr, uint8_t *incomingData, uint8_t len) {
  char macStr[18];
  Serial.print("Packet received from: ");
  snprintf(macStr, sizeof(macStr), "%02x:%02x:%02x:%02x:%02x:%02x",
           mac_addr[0], mac_addr[1], mac_addr[2], mac_addr[3], mac_addr[4], mac_addr[5]);
  Serial.println(macStr);
  memcpy(&myData, incomingData, sizeof(myData));
  Serial.printf("Board ID %u: %u bytes\n", myData.id, len);
  // Update the structures with the new incoming data
  boardsStruct[myData.id-1].x = myData.x;
  boardsStruct[myData.id-1].y = myData.y;
  Serial.printf("x value: %d \n", boardsStruct[myData.id-1].x);
  Serial.printf("y value: %d \n", boardsStruct[myData.id-1].y);
  Serial.println();
}

void setup() {
  // Initialize Serial Monitor
  Serial.begin(115200);

  // Set device as a Wi-Fi Station
  WiFi.mode(WIFI_STA);
  WiFi.disconnect();

  // Init ESP-NOW
  if (esp_now_init() != 0) {
    Serial.println("Error initializing ESP-NOW");
    return;
  }

  // Once ESPNow is successfully Init, we will register for recv CB to
  // get recv packer info
  esp_now_set_self_role(ESP_NOW_ROLE_SLAVE);
  esp_now_register_recv_cb(OnDataRecv);
}

void loop(){
  // Access the variables for each board
  /*int board1X = boardsStruct[0].x;
  int board1Y = boardsStruct[0].y;
  int board2X = boardsStruct[1].x;
  int board2Y = boardsStruct[1].y;
  */
}
Code Explanation
Similarly to the sender, start by including the libraries:
#include <ESP8266WiFi.h>
#include <espnow.h>
Create a structure to receive the data. This structure should be the same defined in the sender sketch.
typedef struct struct_message {
    int id;
    int x;
    int y;
} struct_message;
Create a struct_message variable called myData that will hold the data received.
struct_message myData;
Then, create a struct_message variable for each board, so that we can assign the received data to the corresponding board. Here we’re creating structures for two sender boards. If you have more sender boards, you need to create more structures.
struct_message board1;
struct_message board2;
Create an array that contains all the board structures. If you’re using a different number of boards you need to change that.
struct_message boardsStruct[2] = {board1, board2};
onDataRecv()
Create a callback function that is called when the ESP8266 receives the data via ESP-NOW. The function is called onDataRecv() and should accept several parameters as follows:
void OnDataRecv(uint8_t * mac_addr, uint8_t *incomingData, uint8_t len) {
Get the sender board’s MAC address:
Serial.print("Packet received from: ");
snprintf(macStr, sizeof(macStr), "%02x:%02x:%02x:%02x:%02x:%02x",
         mac_addr[0], mac_addr[1], mac_addr[2], mac_addr[3], mac_addr[4], mac_addr[5]);
Serial.println(macStr);
Copy the content of the incomingData data variable into the myData variable.
memcpy(&myData, incomingData, sizeof(myData));
Now, the myData structure contains several variables with the values sent by one of the ESP8266 senders. We can identify which board send the packet by its ID: myData.id.
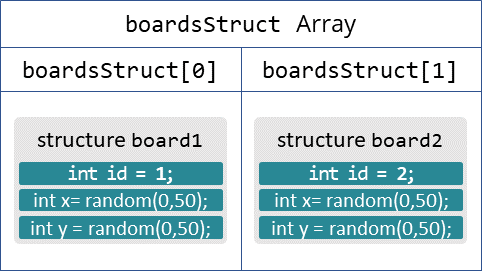
This way, we can assign the values received to the corresponding boards on the boardsStruct array:
boardsStruct[myData.id-1].x = myData.x;
boardsStruct[myData.id-1].y = myData.y;
For example, imagine you receive a packet from board with id 2. The value of myData.id is 2.
So, you want to update the values of the board2 structure. The board2 structure is the element with index 1 on the boardsStruct array. That’s why we subtract 1, because arrays in C have 0 indexing. It may help if you take a look at the following image.
setup()
In the setup(), initialize the Serial Monitor.
Serial.begin(115200);
Set the device as a Wi-Fi Station and disconnect Wi-Fi.
WiFi.mode(WIFI_STA);
WiFi.disconnect();
Initialize ESP-NOW:
if (esp_now_init() != ESP_OK) {
  Serial.println("Error initializing ESP-NOW");
  return;
}
Set the board role. This is a receiver board, so we’ll set it to ESP_NOW_ROLE_SLAVE.
Register for a callback function that will be called when data is received. In this case, we register for the OnDataRecv() function that was created previously.
esp_now_register_recv_cb(OnDataRecv);
The following lines commented on the loop exemplify what you need to do if you want to access the variables of each board structure. For example, to access the x value of board1:
int board1X = boardsStruct[0].x;
Demonstration
Upload the sender code to each of your sender boards, ensuring to assign a different ID to each board.
Upload the receiver code to the ESP8266 receiver board, and adjust the structure to match the number of sender boards.
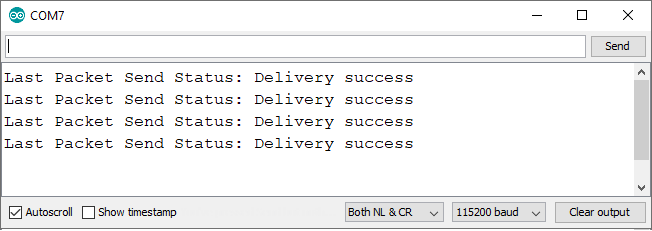
On the sender boards’ Serial Monitor, you should receive a “Delivery Success” message if the messages are successfully transmitted.
On the receiver board, you should receive packets from all the other boards. In this test, data was received from 2 different boards.

Wrapping Up
In this tutorial, you’ve learned how to set up an ESP8266 to receive data from multiple ESP8266 boards using ESP-NOW (many-to-one configuration). A similar approach can be taken with ESP32 boards (ESP32 ESP-NOW: Many-to-one).
As demonstrated, we exchanged random numbers, but in practical applications, these should be replaced with actual sensor readings or commands. This setup is beneficial for collecting data from various sensor nodes.
Check out our other tutorials related to ESP-NOW that you may find useful:
- Real-time Sensor Readings: ESP8266 NodeMCU Web Interface (ESP-NOW + Wi-Fi)
- Enhance Connectivity: Two-Way ESP-NOW with ESP8266 NodeMCU
- Maximize Communication: ESP8266 ESP-NOW for Multi-Board Data Transfer


