
Discover how to create bidirectional communication between two ESP8266 NodeMCU boards using the ESP-NOW communication protocol. For instance, two ESP8266 boards will share DHT sensor data. We’ll employ the Arduino IDE for this purpose.
Introducing ESP-NOW
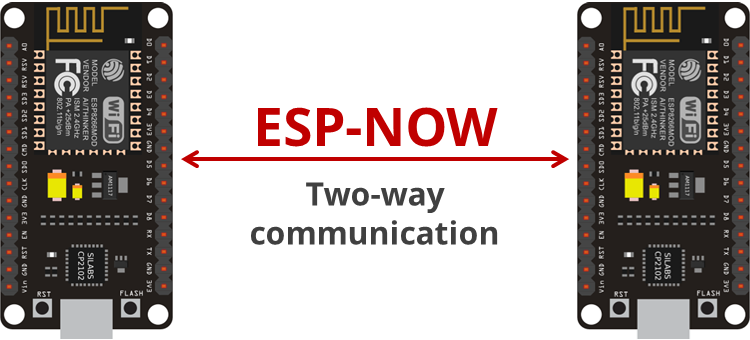
ESP-NOW is a connectionless communication protocol created by Espressif, designed for short packet transmission. It allows multiple devices to communicate without relying on Wi-Fi.
This swift protocol facilitates the exchange of small messages (up to 250 bytes) among ESP32 boards. ESP-NOW offers versatility, accommodating both one-way and two-way communication in various setups.
In this guide, we’ll demonstrate how to establish bidirectional communication between two ESP8266 boards.
Project Overview
The illustration below provides an overview of the project we will construct:
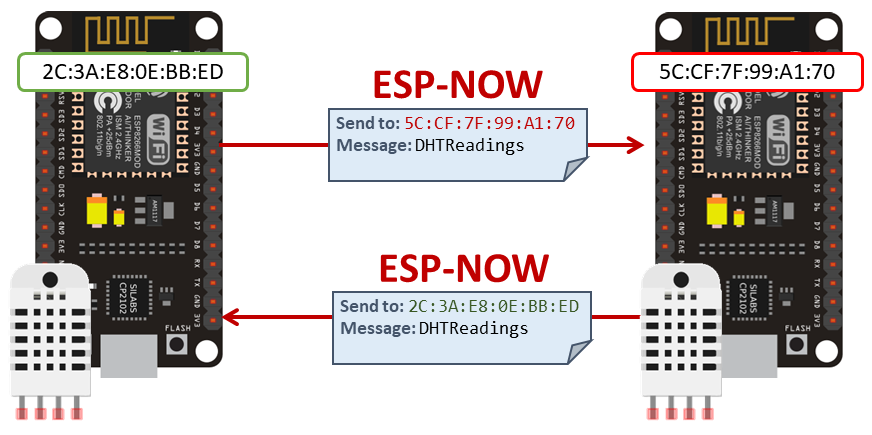
- In this project, we will utilize two ESP8266 boards, with each board linked to a DHT sensor.
- Both boards collect temperature and humidity data from their respective sensors.
- The boards transmit their data to each other via ESP-NOW.
- Upon receiving the data, a board will display it on the Serial Monitor. Alternatively, you can connect an OLED display to visualize the data.
- A confirmation message is printed when a packet is sent, indicating whether it was successfully delivered or not.
- Each board must possess the MAC address of the other board to send messages.
While this example showcases two-way communication between two boards, you can expand the setup by adding more boards, enabling all boards to communicate with each other.
Prerequisites
Before beginning this project, ensure you have the following prerequisites in place:
ESP8266 add-on Arduino IDE
To program the ESP8266, Arduino IDE must be equipped with the ESP8266 add-on. Make sure you have it installed before proceeding with this tutorial. Follow the instructions in the guide below:
Installing DHT Libraries
For reading data from the DHT sensor, we’ll utilize the DHT library from Adafruit. Additionally, you’ll need to install the Adafruit Unified Sensor library to use this DHT library. Follow these steps to install both libraries:
Launch Arduino IDE and navigate to Sketch > Include Library > Manage Libraries. This action will open the Library Manager.
In the search box, enter “DHT” and install the DHT library from Adafruit.

Once the DHT library is installed, search for “Adafruit Unified Sensor” in the search box. Scroll to the bottom of the list to locate the library and install it.
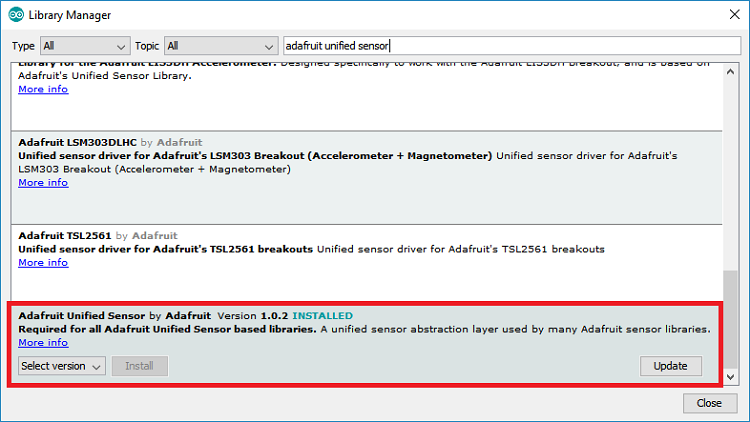
After installing the libraries, restart your Arduino IDE for the changes to take effect.
Parts Required
| Component Name | Buy Now |
| ESP8266 NodeMCU CP2102 | Amazon |
| DHT11 Temperature Humidity Sensor Module | Amazon |
| DHT22 Temperature Humidity Sensor Module | Amazon |
Retrieving the MAC Address of the Boards
To facilitate message exchange between the boards, we must ascertain their respective MAC addresses. Each board possesses a unique MAC address (learn how to obtain and alter the ESP32 MAC Address).
Upload the following code to each of your boards to retrieve their MAC address:
#include "WiFi.h"

void setup(){
  Serial.begin(115200);
  WiFi.mode(WIFI_MODE_STA);
  Serial.println(WiFi.macAddress());
}

void loop(){

}
After uploading the code, press the RST/EN button, and the MAC address will be displayed on the Serial Monitor.
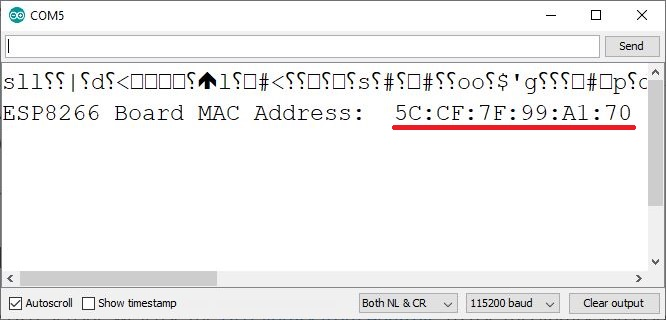
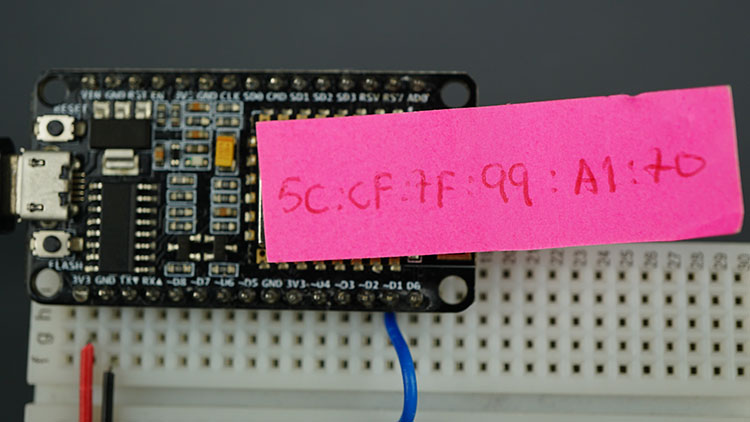
Record the MAC address of each board for clear identification purposes.
ESP8266 and DHT11/DHT22 Wiring Diagram
Before continuing with the tutorial, connect the DHT11 or DHT22 temperature and humidity sensor to the ESP8266 according to the schematic diagram provided below.
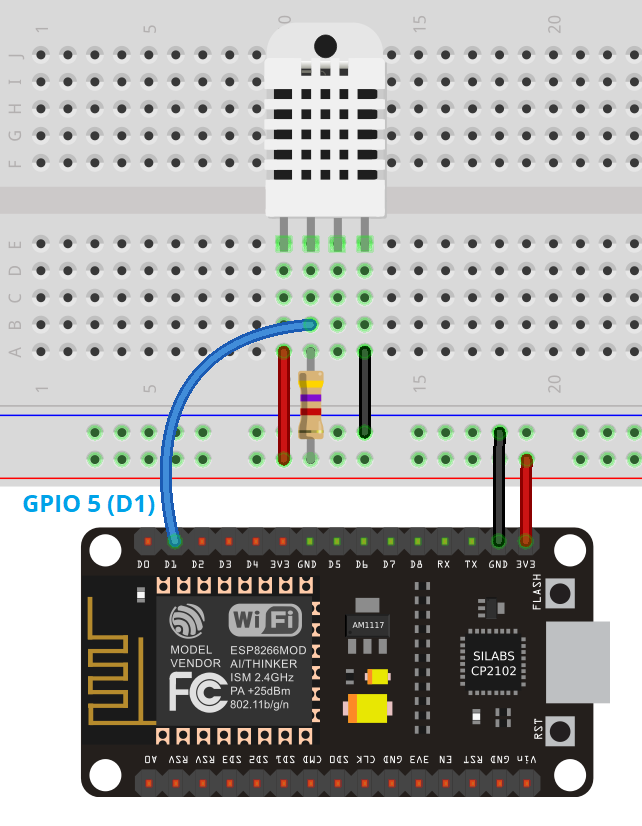
In this illustration, we’re connecting the DHT data pin to GPIO5 (D1), but you have the flexibility to use any other appropriate GPIO. Refer to our ESP8266 GPIO Reference Guide for further information on ESP8266 GPIOs.
ESP8266 Two-Way Communication ESP-NOW Code
Upload the provided code to each of your boards. Before uploading, ensure you input the MAC address of the receiving board (the board to which you’re sending data
#include <ESP8266WiFi.h>
#include <espnow.h>

#include <Adafruit_Sensor.h>
#include <DHT.h>

// REPLACE WITH THE MAC Address of your receiver
uint8_t broadcastAddress[] = {0xFF, 0xFF, 0xFF, 0xFF, 0xFF, 0xFF};

// Digital pin connected to the DHT sensor
#define DHTPIN 5

// Uncomment the type of sensor in use:
//#define DHTTYPE    DHT11     // DHT 11
#define DHTTYPE    DHT22     // DHT 22 (AM2302)
//#define DHTTYPE    DHT21     // DHT 21 (AM2301)

DHT dht(DHTPIN, DHTTYPE);

// Define variables to store DHT readings to be sent
float temperature;
float humidity;

// Define variables to store incoming readings
float incomingTemp;
float incomingHum;

// Updates DHT readings every 10 seconds
const long interval = 10000;
unsigned long previousMillis = 0;    // will store last time DHT was updated

// Variable to store if sending data was successful
String success;

//Structure example to send data
//Must match the receiver structure
typedef struct struct_message {
    float temp;
    float hum;
} struct_message;

// Create a struct_message called DHTReadings to hold sensor readings
struct_message DHTReadings;

// Create a struct_message to hold incoming sensor readings
struct_message incomingReadings;

// Callback when data is sent
void OnDataSent(uint8_t *mac_addr, uint8_t sendStatus) {
  Serial.print("Last Packet Send Status: ");
  if (sendStatus == 0){
    Serial.println("Delivery success");
  }
  else{
    Serial.println("Delivery fail");
  }
}

// Callback when data is received
void OnDataRecv(uint8_t * mac, uint8_t *incomingData, uint8_t len) {
  memcpy(&incomingReadings, incomingData, sizeof(incomingReadings));
  Serial.print("Bytes received: ");
  Serial.println(len);
  incomingTemp = incomingReadings.temp;
  incomingHum = incomingReadings.hum;
}

void getReadings(){
  // Read Temperature
  temperature = dht.readTemperature();
  // Read temperature as Fahrenheit (isFahrenheit = true)
  //float t = dht.readTemperature(true);
  if (isnan(temperature)){
    Serial.println("Failed to read from DHT");
    temperature = 0.0;
  }
  humidity = dht.readHumidity();
  if (isnan(humidity)){
    Serial.println("Failed to read from DHT");
    humidity = 0.0;
  }
}

void printIncomingReadings(){
  // Display Readings in Serial Monitor
  Serial.println("INCOMING READINGS");
  Serial.print("Temperature: ");
  Serial.print(incomingTemp);
  Serial.println(" ºC");
  Serial.print("Humidity: ");
  Serial.print(incomingHum);
  Serial.println(" %");
}

void setup() {
  // Init Serial Monitor
  Serial.begin(115200);

  // Init DHT sensor
  dht.begin();

  // Set device as a Wi-Fi Station
  WiFi.mode(WIFI_STA);
  WiFi.disconnect();

  // Init ESP-NOW
  if (esp_now_init() != 0) {
    Serial.println("Error initializing ESP-NOW");
    return;
  }

  // Set ESP-NOW Role
  esp_now_set_self_role(ESP_NOW_ROLE_COMBO);

  // Once ESPNow is successfully Init, we will register for Send CB to
  // get the status of Trasnmitted packet
  esp_now_register_send_cb(OnDataSent);

  // Register peer
  esp_now_add_peer(broadcastAddress, ESP_NOW_ROLE_COMBO, 1, NULL, 0);

  // Register for a callback function that will be called when data is received
  esp_now_register_recv_cb(OnDataRecv);
}

void loop() {
  unsigned long currentMillis = millis();
  if (currentMillis - previousMillis >= interval) {
    // save the last time you updated the DHT values
    previousMillis = currentMillis;

    //Get DHT readings
    getReadings();

    //Set values to send
    DHTReadings.temp = temperature;
    DHTReadings.hum = humidity;

    // Send message via ESP-NOW
    esp_now_send(broadcastAddress, (uint8_t *) &DHTReadings, sizeof(DHTReadings));

    // Print incoming readings
    printIncomingReadings();
  }
}
After uploading the code, press the RST/EN button, and the communication should commence with the specified MAC address.
Code Explanation
Continue reading to grasp the functionality of the code, or skip ahead to the Demonstration section.
Import libraries
Begin by importing the necessary libraries:
#include <ESP8266WiFi.h>
#include <espnow.h>
The espnow.h library is included by default when you install the ESP8266 board. Ensure you’ve selected an ESP8266 board from the Boards menu while compiling the code.
Import the DHT libraries to read data from the DHT sensor:
#include <Adafruit_Sensor.h>
#include <DHT.h>
In the next step, input the MAC address of the receiver board:
uint8_t broadcastAddress[] = {0x2C, 0x3A, 0xE8, 0x0E, 0xBB, 0xED};
Define the GPIO pin to which the DHT sensor is connected. Here, it’s connected to GPIO 5 (D1):
#define DHTPIN 5
Select the type of DHT sensor you’re using. In this example, DHT22 is chosen:
//#define DHTTYPE    DHT11     // DHT 11
#define DHTTYPE    DHT22     // DHT 22 (AM2302)
//#define DHTTYPE    DHT21     // DHT 21 (AM2301)
Create an instance of the DHT object with the defined type and pin:
DHT dht(DHTPIN, DHTTYPE);
Define variables to store the DHT readings to be sent and incoming readings:
float temperature;
float humidity;

float incomingTemp;
float incomingHum;
The DHT readings will be sent via ESP-NOW every 10 seconds, defined by the interval variable:
const long interval = 10000;
unsigned long previousMillis = 0;    // will store last time DHT was updated
A variable success will store a success message if the readings are delivered successfully.
Create a structure to store temperature and humidity readings:
typedef struct struct_message {
    float temp;
    float hum;
} struct_message;
Create a structure that stores temperature and humidity readings.
typedef struct struct_message {
    float temp;
    float hum;
} struct_message;
Then, create instances of that structure to hold outgoing and incoming readings:
struct_message DHTReadings;
struct_message incomingReadings;
OnDataSent() callback function
The OnDataSent() function will be called when new data is sent. This function simply prints if the message was successfully delivered or not.
If the message is delivered successfully, the status variable returns 0, so we can set our success message to “Delivery Success”:
void OnDataSent(uint8_t *mac_addr, uint8_t sendStatus) {
  Serial.print("Last Packet Send Status: ");
  if (sendStatus == 0){
    Serial.println("Delivery success");
  }
If the success message returns 1, it means the delivery failed:
else {
  success = "Delivery Fail :(";
}
OnDataRecv() callback function
The OnDataRecv() function is executed when a new packet arrives.
void OnDataRecv(uint8_t * mac, uint8_t *incomingData, uint8_t len) {
We save the new packet in the incomingReadings structure we’ve created previously:
memcpy(&incomingReadings, incomingData, sizeof(incomingReadings));
We print the message length on the serial monitor. You can only send 250 bytes in each packet.
Serial.print("Bytes received: ");
Serial.println(len);
Then, store the incoming readings in their corresponding variables. To access the temperature variable inside incomingReadingsstructure, you just need to do call incomingReadings.temp as follows:
incomingTemp = incomingReadings.temp;
The same process is done for the humidity:
incomingHum = incomingReadings.hum;
getReadings()
The getReadings() function gets temperature and humidity from the DHT sensor. The following line gets the current temperature and saves it in the temperature variable:
temperature = dht.readTemperature();
This previous line returns the temperature in Celsius degrees. To get the temperature in Fahrenheit, comment the previous line and uncomment the following:
//float t = dht.readTemperature(true);
Sometimes, you’re not able to get readings from the sensor. When that happens the sensor returns nan. If that’s the case, we set the temperature to 0.0.
A similar process is done to get the humdity readings. The current humidity value is saved on the humidity variable:
humidity = dht.readHumidity();
if (isnan(humidity)){
  Serial.println("Failed to read from DHT");
  humidity = 0.0;
}
printIncomingReadings()
The printIncomingReadings() function simply prints the received readings on the Serial Monitor.
The received temperature in saved on the incomingTemp variable and the received humidity is saved on the incomingHum variable as we’ll see in a moment.
void printIncomingReadings(){
  // Display Readings in Serial Monitor
  Serial.println("INCOMING READINGS");
  Serial.print("Temperature: ");
  Serial.print(incomingTemp);
  Serial.println(" ºC");
  Serial.print("Humidity: ");
  Serial.print(incomingHum);
  Serial.println(" %");
}
setup()
In the setup(), initialize the Serial Monitor:
Serial.begin(115200);
Initialize the DHT sensor:
dht.begin();
Set the ESP8266 as a station:
WiFi.mode(WIFI_STA);
WiFi.disconnect();
Initialize ESP-NOW:
if (esp_now_init() != 0) {
  Serial.println("Error initializing ESP-NOW");
  return;
}
Set the ESP8266 ESP-NOW role. In this example, the ESP8266 receives and sends readings via ESP-NOW, so set the role to ESP_NOW_ROLE_COMBO.
esp_now_set_self_role(ESP_NOW_ROLE_COMBO);
Then, register for the OnDataSent callback function.
esp_now_register_send_cb(OnDataSent);
In order to send data to another board, you need to pair it as a peer. The following line add a new peer.
esp_now_add_peer(broadcastAddress, ESP_NOW_ROLE_COMBO, 1, NULL, 0);
The esp_now_add_peer() function accepts the following arguments, in this order: mac address, peer role, wi-fi channel, key, and key length.
Finally, register for the OnDataRecv callback function.
esp_now_register_recv_cb(OnDataRecv);
loop()
In the loop(), check if it is time to get new readings:
unsigned long currentMillis = millis();
if (currentMillis - previousMillis >= interval) {
  // save the last time you updated the DHT values
  previousMillis = currentMillis;
If it is, call the getReadings function to read the current temperature and humidity.
getReadings();
Then, update the DHTReadings structure with the new temperature and humidity values:
DHTReadings.temp = temperature;
DHTReadings.hum = humidity;
Send the structure via ESP-NOW:
esp_now_send(broadcastAddress, (uint8_t *) &DHTReadings, sizeof(DHTReadings));
Finally, call the printIncomingReadings() function to print the incoming readings on the Serial Monitor.
printIncomingReadings();
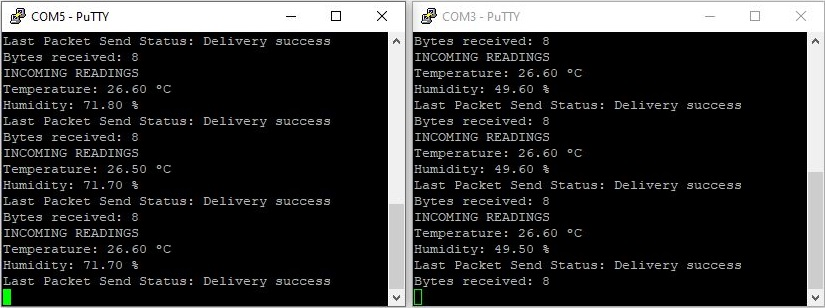
Demonstration
Once you’ve uploaded the code to each board, launch an Arduino IDE Serial Monitor window. Alternatively, you can open two separate serial connections (using PuTTY) to observe the interaction between the two boards simultaneously.
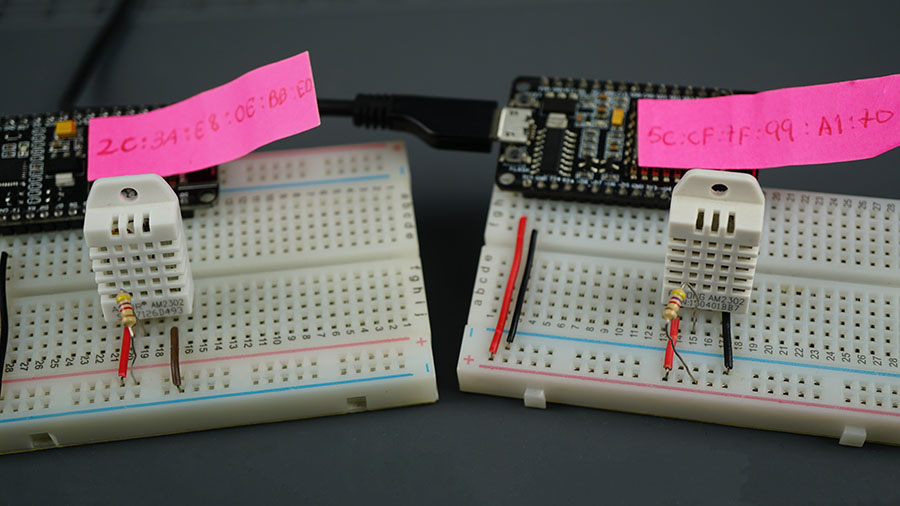
You’ll notice that everything is functioning as expected. Each board will display the readings from the other board.
Wrapping Up
In this tutorial, we’ve demonstrated how to establish bidirectional communication between two ESP8266 boards using ESP-NOW. This protocol offers great flexibility, allowing packets of up to 250 bytes to be sent. Additionally, ESP-NOW can also be utilized with ESP32 boards; refer to our guide on Getting Started with ESP-NOW (ESP32 with Arduino IDE) for more information.
While we’ve showcased the interaction between two boards, you can expand your setup by incorporating additional boards. Simply ensure you have the MAC address of the target board to which you’re transmitting data. Stay tuned for more tutorials on ESP-NOW—we’ll be sharing additional resources soon.
We trust you’ve found this tutorial beneficial. To delve deeper into ESP8266 boards, explore our comprehensive collection of resources:
- ESP8266 NodeMCU Email Tutorial: SMTP Server Setup for HTML, Text, and Attachments (Arduino)
- Ultimate Guide: Crafting an ESP8266 Weather Station Using BME280
- Firebase Data Logging: ESP8266 NodeMCU Sensor Integration
- Beginner’s Guide to ESP8266 NodeMCU and Firebase (Realtime Database)
- Smart LED Control: ESP8266 Empowers WS2812B LEDs via WLED
- Beginner’s Guide: ESP-NOW Setup for ESP8266 NodeMCU
- Enhanced Monitoring: Multiple DS18B20s on ESP8266 Web Server


