

This tutorial will teach you how to record data using the ESP8266 NodeMCU and store it in the Firebase Realtime Database, complete with timestamps for data logging. By following this guide, you’ll create a log of temperature, humidity, and pressure readings from a BME280 sensor, with timestamps retrieved from an NTP server. Afterward, you can view the collected data through the Firebase console or develop a web application to visualize the results (refer to this tutorial for more details).
What is Firebase?
Firebase is a mobile application development platform created by Google, designed to assist in building, enhancing, and expanding your app’s capabilities. It offers various services tailored for managing data from Android, iOS, or web applications, including authentication, real-time database functionality, hosting, and more.
Project Overview
The diagram below presents a broad overview of the project we’re about to construct.
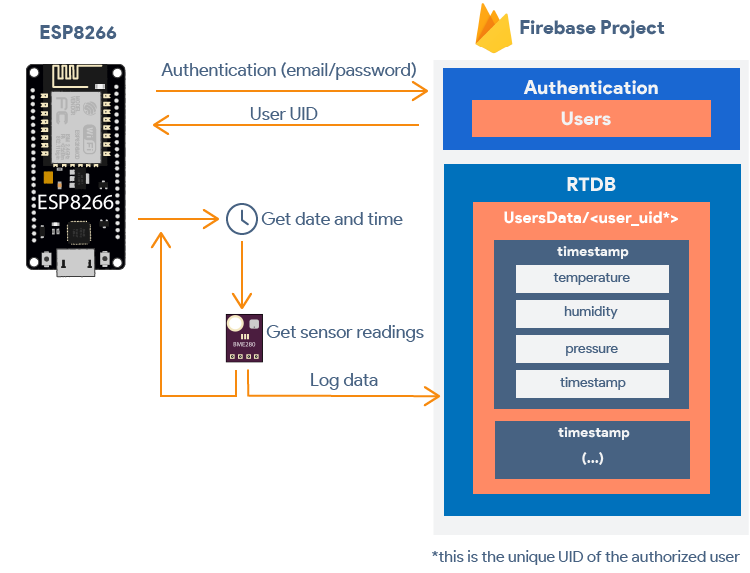
- The ESP8266 undergoes authentication as a user through email and password credentials (the user must be configured within Firebase’s authentication methods).
- Following authentication, the ESP obtains the user’s UID (User Identifier).
- Security rules safeguard the database, allowing the user access solely to database nodes associated with their UID. Upon acquiring the user’s UID, the ESP is able to transmit data to the database.
- The ESP8266 retrieves temperature, humidity, and pressure data from the BME280 sensor.
- Immediately after acquiring readings, it captures epoch time (timestamp).
- The ESP8266 dispatches temperature, humidity, pressure, and timestamp information to the database.
- New readings are consistently appended to the database, ensuring a comprehensive record of all readings within the Firebase real-time database.
These are the primary steps to accomplish this project:
- Create a Firebase Project
- Configure Authentication Methods
- Obtain Project API Key
- Establish Realtime Database Configuration
- Configure Database Security Rules
- ESP8266 Datalogging (Firebase Realtime Database)
You can proceed with the Firebase project outlined in the previous tutorial or initiate a new project. If utilizing the Firebase project from the prior tutorial, you can directly proceed to section 4) Set up Realtime Database as the authentication methods have already been configured.
Create Firebase Project
- Head to Firebase and log in using your Google Account.
- Click on “Get Started” and then select “Add project” to initiate a new project.
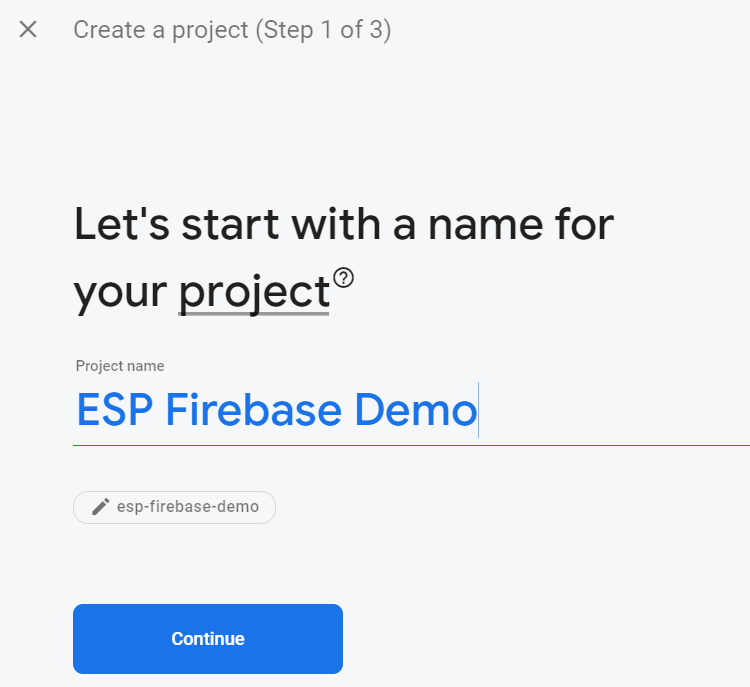
- Provide a name for your project, such as “ESP Firebase Demo.”
- Disable the “Enable Google Analytics” option for this project as it’s unnecessary, then click “Create project.”

- Allow a few moments for your project setup. Once completed, click “Continue.”
- You’ll be redirected to your Project console page.
Set Authentication Methods
To enable authentication via email and password, configure authentication methods for your app.
“Most apps require user identity information. This ensures secure data storage in the cloud and consistent personalized experiences across all user devices.” For detailed information on authentication methods, refer to the documentation.
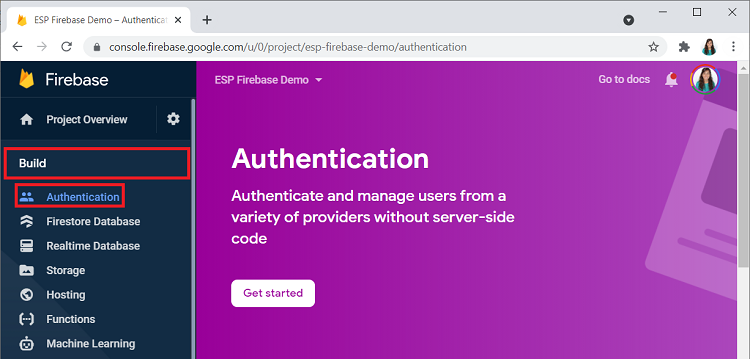
- Navigate to “Authentication” on the left sidebar and click “Get started.”
- Choose the “Email/Password” option.
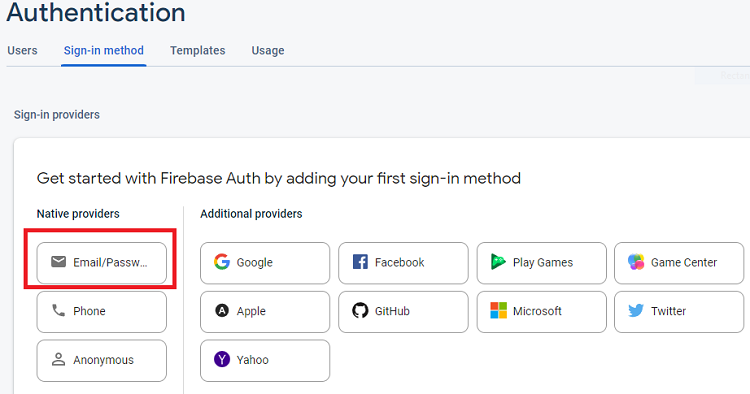
- Enable this authentication method and save your settings.
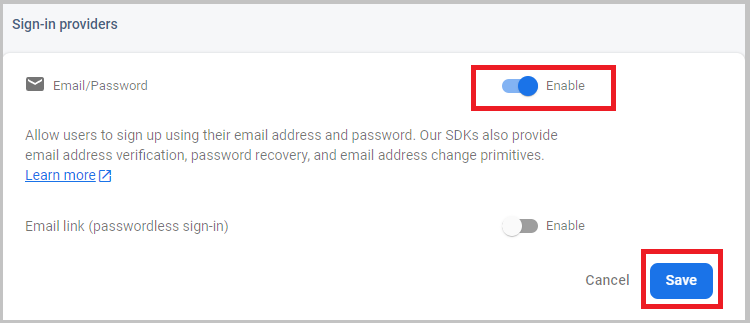
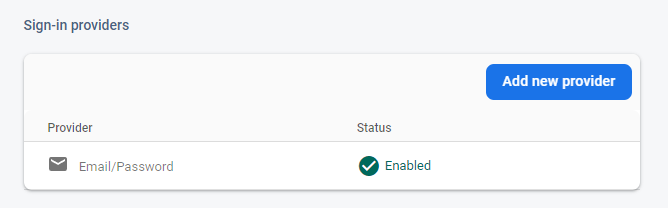
- Authentication with email and password is now enabled.
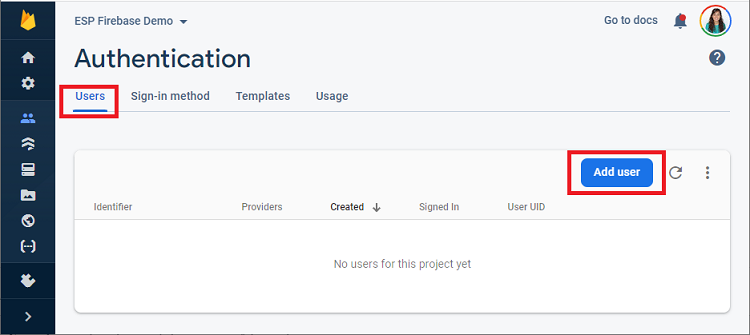
- Add a user by selecting the “Users” tab within the “Authentication” section. Click “Add User.”
- Provide an email address for the authorized user. It can be your Google account email or a designated email for this project. Set a password for accessing your app and database. Remember to store this password securely as it will be required later. Once complete, click “Add user.”
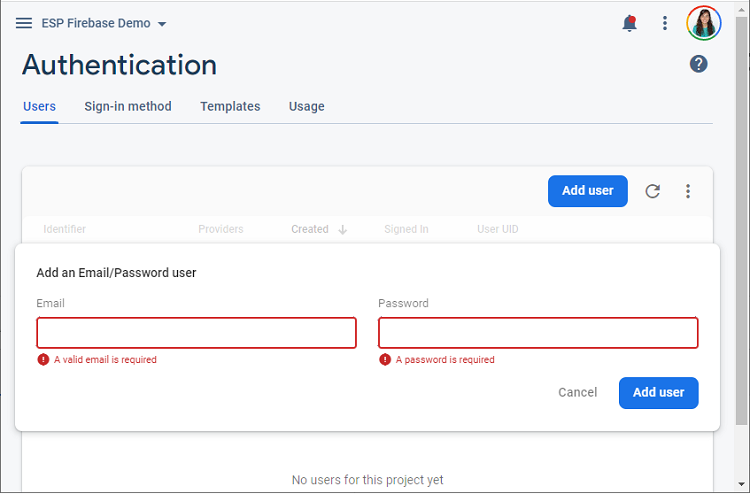
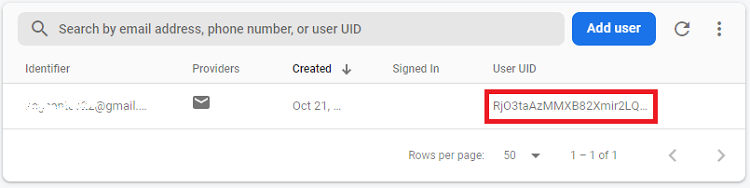
- A new user is successfully created and added to the Users table.
Get Project API Key
To enable interaction between your Firebase project and the ESP8266 board, obtain your project’s API key. Follow these steps:
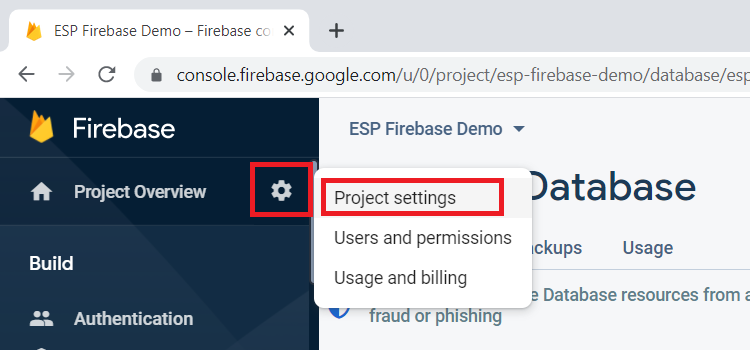
- Select “Project Settings” from the left sidebar.
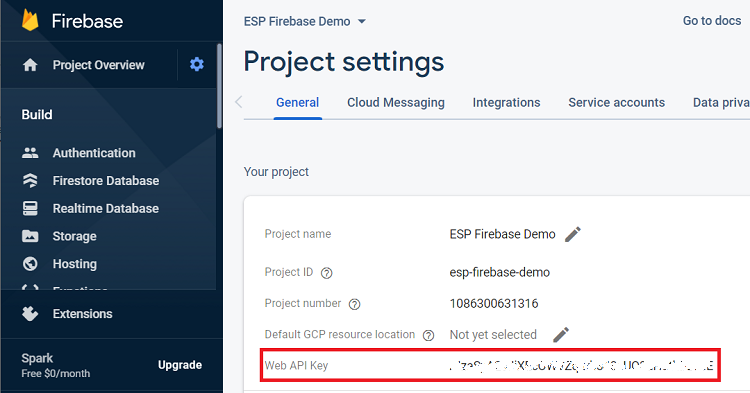
- Copy the Web API Key to a secure location for later use.
Set up Realtime Database
Let’s establish a real-time database and configure database rules for your project.
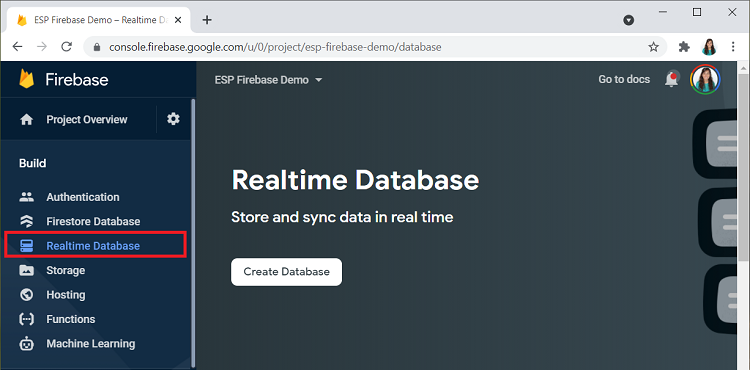
- Navigate to “Realtime Database” on the left sidebar and click “Create Database.”
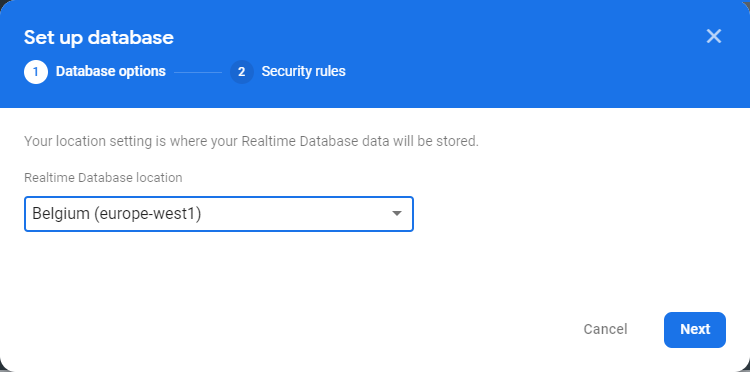
- Choose your database location, preferably the nearest to your location.
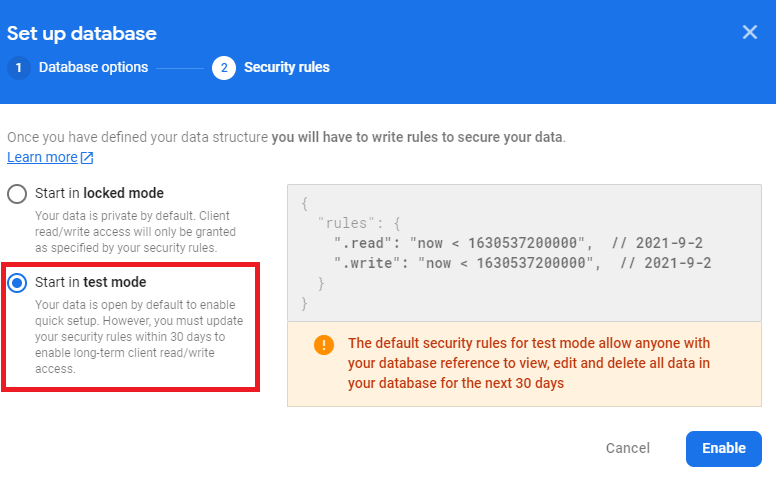
- Set up security rules for your database. Opt for “Start in test mode” for now; you can modify rules shortly.
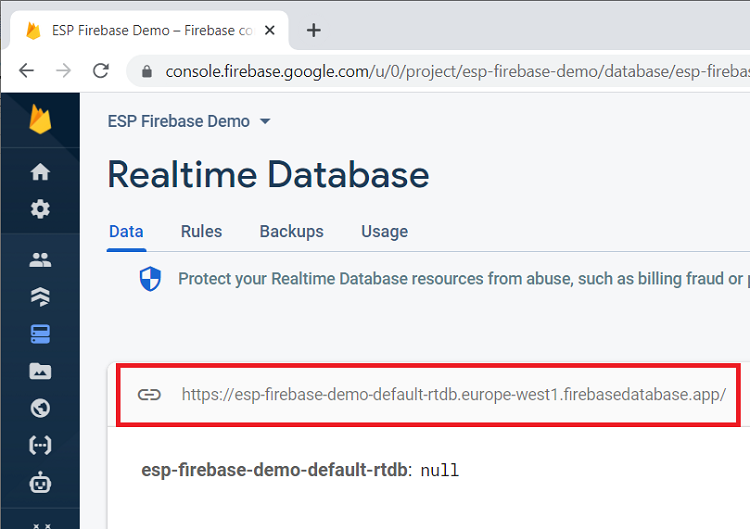
- Your database is now created. Copy and save the database URL provided, as highlighted, for later use in your ESP8266 code.
Set up Database Security Rules
Configure database rules to ensure secure access. Access the “Rules” tab within the “Realtime Database” section. Click “Edit rules,” copy the provided rules, and click “Publish.”
// These rules grant access to a node matching the authenticated
// user's ID from the Firebase auth token
{
  "rules": {
    "UsersData": {
      "$uid": {
        ".read": "$uid === auth.uid",
        ".write": "$uid === auth.uid"
      }
    }
  }
}
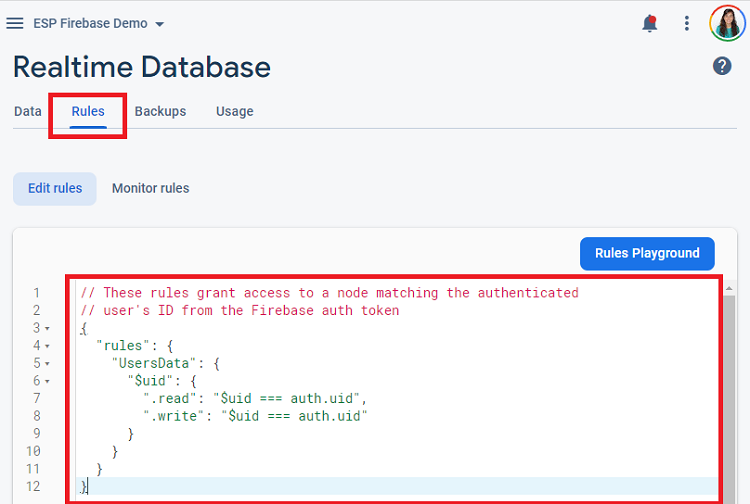
These rules grant access to a node corresponding to the authenticated user’s UID. Each authenticated user can only access their own data under their respective UID node. Other data not under the user’s UID node remains inaccessible to that user.
For instance, suppose the user UID is RjO3taAzMMXBB2Xmir2LQ With these security rules, the user can read and write data under the node UsersData/RjO3taAzMMXBB2Xmir2LQ.
You’ll better understand how this works when you start working with the ESP8266.
ESP8266 Datalogging (Firebase Realtime Database)
This section focuses on programming the ESP8266 board to execute the following tasks:
- Authenticate as a user with email and password (the user you set up in this section).
- Retrieve BME280 sensor readings: temperature, humidity, and pressure.
- Obtain epoch time (timestamp) from an NTP server.
- Transmit sensor readings and timestamp to the realtime database as an authorized user.
Parts Required
Schematic Diagram
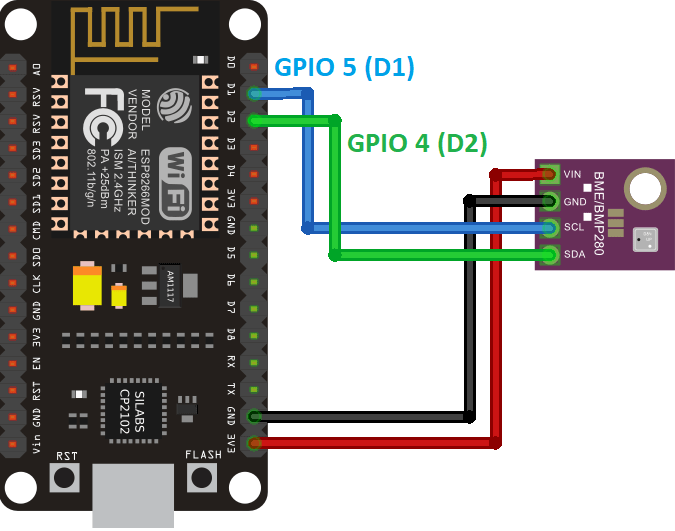
For this tutorial, we’ll transmit BME280 sensor readings to the Firebase Realtime Database. Therefore, wire the BME280 sensor to your board.
We’ll employ I2C communication with the BME280 sensor module. Connect the sensor to the default ESP8266 SCL (GPIO 5 (D1)) and SDA (GPIO 4 (D2)) pins, as depicted in the following schematic diagram.
Installing Libraries
For this project, install the following libraries:
Installing Libraries – VS Code
If you’re using VS Code with the PlatformIO extension, follow these instructions:
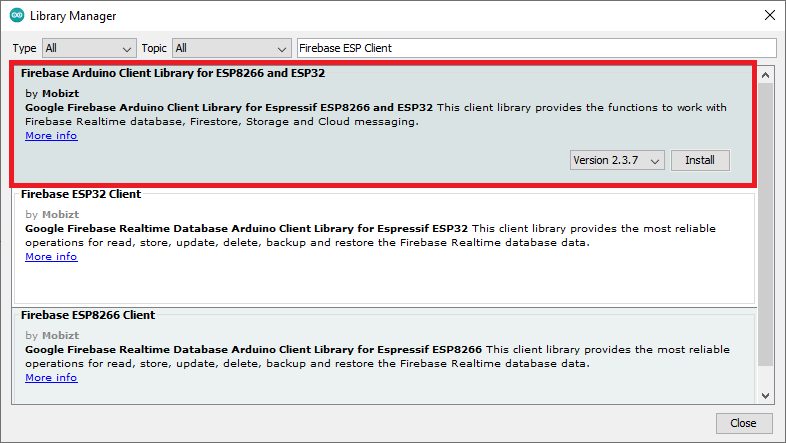
Install the Firebase-ESP-Client Library
This library, Firebase-ESP-Client, provides numerous examples for utilizing Firebase with the ESP8266. It’s compatible with both ESP32 and ESP8266 boards.
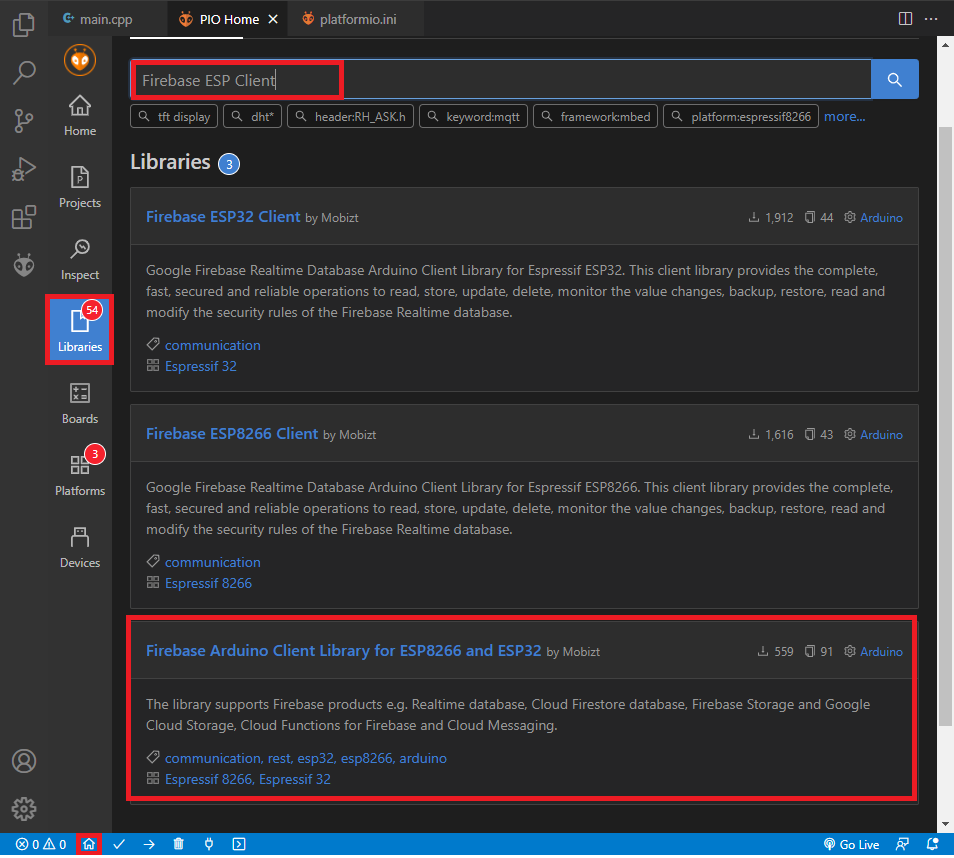
- Click on the PIO Home icon and navigate to the Libraries tab.
- Search for “Firebase ESP Client.”
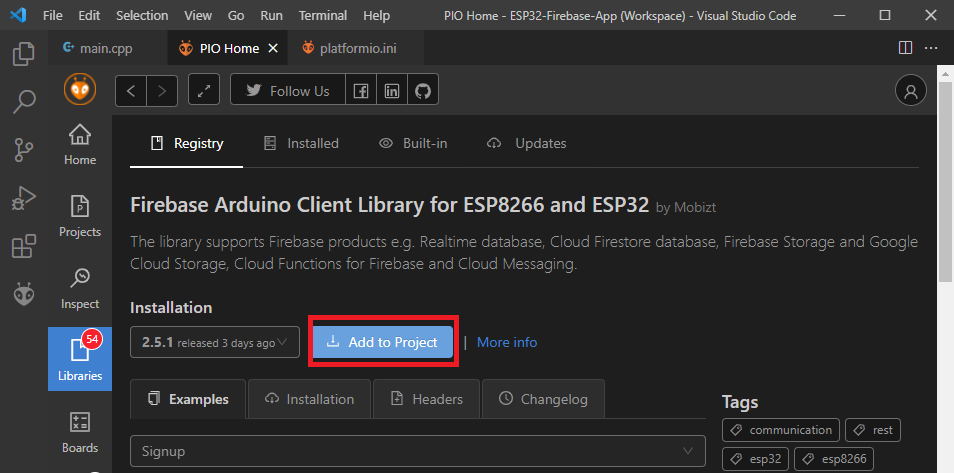
- Select the Firebase Arduino Client Library for ESP8266 and ESP32.
Click Add to Project and select your project.
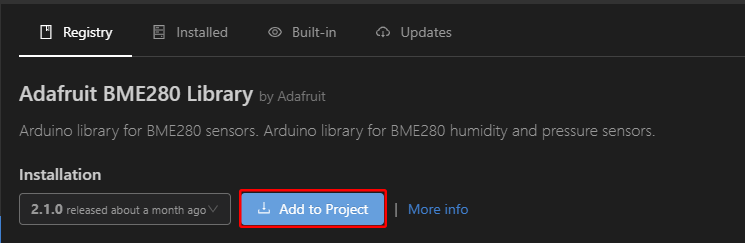
Install the BME280 Library
In the Libraries tab, search for BME280. Select the Adafruit BME280 library.
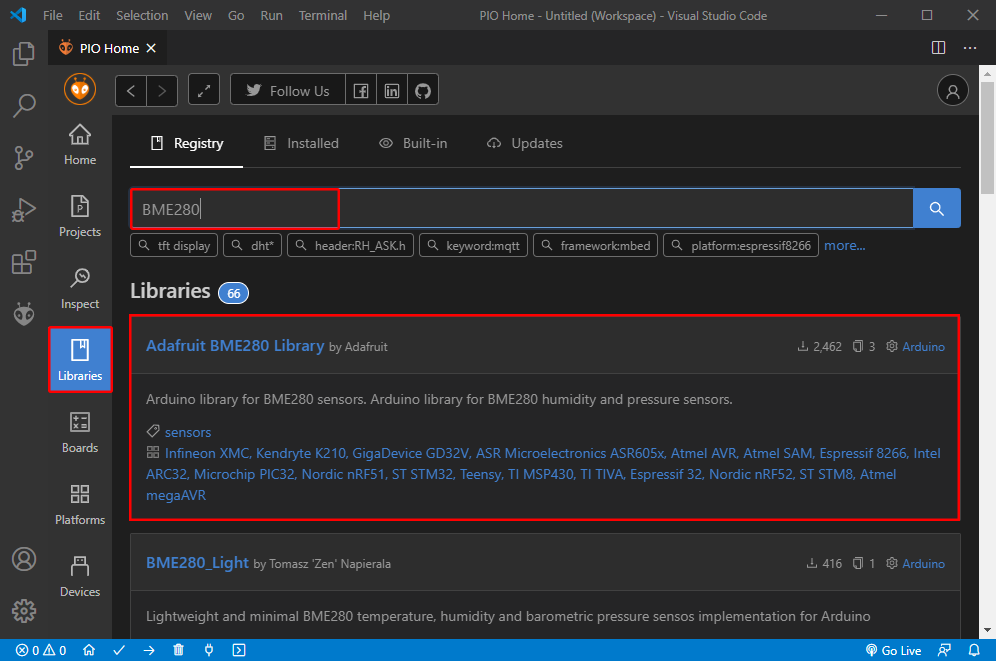
Click Add to Project and select your project.
Additionally, adjust the monitor speed to 115200 by adding the following line to your project’s platformio.ini file:
monitor_speed = 115200
Installation – Arduino IDE
For Arduino IDE users, follow these steps:
Navigate to Sketch > Include Library > Manage Libraries, search for the respective libraries, and install them.
For the Firebase Client library, select the Firebase Arduino Client Library for ESP8266 and ESP32.
Now, you’re ready to begin programming the ESP8266 board to interact with the database.
Datalogging—Firebase Realtime Database Code
Copy the provided code to your Arduino IDE or to the main.cpp file if you’re using VS Code.
Ensure to input your network credentials, project API key, database URL, and the authorized user email and password.
Once the setup is complete, the ESP8266 will transmit new sensor readings to the database periodically.
#include <Arduino.h>
#include <ESP8266WiFi.h>
#include <Firebase_ESP_Client.h>
#include <Wire.h>
#include <Adafruit_Sensor.h>
#include <Adafruit_BME280.h>
#include <NTPClient.h>
#include <WiFiUdp.h>

// Provide the token generation process info.
#include "addons/TokenHelper.h"
// Provide the RTDB payload printing info and other helper functions.
#include "addons/RTDBHelper.h"

// Insert your network credentials
#define WIFI_SSID "REPLACE_WITH_YOUR_SSID"
#define WIFI_PASSWORD "REPLACE_WITH_YOUR_PASSWORD"

// Insert Firebase project API Key
#define API_KEY "REPLACE_WITH_YOUR_PROJECT_API_KEY"

// Insert Authorized Email and Corresponding Password
#define USER_EMAIL "REPLACE_WITH_THE_USER_EMAIL"
#define USER_PASSWORD "REPLACE_WITH_THE_USER_PASSWORD"

// Insert RTDB URLefine the RTDB URL
#define DATABASE_URL "REPLACE_WITH_YOUR_DATABASE_URL"

// Define Firebase objects
FirebaseData fbdo;
FirebaseAuth auth;
FirebaseConfig config;

// Variable to save USER UID
String uid;

// Database main path (to be updated in setup with the user UID)
String databasePath;
// Database child nodes
String tempPath = "/temperature";
String humPath = "/humidity";
String presPath = "/pressure";
String timePath = "/timestamp";

// Parent Node (to be updated in every loop)
String parentPath;

FirebaseJson json;

// Define NTP Client to get time
WiFiUDP ntpUDP;
NTPClient timeClient(ntpUDP, "pool.ntp.org");

// Variable to save current epoch time
int timestamp;

// BME280 sensor
Adafruit_BME280 bme; // I2C
float temperature;
float humidity;
float pressure;

// Timer variables (send new readings every three minutes)
unsigned long sendDataPrevMillis = 0;
unsigned long timerDelay = 180000;

// Initialize BME280
void initBME(){
  if (!bme.begin(0x76)) {
    Serial.println("Could not find a valid BME280 sensor, check wiring!");
    while (1);
  }
}

// Initialize WiFi
void initWiFi() {
  WiFi.begin(WIFI_SSID, WIFI_PASSWORD);
  Serial.print("Connecting to WiFi ..");
  while (WiFi.status() != WL_CONNECTED) {
    Serial.print('.');
    delay(1000);
  }
  Serial.println(WiFi.localIP());
  Serial.println();
}

// Function that gets current epoch time
unsigned long getTime() {
  timeClient.update();
  unsigned long now = timeClient.getEpochTime();
  return now;
}

void setup(){
  Serial.begin(115200);

  // Initialize BME280 sensor
  initBME();
  initWiFi();
  timeClient.begin();

  // Assign the api key (required)
  config.api_key = API_KEY;

  // Assign the user sign in credentials
  auth.user.email = USER_EMAIL;
  auth.user.password = USER_PASSWORD;

  // Assign the RTDB URL (required)
  config.database_url = DATABASE_URL;

  Firebase.reconnectWiFi(true);
  fbdo.setResponseSize(4096);

  // Assign the callback function for the long running token generation task */
  config.token_status_callback = tokenStatusCallback; //see addons/TokenHelper.h

  // Assign the maximum retry of token generation
  config.max_token_generation_retry = 5;

  // Initialize the library with the Firebase authen and config
  Firebase.begin(&config, &auth);

  // Getting the user UID might take a few seconds
  Serial.println("Getting User UID");
  while ((auth.token.uid) == "") {
    Serial.print('.');
    delay(1000);
  }
  // Print user UID
  uid = auth.token.uid.c_str();
  Serial.print("User UID: ");
  Serial.println(uid);

  // Update database path
  databasePath = "/UsersData/" + uid + "/readings";
}

void loop(){

  // Send new readings to database
  if (Firebase.ready() && (millis() - sendDataPrevMillis > timerDelay || sendDataPrevMillis == 0)){
    sendDataPrevMillis = millis();

    //Get current timestamp
    timestamp = getTime();
    Serial.print ("time: ");
    Serial.println (timestamp);

    parentPath= databasePath + "/" + String(timestamp);

    json.set(tempPath.c_str(), String(bme.readTemperature()));
    json.set(humPath.c_str(), String(bme.readHumidity()));
    json.set(presPath.c_str(), String(bme.readPressure()/100.0F));
    json.set(timePath, String(timestamp));
    Serial.printf("Set json... %s\n", Firebase.RTDB.setJSON(&fbdo, parentPath.c_str(), &json) ? "ok" : fbdo.errorReason().c_str());
  }
}
Code Explanation
Continue reading to learn how the code works or skip to the demonstration section.
Include Libraries
First, include the required libraries. The ESP8266WiFi.h library to connect the ESP8266 to the internet, the Firebase_ESP_Client.h library to interface the board with Firebase, the Wire, Adafruit_Sensor, and Adafruit_BME280 to interface with the BME280 sensor, and the NTPClient and WiFiUdp libraries to get the time.
#include <Arduino.h>
#include <ESP8266WiFi.h>
#include <Firebase_ESP_Client.h>
#include <Wire.h>
#include <Adafruit_Sensor.h>
#include <Adafruit_BME280.h>
#include <NTPClient.h>
#include <WiFiUdp.h>
You also need to include the following for the Firebase library to work.
// Provide the token generation process info.
#include "addons/TokenHelper.h"
// Provide the RTDB payload printing info and other helper functions.
#include "addons/RTDBHelper.h"
Network Credentials
Include your network credentials in the following lines so that your boards can connect to the internet using your local network.
// Insert your network credentials
#define WIFI_SSID "REPLACE_WITH_YOUR_SSID"
#define WIFI_PASSWORD "REPLACE_WITH_YOUR_PASSWORD"
Firebase Project API Key, Firebase User, and Database URL
Insert your Firebase project API key—the one you’ve gotten in this section.
#define API_KEY "REPLACE_WITH_YOUR_PROJECT_API_KEY"
Insert the authorized email and the corresponding password—these are the details of the user you’ve added in this section.
// Insert Authorized Email and Corresponding Password
#define USER_EMAIL "REPLACE_WITH_THE_USER_EMAIL"
#define USER_PASSWORD "REPLACE_WITH_THE_USER_PASSWORD"
Insert your database URL in the following line:
// Insert RTDB URLefine the RTDB URL
#define DATABASE_URL "REPLACE_WITH_YOUR_DATABASE_URL"
Firebase Objects and Other Variables
The following line defines a FirebaseData object.
FirebaseData fbdo;
The next line defines a FirebaseAuth object needed for authentication.
FirebaseAuth auth;
Finally, the following line defines a FirebaseConfig object required for configuration data.
FirebaseConfig config;
The uid variable will be used to save the user’s UID. We can get the user’s UID after the authentication.
String uid;
The databasePath variable saves the database main path, which will be updated later with the user UID.
String databasePath;
The following variables save the database child nodes for the temperature, humidity, pressure, and timestamp.
String tempPath = "/temperature";
String humPath = "/humidity";
String presPath = "/pressure";
String timePath = "/timestamp";
The parentPath is the parent node that will be updated in every loop with the current timestamp.
// Parent Node (to be updated in every loop)
String parentPath;
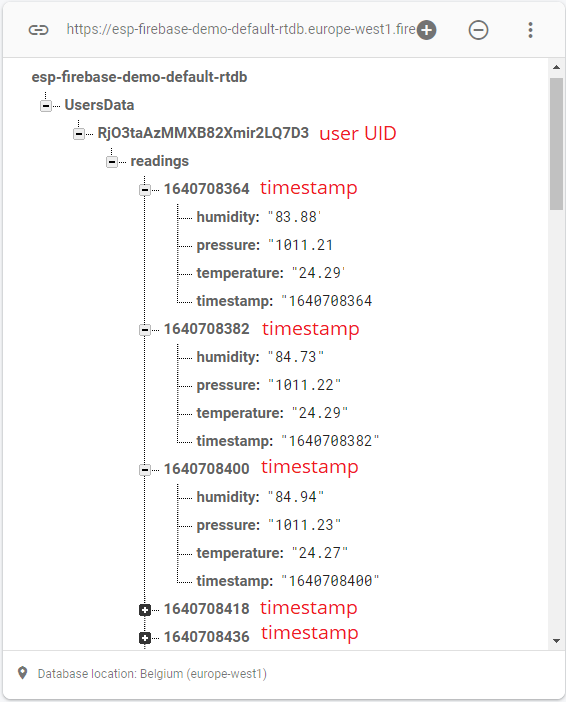
To better understand how we’ll organize our data, here’s a diagram.
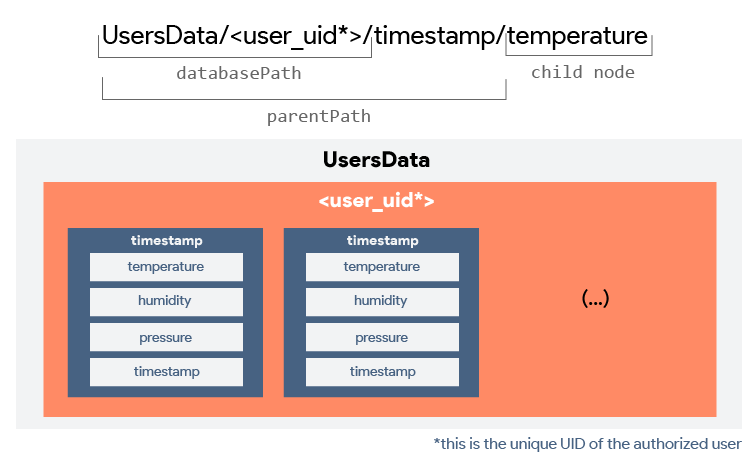
It might seem redundant to save the timestamp twice (in the parent node and in the child node), however, having all the data at the same level of the hierarchy will make things simpler in the future, if we want to build a web app to display the data.
Define the NTP client to get time:
// Define NTP Client to get time
WiFiUDP ntpUDP;
NTPClient timeClient(ntpUDP, "pool.ntp.org");
The timestamp variable will be used to save time (epoch time format).
int timestamp;
To learn more about getting epoch time with the ESP8266 board, you can check the following tutorial:
We’ll send all the readings and corresponding timestamp to the realtime database at the same time by creating a JSON object that contains the values of those variables. The ESP Firebase Client library has its own JSON methods. We’ll use them to send data in JSON format to the database. We start by creating a variable of type FirebaseJson called json.
FirebaseJson json;
The ESP_Firebase_Client library provides some examples showing how to use FirebaseJson and how to send data in JSON format to the database: ESP_Firebase_Client library FirebaseJson examples.
Then, create an Adafruit_BME280 object called bme. This automatically creates a sensor object on the ESP8266 default I2C pins.
Adafruit_BME280 bme; // I2C
The following variables will hold the temperature, humidity, and pressure readings from the sensor.
float temperature;
float humidity;
float pressure;
Delay Time
The sendDataPrevMillis and timerDelay variables are used to check the delay time between each send. In this example, we’re setting the delay time to 3 minutes (18000 milliseconds). Once you test this project and check that everything is working as expected, we recommend increasing the delay.
// Timer variables (send new readings every three minutes)
unsigned long sendDataPrevMillis = 0;
unsigned long timerDelay = 180000;
initBME()
The initBME() function initializes the BME280 library using the bme object created previously. Then, you should call this library in the setup().
void initBME(){
  if (!bme.begin(0x76)) {
    Serial.println("Could not find a valid BME280 sensor, check wiring!");
    while (1);
  }
}
initWiFi()
The initWiFi() function connects your ESP to the internet using the network credentials provided. You must call this function later in the setup() to initialize WiFi.
// Initialize WiFi
void initWiFi() {
  WiFi.begin(WIFI_SSID, WIFI_PASSWORD);
  Serial.print("Connecting to WiFi ..");
  while (WiFi.status() != WL_CONNECTED) {
    Serial.print('.');
    delay(1000);
  }
  Serial.println(WiFi.localIP());
  Serial.println();
}
getTime()
The getTime() function returns the current epoch time.
// Function that gets current epoch time
unsigned long getTime() {
  timeClient.update();
  unsigned long now = timeClient.getEpochTime();
  return now;
}
setup()
In the setup(), initialize the Serial Monitor for debugging purposes at a baud rate of 115200.
Serial.begin(115200);
Call the initBME() function to initialize the BME280 sensor.
initBME();
Call the initWiFi() function to initialize WiFi.
initWiFi();
Initialize the time client:
timeClient.begin();
Assign the API key to the Firebase configuration.
config.api_key = API_KEY;
The following lines assign the email and password to the Firebase authentication object.
auth.user.email = USER_EMAIL;
auth.user.password = USER_PASSWORD;
Assign the database URL to the Firebase configuration object.
config.database_url = DATABASE_URL;
Add the following to the configuration object.
// Assign the callback function for the long running token generation task
config.token_status_callback = tokenStatusCallback; //see addons/TokenHelper.h

// Assign the maximum retry of token generation
config.max_token_generation_retry = 5;
Initialize the Firebase library (authenticate) with the configuration and authentication settings we defined earlier.
// Initialize the library with the Firebase authen and config
Firebase.begin(&config, &auth);
After initializing the library, we can get the user UID by calling auth.token.uid. Getting the user’s UID might take some time, so we add a while loop that waits until we get it.
// Getting the user UID might take a few seconds
Serial.println("Getting User UID");
while ((auth.token.uid) == "") {
  Serial.print('.');
  delay(1000);
}
Finally, we save the user’s UID in the uid variable and print it in the Serial Monitor.
uid = auth.token.uid.c_str();
Serial.print("User UID: ");
Serial.print(uid);
After getting the user UID, we can update the database path to include the user UID.
// Update database path
databasePath = "/UsersData/" + uid + "/readings";
loop()
In the loop(), check if it is time to send new readings:
if (Firebase.ready() && (millis() - sendDataPrevMillis > timerDelay || sendDataPrevMillis == 0)){
  sendDataPrevMillis = millis();
If it is, get the current time and save it in the timestamp variable.
//Get current timestamp
timestamp = getTime();
Serial.print ("time: ");
Serial.println (timestamp);
Update the parentPath variable to include the timestamp.
parentPath= databasePath + "/" + String(timestamp);
Then, add data to the json object by using the set() method and passing as first argument the child node destination (key) and as second argument the value:
json.set(tempPath.c_str(), String(bme.readTemperature()));
json.set(humPath.c_str(), String(bme.readHumidity()));
json.set(presPath.c_str(), String(bme.readPressure()/100.0F));
json.set(timePath, String(timestamp));
Finally, call Firebase.RTDB.setJSON(&fbdo, parentPath.c_str(), &json) to append the data to the parent path. We can call that instruction inside a Serial.printf() command to print the results in the Serial Monitor at the same time the command runs.
Serial.printf("Set json... %s\n", Firebase.RTDB.setJSON(&fbdo, parentPath.c_str(), &json) ? "ok" : fbdo.errorReason().c_str());
Demonstration
Once you’ve uploaded the previous code to your ESP8266 NodeMCU board, remember to input your network credentials, project API key, database URL, user email, and corresponding password.
After uploading the code, press the board’s RST button to initiate code execution. This action triggers the authentication process to Firebase, acquiring the user UID, and promptly sending new readings to the database.
Open the Serial Monitor with a baud rate of 115200 and ensure that everything is functioning as expected.
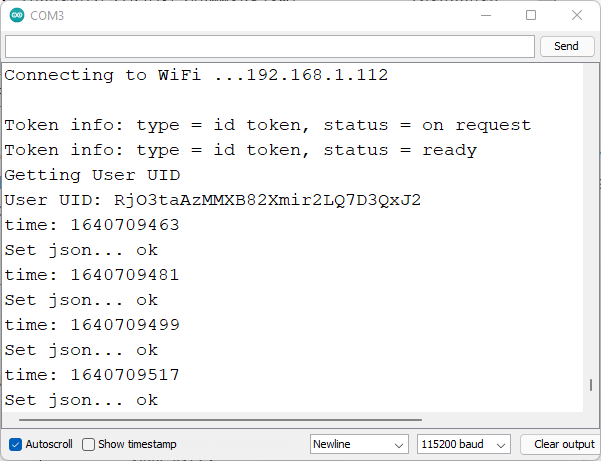
Furthermore, navigate to the Realtime Database within your Firebase project interface and confirm that new readings are being stored. Take note that the data is stored under a node corresponding to the user’s UID, illustrating a method for database access restriction.
Wrapping Up
Throughout this tutorial, you’ve acquired the knowledge to log sensor readings along with timestamps to the Firebase Realtime Database using the ESP8266. This served as a basic example to familiarize you with the process.
The ESP_Firebase_Client library offers various methods for logging data, and you have the flexibility to structure your database in alternative manners. We’ve organized the database in a manner suitable for a forthcoming project, which we’ll share soon.
We trust that you’ve found this tutorial beneficial.
- ESP8266 NodeMCU Email Tutorial: SMTP Server Setup for HTML, Text, and Attachments (Arduino)
- Beginner’s Guide to ESP8266 NodeMCU and Firebase (Realtime Database)
- Smart LED Control: ESP8266 Empowers WS2812B LEDs via WLED
- Control IoT Devices: ESP8266 NodeMCU Async Web Server Tutorial
- ESP8266 NTP Server: Fetching Accurate Date & Time with NodeMCU


