
The BME280 by Bosch is a precise sensor employed in various applications, spanning from weather tracking to gaming interfaces to altitude detection, demanding accuracy within a few feet.
This sensor is user-friendly, pre-calibrated, and doesn’t necessitate extra components, enabling swift measurement of relative humidity, temperature, barometric pressure, and altitude.
Now, let’s familiarize ourselves with the BME280, a device that has garnered considerable attention.
Parts Required
BME280 Capabilities
Measuring Temperature
The BME280 can detect temperatures ranging from -40°C to 85°C. Within the range of 0 to 65°C, it maintains an accuracy of ±1.0°C, but beyond this range, accuracy decreases to ±1.5°C.
It’s worth noting that the temperature measurement serves as an internal calibration for the pressure and humidity sensors. Due to self-heating of the sensor, the measured temperature may slightly exceed the actual temperature. If precision is crucial for your project, it’s advisable to compare the measured temperature with the actual one and apply an offset if necessary.
Measuring Humidity
With a range of 0 to 100%, the BME280 can measure relative humidity with an accuracy of ±3%.
The datasheet indicates that it can measure up to 100% humidity within the temperature range of 0 to 60°C. However, the maximum measurable humidity decreases significantly at extremely high and low temperatures.
Measuring Pressure
Operating within the range of 300Pa to 1100 hPa, the BME280 provides pressure measurements with an absolute accuracy of ±1 hPa.
Within the temperature range of 0 to 65°C, full accuracy is achieved, resulting in an altitude measurement accuracy of approximately ±1 meter. Outside of this range, accuracy diminishes to 1.7 hPa.
Altitude / Elevation Calculation
The precision of pressure measurement by the BME280 (low altitude noise of 0.25m) allows it to function as an altimeter with an accuracy of ±1 meter.
Before proceeding, it’s important to grasp the difference between Absolute and Relative Altitude. “Absolute altitude” refers to height above sea level (MSL), while “relative altitude” pertains to height above ground level (AGL).
The BME280 doesn’t directly measure altitude but can estimate it using pressure readings. Given its accuracy in pressure measurement, it can calculate relative altitude effectively. For instance, if an object’s altitude changes from a table to the floor, the BME280 would reflect a 2-foot difference in height.
However, measuring absolute altitude becomes more complex as the BME280 requires knowledge of current sea level pressure.
To obtain an accurate absolute altitude measurement, the example code below provides the SEA_LEVEL_PRESSURE constant, which should be updated with the current sea level pressure at your location.
Hardware Overview
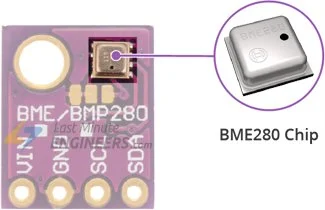
BME280 IC
At the heart of the module lies the BME280, Bosch’s next-generation digital sensor for temperature, humidity, and pressure. It succeeds previous sensors like the BMP180, BMP085, and BMP183.
Power
Equipped with an on-board LM6206 3.3V regulator and I2C Voltage Level Translator, the module is compatible with both 3.3V and 5V logic microcontrollers, such as Arduino, eliminating compatibility concerns.
The BME280 consumes less than 1mA during measurements and a mere 5μA when idle. Its low power consumption makes it suitable for battery-operated devices like smartphones, GPS modules, and wristwatches.
I2C Interface
The BME280 module communicates via I2C and offers two I2C addresses, 0x76 and 0x77, allowing for the use of up to two sensors on the same bus.
The module’s default I2C address is 0x76 (in hexadecimal), but it can be easily changed to 0x77 by adjusting the solder jumper provided.
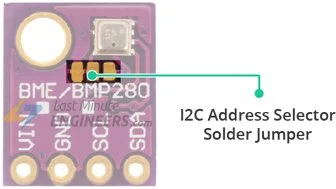
To switch the I2C address to 0x77, sever the connection between the middle and left copper pads using a sharp knife, then bridge the middle and right copper pads with a solder blob.
Technical Specifications
Here are the specifications:
| Input voltage | 3.3V – 5V |
| Current consumption | 1mA (typ.) and 5μA (idle) |
| Temperature | -40°C to 85°C (±1.0°C accuracy) |
| Humidity | 0 to 100% RH (±3% accuracy) |
| Pressure | 300Pa to 1100 hPa (±1 hPa accuracy) |
| Altitude | 0 to 30,000 ft. (±1 m accuracy) |
For more information, please refer to the datasheet below.
BME280 Sensor Pinout
The BME280 module features only four pins that establish its connection to the external world. Here’s how they are configured:
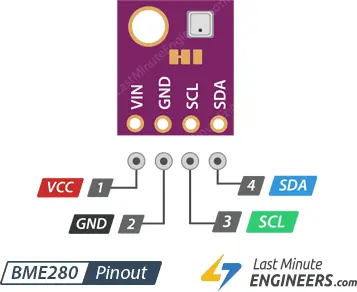
- VIN: This pin supplies power to the module. Connect any voltage between 3.3V and 5V to this pin.
- GND: This pin is the ground connection.
- SCL: This is the serial clock pin for the I2C interface.
- SDA: This is the serial data pin for the I2C interface.
Connecting a BME280 Module to an Arduino
Let’s connect the BME280 module to the Arduino.
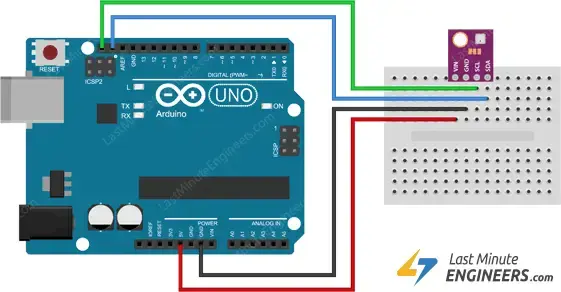
The connections are straightforward. Start by linking the VCC pin to the Arduino’s 5V output and the GND pin to ground.
Now, we need to handle the pins utilized for I2C communication. It’s important to note that each Arduino Board has distinct I2C pins that must be accurately connected. On Arduino boards with the R3 layout, the SDA (data line) and SCL (clock line) are positioned on the pin headers near the AREF pin. They are alternatively labeled as A5 (SCL) and A4 (SDA).
The table below delineates the pin connections:
| BME280 Module | Arduino |
| VCC | 5V |
| GND | GND |
| SCL | SCL or A5 |
| SDA | SDA or A4 |
The diagram below shows how to connect everything.
Installing Required Libraries
To initiate the process of reading sensor data, you’ll need to install the Adafruit BME280 Library. This library can be accessed through the Arduino library manager.
To install the library, follow these steps:
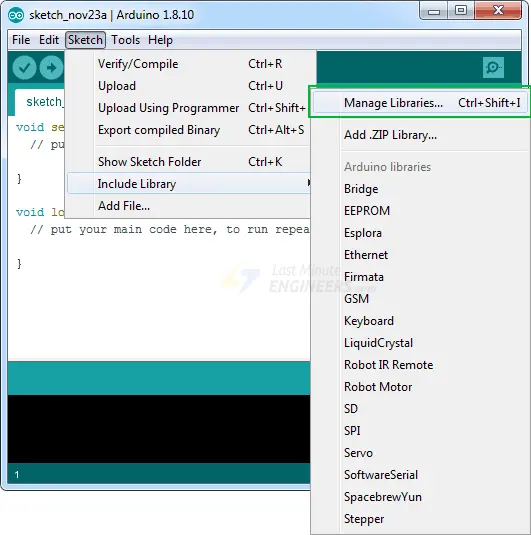
Navigate to Sketch > Include Library > Manage Libraries…
Wait for the Library Manager to download the libraries index and update the list of installed libraries.
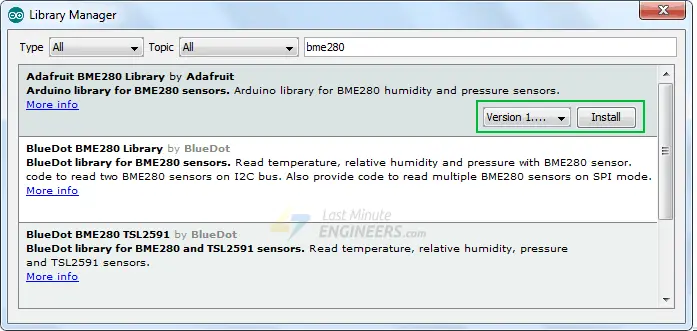
Filter your search by typing ‘bme280’.
Look for the Adafruit BME280 Library by Adafruit. Click on this entry and select Install.
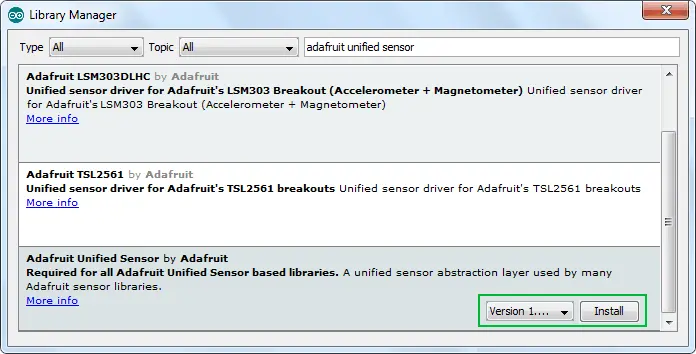
The BME280 sensor library relies on the Adafruit Sensor support backend. Therefore, also look for Adafruit Unified Sensor and install it (you might need to scroll a bit to find it).
Arduino Example Code
Below is a simple program that retrieves temperature, relative humidity, pressure, and approximate altitude from the BME280 module, displaying the results on the serial monitor.
#include <Wire.h>
#include <Adafruit_Sensor.h>
#include <Adafruit_BME280.h>

#define SEALEVELPRESSURE_HPA (1013.25)

Adafruit_BME280 bme;

void setup() {
	Serial.begin(9600);

	if (!bme.begin(0x76)) {
		Serial.println("Could not find a valid BME280 sensor, check wiring!");
		while (1);
	}
}

void loop() {
	Serial.print("Temperature = ");
	Serial.print(bme.readTemperature());
	Serial.println("*C");

	Serial.print("Pressure = ");
	Serial.print(bme.readPressure() / 100.0F);
	Serial.println("hPa");

	Serial.print("Approx. Altitude = ");
	Serial.print(bme.readAltitude(SEALEVELPRESSURE_HPA));
	Serial.println("m");

	Serial.print("Humidity = ");
	Serial.print(bme.readHumidity());
	Serial.println("%");

	Serial.println();
	delay(1000);
}
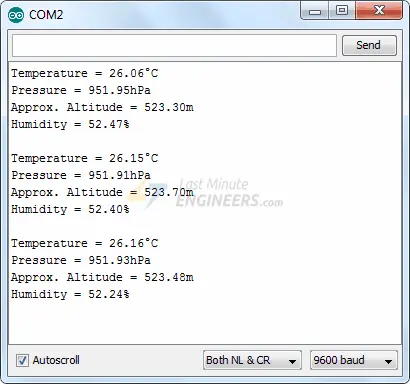
You should observe a similar output in the serial monitor.
Code Explanation:
The code commences by importing three libraries: Wire.h, Adafruit Sensor.h, and Adafruit BME280.h.
#include <Wire.h>
#include <Adafruit_Sensor.h>
#include <Adafruit_BME280.h>
Next, the variable SEALEVELPRESSURE_HPA is defined to store the sea level pressure in millibars. It serves to calculate absolute altitude based on a given pressure, comparing it to the sea level pressure. Although the default value (1013.25) suffices for this sketch, for precise outcomes, replace it with the current sea level pressure at your location.
#define SEALEVELPRESSURE_HPA (1013.25)
An instance of the Adafruit BME280 library, named bme, is created to access its functionalities.
Adafruit_BME280 bme;
In the setup segment of the code, serial communication with the PC is initialized, and the begin() function is invoked.
The begin(I2C_ADDR) function expects the module’s I2C address as a parameter. If the I2C address of your module was modified, ensure its correct specification. This function initializes the I2C interface with the provided I2C address, verifies the chip ID, performs a soft reset of the chip, and waits for sensor calibration post-wakeup.
Serial.begin(9600);

if (!bme.begin(0x76)) {
	Serial.println("Could not find a valid BME280 sensor, check wiring!");
	while (1);
}
Within the loop segment of the code, the following functions are utilized to retrieve temperature, relative humidity, and barometric pressure from the BME280 module:
readTemperature() function yields the temperature.
readPressure() function provides the barometric pressure.
readAltitude(SEALEVELPRESSURE_HPA) function calculates the altitude (in meters) by comparing the specified atmospheric pressure (in hPa) to the sea-level pressure (in hPa).
readHumidity() function furnishes the relative humidity.
Serial.print("Temperature = ");
Serial.print(bme.readTemperature());
Serial.println("*C");

Serial.print("Pressure = ");
Serial.print(bme.readPressure() / 100.0F);
Serial.println("hPa");

Serial.print("Approx. Altitude = ");
Serial.print(bme.readAltitude(SEALEVELPRESSURE_HPA));
Serial.println("m");

Serial.print("Humidity = ");
Serial.print(bme.readHumidity());
Serial.println("%");
Related article
- Step-by-Step: Interfacing Multiple DS18B20 Sensors with Arduino
- MLX90614 Integration Guide for Arduino Temperature Sensing
- Arduino DHT11 Sensor Tutorial: How to Interface and Read Data
- Arduino DHT11 and DHT22 Sensor Interface: Step-by-Step Guide
- MAX6675 Thermocouple Module: Seamless Integration with Arduino
- Arduino-Compatible HTU21D Sensor: Monitor Temp & Humidity Easily


