
Are you interested in maintaining a record of the climate within your greenhouse, creating a humidor control system, or monitoring temperature and humidity for a weather station project? If so, the HTU21D temperature and humidity sensor could be the perfect solution for you!
This sensor comes pre-calibrated from the factory and operates without the need for additional components. With minimal connections and some Arduino programming, you can begin measuring relative humidity and temperature immediately.
Parts Required
Hardware Overview
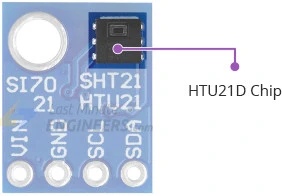
This module features a cost-effective, user-friendly, and highly precise digital temperature and humidity sensor from MEAS Switzerland – the HTU21D.
Its compact size makes it suitable for integration into various devices like thermostats, humidistats, indoor weather stations, and similar applications for monitoring and controlling temperature and humidity levels.
The HTU21D sensor accurately reads humidity across the entire range of 0 to 100% RH with a typical accuracy of ±2% within the range of 5% to 95% RH.
With a maximum temperature range of -40 to 125°C, the HTU21D maintains a typical accuracy of ±0.3°C within the range of 0 to 70°C.
In its standard mode for humidity and temperature measurement, the sensor offers a resolution of 0.7% RH and 0.040°C, with conversion times of 2ms and 11ms, respectively. For more precise measurements, the sensor allows you to enhance the resolution at the cost of increased conversion time. At maximum resolution mode, the HTU21D can achieve 0.04% RH with a conversion time of 14ms and 0.01°C with a conversion time of 44ms.
The HTU21D sensor features a small window exposing the polymer sensing film responsible for temperature and humidity measurements. It’s advisable to prevent liquids, dust, or other contaminants from reaching it, as they may affect sensor accuracy.
Some breakout boards include the HTU21D-F (filtered version) equipped with a hydrophobic PTFE filter (a small white cover on the IC). This filter blocks contaminants while allowing water vapor to pass through, safeguarding the sensor from water damage while maintaining accurate readings.
Power Requirement
Equipped with a precise 3.3V voltage regulator and voltage level translator, this module ensures compatibility with your preferred 3.3V or 5V microcontroller without any concerns.
The HTU21D consumes less than 0.5mA during measurements and less than 0.14µA in sleep mode. This minimal power usage enables integration into battery-operated devices such as handsets, wearables, or smartwatches.
I2C Interface
The HTU21D operates via an I2C interface, utilizing the two I2C data/clock wires commonly found on most microcontrollers. It can share these pins with other I2C sensors provided there are no address conflicts.
With a fixed I2C address set to 0x40HEX, the sensor requires a multiplexer (Mux) for communication with multiple HTU21D sensors on a single bus.
Technical Specifications
Here are the complete specifications:
| Power supply | 3.3V to 5.5V |
| Current draw | ~0.5mA (during measurements) |
| ~0.14µA (during sleep mode) | |
| Minimum Sampling Period | 50ms |
| Humidity Range | 0 to 100 %RH |
| Humidity Accuracy | ±2% over the range of 5% to 95% RH |
| Temperature Range | -40˚C to +125˚C |
| Temperature Accuracy | ±0.3˚C at 25°C |
For more details, please refer below datasheet.
HTU21D Module Pinout
Let’s take a look at the pinout of the HTU21D module.
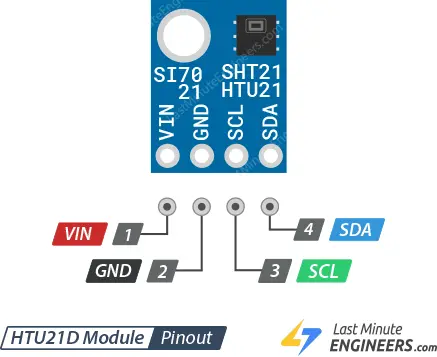
- VCC serves as the power pin, which can be connected to either a 3.3V or 5V output from your Arduino.
- GND is the common ground for both power and logic.
- SCL functions as the I2C clock pin, to be connected to your microcontroller’s I2C clock line.
- SDA serves as the I2C data pin, to be connected to your microcontroller’s I2C data line.
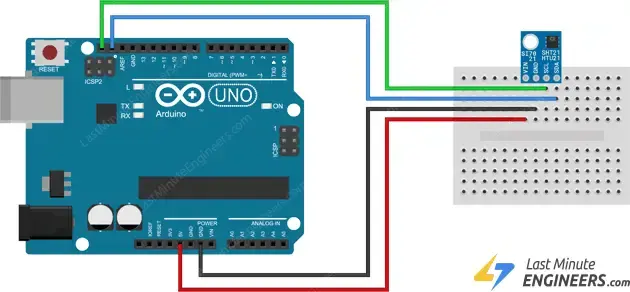
Wiring up a HTU21D Module to an Arduino
Setting up the HTU21D humidity sensor is straightforward.
Only four pins need to be connected to begin using the sensor: one for VCC, one for GND, and two for data lines for I2C communication.
Connect the SCL pin to the I2C clock pin, and the SDA pin to the I2C data pin on your Arduino. Note that different Arduino boards have different I2C pins, so connections should be made accordingly. On Arduino boards with the R3 layout, the SDA (data line) and SCL (clock line) pins are located on the pin headers near the AREF pin, often referred to as A5 (SCL) and A4 (SDA).
The following illustration depicts the wiring setup.
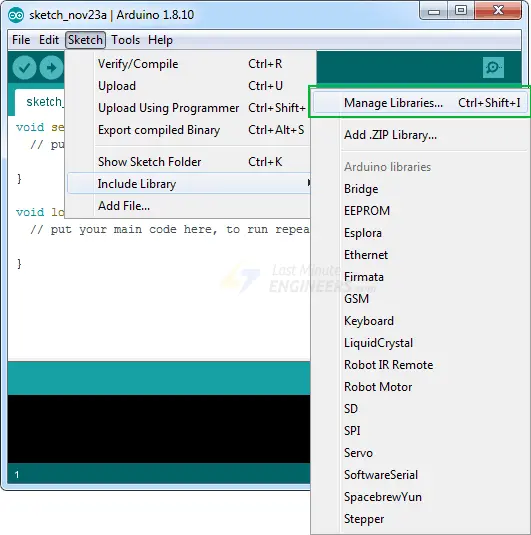
Library Installation
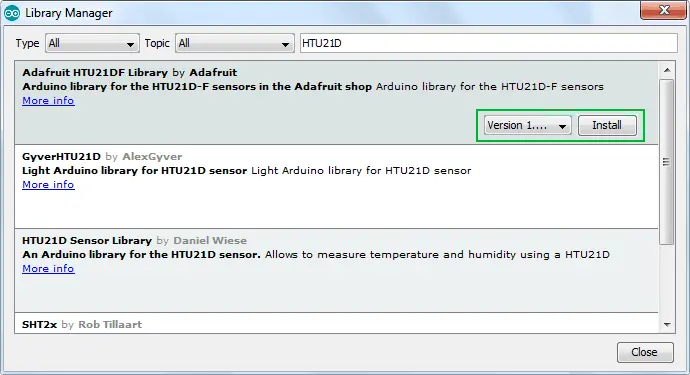
To begin using your sensor, you’ll need to install the Adafruit HTU21DF library. You can find it in the Arduino library manager.
To install the library, navigate to Sketch > Include Library > Manage Libraries… Wait for the Library Manager to download the library index and update the list of installed libraries.
Filter your search by typing ‘HTU21D’ and proceed to install the library.
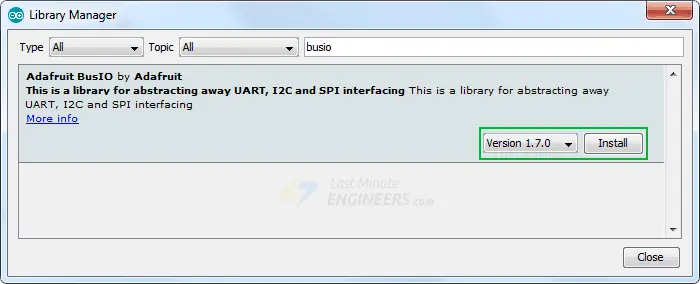
The Adafruit_HTU21DF library internally utilizes the Adafruit Bus IO helper library to abstract I2C & SPI transactions and registers. Therefore, search the library manager for ‘adafruit bus’ and install it as well.
Arduino Code – Reading Temperature and Humidity
Below is a simple Arduino sketch. Upload it to your Arduino, and you’ll be able to monitor the current temperature and humidity in your environment!
#include <Wire.h>
#include "Adafruit_HTU21DF.h"

Adafruit_HTU21DF htu = Adafruit_HTU21DF();

void setup() {
  Serial.begin(9600);

  if (!htu.begin()) {
    Serial.println("Couldn't find sensor!");
    while (1);
  }
}

void loop() {
    float temp = htu.readTemperature();
    float rel_hum = htu.readHumidity();
    Serial.print("Temp: "); Serial.print(temp); Serial.print(" C");
    Serial.print("\t\t");
    Serial.print("Humidity: "); Serial.print(rel_hum); Serial.println(" \%");
    delay(500);
}
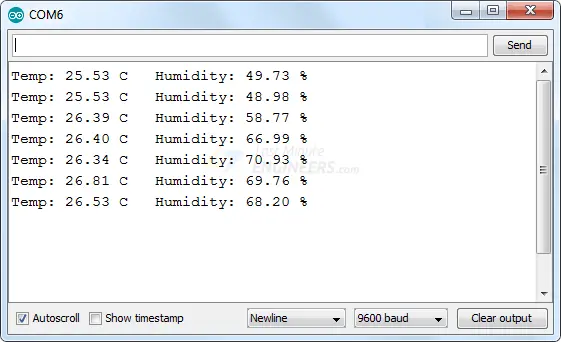
Once your code is uploaded, open the serial terminal at 9600bps. You should observe output similar to the one below. Try exhaling onto the sensor to witness changes in both humidity and temperature values!
Code Explanation:
The code is relatively simple to understand. It begins by including the libraries Wire.h and Adafruit_HTU21DF.h, followed by the creation of an Adafruit_HTU21DF object in the global scope.
#include <Wire.h>
#include "Adafruit_HTU21DF.h"

Adafruit_HTU21DF htu = Adafruit_HTU21DF();
In the setup function, serial communication with the PC is initialized using Serial.begin(9600), and the begin() function of the htu object is called.
The htu.begin() function initializes the sensor. It returns True if the sensor was successfully detected and responded, and False if it wasn’t found.
void setup() {
  Serial.begin(9600);

  if (!htu.begin()) {
    Serial.println("Couldn't find sensor!");
    while (1);
  }
}
Once initialized, you can access the object’s (htu) methods using the dot operator.
htu.readTemperature() returns a floating-point temperature reading in Celsius. You can convert this to Fahrenheit by multiplying by 1.8 and adding 32.
htu.readHumidity() returns the humidity reading as a floating-point value between 0 and 100 (representing % humidity).
void loop() {
    float temp = htu.readTemperature();
    float rel_hum = htu.readHumidity();
    Serial.print("Temperature: "); Serial.print(temp); Serial.print(" C");
    Serial.print("\t");
    Serial.print("Humidity: "); Serial.print(rel_hum); Serial.println(" \%");
    delay(500);
}
Related article
- Step-by-Step: Interfacing Multiple DS18B20 Sensors with Arduino
- MLX90614 Integration Guide for Arduino Temperature Sensing
- Arduino DHT11 Sensor Tutorial: How to Interface and Read Data
- Arduino DHT11 and DHT22 Sensor Interface: Step-by-Step Guide
- MAX6675 Thermocouple Module: Seamless Integration with Arduino


