
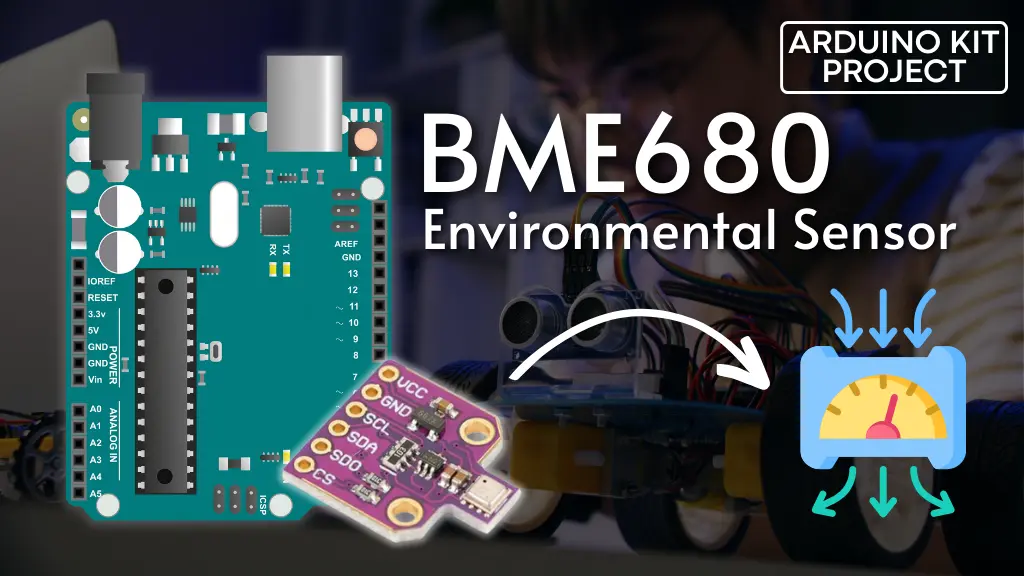
Interested in creating your own personal air quality monitor to assess the ventilation in your bedroom, workshop, or workplace? Simply attach the BME680 environmental sensor module to an Arduino and keep track of various aspects of your indoor environment.
The cutting-edge BME680 breakout allows you to measure temperature, pressure, humidity, and indoor air quality, and the great thing is that it’s compatible with Arduino!
Parts Required
| Component Name | Buy Now |
| Arduino Uno REV3 | Amazon |
| BME680 Digital Temperature Humidity Pressure Sensor | Amazon |
The BME680 Environmental Sensor
Central to the module lies the advanced environmental sensor produced by Bosch – the BME680.

This compact sensor possesses capabilities for measuring temperature, humidity, barometric pressure, and volatile organic compounds (VOCs). It incorporates a small MOx (metal-oxide) sensor. When heated, the metal oxide undergoes resistance changes in response to VOCs present in the air, enabling the detection of gases and alcohols such as Ethanol, Alcohol, and Carbon Monoxide, facilitating air quality assessments. Consequently, the BME680 can function as a fully independent environmental sensor.
Similar to most gas sensors, this sensor exhibits sensitivity to various gases and alcohols without distinguishing between them. It provides a single resistance value indicative of the overall VOC content, making it suitable for gauging fluctuations in a known gas density rather than pinpointing the specific gas type undergoing changes.
Like its predecessor, the BME280, this high-precision sensor offers humidity measurements with ±3% accuracy, barometric pressure readings with ±1 hPa absolute accuracy, and temperature readings with ±1.0°C accuracy. Its pressure measurements are exceptionally precise, enabling altimetry with an accuracy of ±1 meter.
Below are the comprehensive specifications:
| Temp | -40°C to 85°C |
| Humidity | 0 to 100% RH with ±3% accuracy |
| Pressure | 300Pa to 1100 hPa with ±1 hPa absolute accuraccy |
| Altitude | 0 to 30,000 ft (9.2 km) with ±1 meter accuracy |
For more details, please refer below datasheet.
Volatile organic compounds (VOCs) are gases emitted from certain products used in the construction and maintenance of our homes, such as air fresheners, cleaning products, cosmetics, fuel oil, gasoline, paint, varnishes, carpet, and vinyl flooring, among others. VOCs encompass a range of chemicals, some of which may have short- and long-term adverse health effects.
Common examples of VOCs that may be encountered in daily life include benzene, ethylene glycol, formaldehyde, methylene chloride, tetrachloroethylene, toluene, xylene, and 1,3-butadiene.
Power Requirement
Equipped with a XC6206 3.3V precise voltage regulator and voltage level translator, the module ensures compatibility with both 3.3V and 5V microcontrollers, offering flexibility without concern.
The BME680 operates with minimal power consumption, drawing less than 1mA during measurements and a mere 0.15µA in sleep mode. This efficient energy usage makes it suitable for integration into battery-powered devices like handsets, wearables, or smartwatches.
Digital interfaces
The sensor communicates through either I2C or SPI.
I2C Interface
For communication with the Arduino, the sensor utilizes the I2C interface. It supports two distinct I2C addresses: 0x77Hex and 0x76Hex, enabling the use of two BME680s on the same bus or avoidance of address conflicts with other devices.

The I2C address of the module is determined by the SDO pin, which features a built-in pull-up resistor. Leaving the SDO pin unconnected defaults the I2C address to 0x77Hex, while connecting it to GND pulls the line LOW, setting the I2C address to 0x76Hex.
SPI Interface
Additionally, the sensor offers communication via the SPI interface.
When selecting between the two interfaces, SPI generally provides faster transfer speeds (up to 10 MHz), making it preferable for speed-critical applications. However, I2C is advantageous when microcontroller pin availability is limited.
How Does the BME680 MEMS Gas Sensor Work?
In contrast to sensors like the MQ2 or MQ3, the BME680 gas sensor employs micro-electro-mechanical system (MEMS) technology. This MEMS-based gas detection offers significant advantages such as size reduction, decreased power consumption, and enhanced functionality and selectivity.
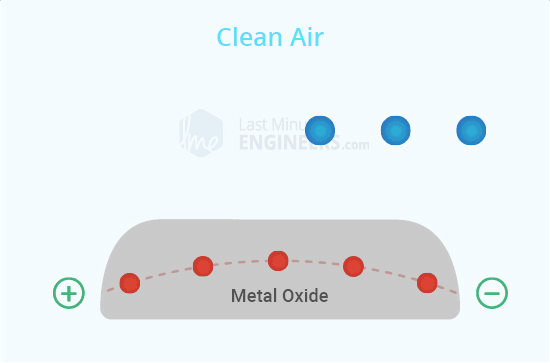
Typically, a MEMS gas sensor comprises a metal oxide semiconductor layer (sensing material) that interacts with the target gas, at least two electrodes for monitoring electrical resistance/current variations, and a micro-hotplate to elevate the operating temperature.

When the metal oxide semiconductor layer is heated to a high temperature, oxygen becomes adsorbed on the surface. In clean air, electrons from the conduction band within the metal oxide are drawn towards oxygen molecules, forming an electron depletion layer just beneath the surface of the metal oxide particles and creating a potential barrier. Consequently, the metal oxide layer becomes highly resistant, hindering the flow of electric current.
However, in the presence of gases, the surface density of adsorbed oxygen diminishes as it reacts with the gases, thereby reducing the potential barrier. This leads to the release of electrons into the metal oxide layer, enabling the unrestricted flow of current through the sensor.
BME680 Module Pinout
Now, let’s examine the pinout.
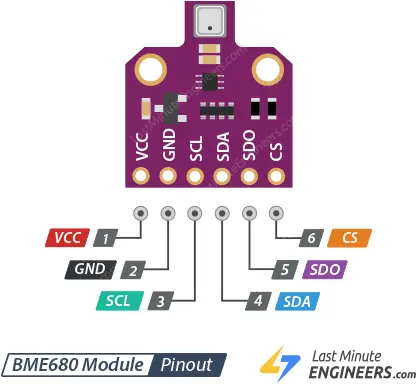
Power Pins:
- VCC: This is the power pin. You can connect it to the 5V output from your Arduino.
- GND: This serves as the common ground for power and logic.
SPI Logic pins:
- SCL: The SPI Clock pin, functioning as an input to the chip.
- SDA: Serial Data In (SDI/MOSI) pin, used for transmitting data from your microcontroller to the BME680.
- SDO: Serial Data Out (SDO/MISO) pin, utilized for transmitting data from the BME680 to your microcontroller.
- CS: Chip Select pin, pull it LOW to enable SPI communication. If you plan to connect multiple BME680s to one microcontroller, they can share the SDI, SDO, and SCK pins, with each having a unique CS pin assignment.
I2C Logic pins:
- SCL: Also doubles as the I2C clock pin, to be connected to your microcontroller’s I2C clock line.
- SDA: Also serves as the I2C data pin, to be connected to your microcontroller’s I2C data line.
Preparing BME680 Module for Use
Before utilizing the sensor for the first time, it’s advisable to conduct a 48-hour burn-in period, followed by 30 minutes of operation in the desired mode each time the sensor is utilized. This practice is recommended because the sensitivity of the sensor undergoes changes during initial usage, with the resistance gradually increasing as the MOx heats up to its baseline reading over time.
Wiring the BME680 Module with Arduino
Now that we have all the information about the module, we can proceed to connect it to our Arduino!
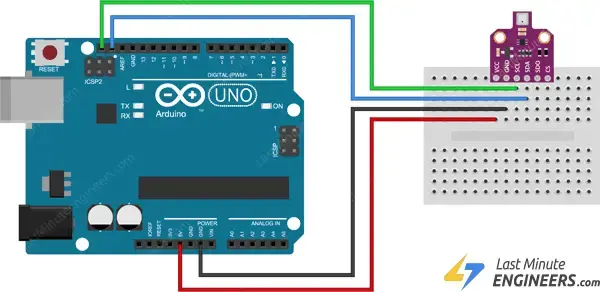
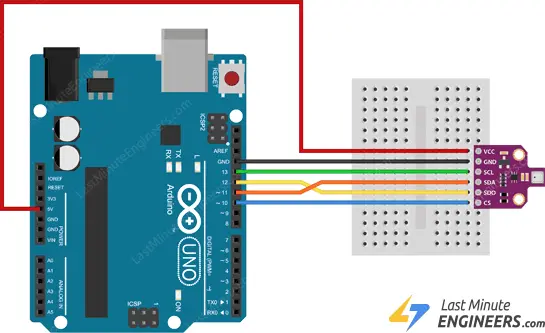
I2C Wiring
If you prefer to connect via the I2C interface, follow these steps:
Start by linking the VCC pin to the power supply, ranging from 3V to 5V. Ensure it matches the voltage of your microcontroller logic. Typically, for most Arduinos, this is 5V. For devices with 3.3V logic, utilize 3.3V. Then, connect GND to the common ground.
Attach the SCL pin to the I2C clock pin and the SDA pin to the I2C data pin on your Arduino. Note that different Arduino boards have distinct I2C pins that should be connected accordingly. On boards with the R3 layout, such as Arduino Uno, the SDA (data line) and SCL (clock line) are located near the AREF pin, labeled as A4 (SDA) and A5 (SCL).
The following diagram illustrates the wiring.
SPI Wiring
Given that the sensor supports SPI, you can utilize either hardware or software SPI. However, it’s recommended to utilize hardware SPI pins as they offer faster performance compared to ‘bit-banging’ the interface code using other pins.
Again, each Arduino board has different SPI pins that should be connected accordingly. For boards like UNO/Nano V3.0, these pins are digital 13 (SCK), 12 (MISO), 11 (MOSI), and 10 (SS).
If you’re using a different Arduino board, it’s prudent to consult the official documentation for the specific SPI pin locations before proceeding.
The following diagram depicts the wiring.
Once your module is connected to the Arduino, it’s time to write some code!
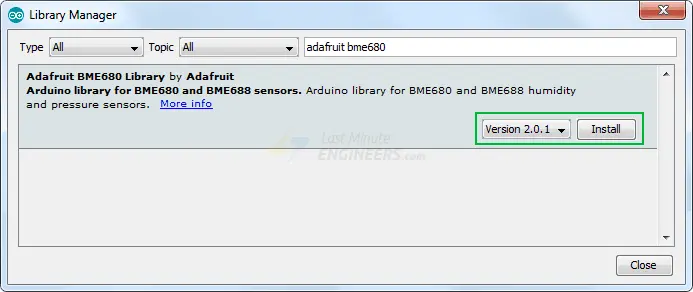
Library Installation
To initiate the process of reading sensor data, you’ll need to install the Adafruit_BME680 library, which is conveniently accessible from the Arduino library manager.
To install the library, follow these steps: navigate to Sketch > Include Library > Manage Libraries… Allow the Library Manager to download the library index and update the list of installed libraries.

Next, filter your search by typing ‘adafruit bme680’. Click on the corresponding entry, and then select Install.
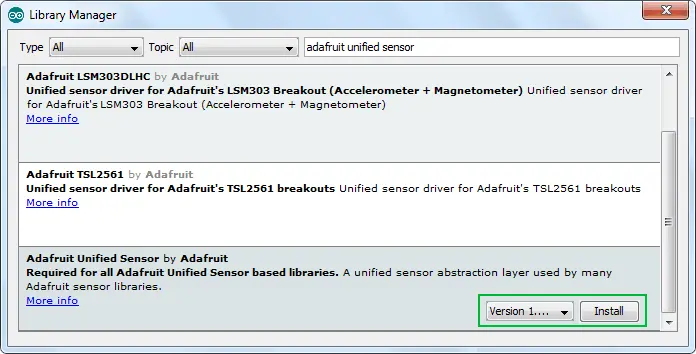
Keep in mind that the BME280 sensor library utilizes the Adafruit Sensor support backend. To ensure compatibility, search the library manager for Adafruit Unified Sensor and install it as well (you may need to scroll down to locate it).
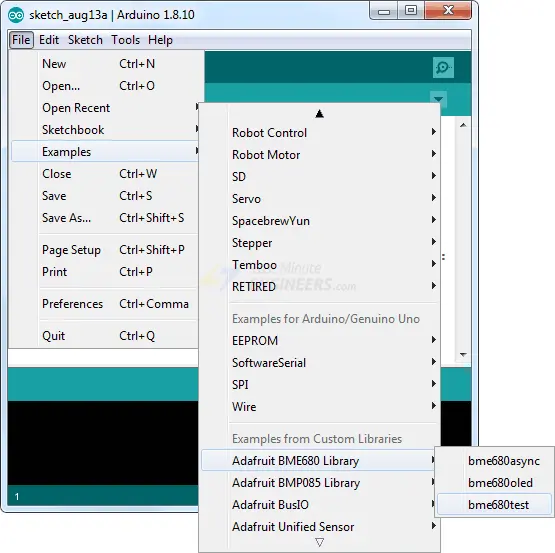
BME680 Example Sketches
The Adafruit_BME680 library includes several example sketches that serve as valuable references for developing your own code.
To access these examples, navigate to File > Examples > Adafruit BME680 Library. You’ll find a variety of example sketches to explore and utilize as needed.
Arduino Code – Reading gas, pressure, humidity, temperature, and altitude
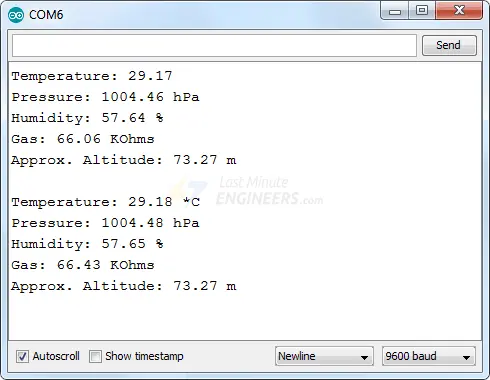
Begin by loading the bme680test sketch from the example sketches into your Arduino IDE. This serves as a fundamental Arduino sketch. Proceed to upload it to your Arduino. Once uploaded, you should observe temperature, pressure, humidity, gas, and approximate altitude readings on the serial monitor.
#include <Wire.h>
#include <SPI.h>
#include <Adafruit_Sensor.h>
#include "Adafruit_BME680.h"

// Uncomment if you want to use SPI
//#define BME_SCK 13
//#define BME_MISO 12
//#define BME_MOSI 11
//#define BME_CS 10

#define SEALEVELPRESSURE_HPA (1013.25)

Adafruit_BME680 bme;
//Adafruit_BME680 bme(BME_CS); // Uncomment if you want to use SPI
//Adafruit_BME680 bme(BME_CS, BME_MOSI, BME_MISO,  BME_SCK);

void setup() {
  Serial.begin(9600);
  while (!Serial);

  if (!bme.begin()) {
    Serial.println("Could not find a valid BME680 sensor, check wiring!");
    while (1);
  }

  // Set up oversampling and filter initialization
  bme.setTemperatureOversampling(BME680_OS_8X);
  bme.setHumidityOversampling(BME680_OS_2X);
  bme.setPressureOversampling(BME680_OS_4X);
  bme.setIIRFilterSize(BME680_FILTER_SIZE_3);
  bme.setGasHeater(320, 150); // 320*C for 150 ms
}

void loop() {
  if (! bme.performReading()) {
    Serial.println("Failed to perform reading :(");
    return;
  }
  Serial.print("Temperature = ");
  Serial.print(bme.temperature);
  Serial.println(" *C");

  Serial.print("Pressure = ");
  Serial.print(bme.pressure / 100.0);
  Serial.println(" hPa");

  Serial.print("Humidity = ");
  Serial.print(bme.humidity);
  Serial.println(" %");

  Serial.print("Gas = ");
  Serial.print(bme.gas_resistance / 1000.0);
  Serial.println(" KOhms");

  Serial.print("Approx. Altitude = ");
  Serial.print(bme.readAltitude(SEALEVELPRESSURE_HPA));
  Serial.println(" m");

  Serial.println();
  delay(2000);
}
Ensure that your serial monitor is set to a baud rate of 115200 to test out the sketch.
Upon execution, you’ll observe a plethora of data showcasing temperature, pressure, humidity, gas, and approximate altitude values. Experiment by moving your sensor around and observe how the data dynamically changes.
Code Explanation:
The sketch begins by including four essential libraries: Wire.h (for I2C), SPI.h (for SPI), Adafruit_Sensor.h, and Adafruit_BME680.h.
#include <Wire.h>
#include <SPI.h>
#include <Adafruit_Sensor.h>
#include "Adafruit_BME680.h"
This example employs the I2C communication protocol to interact with the sensor. However, the code is prepped for SPI usage as well. You can uncomment the following lines of code to define the SPI pins.
//#define BME_SCK 13
//#define BME_MISO 12
//#define BME_MOSI 11
//#define BME_CS 10
Next, a variable named SEALEVELPRESSURE_HPA is defined to store the sea level pressure in millibars. This value is utilized to estimate altitude based on the given pressure in comparison to the sea level pressure. While this sketch employs the default value, for precise results, you should update it with the current sea level pressure at your location.
#define SEALEVELPRESSURE_HPA (1013.25)
By default, this sketch utilizes the I2C communication protocol. The subsequent line creates an Adafruit_BME680 object named bme on the Arduino I2C pins.
Adafruit_BME680 bme;
If you intend to use SPI instead, you need to comment out the previous line and uncomment the following lines.
//Adafruit_BME680 bme(BME_CS);
//Adafruit_BME680 bme(BME_CS, BME_MOSI, BME_MISO,  BME_SCK);
In the setup section, we initialize serial communication with the PC and invoke the begin() function. The begin() function initializes the I2C interface and verifies the correctness of the chip ID. It then initiates a soft reset of the chip and awaits sensor calibration after wake-up.
Serial.begin(9600);
while (!Serial);

if (!bme.begin()) {
	Serial.println("Could not find a valid BME680 sensor, check wiring!");
	while (1);
}
Subsequently, we configure some parameters for the sensor.
bme.setTemperatureOversampling(BME680_OS_8X);
bme.setHumidityOversampling(BME680_OS_2X);
bme.setPressureOversampling(BME680_OS_4X);
bme.setIIRFilterSize(BME680_FILTER_SIZE_3);
bme.setGasHeater(320, 150); // 320*C for 150 ms
Let’s examine each function individually.
setTemperatureOversampling(uint8_t os)
setPressureOversampling(uint8_t os)
setHumidityOversampling(uint8_t os)
These functions increase measurement resolution and reduce noise by implementing oversampling, which involves averaging multiple samples. You can set oversampling for temperature, humidity, and pressure measurements using these functions, with parameters ranging from BME680_OS_NONE (no oversampling) to BME680_OS_16X.
setIIRFilterSize(fs)
The BME680 includes an internal IIR filter to mitigate short-term variations in sensor output values caused by external disturbances. This function sets the IIR filter, with configurable filter coefficients ranging from BME680_FILTER_SIZE_0 (no filtering) to BME680_FILTER_SIZE_127.
setGasHeater(heaterTemp, heaterTime)
Additionally, the gas sensor’s hot plate can be heated before gas measurement. This function configures the heater profile, accepting arguments for heater temperature (in °C) and duration (in milliseconds).
In the loop, we invoke the bme.performReading() function to execute a reading in blocking mode. Once completed, we can access bme’s instance variables using the dot (.) operator.
if (! bme.performReading()) {
	Serial.println("Failed to perform reading :(");
	return;
}
Serial.print("Temperature = ");
Serial.print(bme.temperature);
Serial.println(" *C");

Serial.print("Pressure = ");
Serial.print(bme.pressure / 100.0);
Serial.println(" hPa");

Serial.print("Humidity = ");
Serial.print(bme.humidity);
Serial.println(" %");

Serial.print("Gas = ");
Serial.print(bme.gas_resistance / 1000.0);
Serial.println(" KOhms");

Serial.print("Approx. Altitude = ");
Serial.print(bme.readAltitude(SEALEVELPRESSURE_HPA));
Serial.println(" m");
Related article
- Step-by-Step: Interfacing Multiple DS18B20 Sensors with Arduino
- MLX90614 Integration Guide for Arduino Temperature Sensing
- Arduino DHT11 Sensor Tutorial: How to Interface and Read Data
- Arduino DHT11 and DHT22 Sensor Interface: Step-by-Step Guide
- MAX6675 Thermocouple Module: Seamless Integration with Arduino
- Arduino-Compatible HTU21D Sensor: Monitor Temp & Humidity Easily


