

The BMP388, a small yet highly accurate absolute barometric pressure sensor, is commonly employed for altitude estimation in drone technology. It finds applications in indoor/outdoor navigation, GPS systems, and more. This tutorial elucidates the utilization of the BMP388 pressure sensor with Arduino boards, encompassing a wiring diagram and sample code demonstration.
Introducing the BMP388 Barometric Sensor
The BMP388 stands as a precise, low-power, and low-noise absolute barometric pressure sensor, capable of measuring both absolute pressure and temperature. Given the correlation between pressure and altitude, accurate altitude estimation becomes feasible. Hence, this sensor proves invaluable for drone and navigation tasks. Additionally, its utility extends to various other applications including:
- Vertical velocity calculation
- Internet of Things
- Weather forecasting and weather stations
- Healthcare applications
- Fitness applications
- And more…
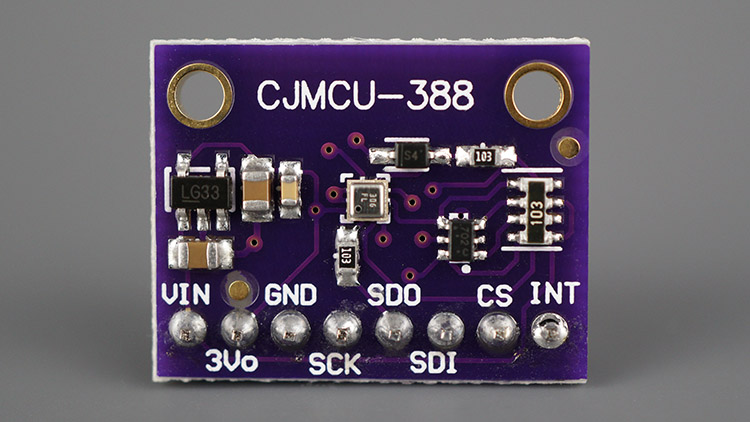
We utilize the BMP388 sensor as a module, as depicted in the accompanying figure. It’s also available in various alternative formats.
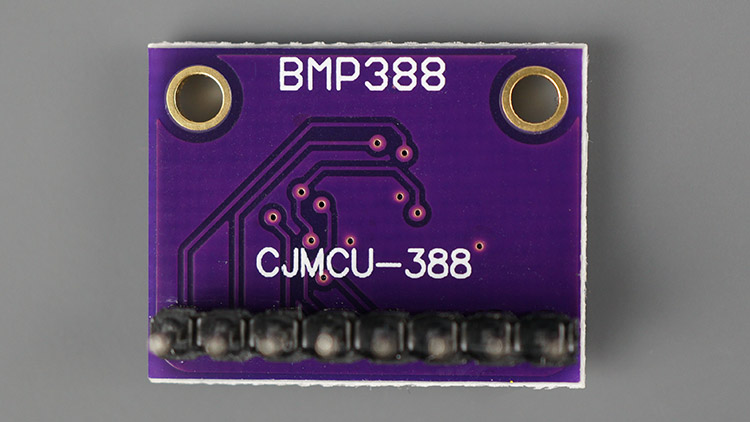
The image below displays the reverse side of the sensor.
BMP388 Technical Specifications
Below is a table detailing the key features of the BMP388 sensor. For additional information, please refer to the datasheet.
| Operation range | 300 to 1250 hPa (pressure) -40 to +85ºC (temperature) |
| Interface | I2C and SPI |
| Average typical current consumption | 3.4 µA @ 1Hz |
| Absolute accuracy pressure (typ.) P=900 …1100 hPa (T=25 … 40°C) | ±0.5 hPa |
| Relative accuracy pressure (typ.) P=900…1100 hPa (T=25 … 40°C) | ±0.08 hPa |
| Noise in pressure (lowest bandwidth, highest resolution) | 0.03 Pa |
| Maximum sampling rate | 200 Hz |
BMP388 Pinout
Presented below is the pin configuration of the BMP388 module we are utilizing—variations may exist for other modules.
| VIN | Powers the sensor (5V) |
| 3V3 | Powers the sensor (3V3) |
| GND | Common GND |
| SCK | SCL pin for I2C communication SCK pin for SPI communication |
| SDO | SDO (MISO) pin for SPI communication |
| SDI | SDI (MOSI) pin for SPI communication SDA pin for I2C communication |
| CS | Chip select pin for SPI communication |
| INT | Interrupt pin |
BMP388 Interface
As previously noted, the BMP388 sensor accommodates both I2C and SPI interfaces.
BMP388 I2C
For I2C communication protocol, utilize the following pins:
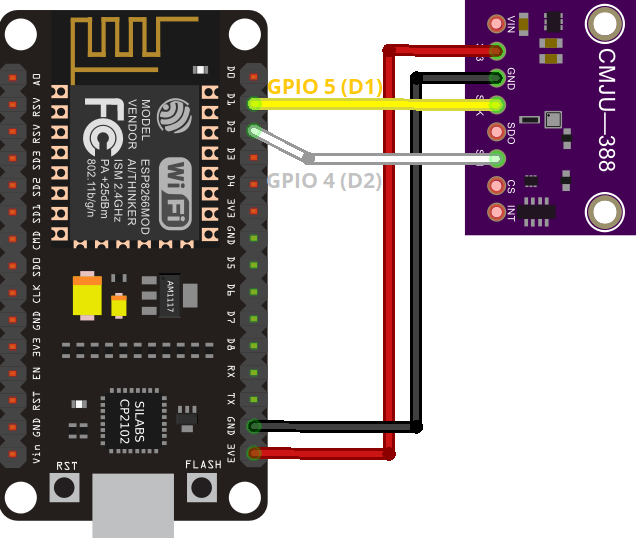
| BMP388 | ESP8266 |
| SDI (SDA) | GPIO 4 (D2) |
| SCK (SCL) | GPIO 5 (D1) |
BMP388 SPI
For SPI communication protocol, utilize the following pins:
| BMP388 | ESP8266 |
| SCK | GPIO 14 (D5) |
| SDI (MOSI) | GPIO 13 (D7) |
| SDO (MISO) | GPIO 12 (D6) |
| CS (Chip Select) | GPIO 15 (D8) |
Schematic – ESP8266 NodeMCU with BMP388
The BMP388 supports communication via both I2C and SPI protocols.
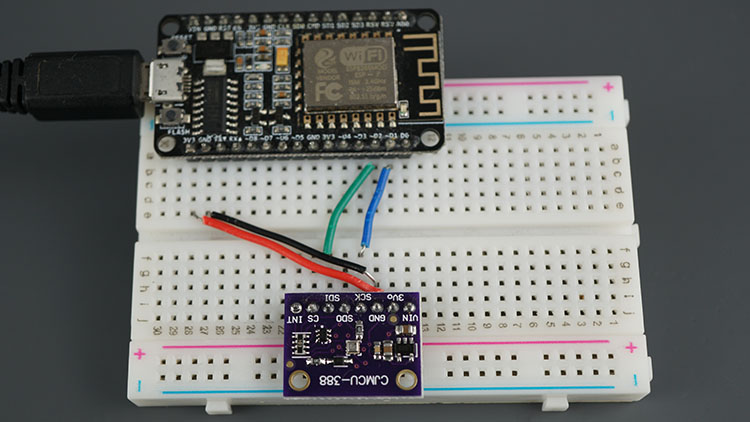
ESP8266 with BMP388 via I2C
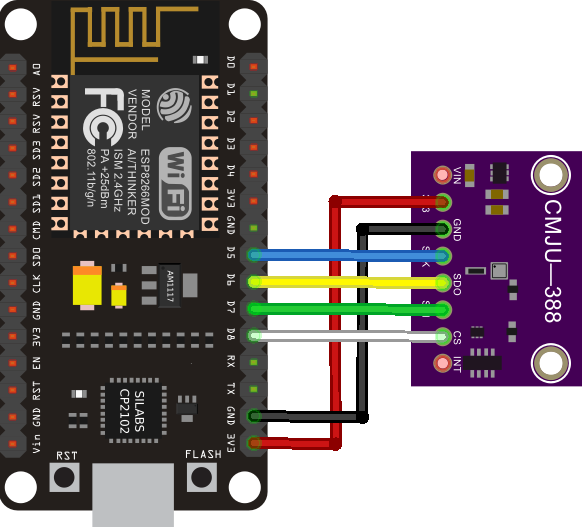
Refer to the following schematic diagram for wiring the BMP388 to the ESP8266 using the default I2C pins.
ESP8266 with BMP388 via SPI
Alternatively, if you prefer SPI communication, refer to the schematic diagram below for wiring the BMP388 to the ESP8266 using the default SPI pins.
Installing the Adafruit BMP3XX Library
Various libraries are compatible with the BMP388 sensor and ESP8266. For this tutorial, we’ll utilize the Adafruit BMP3XX library.
Follow these steps to install the library in your Arduino IDE:
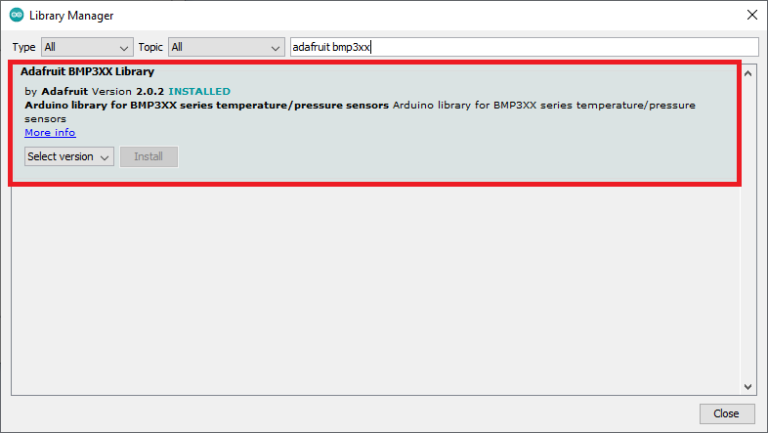
Open your Arduino IDE and navigate to Sketch > Include Library > Manage Libraries. The Library Manager will appear.
In the search box, type “adafruit bmp3xx” and install the library when it appears.
Installing the Adafruit_Sensor Library
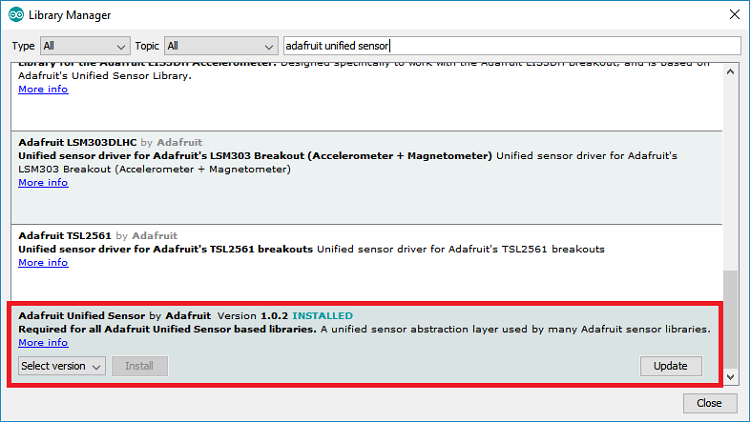
To utilize the BMP3XX library, you also need to install the Adafruit_Sensor library. Follow these steps to install it in your Arduino IDE:
Go to Sketch > Include Library > Manage Libraries and type “Adafruit Unified Sensor” in the search box.
Scroll down to find the library and install it.
Code – BMP388 Pressure, Altitude, and Temperature Readings
A great way to acquaint yourself with a new sensor is by starting with a basic example provided by the library.
Once you’ve installed the BMP3XX library, follow these steps:
- Open the Arduino IDE and navigate to File > Examples > Adafruit BMP3XX Library > bmp3XX_simpletest. We’ve made a few modifications to ensure full compatibility with the ESP8266.
#include <Wire.h>
#include <SPI.h>
#include <Adafruit_Sensor.h>
#include "Adafruit_BMP3XX.h"

#define BMP_SCK 14
#define BMP_MISO 12
#define BMP_MOSI 13
#define BMP_CS 15

#define SEALEVELPRESSURE_HPA (1013.25)

Adafruit_BMP3XX bmp;

void setup() {
  Serial.begin(115200);
  while (!Serial);
  Serial.println("Adafruit BMP388 / BMP390 test");

  if (!bmp.begin_I2C()) {   // hardware I2C mode, can pass in address & alt Wire
  //if (! bmp.begin_SPI(BMP_CS)) {  // hardware SPI mode
  //if (! bmp.begin_SPI(BMP_CS, BMP_SCK, BMP_MISO, BMP_MOSI)) {  // software SPI mode
    Serial.println("Could not find a valid BMP3 sensor, check wiring!");
    while (1);
  }

  // Set up oversampling and filter initialization
  bmp.setTemperatureOversampling(BMP3_OVERSAMPLING_8X);
  bmp.setPressureOversampling(BMP3_OVERSAMPLING_4X);
  bmp.setIIRFilterCoeff(BMP3_IIR_FILTER_COEFF_3);
  bmp.setOutputDataRate(BMP3_ODR_50_HZ);
}

void loop() {
  if (! bmp.performReading()) {
    Serial.println("Failed to perform reading :(");
    return;
  }
  Serial.print("Temperature = ");
  Serial.print(bmp.temperature);
  Serial.println(" *C");

  Serial.print("Pressure = ");
  Serial.print(bmp.pressure / 100.0);
  Serial.println(" hPa");

  Serial.print("Approx. Altitude = ");
  Serial.print(bmp.readAltitude(SEALEVELPRESSURE_HPA));
  Serial.println(" m");

  Serial.println();
  delay(2000);
}
Sea Level Pressure
To attain more precise pressure and altitude readings, adjust the sea level pressure according to your location in the SEALEVELPRESSURE_HPA variable:
#define SEALEVELPRESSURE_HPA (1013.25)
How the Code Works
Understanding the functionality of the code aids in comprehending its operation.
Libraries
The code starts by importing necessary libraries: Wire for I2C, SPI (if opting for SPI), Adafruit_Sensor, and Adafruit_BMP3XX to interface with BMP388 sensor.
#include <Wire.h>
#include <SPI.h>
#include <Adafruit_Sensor.h>
#include "Adafruit_BMP3XX.h"
SPI communication
While I2C is preferred, the code accommodates SPI usage. SPI pin definitions are outlined.
#define BMP_SCK 14
#define BMP_MISO 12
#define BMP_MOSI 13
#define BMP_CS 15
Sea level pressure
A variable SEALEVELPRESSURE_HPA is set to default sea level pressure in hectopascals, vital for altitude estimation based on pressure variance. For precise results, adjust the value to reflect the current sea level pressure.
#define SEALEVELPRESSURE_HPA (1013.25)
setup()
Serial communication is initialized, followed by BMP388 sensor setup using I2C mode by default. SPI setup options are also provided, though I2C is recommended. Sensor parameters like oversampling, filter, and output data rate are configured.
Serial.begin(115200);
Init BMP388 Sensor I2C
This example uses I2C communication protocol by default. The following line starts an Adafruit_BMP3XX object called bmp on the default ESP8266 I2C pins: GPIO 5 (SCL), GPIO 4 (SDA).
if (!bmp.begin_I2C()) { // hardware I2C mode, can pass in address & alt Wire
To use SPI, you need to comment this previous line and uncomment one of the following lines for hardware SPI (use the default SPI pins and choose the CS pin) or software SPI (use any pins).
//if (! bmp.begin_SPI(BMP_CS)) {  // hardware SPI mode
//if (! bmp.begin_SPI(BMP_CS, BMP_SCK, BMP_MISO, BMP_MOSI)) {  // software SPI mode
Set up the following parameters (oversampling and filter) for the sensor.
// Set up oversampling and filter initialization
bmp.setTemperatureOversampling(BMP3_OVERSAMPLING_8X);
bmp.setPressureOversampling(BMP3_OVERSAMPLING_4X);
bmp.setIIRFilterCoeff(BMP3_IIR_FILTER_COEFF_3);
bmp.setOutputDataRate(BMP3_ODR_50_HZ);
To increase the resolution of the raw sensor data, it supports oversampling. We’ll use the default oversampling parameters, but you can change them.
setTemperatureOversampling(): set temperature oversampling.setPressureOversampling(): set pressure oversampling.
These methods can accepts one of the following parameters:
BMP3_NO_OVERSAMPLINGBMP3_OVERSAMPLING_2XBMP3_OVERSAMPLING_4XBMP3_OVERSAMPLING_8XBMP3_OVERSAMPLING_16XBMP3_OVERSAMPLING_32X
The setIIRFilterCoeff() function sets the coefficient of the filter (in samples). It can be:
BMP3_IIR_FILTER_DISABLE(no filtering)BMP3_IIR_FILTER_COEFF_1BMP3_IIR_FILTER_COEFF_3BMP3_IIR_FILTER_COEFF_7BMP3_IIR_FILTER_COEFF_15BMP3_IIR_FILTER_COEFF_31BMP3_IIR_FILTER_COEFF_63BMP3_IIR_FILTER_COEFF_127
Set the output data rate with the setOutputDataRate() function. It can accept one of the following options:
BMP3_ODR_200_HZ, BMP3_ODR_100_HZ, BMP3_ODR_50_HZ, BMP3_ODR_25_HZ,BMP3_ODR_12_5_HZ, BMP3_ODR_6_25_HZ, BMP3_ODR_3_1_HZ, BMP3_ODR_1_5_HZ, BMP3_ODR_0_78_HZ, BMP3_ODR_0_39_HZ,BMP3_ODR_0_2_HZ, BMP3_ODR_0_1_HZ, BMP3_ODR_0_05_HZ, BMP3_ODR_0_02_HZ, BMP3_ODR_0_01_HZ, BMP3_ODR_0_006_HZ, BMP3_ODR_0_003_HZ, or BMP3_ODR_0_001_HZ
loop()
In the loop(), we’ll get measurements from the BMP388 sensor.
First, tell the sensor to get new readings with bmp.performReading().
if (! bmp.performReading()) {
  Serial.println("Failed to perform reading :(");
  return;
}
Then, get and print the temperature, pressure and altitude readings as follows:
Serial.print("Temperature = ");
Serial.print(bmp.temperature);
Serial.println(" *C");

Serial.print("Pressure = ");
Serial.print(bmp.pressure / 100.0);
Serial.println(" hPa");

Serial.print("Approx. Altitude = ");
Serial.print(bmp.readAltitude(SEALEVELPRESSURE_HPA));
Serial.println(" m");
You get each specific reading as follows:
bmp.temperature: returns temperature readingbmp.pressure: returns pressure readingbmp.readAltitude (SEALEVELPRESSURE_HPA): returns altitude estimation
Demonstration
Once you’ve configured the sea level pressure for your location, upload the code to your board. In Arduino IDE, navigate to Tools > Boards and select your board. Then, in Tools > Port, choose the COM port.
Once uploaded, open the Serial Monitor at a baud rate of 115200. The readings will display in the Serial Monitor.
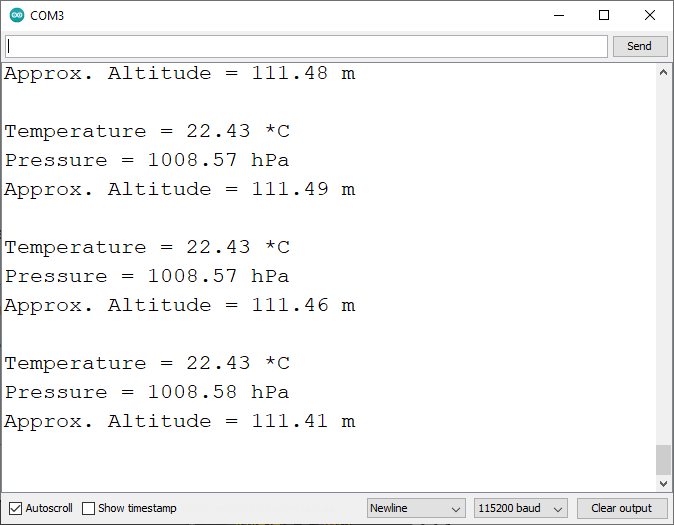
Note that altering the sensor’s altitude will reflect in the altitude reading. The altitude estimation is highly accurate, detecting even small changes in centimeters or inches. You can verify it by comparing with your location’s altitude, obtainable from this website.
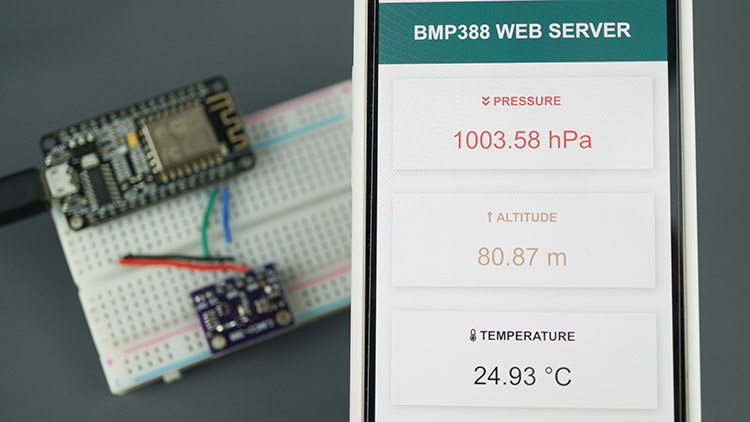
ESP8266 NodeMCU Web Server with BMP388
Here, we present an example of a web server that you can create with the ESP8266 to showcase BMP388 readings on a web page.
Installing Libraries – Async Web Server
To construct the web server, you’ll require the following libraries. Click on the links below to download them.
As these libraries aren’t accessible through the Arduino Library Manager, you must manually copy the library files to the Arduino Installation Libraries folder. Alternatively, you can utilize the Arduino Library Manager to install them.
Code
Then, upload the following code to your board (type your SSID and password).
#include <Wire.h>
#include <SPI.h>
#include <Adafruit_Sensor.h>
#include <Adafruit_BMP3XX.h>
#include <ESP8266WiFi.h>
#include <ESPAsyncWebServer.h>
// Replace with your network credentials
const char* ssid = "REPLACE_WITH_YOUR_SSID";
const char* password = "REPLACE_WITH_YOUR_PASSWORD";
//Uncomment if using SPI
/*#define BMP_SCK 14
#define BMP_MISO 12
#define BMP_MOSI 13
#define BMP_CS 15*/
#define SEALEVELPRESSURE_HPA (1013.25)
Adafruit_BMP3XX bmp;
float temp;
float pres;
float alt;
AsyncWebServer server(80);
AsyncEventSource events("/events");
unsigned long lastTime = 0;
unsigned long timerDelay = 30000; // send readings timer
void getBMPReadings(){
if (! bmp.performReading()) {
Serial.println("Failed to perform reading :(");
return;
}
temp = bmp.temperature;
pres = bmp.pressure / 100.0;
alt = bmp.readAltitude(SEALEVELPRESSURE_HPA);
}
String processor(const String& var){
getBMPReadings();
//Serial.println(var);
if(var == "TEMPERATURE"){
return String(temp);
}
else if(var == "PRESSURE"){
return String(pres);
}
else if(var == "ALTITUDE"){
return String(alt);
}
}
const char index_html[] PROGMEM = R"rawliteral(
<!DOCTYPE HTML><html>
<head>
<title>BMP388 Web Server</title>
<meta name="viewport" content="width=device-width, initial-scale=1">
<link rel="stylesheet" href="https://use.fontawesome.com/releases/v5.7.2/css/all.css" integrity="sha384-fnmOCqbTlWIlj8LyTjo7mOUStjsKC4pOpQbqyi7RrhN7udi9RwhKkMHpvLbHG9Sr" crossorigin="anonymous">
<link rel="icon" href="data:,">
<style>
html {font-family: Arial; display: inline-block; text-align: center;}
p { font-size: 1.2rem;}
body { margin: 0;}
.topnav { overflow: hidden; background-color: #0F7173; color: white; font-size: 1.4rem; }
.content { padding: 20px; }
.card { background-color: white; box-shadow: 2px 2px 12px 1px rgba(140,140,140,.5); }
.cards { max-width: 700px; margin: 0 auto; display: grid; grid-gap: 2rem; grid-template-columns: repeat(auto-fit, minmax(200px, 1fr)); }
.reading { font-size: 2rem; }
.card.temperature { color: #272932; }
.card.altitude { color: #D8A47F; }
.card.pressure { color: #F05D5E; }
</style>
</head>
<body>
<div class="topnav">
<h3>BMP388 WEB SERVER</h3>
</div>
<div class="content">
<div class="cards">
<div class="card pressure">
<h4><i class="fas fa-angle-double-down"></i> PRESSURE</h4><p><span class="reading"><span id="pres">%PRESSURE%</span> hPa</span></p>
</div>
<div class="card altitude">
<h4><i class="fas fa-long-arrow-alt-up"></i> ALTITUDE</h4><p><span class="reading"><span id="alt">%ALTITUDE%</span> m</span></p>
</div>
<div class="card temperature">
<h4><i class="fas fa-thermometer-half"></i> TEMPERATURE</h4><p><span class="reading"><span id="temp">%TEMPERATURE%</span> °C</span></p>
</div>
</div>
</div>
<script>
if (!!window.EventSource) {
var source = new EventSource('/events');
source.addEventListener('open', function(e) {
console.log("Events Connected");
}, false);
source.addEventListener('error', function(e) {
if (e.target.readyState != EventSource.OPEN) {
console.log("Events Disconnected");
}
}, false);
source.addEventListener('message', function(e) {
console.log("message", e.data);
}, false);
source.addEventListener('temperature', function(e) {
console.log("temperature", e.data);
document.getElementById("temp").innerHTML = e.data;
}, false);
source.addEventListener('pressure', function(e) {
console.log("pressure", e.data);
document.getElementById("pres").innerHTML = e.data;
}, false);
source.addEventListener('altitude', function(e) {
console.log("altitude", e.data);
document.getElementById("alt").innerHTML = e.data;
}, false);
}
</script>
</body>
</html>)rawliteral";
void setup() {
Serial.begin(115200);
WiFi.mode(WIFI_STA);
// Set device as a Wi-Fi Station
WiFi.begin(ssid, password);
while (WiFi.status() != WL_CONNECTED) {
delay(1000);
Serial.println("Setting as a Wi-Fi Station..");
}
Serial.print("Station IP Address: ");
Serial.println(WiFi.localIP());
Serial.println();
// Init BMEP388 sensor
if (!bmp.begin_I2C()) { // hardware I2C mode, can pass in address & alt Wire
//if (! bmp.begin_SPI(BMP_CS)) { // hardware SPI mode
//if (! bmp.begin_SPI(BMP_CS, BMP_SCK, BMP_MISO, BMP_MOSI)) { // software SPI mode
Serial.println("Could not find a valid BMP3 sensor, check wiring!");
while (1);
}
// Set up oversampling and filter initialization
bmp.setTemperatureOversampling(BMP3_OVERSAMPLING_8X);
bmp.setPressureOversampling(BMP3_OVERSAMPLING_4X);
bmp.setIIRFilterCoeff(BMP3_IIR_FILTER_COEFF_3);
bmp.setOutputDataRate(BMP3_ODR_50_HZ);
//Get readings when initializing
getBMPReadings();
// Handle Web Server
server.on("/", HTTP_GET, [](AsyncWebServerRequest *request){
request->send_P(200, "text/html", index_html, processor);
});
// Handle Web Server Events
events.onConnect([](AsyncEventSourceClient *client){
if(client->lastId()){
Serial.printf("Client reconnected! Last message ID that it got is: %u\n", client->lastId());
}
// send event with message "hello!", id current millis
// and set reconnect delay to 1 second
client->send("hello!", NULL, millis(), 10000);
});
server.addHandler(&events);
server.begin();
}
void loop() {
if ((millis() - lastTime) > timerDelay) {
getBMPReadings();
Serial.printf("Pressure = %.2f hPa \n", pres);
Serial.printf("Altitude = %.2f m \n", alt);
Serial.printf("Temperature = %.2f ºC \n", temp);
Serial.println();
// Send Events to the Web Server with the Sensor Readings
events.send("ping",NULL,millis());
events.send(String(pres).c_str(),"pressure",millis());
events.send(String(alt).c_str(),"altitude",millis());
events.send(String(temp).c_str(),"temperature",millis());
lastTime = millis();
}
}
Demonstration
Once the upload is complete, launch the Serial Monitor with a baud rate of 115200 to obtain the ESP8266’s IP address.
Next, open a web browser and enter the IP address. This will grant you access to the web server, displaying the most recent sensor readings. Access to the web server is available on your computer, tablet, or smartphone within your local network.
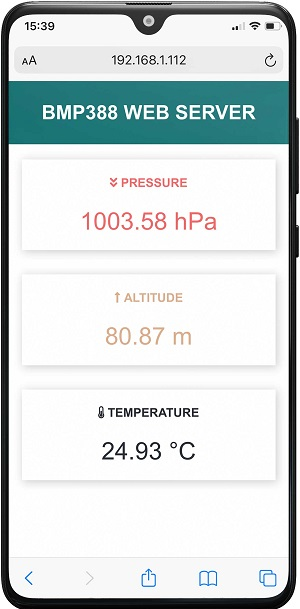
The sensor readings are continuously updated on the web server through Server-Sent Events. For further insight into its functionality, you may refer to the Server-Sent Events tutorial.
Wrapping Up
In conclusion, the BMP388 emerges as a compact and highly accurate pressure sensor, offering precise altitude estimation alongside temperature measurement capabilities. Its versatility extends to various applications such as outdoor/indoor navigation, drone technology, weather monitoring, and more.
This tutorial has equipped you with the knowledge to integrate the BMP388 sensor seamlessly with the ESP8266 development board using the Arduino IDE. We trust that you’ve found this introductory guide beneficial. Furthermore, we offer comprehensive guides for numerous other sought-after sensors.
- Arduino IDE Tutorial: Using HC-SR04 Ultrasonic Sensor with ESP8266 NodeMCU
- Master DC Motor Control: ESP8266 NodeMCU and L298N Driver Tutorial
- ESP8266 NodeMCU: MAX6675 Amplifier for Precise Thermocouple Readings
- DIY Water Quality Testing: ESP8266 NodeMCU and TDS Sensor


