

This article demonstrates how to utilize ESP-NOW for data exchange between ESP8266 NodeMCU boards programmed using the Arduino IDE. ESP-NOW, created by Espressif, is a connectionless communication protocol known for its short packet transmission. It is compatible with both ESP8266 and ESP32 boards.
Introducing ESP-NOW
The following video provides an overview of ESP-NOW. Although it was recorded for the ESP32, most of the concepts discussed apply to the ESP8266 NodeMCU board as well.
According to the Espressif website, ESP-NOW is a protocol developed by Espressif that allows multiple devices to communicate without using Wi-Fi. This protocol is akin to low-power 2.4GHz wireless connectivity. Devices need to be paired before communication, after which the connection is secure and peer-to-peer, requiring no handshake.
Once devices are paired, the connection remains persistent. If one board loses power or resets, it automatically reconnects to its peer to resume communication.
ESP-NOW offers the following features:
- Encrypted and unencrypted unicast communication
- Mixed encrypted and unencrypted peer devices
- Payload of up to 250 bytes
- Sending callback function to inform the application layer of transmission success or failure
However, ESP-NOW has some limitations:
- Station mode supports up to 10 encrypted peers and SoftAP or SoftAP + Station mode supports up to 6 encrypted peers
- Multiple unencrypted peers are supported, but their total number should be less than 20, including encrypted peers
- Payload is limited to 250 bytes
In essence, ESP-NOW is a rapid communication protocol suitable for exchanging small messages (up to 250 bytes) between ESP8266 boards.
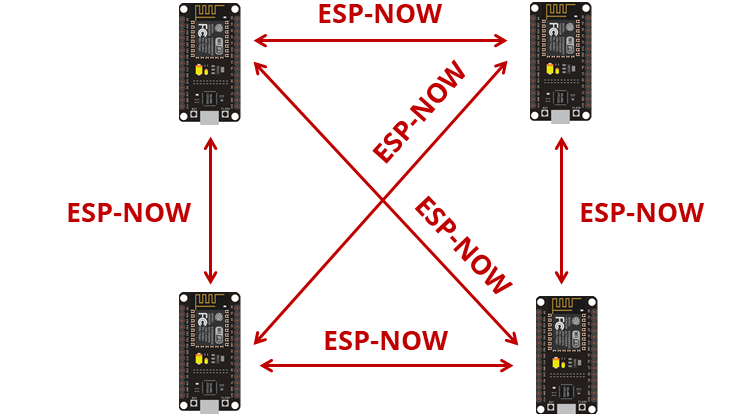
ESP-NOW is highly versatile, supporting one-way or two-way communication in various setups.
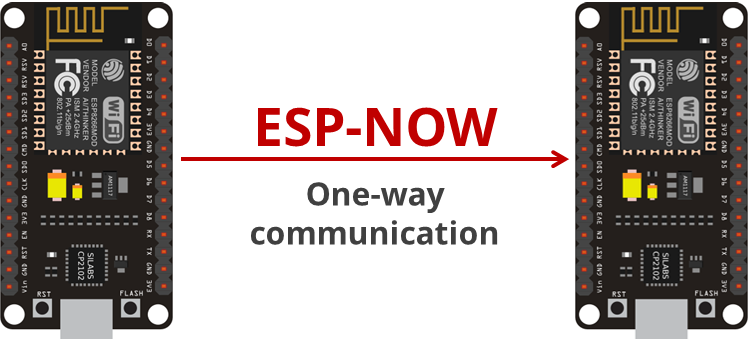
For one-way communication, examples include:
- One ESP8266 board sending data to another ESP8266 board, useful for tasks like transmitting sensor readings or control commands.
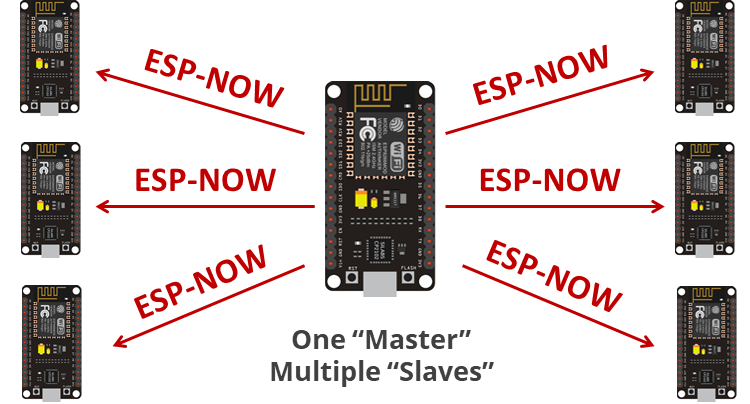
- A “master” ESP8266 sending data to multiple ESP8266 “slaves,” enabling centralized control over multiple boards.
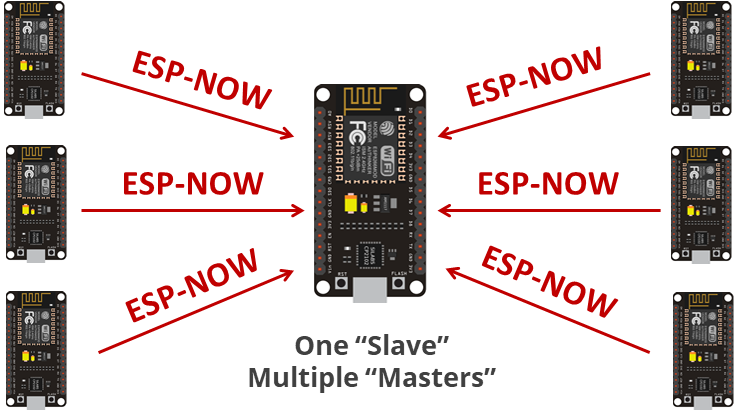
- One ESP8266 “slave” receiving data from multiple “masters,” suitable for consolidating data from multiple sensors into a single board for display or processing.
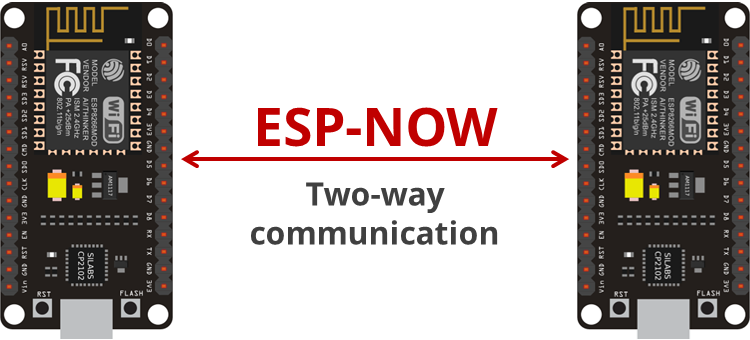
For two-way communication:
- Each board can act as both a sender and receiver simultaneously, facilitating two-way communication between boards.
- Multiple boards can communicate with each other, forming a network-like structure where all ESP8266 boards interact.
Parts Required
| Component Name | Buy Now |
| ESP8266 NodeMCU CP2102 | Amazon |
Obtaining ESP8266 Board MAC Address
To establish communication through ESP-NOW, you must obtain the MAC Address of the ESP8266 receiver. This address specifies the destination device for transmitting information.
Every ESP8266 possesses a unique MAC Address, serving as the identifier for directing data via ESP-NOW (refer to instructions on How to Get and Change the ESP8266 MAC Address).
To acquire your board’s MAC Address, upload the provided code:
#include <ESP8266WiFi.h>

void setup(){
  Serial.begin(115200);
  Serial.println();
  Serial.print("ESP8266 Board MAC Address:  ");
  Serial.println(WiFi.macAddress());
}

void loop(){

}
After uploading the code, launch the Serial Monitor at a baud rate of 115200 and press the RESET button on the ESP8266. The MAC address will be printed as follows:
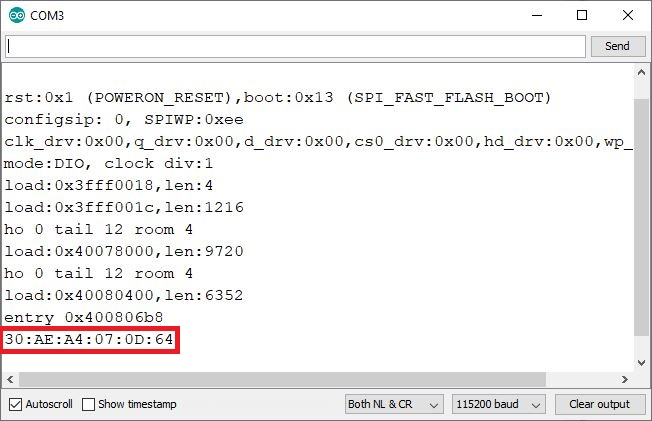
Ensure to save your board’s MAC address as it is necessary for correctly directing data to the intended board via ESP-NOW.
ESP-NOW One-way Point to Point Communication with ESP8266
To help you begin with ESP-NOW wireless communication, we’ll create a simple project demonstrating how to send a message from one ESP8266 to another. One ESP8266 will act as the “sender,” while the other will serve as the “receiver.”

We’ll transmit a structure containing variables of type char, int, float, String, and boolean. Then, you can customize the structure to send whichever variable types suit your project, such as sensor readings or boolean variables for toggling devices.
For clarity, we’ll refer to ESP8266 #1 as the “sender” and ESP8266 #2 as the “receiver.”
Here’s what the “sender” sketch should include:
- Initialize ESP-NOW.
- Register a callback function for data transmission – the
OnDataSentfunction will execute when a message is sent. This provides feedback on whether the message was successfully delivered. - Add the receiver device as a peer. You’ll need the receiver’s MAC address for this step.
- Send a message to the receiver device.
On the “receiver” side, the sketch should include:
- Initialize ESP-NOW.
- Register a callback function for receiving data (
OnDataRecv). This function executes when a message is received. - Within the callback function, store the received message in a variable to perform any necessary tasks with that information.
ESP-NOW operates with callback functions that are invoked when a device either receives or sends a message, providing feedback on whether the message was successfully delivered or failed.
ESP-NOW Useful Functions
Here’s a summary of most essential ESP-NOW functions:
| Function Name and Description |
esp_now_init() Initializes ESP-NOW. You must initialize Wi-Fi before initializing ESP-NOW. Returns 0, if succeed. |
esp_now_set_self_role(role) the role can be: ESP_NOW_ROLE_IDLE = 0,ESP_NOW_ROLE_CONTROLLER, ESP_NOW_ROLE_SLAVE, ESP_NOW_ROLE_COMBO, ESP_NOW_ROLE_MAX |
esp_now_add_peer(uint8 mac_addr, uint8 role, uint8 channel, uint8 key, uint8 key_len) Call this function to pair a device. |
esp_now_send(uint8 mac_address, uint8 data, int len) Send data with ESP-NOW. |
esp_now_register_send_cb() Register a callback function that is triggered upon sending data. When a message is sent, a function is called – this function returns whether the delivery was successful or not. |
esp_now_register_rcv_cb() Register a callback function that is triggered upon receiving data. When data is received via ESP-NOW, a function is called. |
ESP8266 NodeMCU Sender Sketch (ESP-NOW)
Below is the code for the ESP8266 NodeMCU Sender board. Copy the code to your Arduino IDE, but refrain from uploading it just yet. You’ll need to make a few adjustments to tailor it to your needs.
#include <ESP8266WiFi.h>
#include <espnow.h>

// REPLACE WITH RECEIVER MAC Address
uint8_t broadcastAddress[] = {0xFF, 0xFF, 0xFF, 0xFF, 0xFF, 0xFF};

// Structure example to send data
// Must match the receiver structure
typedef struct struct_message {
  char a[32];
  int b;
  float c;
  String d;
  bool e;
} struct_message;

// Create a struct_message called myData
struct_message myData;

unsigned long lastTime = 0;
unsigned long timerDelay = 2000;  // send readings timer

// Callback when data is sent
void OnDataSent(uint8_t *mac_addr, uint8_t sendStatus) {
  Serial.print("Last Packet Send Status: ");
  if (sendStatus == 0){
    Serial.println("Delivery success");
  }
  else{
    Serial.println("Delivery fail");
  }
}

void setup() {
  // Init Serial Monitor
  Serial.begin(115200);

  // Set device as a Wi-Fi Station
  WiFi.mode(WIFI_STA);

  // Init ESP-NOW
  if (esp_now_init() != 0) {
    Serial.println("Error initializing ESP-NOW");
    return;
  }

  // Once ESPNow is successfully Init, we will register for Send CB to
  // get the status of Trasnmitted packet
  esp_now_set_self_role(ESP_NOW_ROLE_CONTROLLER);
  esp_now_register_send_cb(OnDataSent);

  // Register peer
  esp_now_add_peer(broadcastAddress, ESP_NOW_ROLE_SLAVE, 1, NULL, 0);
}

void loop() {
  if ((millis() - lastTime) > timerDelay) {
    // Set values to send
    strcpy(myData.a, "THIS IS A CHAR");
    myData.b = random(1,20);
    myData.c = 1.2;
    myData.d = "Hello";
    myData.e = false;

    // Send message via ESP-NOW
    esp_now_send(broadcastAddress, (uint8_t *) &myData, sizeof(myData));

    lastTime = millis();
  }
}
Code Explanation
First, include the ESP8266WiFi.h and espnow.h libraries.
#include <ESP8266WiFi.h>
#include <espnow.h>
In the next line, you should insert the ESP8266 receiver MAC address.
uint8_t broadcastAddress[] = {0x5C, 0xCF, 0x7F, 0x99, 0x9A, 0xEA};
In our case, the receiver MAC address is: 5C:CF:7F:99:9A:EA, but you need to replace that variable with your own MAC address.
Then, create a structure that contains the type of data we want to send. We called this structure struct_message and it contains 5 different variable types. You can change this to send whatever variable types you want.
typedef struct struct_message {
  char a[32];
  int b;
  float c;
  String d;
  bool e;
} struct_message;
Create a new variable of type struct_message that is called myData that will store the variables values.
struct_message myData;
Next, define the OnDataSent() function. This is a callback function that will be executed when a message is sent. In this case, this message simply prints if the message was successfully sent or not.
void OnDataSent(uint8_t *mac_addr, uint8_t sendStatus) {
  Serial.print("Last Packet Send Status: ");
  if (sendStatus == 0){
    Serial.println("Delivery success");
  }
  else{
    Serial.println("Delivery fail");
  }
}
In the setup(), initialize the serial monitor for debugging purposes:
Serial.begin(115200);
Set the device as a Wi-Fi station:
WiFi.mode(WIFI_STA);
Initialize ESP-NOW:
if (esp_now_init() != 0) {
  Serial.println("Error initializing ESP-NOW");
  return;
}
Set the ESP8266 role:
esp_now_set_self_role(ESP_NOW_ROLE_CONTROLLER);
It accepts the following roles: ESP_NOW_ROLE_CONTROLLER, ESP_NOW_ROLE_SLAVE, ESP_NOW_ROLE_COMBO, ESP_NOW_ROLE_MAX.
After successfully initializing ESP-NOW, register the callback function that will be called when a message is sent. In this case, we register for the OnDataSent() function created previously.
esp_now_register_send_cb(OnDataSent);
Then, pair with another ESP-NOW device to send data:
esp_now_add_peer(broadcastAddress, ESP_NOW_ROLE_SLAVE, 1, NULL, 0);
The esp_now_add_peer accepts the following arguments, in this order: mac address, role, wi-fi channel, key, and key length.
In the loop(), we’ll send a message via ESP-NOW every 2 seconds (you can change this delay time on the timerDelay variable).
First, we set the variables values as follows:
strcpy(myData.a, "THIS IS A CHAR");
myData.b = random(1,20);
myData.c = 1.2;
myData.d = "Hello";
myData.e = false;
Remember that myData is a structure. Here we assign the values we want to send inside the structure. For example, the first line assigns a char, the second line assigns a random Int number, a Float, a String and a Boolean variable.
We create this kind of structure to show you how to send the most common variable types. You can change the structure to send any other type of data.
Finally, send the message as follows:
esp_now_send(broadcastAddress, (uint8_t *) &myData, sizeof(myData));
The loop() is executed every 2000 milliseconds (2 seconds).
if ((millis() - lastTime) > timerDelay) {
  // Set values to send
  strcpy(myData.a, "THIS IS A CHAR");
  myData.b = random(1,20);
  myData.c = 1.2;
  myData.d = "Hello";
  myData.e = false;

  // Send message via ESP-NOW
  esp_now_send(broadcastAddress, (uint8_t *) &myData, sizeof(myData));

  lastTime = millis();
}
ESP8266 NodeMCU Receiver Sketch (ESP-NOW)
Upload the following code to your ESP8266 NodeMCU receiver board.
#include <ESP8266WiFi.h>
#include <espnow.h>

// Structure example to receive data
// Must match the sender structure
typedef struct struct_message {
    char a[32];
    int b;
    float c;
    String d;
    bool e;
} struct_message;

// Create a struct_message called myData
struct_message myData;

// Callback function that will be executed when data is received
void OnDataRecv(uint8_t * mac, uint8_t *incomingData, uint8_t len) {
  memcpy(&myData, incomingData, sizeof(myData));
  Serial.print("Bytes received: ");
  Serial.println(len);
  Serial.print("Char: ");
  Serial.println(myData.a);
  Serial.print("Int: ");
  Serial.println(myData.b);
  Serial.print("Float: ");
  Serial.println(myData.c);
  Serial.print("String: ");
  Serial.println(myData.d);
  Serial.print("Bool: ");
  Serial.println(myData.e);
  Serial.println();
}

void setup() {
  // Initialize Serial Monitor
  Serial.begin(115200);

  // Set device as a Wi-Fi Station
  WiFi.mode(WIFI_STA);

  // Init ESP-NOW
  if (esp_now_init() != 0) {
    Serial.println("Error initializing ESP-NOW");
    return;
  }

  // Once ESPNow is successfully Init, we will register for recv CB to
  // get recv packer info
  esp_now_set_self_role(ESP_NOW_ROLE_SLAVE);
  esp_now_register_recv_cb(OnDataRecv);
}

void loop() {

}
Code Explanation
Similarly to the sender, start by including the libraries:
#include <esp_now.h>
#include <WiFi.h>
Create a structure to receive the data. This structure should be the same defined in the sender sketch.
typedef struct struct_message {
  char a[32];
  int b;
  float c;
  String d;
  bool e;
} struct_message;
Create a struct_message variable called myData.
struct_message myData;
Create a callback function that will be called when the ESP8266 receives the data via ESP-NOW. The function is called onDataRecv() and should accept several parameters as follows:
void OnDataRecv(const uint8_t * mac, const uint8_t *incomingData, int len) {
We copy the content of the incomingData data variable into the myData variable.
memcpy(&myData, incomingData, sizeof(myData));
Now, the myData structure contains several variables inside with the values sent by the sender ESP8266. To access variable a, for example, we just need to call myData.a.
In this example, we simply print the received data, but in a practical application you can print the data on a display, for example.
  Serial.print("Bytes received: ");
  Serial.println(len);
  Serial.print("Char: ");
  Serial.println(myData.a);
  Serial.print("Int: ");
  Serial.println(myData.b);
  Serial.print("Float: ");
  Serial.println(myData.c);
  Serial.print("String: ");
  Serial.println(myData.d);
  Serial.print("Bool: ");
  Serial.println(myData.e);
  Serial.println();
}
In the setup(), intialize Serial communication for debugging purposes.
Serial.begin(115200);
Set the device as a Wi-Fi Station.
WiFi.mode(WIFI_STA);
Initialize ESP-NOW:
if (esp_now_init() != ESP_OK) {
  Serial.println("Error initializing ESP-NOW");
  return;
}
Set the ESP8266 role:
esp_now_set_self_role(ESP_NOW_ROLE_SLAVE);
Register for a callback function that will be called when data is received. In this case, we register for the OnDataRecv() function that was created previously.
esp_now_register_recv_cb(OnDataRecv);
Testing ESP-NOW Communication
To begin testing ESP-NOW communication, upload the sender sketch to one board and the receiver sketch to the other board. Ensure to insert the receiver’s MAC address into the sender sketch.
Next, open two separate Arduino IDE windows: one for the receiver and another for the sender. Open the Serial Monitor for each board, noting that each board should be assigned a different COM port.
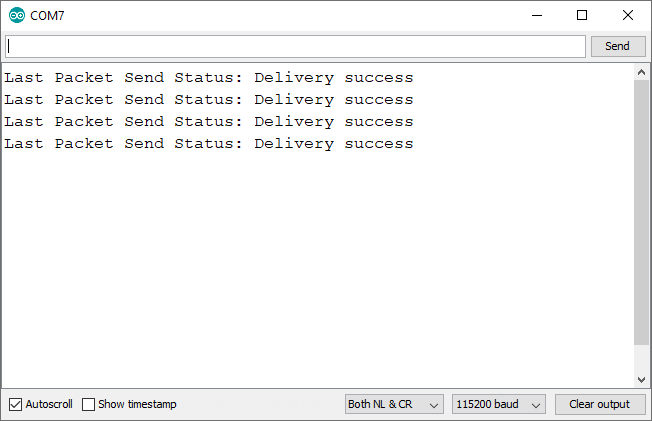
On the sender side, you should observe the following output.
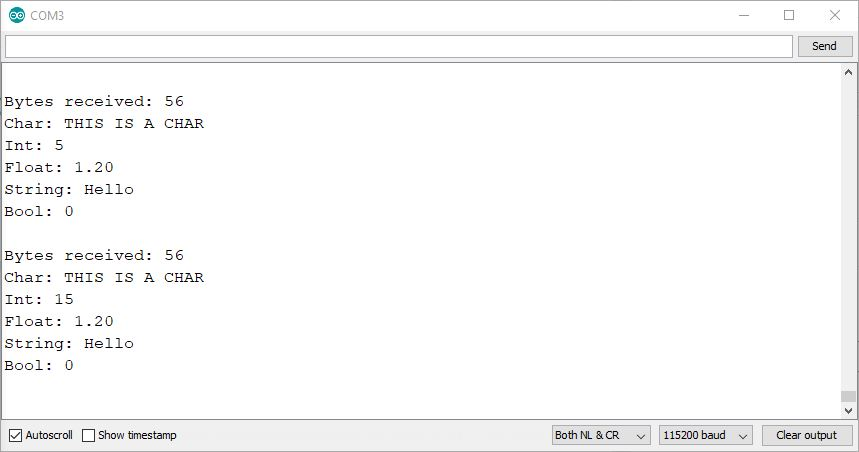
On the receiver side, you should observe the following output. Note that the integer variable changes with each received reading, as it is set to a random number on the sender side.
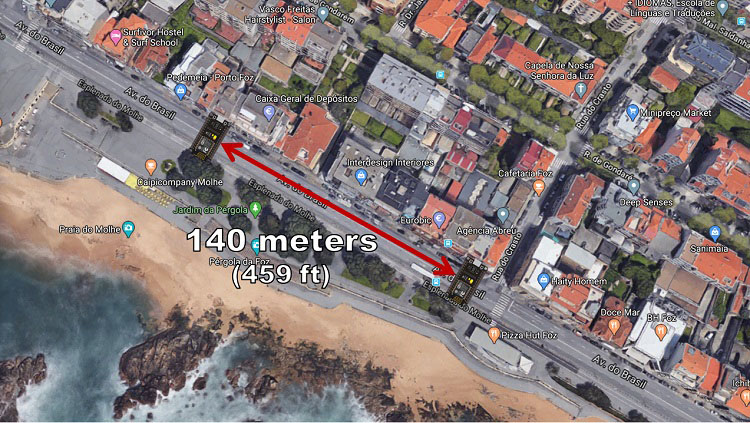
We conducted tests to evaluate the communication range between the two boards and achieved stable communication up to 140 meters (approximately 459 feet) in an open field. During the experiment, both ESP8266 on-board antennas were positioned to face each other.
Conclusion
In this tutorial, you have gained knowledge on utilizing ESP-NOW with the ESP8266 NodeMCU board. Now, you can integrate the sender and receiver sketches to enable two-way communication, with each board functioning as both a server and sender simultaneously. Additionally, you can extend this capability to facilitate communication between multiple boards.
ESP8266 and ESP32 boards can seamlessly communicate with each other using the ESP-NOW communication protocol. Simply upload the appropriate sketches to each board. To delve deeper into ESP-NOW usage with the ESP32, refer to our ESP-NOW getting started guide for the ESP32.
We trust that you have found this tutorial beneficial. For further exploration of the ESP8266 board, be sure to explore our additional resources:
- ESP8266 NodeMCU Email Tutorial: SMTP Server Setup for HTML, Text, and Attachments (Arduino)
- Ultimate Guide: Crafting an ESP8266 Weather Station Using BME280
- Firebase Data Logging: ESP8266 NodeMCU Sensor Integration
- Beginner’s Guide to ESP8266 NodeMCU and Firebase (Realtime Database)
- Smart LED Control: ESP8266 Empowers WS2812B LEDs via WLED
- Control IoT Devices: ESP8266 NodeMCU Async Web Server Tutorial
- Enhanced Monitoring: Multiple DS18B20s on ESP8266 Web Server


