

Have you ever wished to equip your home and garden with sensors spread throughout, regularly relaying their temperature readings to a central server? If so, this IoT project could serve as an excellent starting point for you!
In this project, an ESP8266 NodeMCU is utilized as the control device, effortlessly connecting to your existing WiFi network and establishing a Web Server. Whenever any connected device accesses this web server, the ESP8266 retrieves temperature data from multiple DS18B20 Temperature sensors and presents it on the web browser of that device through a user-friendly interface. Intrigued? Let’s begin!
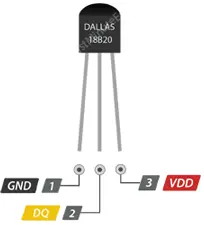
Using Multiple DS18B20 Sensors on a Single Bus
One of the remarkable features of the DS18B20 is its capability to accommodate multiple sensors on the same 1-Wire bus. Each DS18B20 possesses a unique 64-bit serial code programmed during manufacturing, simplifying their differentiation.
This attribute becomes particularly advantageous when managing numerous DS18B20s spread across a wide area. In this tutorial, we’ll explore this capability.
Wiring Multiple DS18B20 Sensors to ESP8266 NodeMCU
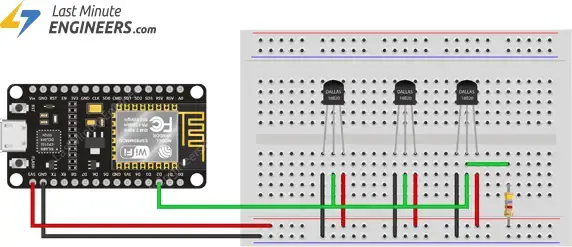
Connecting DS18B20 sensors to the ESP8266 NodeMCU is a straightforward process.
Begin by wiring all the DS18B20s in parallel, meaning all VDD pins, GND pins, and signal pins are connected together. Then, connect VDD to the 3.3V output, GND to ground, and the signal pin to digital pin D2 on the ESP8266 NodeMCU.
Additionally, incorporate a 4.7k pull-up resistor across the signal and power pin to ensure stable data transfer across the entire bus.
Parts Required
Setting up the Arduino IDE
To program the ESP8266 NodeMCU using the Arduino IDE, you’ll need to install an add-on. Follow the tutorial below to configure your Arduino IDE for use with the ESP8266, if you haven’t already done so.
Installing Library For DS18B20
The Dallas 1-Wire protocol can be somewhat intricate, necessitating a considerable amount of code to interpret the communication. To simplify this process and abstract away unnecessary complexity, we’ll install the DallasTemperature.h library. This library enables us to issue straightforward commands to retrieve temperature readings from the sensor.
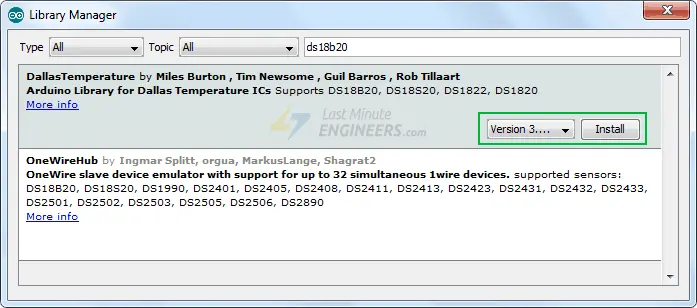
To install the library, navigate to Arduino IDE > Sketch > Include Library > Manage Libraries… Wait for the Library Manager to download the libraries index and update the list of installed libraries.
Filter your search by typing ‘ds18b20’. You should see a couple of entries. Look for DallasTemperature by Miles Burton. Click on that entry, and then select Install.
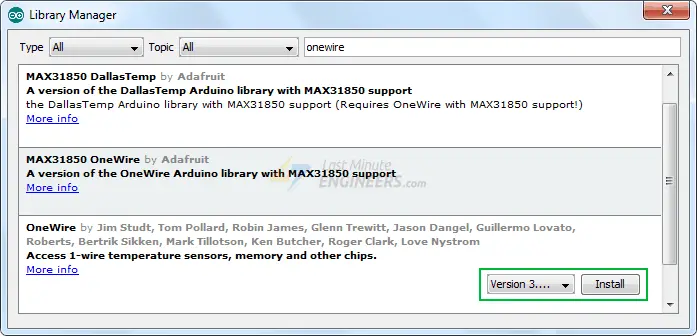
This Dallas Temperature library is hardware-specific, handling lower-level functions. It must be used alongside the One Wire Library to communicate with any one-wire device, not just the DS18B20. Make sure to install this library as well.
Discovering DS18B20 Addresses on the Bus
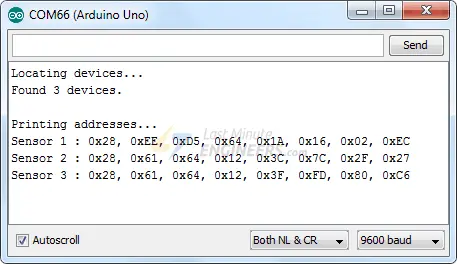
Each DS18B20 is assigned a unique 64-bit address to distinguish it from others. Initially, we’ll locate this address to label each sensor appropriately. This address will then enable us to individually read each sensor.
The following code detects all DS18B20s present on the bus and displays their one-wire addresses on the serial monitor.
You can connect just one sensor at a time to find its address (or sequentially add new sensors) to identify each one by its address. Subsequently, you can label each sensor.
#include <OneWire.h>
#include <DallasTemperature.h>

// Data wire is plugged into port D2 on the ESP8266
#define ONE_WIRE_BUS D2

// Setup a oneWire instance to communicate with any OneWire devices
OneWire oneWire(ONE_WIRE_BUS);

// Pass our oneWire reference to Dallas Temperature.
DallasTemperature sensors(&oneWire);

// variable to hold device addresses
DeviceAddress Thermometer;

int deviceCount = 0;

void setup(void)
{
  // start serial port
  Serial.begin(115200);

  // Start up the library
  sensors.begin();

  // locate devices on the bus
  Serial.println("Locating devices...");
  Serial.print("Found ");
  deviceCount = sensors.getDeviceCount();
  Serial.print(deviceCount, DEC);
  Serial.println(" devices.");
  Serial.println("");

  Serial.println("Printing addresses...");
  for (int i = 0;  i < deviceCount;  i++)
  {
    Serial.print("Sensor ");
    Serial.print(i+1);
    Serial.print(" : ");
    sensors.getAddress(Thermometer, i);
    printAddress(Thermometer);
  }
}

void loop(void)
{ }

void printAddress(DeviceAddress deviceAddress)
{
  for (uint8_t i = 0; i < 8; i++)
  {
    Serial.print("0x");
    if (deviceAddress[i] < 0x10) Serial.print("0");
    Serial.print(deviceAddress[i], HEX);
    if (i < 7) Serial.print(", ");
  }
  Serial.println("");
}
Now, open the serial monitor. You should see output similar to the following. Copy all the addresses as we’ll need them in our next sketch.
Creating an ESP8266 Web Server in Station (STA) Mode
Now, we’ll configure our ESP8266 into Station (STA) mode and establish a web server to provide web pages to any connected client within the existing network.
If you’re interested in learning about creating a web server with the ESP8266 NodeMCU in AP/STA mode, check out this tutorial.
Before you proceed to upload the sketch, you need to make some adjustments to tailor it to your needs.
You must modify the following two variables with your network credentials so that the ESP8266 can connect to the existing network:
const char* ssid = "YourNetworkName"; // Enter SSID here
const char* password = "YourPassword"; // Enter Password here
Before serving a web page, the ESP8266 reads the temperature from each DS18B20 using its address. Therefore, you need to replace the addresses of the DS18B20s with the ones you found in the previous sketch:
uint8_t sensor1[8] = { 0x28, 0xEE, 0xD5, 0x64, 0x1A, 0x16, 0x02, 0xEC };
uint8_t sensor2[8] = { 0x28, 0x61, 0x64, 0x12, 0x3C, 0x7C, 0x2F, 0x27 };
uint8_t sensor3[8] = { 0x28, 0x61, 0x64, 0x12, 0x3F, 0xFD, 0x80, 0xC6 };
Once you’ve made these changes, go ahead and try out the sketch.
#include <ESP8266WebServer.h>
#include <OneWire.h>
#include <DallasTemperature.h>
// Data wire is plugged into port D2 on the ESP8266
#define ONE_WIRE_BUS D2

// Setup a oneWire instance to communicate with any OneWire devices
OneWire oneWire(ONE_WIRE_BUS);

// Pass our oneWire reference to Dallas Temperature.
DallasTemperature sensors(&oneWire);

float tempSensor1, tempSensor2, tempSensor3;
uint8_t sensor1[8] = { 0x28, 0xEE, 0xD5, 0x64, 0x1A, 0x16, 0x02, 0xEC  };
uint8_t sensor2[8] = { 0x28, 0x61, 0x64, 0x12, 0x3C, 0x7C, 0x2F, 0x27  };
uint8_t sensor3[8] = { 0x28, 0x61, 0x64, 0x12, 0x3F, 0xFD, 0x80, 0xC6  };
/*Put your SSID & Password*/
const char* ssid = "YourNetworkName";  // Enter SSID here
const char* password = "YourPassword";  //Enter Password here

ESP8266WebServer server(80);
void setup() {
Serial.begin(115200);
delay(100);

sensors.begin();
Serial.println("Connecting to ");
Serial.println(ssid);

//connect to your local wi-fi network
WiFi.begin(ssid, password);
//check wi-fi is connected to wi-fi network
  while (WiFi.status() != WL_CONNECTED) {
  delay(1000);
  Serial.print(".");
  }
Serial.println("");
  Serial.println("WiFi connected..!");
  Serial.print("Got IP: ");  Serial.println(WiFi.localIP());
server.on("/", handle_OnConnect);
server.onNotFound(handle_NotFound);
server.begin();
Serial.println("HTTP server started");
}
void loop() {
server.handleClient();
}
void handle_OnConnect() {
sensors.requestTemperatures();
tempSensor1 = sensors.getTempC(sensor1); // Gets the values of the temperature
tempSensor2 = sensors.getTempC(sensor2); // Gets the values of the temperature
tempSensor3 = sensors.getTempC(sensor3); // Gets the values of the temperature
server.send(200, "text/html", SendHTML(tempSensor1,tempSensor2,tempSensor3));
}
void handle_NotFound(){
server.send(404, "text/plain", "Not found");
}
String SendHTML(float tempSensor1,float tempSensor2,float tempSensor3){
String ptr = "<!DOCTYPE html> <html>\n";
ptr +="<head><meta name=\"viewport\" content=\"width=device-width, initial-scale=1.0, user-scalable=no\">\n";
ptr +="<title>ESP8266 Temperature Monitor</title>\n";
ptr +="<style>html { font-family: Helvetica; display: inline-block; margin: 0px auto; text-align: center;}\n";
ptr +="body{margin-top: 50px;} h1 {color: #444444;margin: 50px auto 30px;}\n";
ptr +="p {font-size: 24px;color: #444444;margin-bottom: 10px;}\n";
ptr +="</style>\n";
ptr +="</head>\n";
ptr +="<body>\n";
ptr +="<div id=\"webpage\">\n";
ptr +="<h1>ESP8266 Temperature Monitor</h1>\n";
ptr +="<p>Living Room: ";
ptr +=tempSensor1;
ptr +="°C</p>";
ptr +="<p>Bedroom: ";
ptr +=tempSensor2;
ptr +="°C</p>";
ptr +="<p>Kitchen: ";
ptr +=tempSensor3;
ptr +="°C</p>";
ptr +="</div>\n";
ptr +="</body>\n";
ptr +="</html>\n";
return ptr;
}
Accessing the Web Server
After uploading the sketch, open the Serial Monitor at a baud rate of 115200. And press the RST button on NodeMCU . If everything is OK, it will output the dynamic IP address obtained from your router and show HTTP server started message.

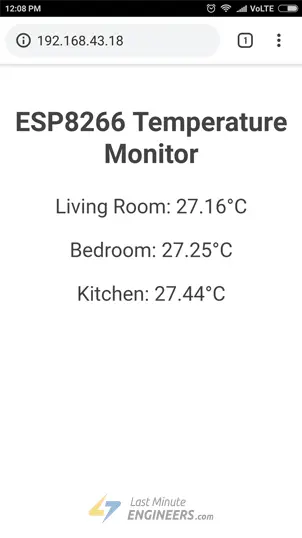
Next, load up a browser and point it to the IP address shown on the serial monitor. The ESP8266 should serve up a web page showing temperatures from all the DS18B20s.
Detailed Code Explanation
The sketch starts by including following libraries.
- ESP8266WebServer.h library provides ESP8266 specific WiFi methods we are calling to connect to network. It also has some methods available that will help us setting up a server and handle incoming HTTP requests without needing to worry about low level implementation details.
- DallasTemperature.h library is a hardware-specific library which handles lower-level functions. It needs to be paired with One Wire Library, in order to make it work.
- OneWire.h library communicates with any one-wire device not just DS18B20.
#include <ESP8266WebServer.h> #include <OneWire.h> #include <DallasTemperature.h>
Next we create the instances needed for the temperature sensor and variables to store temperature readings. The temperature sensor is connected to GPIO D2.
// Data wire is plugged into port D2 on the ESP8266 #define ONE_WIRE_BUS D2 // Setup a oneWire instance to communicate with any OneWire devices OneWire oneWire(ONE_WIRE_BUS); // Pass our oneWire reference to Dallas Temperature. DallasTemperature sensors(&oneWire); float tempSensor1, tempSensor2, tempSensor3;
Next, we enter the addresses that are found previously for each temperature sensor. In our case, we have the following.
uint8_t sensor1[8] = { 0x28, 0xEE, 0xD5, 0x64, 0x1A, 0x16, 0x02, 0xEC };
uint8_t sensor2[8] = { 0x28, 0x61, 0x64, 0x12, 0x3C, 0x7C, 0x2F, 0x27 };
uint8_t sensor3[8] = { 0x28, 0x61, 0x64, 0x12, 0x3F, 0xFD, 0x80, 0xC6 };
As we are configuring ESP8266 in Station (STA) mode, it will join existing WiFi network. Hence, we need to provide it with your network’s SSID & Password. Next we start web server at port 80.
/*Put your SSID & Password*/ const char* ssid = "YourNetworkName"; // Enter SSID here const char* password = "YourPassword"; //Enter Password here ESP8266WebServer server(80);
Inside Setup() Function
Inside Setup() Function we configure our HTTP server before actually running it. First of all, we initialize serial communication with PC and initialize DallasTemperature object using begin() function. It initializes the bus and detects all the DS18B20s present on it. Each sensor is then assigned with an index and set bit resolution to 12-bit.
Serial.begin(115200); delay(100); sensors.begin();
Now, we need to join the WiFi network using WiFi.begin() function. The function takes SSID (Network Name) and password as a parameter.
Serial.println("Connecting to ");
Serial.println(ssid);
//connect to your local wi-fi network
WiFi.begin(ssid, password);
While the ESP8266 tries to connect to the network, we can check the connectivity status with WiFi.status() function.
//check wi-fi is connected to wi-fi network
while (WiFi.status() != WL_CONNECTED) {
delay(1000);
Serial.print(".");
}
Once the ESP8266 is connected to the network, the sketch prints the IP address assigned to ESP8266 by displaying WiFi.localIP() value on serial monitor.
Serial.println("");
Serial.println("WiFi connected..!");
Serial.print("Got IP: "); Serial.println(WiFi.localIP());
In order to handle incoming HTTP requests, we need to specify which code to execute when a URL is hit. To do so, we use on method. This method takes two parameters. First one is a URL path and second one is the name of function which we want to execute when that URL is hit.
The code below indicates that when a server receives an HTTP request on the root (/) path, it will trigger the handle_OnConnect function. Note that the URL specified is a relative path.
server.on("/", handle_OnConnect);
We haven’t specified what the server should do if the client requests any URL other than specified with server.on. It should respond with an HTTP status 404 (Not Found) and a message for the user. We put this in a function as well, and use server.onNotFound to tell it that it should execute it when it receives a request for a URL that wasn’t specified with server.on
server.onNotFound(handle_NotFound);
Now, to start our server, we call the begin method on the server object.
server.begin();
Serial.println("HTTP server started");
Inside Loop() Function
To handle the actual incoming HTTP requests, we need to call the handleClient() method on the server object.
server.handleClient();
Next, we need to create a function we attached to root (/) URL with server.on Remember?
At the start of this function, we get the temperature reading from each sensor. In order to respond to the HTTP request, we use the send method. Although the method can be called with a different set of arguments, its simplest form consists of the HTTP response code, the content type and the content.
In our case, we are sending the code 200 (one of the HTTP status codes), which corresponds to the OK response. Then, we are specifying the content type as “text/html“, and finally we are calling SendHTML() custom function which creates a dynamic HTML page containing temperature readings.
void handle_OnConnect() {
  sensors.requestTemperatures();
  tempSensor1 = sensors.getTempC(sensor1);
  tempSensor2 = sensors.getTempC(sensor2);
  tempSensor3 = sensors.getTempC(sensor3);
  server.send(200, "text/html", SendHTML(tempSensor1,tempSensor2,tempSensor3));
}
Likewise, we need to create a function to handle 404 Error page.
void handle_NotFound(){
  server.send(404, "text/plain", "Not found");
}
Displaying the HTML Web Page
SendHTML() function is responsible for generating a web page whenever the ESP8266 web server gets a request from a web client. It merely concatenates HTML code into a big string and returns to the server.send() function we discussed earlier. The function takes temperature readings as a parameter to dynamically generate the HTML content.
The first text you should always send is the <!DOCTYPE> declaration that indicates that we’re sending HTML code.
String SendHTML(float tempSensor1,float tempSensor2,float tempSensor3){
  String ptr = "<!DOCTYPE html> <html>\n";
Next, the <meta> viewport element makes the web page responsive in any web browser, while title tag sets the title of the page.
ptr +="<head><meta name=\"viewport\" content=\"width=device-width, initial-scale=1.0, user-scalable=no\">\n";
ptr +="<title>ESP8266 Temperature Monitor</title>\n";
Styling the Web Page
Next, we have some CSS to style the web page appearance. We choose the Helvetica font, define the content to be displayed as an inline-block and aligned at the center.
ptr +="<style>html { font-family: Helvetica; display: inline-block; margin: 0px auto; text-align: center;}\n";
Following code then sets color, font and margin around the body, H1 and p tags.
ptr +="body{margin-top: 50px;} h1 {color: #444444;margin: 50px auto 30px;}\n";
ptr +="p {font-size: 24px;color: #444444;margin-bottom: 10px;}\n";
ptr +="</style>\n";
ptr +="</head>\n";
ptr +="<body>\n";
Setting the Web Page Heading
Next, heading of the web page is set; you can change this text to anything that suits your application.
ptr +="<div id=\"webpage\">\n";
ptr +="<h1>ESP8266 Temperature Monitor</h1>\n";
Displaying Temperature readings on Web Page
To dynamically display temperature readings, we put those values in paragraph tag. To display degree symbol, we use HTML entity °
ptr +="<p>Living Room: "; ptr +=tempSensor1; ptr +="°C</p>"; ptr +="<p>Bedroom: "; ptr +=tempSensor2; ptr +="°C</p>"; ptr +="<p>Kitchen: "; ptr +=tempSensor3; ptr +="°C</p>"; ptr +="</div>\n"; ptr +="</body>\n"; ptr +="</html>\n"; return ptr; }
Improving Web Page Appearance for a Professional Look
As programmers, we may feel daunted by design tasks, but a little effort can significantly enhance the attractiveness and professionalism of our web pages. The screenshot below provides a glimpse of the basic changes we’ll be making.
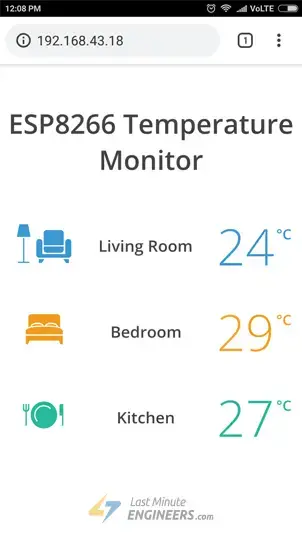
Impressive, isn’t it? Without delay, let’s apply some styling to our previous HTML page. Begin by replacing the SendHTML() function in the sketch above with the code provided below.
String SendHTML(float tempSensor1,float tempSensor2,float tempSensor3){
String ptr = "<!DOCTYPE html>";
ptr +="<html>";
ptr +="<head>";
ptr +="<title>ESP8266 Temperature Monitor</title>";
ptr +="<meta name='viewport' content='width=device-width, initial-scale=1.0'>";
ptr +="<link href='https://fonts.googleapis.com/css?family=Open+Sans:300,400,600' rel='stylesheet'>";
ptr +="<style>";
ptr +="html { font-family: 'Open Sans', sans-serif; display: block; margin: 0px auto; text-align: center;color: #444444;}";
ptr +="body{margin-top: 50px;} ";
ptr +="h1 {margin: 50px auto 30px;} ";
ptr +=".side-by-side{display: table-cell;vertical-align: middle;position: relative;}";
ptr +=".text{font-weight: 600;font-size: 19px;width: 200px;}";
ptr +=".temperature{font-weight: 300;font-size: 50px;padding-right: 15px;}";
ptr +=".living-room .temperature{color: #3B97D3;}";
ptr +=".bedroom .temperature{color: #F29C1F;}";
ptr +=".kitchen .temperature{color: #26B99A;}";
ptr +=".superscript{font-size: 17px;font-weight: 600;position: absolute;right: -5px;top: 15px;}";
ptr +=".data{padding: 10px;}";
ptr +=".container{display: table;margin: 0 auto;}";
ptr +=".icon{width:82px}";
ptr +="</style>";
ptr +="</head>";
ptr +="<body>";
ptr +="<h1>ESP8266 Temperature Monitor</h1>";
ptr +="<div class='container'>";
ptr +="<div class='data living-room'>";
ptr +="<div class='side-by-side icon'>";
ptr +="<svg enable-background='new 0 0 65.178 45.699'height=45.699px id=Layer_1 version=1.1 viewBox='0 0 65.178 45.699'width=65.178px x=0px xml:space=preserve xmlns=http://www.w3.org/2000/svg xmlns:xlink=http://www.w3.org/1999/xlink y=0px><polygon fill=#3B97D3 points='8.969,44.261 8.969,16.469 7.469,16.469 7.469,44.261 1.469,44.261 1.469,45.699 14.906,45.699 ";
ptr +="14.906,44.261 '/><polygon fill=#3B97D3 points='13.438,0 3,0 0,14.938 16.438,14.938 '/><polygon fill=#3B97D3 points='29.927,45.699 26.261,45.699 26.261,41.156 32.927,41.156 '/><polygon fill=#3B97D3 points='58.572,45.699 62.239,45.699 62.239,41.156 55.572,41.156 '/><path d='M61.521,17.344c-2.021,0-3.656,1.637-3.656,3.656v14.199H30.594V21c0-2.02-1.638-3.656-3.656-3.656";
ptr +="c-2.02,0-3.657,1.636-3.657,3.656v14.938c0,2.021,1.637,3.655,3.656,3.655H61.52c2.02,0,3.655-1.637,3.655-3.655V21";
ptr +="C65.177,18.98,63.54,17.344,61.521,17.344z'fill=#3B97D3 /><g><path d='M32.052,30.042c0,2.02,1.637,3.656,3.656,3.656h16.688c2.019,0,3.656-1.638,3.656-3.656v-3.844h-24";
ptr +="L32.052,30.042L32.052,30.042z'fill=#3B97D3 /><path d='M52.396,6.781H35.709c-2.02,0-3.656,1.637-3.656,3.656v14.344h24V10.438";
ptr +="C56.053,8.418,54.415,6.781,52.396,6.781z'fill=#3B97D3 /></g></svg>";
ptr +="</div>";
ptr +="<div class='side-by-side text'>Living Room</div>";
ptr +="<div class='side-by-side temperature'>";
ptr +=(int)tempSensor1;
ptr +="<span class='superscript'>°C</span></div>";
ptr +="</div>";
ptr +="<div class='data bedroom'>";
ptr +="<div class='side-by-side icon'>";
ptr +="<svg enable-background='new 0 0 43.438 35.75'height=35.75px id=Layer_1 version=1.1 viewBox='0 0 43.438 35.75'width=43.438px x=0px xml:space=preserve xmlns=http://www.w3.org/2000/svg xmlns:xlink=http://www.w3.org/1999/xlink y=0px><g><path d='M25.489,14.909H17.95C13.007,14.908,0,15.245,0,20.188v3.688h43.438v-3.688";
ptr +="C43.438,15.245,30.431,14.909,25.489,14.909z'fill=#F29C1F /><polygon fill=#F29C1F points='0,31.25 0,35.75 2.5,35.75 4.5,31.25 38.938,31.25 40.938,35.75 43.438,35.75 43.438,31.25 ";
ptr +="43.438,25.375 0,25.375 '/><path d='M13.584,11.694c-3.332,0-6.033,0.973-6.033,2.175c0,0.134,0.041,0.264,0.105,0.391";
ptr +="c3.745-0.631,7.974-0.709,10.341-0.709h1.538C19.105,12.501,16.613,11.694,13.584,11.694z'fill=#F29C1F /><path d='M30.009,11.694c-3.03,0-5.522,0.807-5.951,1.856h1.425V13.55c2.389,0,6.674,0.081,10.444,0.728";
ptr +="c0.069-0.132,0.114-0.268,0.114-0.408C36.041,12.668,33.34,11.694,30.009,11.694z'fill=#F29C1F /><path d='M6.042,14.088c0-2.224,3.376-4.025,7.542-4.025c3.825,0,6.976,1.519,7.468,3.488h1.488";
ptr +="c0.49-1.97,3.644-3.489,7.469-3.489c4.166,0,7.542,1.801,7.542,4.025c0,0.17-0.029,0.337-0.067,0.502";
ptr +="c1.08,0.247,2.088,0.549,2.945,0.926V3.481C40.429,1.559,38.871,0,36.948,0H6.49C4.568,0,3.009,1.559,3.009,3.481v12.054";
ptr +="c0.895-0.398,1.956-0.713,3.095-0.968C6.069,14.41,6.042,14.251,6.042,14.088z'fill=#F29C1F /></g></svg>";
ptr +="</div>";
ptr +="<div class='side-by-side text'>Bedroom</div>";
ptr +="<div class='side-by-side temperature'>";
ptr +=(int)tempSensor2;
ptr +="<span class='superscript'>°C</span></div>";
ptr +="</div>";
ptr +="<div class='data kitchen'>";
ptr +="<div class='side-by-side icon'>";
ptr +="<svg enable-background='new 0 0 48 31.5'height=31.5px id=Layer_1 version=1.1 viewBox='0 0 48 31.5'width=48px x=0px xml:space=preserve xmlns=http://www.w3.org/2000/svg xmlns:xlink=http://www.w3.org/1999/xlink y=0px><circle cx=24.916 cy=15.75 fill=#26B99A r=15.75 /><path d='M14.917,15.75c0-5.522,4.478-10,10-10c2.92,0,5.541,1.26,7.369,3.257l1.088-1.031";
ptr +="c-2.103-2.285-5.106-3.726-8.457-3.726c-6.351,0-11.5,5.149-11.5,11.5c0,3.127,1.252,5.958,3.277,8.031l1.088-1.031";
ptr +="C16.011,20.945,14.917,18.477,14.917,15.75z'fill=#FFFFFF /><path d='M45.766,2.906c-1.232,0-2.232,1-2.232,2.234v11.203c0,0,2.76,0,3,0v12H48v-12V2.906";
ptr +="C48,2.906,46.035,2.906,45.766,2.906z'fill=#26B99A /><path d='M6.005,2.917v5.184c0,0.975-0.638,1.792-1.516,2.083V2.917H3.021v7.267c-0.878-0.29-1.516-1.107-1.516-2.083";
ptr +="V2.917H0v5.458c0,1.802,1.306,3.291,3.021,3.592v16.376H4.49v-16.38c1.695-0.318,2.979-1.8,2.979-3.588V2.917H6.005z'fill=#26B99A /></svg>";
ptr +="</div>";
ptr +="<div class='side-by-side text'>Kitchen</div>";
ptr +="<div class='side-by-side temperature'>";
ptr +=(int)tempSensor3;
ptr +="<span class='superscript'>°C</span></div>";
ptr +="</div>";
ptr +="</div>";
ptr +="</body>";
ptr +="</html>";
return ptr;
}
Upon comparison with the previous function, you’ll notice some similarities, along with these notable changes:
We’ve incorporated the Google-commissioned Open Sans web font for our web page. Please note that Google fonts require an active internet connection on the device to be visible, as they are loaded dynamically.
<link href='https://fonts.googleapis.com/css?family=Open+Sans:300,400,600' rel='stylesheet'>
The icons utilized to represent temperature readings are Scalable Vector Graphics (SVG) defined within <svg> tags. Creating SVG graphics doesn’t necessitate specialized programming skills; tools like the Google SVG Editor can be employed for crafting graphics for your page. Below are the SVG icons we’ve utilized.
Improving the Code – Automatic Page Refresh
One enhancement you can implement in our code is to automatically refresh the web page to update the sensor values.
By adding a single meta tag to your HTML document, you can direct the browser to reload the page at specified intervals.
<meta http-equiv="refresh" content="2" >
Insert this code within the <head> tag of your document. This meta tag will prompt the browser to refresh the page every two seconds. Quite handy!
Loading Sensor Data Dynamically with AJAX
Refreshing a web page might not be practical, especially if the page is heavy. A more efficient approach is to utilize Asynchronous JavaScript And XML (AJAX), enabling us to request data from the server asynchronously (in the background) without reloading the page.
The XMLHttpRequest object in JavaScript is commonly employed to execute AJAX on web pages. It conducts silent GET requests on the server and updates elements on the page. AJAX isn’t a new technology or a different language; it simply employs existing technologies in innovative ways. Additionally, AJAX facilitates the following:
- Requesting data from a server after the page has loaded
- Receiving data from a server after the page has loaded
- Sending data to a server in the background
Below is the AJAX script we’ll be utilizing. Place this script just before closing the </head> tag.
ptr +="<script>\n";
ptr +="setInterval(loadDoc,1000);\n";
ptr +="function loadDoc() {\n";
ptr +="var xhttp = new XMLHttpRequest();\n";
ptr +="xhttp.onreadystatechange = function() {\n";
ptr +="if (this.readyState == 4 && this.status == 200) {\n";
ptr +="document.body.innerHTML =this.responseText}\n";
ptr +="};\n";
ptr +="xhttp.open(\"GET\", \"/\", true);\n";
ptr +="xhttp.send();\n";
ptr +="}\n";
ptr +="</script>\n";
The script commences with the <script> tag since AJAX script is essentially JavaScript. To repeatedly call this function, we utilize the JavaScript setInterval() function, specifying the function to be executed and the time interval (in milliseconds) for executing the function.
ptr +="<script>\n";
ptr +="setInterval(loadDoc,1000);\n";
At the core of this script lies the loadDoc() function. Inside this function, an XMLHttpRequest() object is instantiated, utilized to request data from the web server.
ptr +="function loadDoc() {\n";
ptr +="var xhttp = new XMLHttpRequest();\n";
The xhttp.onreadystatechange() function is invoked each time the readyState changes. The readyState property denotes the status of the XMLHttpRequest and has various values indicating different states of the request. Similarly, the status property denotes the status of the XMLHttpRequest object, indicating if the request was successful.
ptr +="xhttp.onreadystatechange = function() {\n";
ptr +="if (this.readyState == 4 && this.status == 200) {\n";
ptr +="document.body.innerHTML =this.responseText}\n";
ptr +="};\n";
When readyState is 4 and status is 200, the response is ready. Subsequently, the content of the body, containing temperature readings, is updated.
Lastly, the HTTP request is initiated via the open() and send() functions.
ptr +="xhttp.open(\"GET\", \"/\", true);\n";
ptr +="xhttp.send();\n";
ptr +="}\n";
Related article
- ESP8266 NodeMCU Email Tutorial: SMTP Server Setup for HTML, Text, and Attachments (Arduino)
- Ultimate Guide: Crafting an ESP8266 Weather Station Using BME280
- Firebase Data Logging: ESP8266 NodeMCU Sensor Integration
- Beginner’s Guide to ESP8266 NodeMCU and Firebase (Realtime Database)
- Smart LED Control: ESP8266 Empowers WS2812B LEDs via WLED
- Control IoT Devices: ESP8266 NodeMCU Async Web Server Tutorial
- ESP8266 NTP Server: Fetching Accurate Date & Time with NodeMCU


