

Have you ever wished to have the ability to monitor the temperature and humidity of your home, walk-in cooler, or wine cellar using your mobile, tablet, or PC? If so, this IoT project is the perfect starting point for you!
In this project, we utilize the ESP8266 NodeMCU as the control device, which connects to your existing WiFi network and establishes a Web Server. Whenever a device connects to this web server, the ESP8266 reads the temperature and relative humidity from the DHT11/DHT22 sensor and presents the data on the device’s web browser through a user-friendly interface. Exciting, right? Let’s begin this project!
Before proceeding with this tutorial, there are a few concepts that you should be familiar with. If any of the following tutorials are unfamiliar to you, we recommend reading through them first:
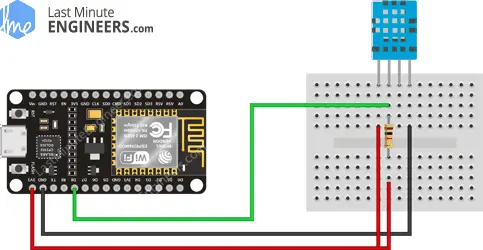
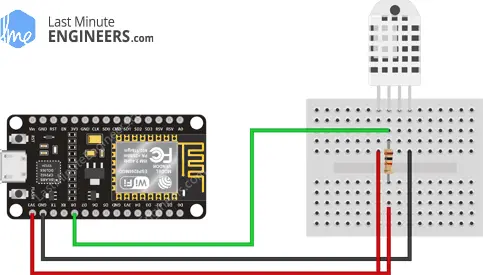
Wiring a DHT11/DHT22 sensor to an ESP8266
Wiring the DHT11/DHT22 sensor to an ESP8266 is a straightforward process. Follow these steps to successfully connect the components:
- Place the ESP8266 on your breadboard, ensuring that each side of the board is on a different side of the breadboard.
- Position the DHT11/DHT22 sensor next to the ESP8266 on the breadboard.
- Connect the VCC pin of the sensor to the 3.3V pin of the ESP8266.
- Connect the ground pin of the sensor to the ground (GND) pin of the ESP8266.
- Connect the data pin of the sensor to the D8 pin of the ESP8266.
- To enable proper communication between the sensor and the ESP8266, add a 10KΩ pull-up resistor between the VCC and the data line. This resistor will keep the data line HIGH.
Refer to the provided image below for a visual representation of the wiring setup.
Parts Required
| Component Name | Buy Now |
| ESP8266 NodeMCU CP2102 | Amazon |
| Breadboard | Amazon |
| DHT11 Temperature Humidity Sensor Module | Amazon |
| DHT22 Temperature And Humidity Sensor Module | Amazon |
| BOJACK 1000 Pcs 25 Values Resistor Kit 1 Ohm-1M Ohm with 5% 1/4W | Amazon |
Installing DHT Sensor Library
To start reading sensor data, you will need to install the DHT sensor library, which can be found in the Arduino library manager.
Follow these steps to install the library:
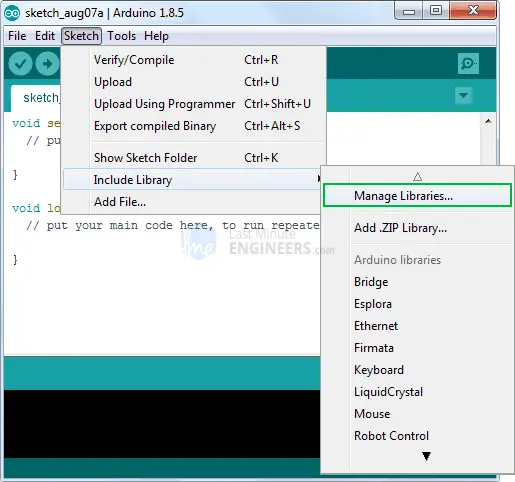
Open the Arduino IDE and go to Sketch > Include Library > Manage Libraries…
Wait for the Library Manager to download the libraries index and update the list of installed libraries.
In the search bar, enter ‘DHT sensor’ to filter the results.
Look for the DHT sensor library by Adafruit. Click the Install button to install the library.
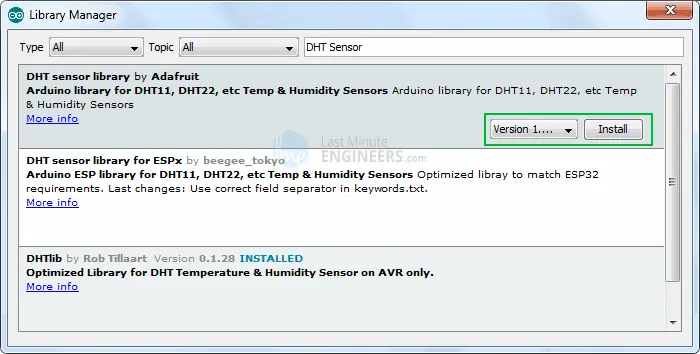
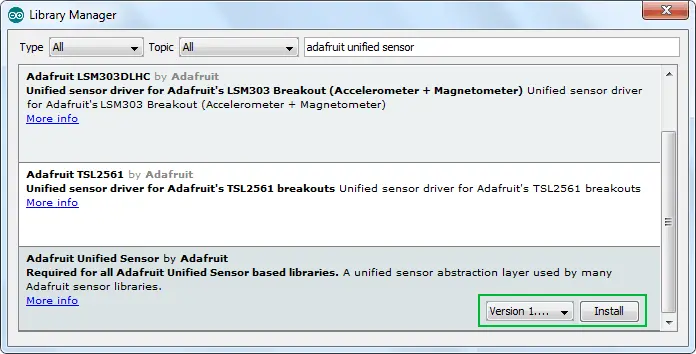
The DHT sensor library relies on the Adafruit Sensor support backend, so you also need to install the Adafruit Unified Sensor library. Search for ‘Adafruit Unified Sensor’ in the library manager and install it as well.
Once both libraries are installed, you can proceed with using the DHT sensor to read data.
Creating an ESP8266 Web Server using WiFi Station (STA) mode
Now let’s dive into the exciting part!
In this section, we will configure an ESP8266 web server in Station (STA) mode, which allows it to serve web pages to any connected client on the existing network.
Before uploading the sketch, you need to update two variables with your network credentials. Replace the following lines with your actual network information:
const char* ssid = "YourNetworkName";  // Enter SSID here
const char* password = "YourPassword";  //Enter Password here
Once you’ve made the necessary changes, try uploading the sketch, and we’ll go over it in detail afterward.
#include <ESP8266WiFi.h>
#include <ESP8266WebServer.h>
#include "DHT.h"

// Uncomment one of the lines below for whatever DHT sensor type you're using!
//#define DHTTYPE DHT11   // DHT 11
//#define DHTTYPE DHT21   // DHT 21 (AM2301)
#define DHTTYPE DHT22   // DHT 22  (AM2302), AM2321

/*Put your SSID & Password*/
const char* ssid = "YourNetworkName";  // Enter SSID here
const char* password = "YourPassword";  //Enter Password here

ESP8266WebServer server(80);

// DHT Sensor
uint8_t DHTPin = D8;

// Initialize DHT sensor.
DHT dht(DHTPin, DHTTYPE);

float Temperature;
float Humidity;

void setup() {
  Serial.begin(115200);
  delay(100);

  pinMode(DHTPin, INPUT);

  dht.begin();

  Serial.println("Connecting to ");
  Serial.println(ssid);

  //connect to your local wi-fi network
  WiFi.begin(ssid, password);

  //check wi-fi is connected to wi-fi network
  while (WiFi.status() != WL_CONNECTED) {
  delay(1000);
  Serial.print(".");
  }
  Serial.println("");
  Serial.println("WiFi connected..!");
  Serial.print("Got IP: ");  Serial.println(WiFi.localIP());

  server.on("/", handle_OnConnect);
  server.onNotFound(handle_NotFound);

  server.begin();
  Serial.println("HTTP server started");

}
void loop() {

  server.handleClient();

}

void handle_OnConnect() {

 Temperature = dht.readTemperature(); // Gets the values of the temperature
  Humidity = dht.readHumidity(); // Gets the values of the humidity
  server.send(200, "text/html", SendHTML(Temperature,Humidity));
}

void handle_NotFound(){
  server.send(404, "text/plain", "Not found");
}

String SendHTML(float Temperaturestat,float Humiditystat){
  String ptr = "<!DOCTYPE html> <html>\n";
  ptr +="<head><meta name=\"viewport\" content=\"width=device-width, initial-scale=1.0, user-scalable=no\">\n";
  ptr +="<title>ESP8266 Weather Report</title>\n";
  ptr +="<style>html { font-family: Helvetica; display: inline-block; margin: 0px auto; text-align: center;}\n";
  ptr +="body{margin-top: 50px;} h1 {color: #444444;margin: 50px auto 30px;}\n";
  ptr +="p {font-size: 24px;color: #444444;margin-bottom: 10px;}\n";
  ptr +="</style>\n";
  ptr +="</head>\n";
  ptr +="<body>\n";
  ptr +="<div id=\"webpage\">\n";
  ptr +="<h1>ESP8266 NodeMCU Weather Report</h1>\n";

  ptr +="<p>Temperature: ";
  ptr +=(int)Temperaturestat;
  ptr +="°C</p>";
  ptr +="<p>Humidity: ";
  ptr +=(int)Humiditystat;
  ptr +="%</p>";

  ptr +="</div>\n";
  ptr +="</body>\n";
  ptr +="</html>\n";
  return ptr;
}
Accessing the Web Server
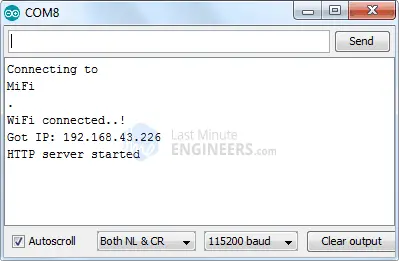
Once you have uploaded the sketch, open the Serial Monitor at a baud rate of 115200 and press the RESET button on the NodeMCU. If everything is working correctly, it will show the dynamic IP address acquired from your router, along with the message “HTTP server started.”
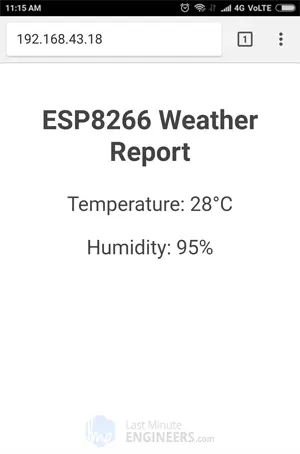
Now, open a web browser and enter the IP address shown on the serial monitor. The ESP8266 will serve a web page that displays the current temperature and relative humidity.
Detailed Code Explanation
The sketch starts by including the necessary libraries for the ESP8266, WiFi, web server, and DHT sensor:
#include <ESP8266WiFi.h>
#include <ESP8266WebServer.h>
#include "DHT.h"
Next, you need to specify the type of DHT sensor you are using by uncommenting the appropriate line:
//#define DHTTYPE DHT11   // DHT 11
//#define DHTTYPE DHT21   // DHT 21 (AM2301)
#define DHTTYPE DHT22   // DHT 22  (AM2302), AM2321
To configure the ESP8266 web server in Station (STA) mode, you need to provide the SSID and password of the network you want to connect to:
/*Put your SSID & Password*/
const char* ssid = "YourNetworkName";  // Enter SSID here
const char* password = "YourPassword";  //Enter Password here
After that, an instance of the ESP8266WebServer object is created, specifying the listening port (80) for the server:
ESP8266WebServer server(80);
The GPIO pin number to which the sensor’s Data pin is connected is defined, and a DHT object is created to access DHT library functions:
uint8_t DHTPin = D8;
DHT dht(DHTPin, DHTTYPE);
Lastly, two float variables, Temperature and Humidity, are declared:
float Temperature;
float Humidity;
Inside Setup() Function
Inside the setup() function, we perform the necessary configurations for our web server. Here’s a breakdown of the steps:
First, we establish a serial connection for debugging purposes and configure the GPIO pin as an INPUT. We also initialize the DHT object:
Serial.begin(115200);
delay(100);

pinMode(DHTPin, INPUT);

dht.begin();
Then, we use the WiFi.begin() function to connect to the WiFi network by providing the SSID (Network Name) and password as parameters:
Serial.println("Connecting to ");
Serial.println(ssid);

WiFi.begin(ssid, password);
While the ESP8266 attempts to connect to the network, we use the WiFi.status() function in a while loop to check the connectivity status:
while (WiFi.status() != WL_CONNECTED) {
  delay(1000);
  Serial.print(".");
}
Once the ESP8266 is connected to the network, we print the assigned IP address using the WiFi.localIP() function:
Serial.println("");
Serial.println("WiFi connected..!");
Serial.print("Got IP: ");
Serial.println(WiFi.localIP());
To handle incoming HTTP requests, we use the server.on() method to specify which function should be executed when a specific URL is accessed. For example, when the server receives an HTTP request on the root (“/”) path, it calls the handle_OnConnect() function:
server.on("/", handle_OnConnect);
We also handle the case when a requested URL is not found by using the server.onNotFound() method:
server.onNotFound(handle_NotFound);
Finally, we start the server by calling the server.begin() method, and print a message indicating that the HTTP server has started:
server.begin();
Serial.println("HTTP server started");
Inside Loop() Function
Inside the loop() function, incoming HTTP requests are handled using the server.handleClient() method:
server.handleClient();
The handle_OnConnect() function, which we previously attached to the root (“/”) URL using server.on(), is responsible for processing the incoming requests. It begins by reading the temperature and humidity values from the sensor:
void handle_OnConnect() {
  Temperature = dht.readTemperature(); // Gets the values of the temperature
  Humidity = dht.readHumidity(); // Gets the values of the humidity
  server.send(200, "text/html", SendHTML(Temperature,Humidity));
}
To respond to the HTTP request, we use the send() method of the server object. We pass the response code (200 for “OK”), the content type (“text/html”), and the result of the SendHTML() function, which generates a dynamic HTML page with the temperature and humidity readings.
Similarly, we define the handle_NotFound() function to handle the 404 error page:
void handle_NotFound(){
  server.send(404, "text/plain", "Not found");
}
In this function, we use the send() method to send a response with the code 404, content type “text/plain”, and the message “Not found”.
Displaying the HTML Web Page
To display the HTML web page, the sendHTML() function is used. When the ESP8266 web server receives a request from a client, this function generates a web page by concatenating HTML code into a string and returns it to the server.send() function.
The first line of the HTML content sent is the <!DOCTYPE> declaration, indicating that HTML code is being sent:
String SendHTML(float Temperaturestat, float Humiditystat) {
  String ptr = "<!DOCTYPE html> <html>\n";
The function then includes the <meta> viewport element, which makes the web page responsive and ensures it looks good on all devices. The <title> tag sets the title of the page:
ptr +="<head><meta name=\"viewport\" content=\"width=device-width, initial-scale=1.0, user-scalable=no\">\n";
ptr +="<title>ESP8266 Weather Report</title>\n";
The rest of the HTML content is dynamically generated based on the temperature and humidity readings, which are passed as parameters to the function.
Styling the Web Page
To style the web page, CSS code is added to define the appearance of various elements. After the <head> tag, the following CSS code is included:
ptr +="<style>html { font-family: Helvetica; display: inline-block; margin: 0px auto; text-align: center;}\n";
ptr +="body{margin-top: 50px;} h1 {color: #444444;margin: 50px auto 30px;}\n";
ptr +="p {font-size: 24px;color: #444444;margin-bottom: 10px;}\n";
ptr +="</style>\n";
ptr +="</head>\n";
ptr +="<body>\n";
This CSS code applies the following styles to the web page:
- The
<html>element is styled with the Helvetica font, displayed as an inline block, and centered. - The
<body>element has a top margin of 50px. - The
<h1>element has a color of #444444, a top margin of 50px, auto left and right margins, and a bottom margin of 30px. - The
<p>elements have a font size of 24px, a color of #444444, and a bottom margin of 10px.
These styles help in formatting and visually enhancing the content of the web page.
Setting the Web Page Heading
To set the heading of the web page, the following code is used:
ptr +="<div id=\"webpage\">\n";
ptr +="<h1>ESP8266 Weather Report</h1>\n";
This code creates a <div> element with the ID “webpage” and a <h1> (heading level 1) element inside it. The text “ESP8266 Weather Report” is displayed as the heading of the web page.
You can modify the text within the <h1> tags to customize the heading according to your specific application or purpose.
Displaying Temperature and Humidity on Web Page
To display the temperature and humidity values on the web page, the following code is used:
ptr +="<p>Temperature: ";
ptr +=(int)Temperaturestat;
ptr +="°C</p>";
ptr +="<p>Humidity: ";
ptr +=(int)Humiditystat;
ptr +="%</p>";

ptr +="</div>\n";
ptr +="</body>\n";
ptr +="</html>\n";
return ptr;
}
This code adds two <p> (paragraph) elements to the web page. The first paragraph displays the temperature value followed by “°C” to indicate the unit of measurement. The second paragraph displays the humidity value followed by “%”.
The temperature and humidity values are cast to integers (int) before being added to the string to remove any decimal places and display them as whole numbers.
After displaying the temperature and humidity values, the closing tags for the <div>, <body>, and <html> elements are added, and the complete HTML string is returned using return ptr;
You can modify this code to customize the formatting or add additional information to the web page as needed.
Styling Web Page to Look More Attractive
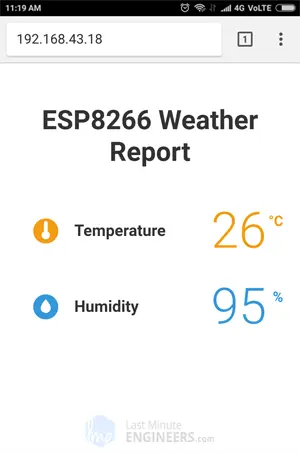
To enhance the visual appeal of our web page, we can apply some styling to make it more attractive. Below is an updated version of the SendHTML() function that incorporates the necessary code for styling. After making the changes, you can test the updated sketch to see the visual improvements.
String SendHTML(float TempCstat,float TempFstat,float Humiditystat){
  String ptr = "<!DOCTYPE html> <html>\n";
  ptr +="<head><meta name=\"viewport\" content=\"width=device-width, initial-scale=1.0, user-scalable=no\">\n";
  ptr +="<link href=\"https://fonts.googleapis.com/css?family=Open+Sans:300,400,600\" rel=\"stylesheet\">\n";
  ptr +="<title>ESP8266 Weather Report</title>\n";
  ptr +="<style>html { font-family: 'Open Sans', sans-serif; display: block; margin: 0px auto; text-align: center;color: #333333;}\n";
  ptr +="body{margin-top: 50px;}\n";
  ptr +="h1 {margin: 50px auto 30px;}\n";
  ptr +=".side-by-side{display: inline-block;vertical-align: middle;position: relative;}\n";
  ptr +=".humidity-icon{background-color: #3498db;width: 30px;height: 30px;border-radius: 50%;line-height: 36px;}\n";
  ptr +=".humidity-text{font-weight: 600;padding-left: 15px;font-size: 19px;width: 160px;text-align: left;}\n";
  ptr +=".humidity{font-weight: 300;font-size: 60px;color: #3498db;}\n";
  ptr +=".temperature-icon{background-color: #f39c12;width: 30px;height: 30px;border-radius: 50%;line-height: 40px;}\n";
  ptr +=".temperature-text{font-weight: 600;padding-left: 15px;font-size: 19px;width: 160px;text-align: left;}\n";
  ptr +=".temperature{font-weight: 300;font-size: 60px;color: #f39c12;}\n";
  ptr +=".superscript{font-size: 17px;font-weight: 600;position: absolute;right: -20px;top: 15px;}\n";
  ptr +=".data{padding: 10px;}\n";
  ptr +="</style>\n";
  ptr +="</head>\n";
  ptr +="<body>\n";

   ptr +="<div id=\"webpage\">\n";

   ptr +="<h1>ESP8266 Weather Report</h1>\n";
   ptr +="<div class=\"data\">\n";
   ptr +="<div class=\"side-by-side temperature-icon\">\n";
   ptr +="<svg version=\"1.1\" id=\"Layer_1\" xmlns=\"http://www.w3.org/2000/svg\" xmlns:xlink=\"http://www.w3.org/1999/xlink\" x=\"0px\" y=\"0px\"\n";
   ptr +="width=\"9.915px\" height=\"22px\" viewBox=\"0 0 9.915 22\" enable-background=\"new 0 0 9.915 22\" xml:space=\"preserve\">\n";
   ptr +="<path fill=\"#FFFFFF\" d=\"M3.498,0.53c0.377-0.331,0.877-0.501,1.374-0.527C5.697-0.04,6.522,0.421,6.924,1.142\n";
   ptr +="c0.237,0.399,0.315,0.871,0.311,1.33C7.229,5.856,7.245,9.24,7.227,12.625c1.019,0.539,1.855,1.424,2.301,2.491\n";
   ptr +="c0.491,1.163,0.518,2.514,0.062,3.693c-0.414,1.102-1.24,2.038-2.276,2.594c-1.056,0.583-2.331,0.743-3.501,0.463\n";
   ptr +="c-1.417-0.323-2.659-1.314-3.3-2.617C0.014,18.26-0.115,17.104,0.1,16.022c0.296-1.443,1.274-2.717,2.58-3.394\n";
   ptr +="c0.013-3.44,0-6.881,0.007-10.322C2.674,1.634,2.974,0.955,3.498,0.53z\"/>\n";
   ptr +="</svg>\n";
   ptr +="</div>\n";
   ptr +="<div class=\"side-by-side temperature-text\">Temperature</div>\n";
   ptr +="<div class=\"side-by-side temperature\">";
   ptr +=(int)TempCstat;
   ptr +="<span class=\"superscript\">°C</span></div>\n";
   ptr +="</div>\n";
   ptr +="<div class=\"data\">\n";
   ptr +="<div class=\"side-by-side humidity-icon\">\n";
   ptr +="<svg version=\"1.1\" id=\"Layer_2\" xmlns=\"http://www.w3.org/2000/svg\" xmlns:xlink=\"http://www.w3.org/1999/xlink\" x=\"0px\" y=\"0px\"\n\"; width=\"12px\" height=\"17.955px\" viewBox=\"0 0 13 17.955\" enable-background=\"new 0 0 13 17.955\" xml:space=\"preserve\">\n";
   ptr +="<path fill=\"#FFFFFF\" d=\"M1.819,6.217C3.139,4.064,6.5,0,6.5,0s3.363,4.064,4.681,6.217c1.793,2.926,2.133,5.05,1.571,7.057\n";
   ptr +="c-0.438,1.574-2.264,4.681-6.252,4.681c-3.988,0-5.813-3.107-6.252-4.681C-0.313,11.267,0.026,9.143,1.819,6.217\"></path>\n";
   ptr +="</svg>\n";
   ptr +="</div>\n";
   ptr +="<div class=\"side-by-side humidity-text\">Humidity</div>\n";
   ptr +="<div class=\"side-by-side humidity\">";
   ptr +=(int)Humiditystat;
   ptr +="<span class=\"superscript\">%</span></div>\n";
   ptr +="</div>\n";

  ptr +="</div>\n";
  ptr +="</body>\n";
  ptr +="</html>\n";
  return ptr;
}
In this updated code, we have introduced additional CSS styles to enhance the appearance of the web page. The changes include:
- Setting a background color for the body element.
- Applying a background color, padding, width, and border radius to the sensor container.
- Adjusting the padding and margins for the heading and paragraphs.
- Creating a visually pleasing layout for the temperature and humidity values using the sensor container.
Feel free to modify the styling code to match your desired aesthetics and further customize the web page according to your needs.
Code Explanation
In this code explanation, we will discuss the purpose of certain code sections related to using Google Fonts in an HTML document.
The first important element is the <!DOCTYPE> declaration, which informs the browser that we are sending HTML code. Additionally, the <meta> viewport element is included to make the web page responsive and adapt to different screen sizes. The unique aspect in this code is the integration of Google Fonts, which offers a vast collection of free web fonts for both commercial and personal use.
For our website, we have specifically chosen to utilize the Google-commissioned Open Sans web font. To include this font in our HTML document, we embed it in the document’s head section using the <link> tag.
Within our page, we have carefully selected font weights of 300 (Light), 400 (Regular), and 600 (Bold) for our desired typography. However, it’s worth noting that you have the flexibility to choose additional font weights according to your preferences. Nevertheless, keep in mind that using excessive font weights can lead to slower page load times.
Furthermore, if you wish to incorporate italic style into your fonts, you can achieve it simply by appending the letter “i” to the end of the font weight value. For instance, if you use the font weight 400i, it will embed a regular-italic style font.
Lastly, it’s essential to understand that Google Fonts are loaded dynamically. This means that the Google font will not be visible unless you have an active internet connection on the device from which you are accessing the web page. Therefore, ensure that you have an internet connection to properly view and utilize the chosen Google font in your HTML document.
String SendHTML(float TempCstat,float TempFstat,float Humiditystat){
String ptr = "<!DOCTYPE html> <html>\n";
ptr +="<head><meta name=\"viewport\" content=\"width=device-width, initial-scale=1.0, user-scalable=no\">\n";
ptr +="<link href=\"https://fonts.googleapis.com/css?family=Open+Sans:300,400,600\" rel=\"stylesheet\">\n";
To ensure consistent and cohesive typography throughout the entire HTML document, we will apply the Open Sans font. Additionally, we need to specify a fallback font in case the Open Sans font fails to load. In this case, we will use the sans-serif font family as our fallback option. This fallback font acts as a backup in situations where the desired font is unavailable, allowing the browser to display a suitable alternative font to maintain readability and aesthetics. By specifying a fallback font, we ensure that even if the Open Sans font doesn’t load, the browser will attempt to load the fallback font, providing a consistent and visually appealing experience for users accessing the HTML document.
ptr +="<title>ESP8266 Weather Report</title>\n";
ptr +="<style>html { font-family: 'Open Sans', sans-serif; display: block; margin: 0px auto; text-align: center;color: #333333;}\n";
ptr +="body{margin-top: 50px;}\n";
ptr +="h1 {margin: 50px auto 30px;}\n";
Next, we apply CSS for Humidity & Temperature – icons, titles, and values. All three of these elements are inline and vertically aligned. The icon background is made circular using a border radius of 50% and 30px height and width.
ptr +=".side-by-side{display: inline-block;vertical-align: middle;position: relative;}\n";
ptr +=".humidity-icon{background-color: #3498db;width: 30px;height: 30px;border-radius: 50%;line-height: 36px;}\n";
ptr +=".humidity-text{font-weight: 600;padding-left: 15px;font-size: 19px;width: 160px;text-align: left;}\n";
ptr +=".humidity{font-weight: 300;font-size: 60px;color: #3498db;}\n";
ptr +=".temperature-icon{background-color: #f39c12;width: 30px;height: 30px;border-radius: 50%;line-height: 40px;}\n";
ptr +=".temperature-text{font-weight: 600;padding-left: 15px;font-size: 19px;width: 160px;text-align: left;}\n";
ptr +=".temperature{font-weight: 300;font-size: 60px;color: #f39c12;}\n";
ptr +=".superscript{font-size: 17px;font-weight: 600;position: absolute;right: -20px;top: 15px;}\n";
ptr +=".data{padding: 10px;}\n";
ptr +="</style>\n";
ptr +="</head>\n";
ptr +="<body>\n";
Subsequently, we will apply CSS styling to the elements related to humidity and temperature, including the icons, titles, and values. These elements will be displayed inline and vertically aligned to maintain a neat layout.
To achieve a visually appealing design, we will make the background of the icons circular by applying a border radius of 50%. Additionally, we will set the height and width of the icons to 30 pixels. This circular shape adds a touch of elegance to the icons, enhancing the overall aesthetics of the page.
ptr +="<div id=\"webpage\">\n";
ptr +="<h1>ESP8266 NodeMCU Weather Report</h1>\n";
ptr +="<div class=\"data\">\n";

ptr +="<div class=\"side-by-side temperature-icon\">\n";
ptr +="<svg version=\"1.1\" id=\"Layer_1\" xmlns=\"http://www.w3.org/2000/svg\" xmlns:xlink=\"http://www.w3.org/1999/xlink\" x=\"0px\" y=\"0px\"\n";
ptr +="width=\"9.915px\" height=\"22px\" viewBox=\"0 0 9.915 22\" enable-background=\"new 0 0 9.915 22\" xml:space=\"preserve\">\n";
ptr +="<path fill=\"#FFFFFF\" d=\"M3.498,0.53c0.377-0.331,0.877-0.501,1.374-0.527C5.697-0.04,6.522,0.421,6.924,1.142\n";
ptr +="c0.237,0.399,0.315,0.871,0.311,1.33C7.229,5.856,7.245,9.24,7.227,12.625c1.019,0.539,1.855,1.424,2.301,2.491\n";
ptr +="c0.491,1.163,0.518,2.514,0.062,3.693c-0.414,1.102-1.24,2.038-2.276,2.594c-1.056,0.583-2.331,0.743-3.501,0.463\n";
ptr +="c-1.417-0.323-2.659-1.314-3.3-2.617C0.014,18.26-0.115,17.104,0.1,16.022c0.296-1.443,1.274-2.717,2.58-3.394\n";
ptr +="c0.013-3.44,0-6.881,0.007-10.322C2.674,1.634,2.974,0.955,3.498,0.53z\"/>\n";
ptr +="</svg>\n";
ptr +="</div>\n";

ptr +="<div class=\"side-by-side temperature-text\">Temperature</div>\n";
ptr +="<div class=\"side-by-side temperature\">";
ptr +=(int)TempCstat;
ptr +="<span class=\"superscript\">°C</span></div>\n";
ptr +="</div>\n";
With this icon, we display humidity readings. It’s another SVG.
After printing the humidity values, we close all open tags such as body and html.
ptr +="<div class=\"data\">\n";
ptr +="<div class=\"side-by-side humidity-icon\">\n";
ptr +="<svg version=\"1.1\" id=\"Layer_2\" xmlns=\"http://www.w3.org/2000/svg\" xmlns:xlink=\"http://www.w3.org/1999/xlink\" x=\"0px\" y=\"0px\"\n\"; width=\"12px\" height=\"17.955px\" viewBox=\"0 0 13 17.955\" enable-background=\"new 0 0 13 17.955\" xml:space=\"preserve\">\n";
ptr +="<path fill=\"#FFFFFF\" d=\"M1.819,6.217C3.139,4.064,6.5,0,6.5,0s3.363,4.064,4.681,6.217c1.793,2.926,2.133,5.05,1.571,7.057\n";
ptr +="c-0.438,1.574-2.264,4.681-6.252,4.681c-3.988,0-5.813-3.107-6.252-4.681C-0.313,11.267,0.026,9.143,1.819,6.217\"></path>\n";
ptr +="</svg>\n";
ptr +="</div>\n";
ptr +="<div class=\"side-by-side humidity-text\">Humidity</div>\n";
ptr +="<div class=\"side-by-side humidity\">";
ptr +=(int)Humiditystat;
ptr +="<span class=\"superscript\">%</span></div>\n";
ptr +="</div>\n";

ptr +="</div>\n";
ptr +="</body>\n";
ptr +="</html>\n";
return ptr;
}
Improvement 1 – Auto Page Refresh
One possible improvement is to enable automatic page refresh to ensure that the sensor value is updated continuously.
To achieve this, you can include a single <meta> tag in the <head> section of your HTML document. By adding the following code:
<meta http-equiv="refresh" content="2">
the browser will be instructed to reload the page every two seconds. This ensures that the content is dynamically updated without requiring manual intervention.
Improvement 2 – Dynamically load Sensor Data with AJAX
Another improvement you can make is to dynamically load sensor data using AJAX (Asynchronous JavaScript and XML). This approach eliminates the need to refresh the entire webpage, making it more efficient, especially for larger web pages.
To implement AJAX, you can utilize the XMLHttpRequest object in JavaScript. This object allows you to send asynchronous requests to the server, retrieve data, and update specific page elements without the need for a page refresh.
Here’s an example of an AJAX script that you can place before closing the <head> tag:
ptr +="<script>\n";
ptr +="setInterval(loadDoc,200);\n";
ptr +="function loadDoc() {\n";
ptr +="var xhttp = new XMLHttpRequest();\n";
ptr +="xhttp.onreadystatechange = function() {\n";
ptr +="if (this.readyState == 4 && this.status == 200) {\n";
ptr +="document.getElementById(\"webpage\").innerHTML =this.responseText}\n";
ptr +="};\n";
ptr +="xhttp.open(\"GET\", \"/\", true);\n";
ptr +="xhttp.send();\n";
ptr +="}\n";
ptr +="</script>\n";
In this script, the loadDoc() function is called at a specified interval using setInterval(). It creates an XMLHttpRequest object, which sends a GET request to the server. When the response is received (readyState 4 and status 200), the innerHTML property of the element with the ID “webpage” is updated with the retrieved data.
By implementing this AJAX script, you can dynamically update specific parts of the webpage with sensor data without the need to refresh the entire page.
Code Explanation
Here’s an explanation of the code:
ptr +="<script>\n";
ptr +="setInterval(loadDoc, 200);\n";
In this part of the code, the setInterval() function is used to repeatedly call the loadDoc() function at an interval of 200 milliseconds.
ptr +="function loadDoc() {\n";
ptr +="var xhttp = new XMLHttpRequest();\n";
The loadDoc() function is defined here. Inside the function, an XMLHttpRequest object named xhttp is created. This object is used to send requests to a web server and retrieve data.
ptr +="xhttp.onreadystatechange = function() {\n";
ptr +="if (this.readyState == 4 && this.status == 200) {\n";
ptr +="document.getElementById(\"webpage\").innerHTML = this.responseText;\n";
ptr +="}\n";
ptr +="};\n";
The onreadystatechange event handler is set for the xhttp object. It is triggered whenever the readyState property of the object changes. In this code, it checks if the readyState is 4 (request finished and response is ready) and the status is 200 (OK). If both conditions are met, it updates the content of the element with the ID “webpage” by setting its innerHTML to the responseText received from the server.
ptr +="xhttp.open(\"GET\", \"/\", true);\n";
ptr +="xhttp.send();\n";
ptr +="}\n";
Finally, the open() method is called on the xhttp object to specify the type of request (GET) and the URL (“/”) to send the request to. The send() method is then invoked to initiate the HTTP request.
Overall, this code sets up an AJAX request using the XMLHttpRequest object. It periodically sends a GET request to the server, and when a response with a status of 200 is received, it updates the content of the “webpage” element with the received data. This allows for dynamic loading of sensor data without refreshing the entire page.
Related article
- Control IoT Devices: ESP8266 NodeMCU Async Web Server Tutorial
- Ultimate Guide: Crafting an ESP8266 Weather Station Using BME280
- Enhanced Monitoring: Multiple DS18B20s on ESP8266 Web Server


