

This manual demonstrates the process of utilizing the BMP180 barometric sensor alongside the ESP32 to measure pressure, temperature, and approximate altitude. It outlines the steps for connecting the sensor to the ESP32, installing the necessary library, and composing the sketch within the Arduino IDE.
Meet the BMP180 Barometric Sensor
The BMP180 functions as a digital pressure sensor, gauging the absolute pressure of its surrounding air.
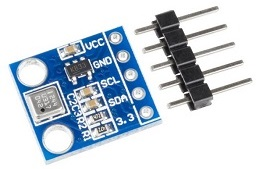
With a measuring range spanning from 300 to 1100hPa, it boasts an accuracy reaching 0.02 hPa.
To counteract the impact of temperature on pressure readings, the sensor is equipped with a temperature sensor, ensuring temperature-compensated pressure measurements.
Moreover, considering the correlation between pressure and altitude variations, it’s possible to approximate altitude based on current pressure readings.
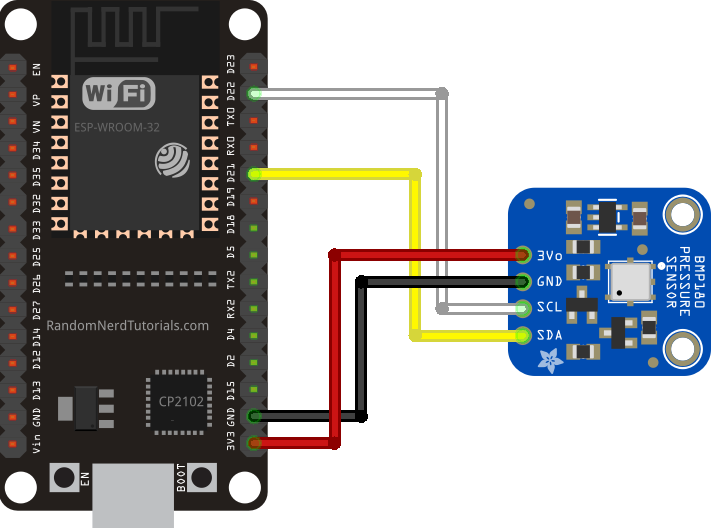
Wiring BMP180 Sensor to the ESP32
Utilizing the I2C communication protocol, the BMP180 barometric sensor necessitates the utilization of the SDA and SCL pins on the ESP32.
Refer to the table below for guidance on wiring the sensor.
| BMP180 | Wiring to ESP32 |
| Vin | 3.3V |
| GND | GND |
| SCL | GPIO 22 (SCL) |
| SDA | GPIO 21 (SDA) |
Temperature, Pressure, and Altitude Readings
In this section, we’ll guide you through the process of reading pressure and temperature data from the BMP180 barometric sensor using the ESP32. Additionally, we’ll demonstrate how to estimate altitude.
Parts Required
| Component Name | Buy Now |
| ESP32-WROOM-32 Development | Amazon |
| BMP180 I2C IIC Digital Atmospheric Pressure, Temperature | Amazon |
Schematic
Connect the BMP180 barometric sensor to the ESP32 according to the schematic diagram provided below.
BMP_085 Library Installation
To simplify the process of reading pressure, temperature, and altitude with the BMP180 sensor, we recommend using the BMP_085 library developed by Adafruit. This library is compatible with both BMP085 and BMP180 sensors. Follow the steps below to install the library in your Arduino IDE:
Open your Arduino IDE and navigate to Sketch > Include Library > Manage Libraries. This action will prompt the Library Manager to open.
In the Library Manager, search for “BMP085” in the search box, and proceed to install the BMP085 library from Adafruit.
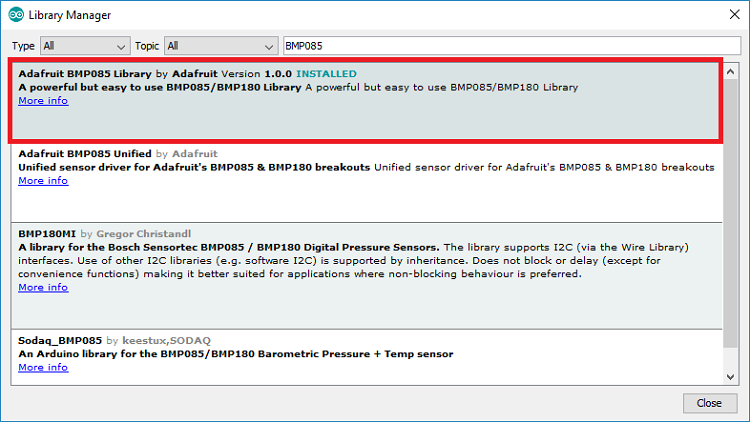
Once the installation is complete, restart your Arduino IDE for the changes to take effect.
Code
The library includes a sample code demonstrating how to retrieve temperature, pressure, and altitude data. Navigate to File > Examples > Adafruit BMP085 Library > BMP085test.
#include <Wire.h>
#include <Adafruit_BMP085.h>

Adafruit_BMP085 bmp;

void setup() {
  Serial.begin(9600);
  if (!bmp.begin()) {
	Serial.println("Could not find a valid BMP085/BMP180 sensor, check wiring!");
	while (1) {}
  }
}

void loop() {
  Serial.print("Temperature = ");
  Serial.print(bmp.readTemperature());
  Serial.println(" *C");

  Serial.print("Pressure = ");
  Serial.print(bmp.readPressure());
  Serial.println(" Pa");

  // Calculate altitude assuming 'standard' barometric
  // pressure of 1013.25 millibar = 101325 Pascal
  Serial.print("Altitude = ");
  Serial.print(bmp.readAltitude());
  Serial.println(" meters");

  Serial.print("Pressure at sealevel (calculated) = ");
  Serial.print(bmp.readSealevelPressure());
  Serial.println(" Pa");

  // you can get a more precise measurement of altitude
  // if you know the current sea level pressure which will
  // vary with weather and such. If it is 1015 millibars
  // that is equal to 101500 Pascals.
  Serial.print("Real altitude = ");
  Serial.print(bmp.readAltitude(102000));
  Serial.println(" meters");

  Serial.println();
  delay(500);
}
The code begins by importing the necessary libraries:
#include <Wire.h>
#include <Adafruit_BMP085.h>
Next, an object named bmp of type Adafruit_BMP085 is created:
Adafruit_BMP085 bmp;
In the setup() function, the sensor is initialized:
void setup() {
  Serial.begin(9600);
  if (!bmp.begin()) {
	Serial.println("Could not find a valid BMP085/BMP180 sensor, check wiring!");
	while (1) {}
  }
}
Reading Temperature
To obtain the temperature, you simply utilize the readTemperature() method with the bmp object:
bmp.readTemperature()
Reading Pressure
Reading the pressure is similarly straightforward; you employ the readPressure() method:
bmp.readPressure()
The pressure readings are presented in Pascal units.
Reading Altitude
Since pressure varies with altitude, estimating current altitude involves comparing it with sea level pressure.
The example provides two different methods for altitude estimation:
- The first method assumes a standard barometric pressure of 10132 Pascal at sea level. Altitude is obtained as follows:
bmp.readAltitude()
- The second method accounts for the current sea level pressure. For instance, if the current sea level pressure is 101500 Pa, you pass 101500 as an argument to the
readAltitude()method as follows:
bmp.readAltitude(101500)
Demonstration
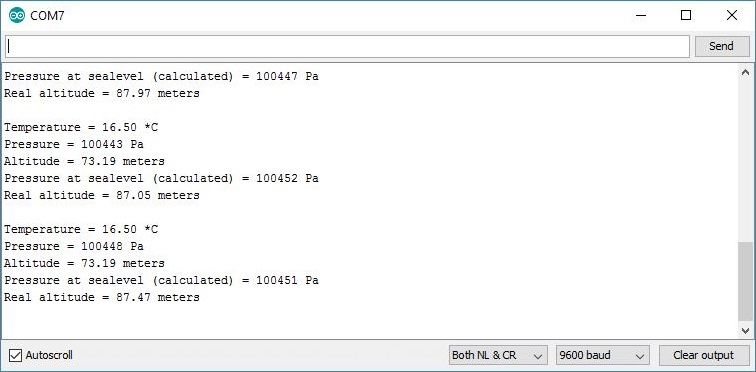
Upload the code to your ESP32, ensuring you’ve selected the correct board and COM port.
Next, open the Serial Monitor with a baud rate of 9600. You should receive the sensor readings, depicted in the figure below.
Wrapping Up
Throughout this guide, we’ve illustrated how to utilize the BMP180 barometric sensor alongside the ESP32 to obtain pressure, temperature, and estimate altitude.
Now, you can expand upon this project by displaying the latest sensor readings on a web server. We provide various examples that you can customize to showcase the readings:
- Arduino BMP180 Guide: Barometric Pressure and Temperature
- ESP32 Environmental Sensor: BME680 Gas, Pressure, Humidity, Temperature
- Arduino IDE: ESP32 BME280 Sensor Setup (Temp, Humidity, Pressure)
- Ultimate Guide: Crafting an ESP8266 Weather Station Using BME280


