
This guide teaches you how to utilize the BMP388 pressure sensor alongside the ESP32 board with Arduino IDE. The BMP388 is a compact and accurate absolute barometric pressure sensor frequently employed for altitude estimation in drone operations due to its precision. Additionally, it finds utility in indoor/outdoor navigation, GPS applications, and various other contexts. Communication with a microcontroller occurs through either I2C or SPI communication protocols.
Introducing the BMP388 Barometric Sensor
The BMP388 is a precise, low-power, low-noise absolute barometric pressure sensor capable of measuring absolute pressure and temperature. Given that pressure varies with altitude, it enables accurate altitude estimation. Consequently, it proves valuable in drone and navigation applications. Additionally, it serves various other purposes:
- Calculating vertical velocity
- Internet of Things (IoT)
- Weather forecasting and weather stations
- Healthcare applications
- Fitness applications
- And more
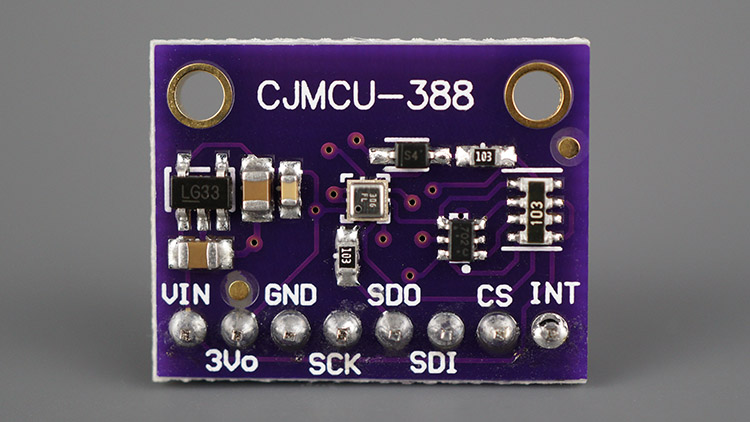
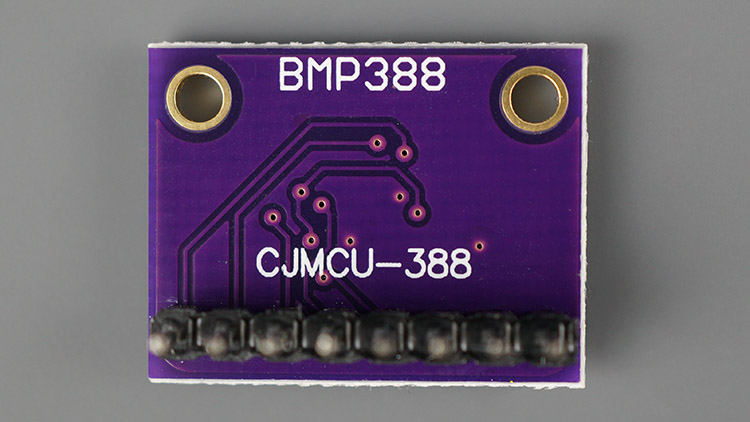
We’re employing the BMP388 sensor in module form, as depicted in the figure below. It’s also accessible in alternative formats. The accompanying image displays the reverse side of the sensor.
BMP388 Technical Data
The following table shows the key features of the BMP388 sensor. For more information, consult the datasheet.
| Operation range | 300 to 1250 hPa (pressure) -40 to +85ºC (temperature) |
| Interface | I2C and SPI |
| Average typical current consumption | 3.4 µA @ 1Hz |
| Absolute accuracy pressure (typ.) P=900 …1100 hPa (T=25 … 40°C) | ±0.5 hPa |
| Relative accuracy pressure (typ.) P=900…1100 hPa (T=25 … 40°C) | ±0.08 hPa |
| Noise in pressure (lowest bandwidth, highest resolution) | 0.03 Pa |
| Maximum sampling rate |
BMP388 Pinout
Here’s the pinout of the BMP388 module we’re using—it might be slightly different for other modules.
| VIN | Powers the sensor (5V) |
| 3V3 | Powers the sensor (3V3) |
| GND | Common GND |
| SCK | SCL pin for I2C communication SCK pin for SPI communication |
| SDO | SDO (MISO) pin for SPI communication |
| SDI | SDI (MOSI) pin for SPI communication SDA pin for I2C communication |
| CS | Chip select pin for SPI communication |
| INT | Interrupt pin |
BMP388 Interface
As mentioned previously, the BMP388 sensor supports I2C and SPI interfaces.
BMP388 I2C
To use I2C communication protocol, use the following pins:
| BMP388 | ESP32 |
| SDI (SDA) | GPIO 21 |
| SCK (SCL) | GPIO 22 |
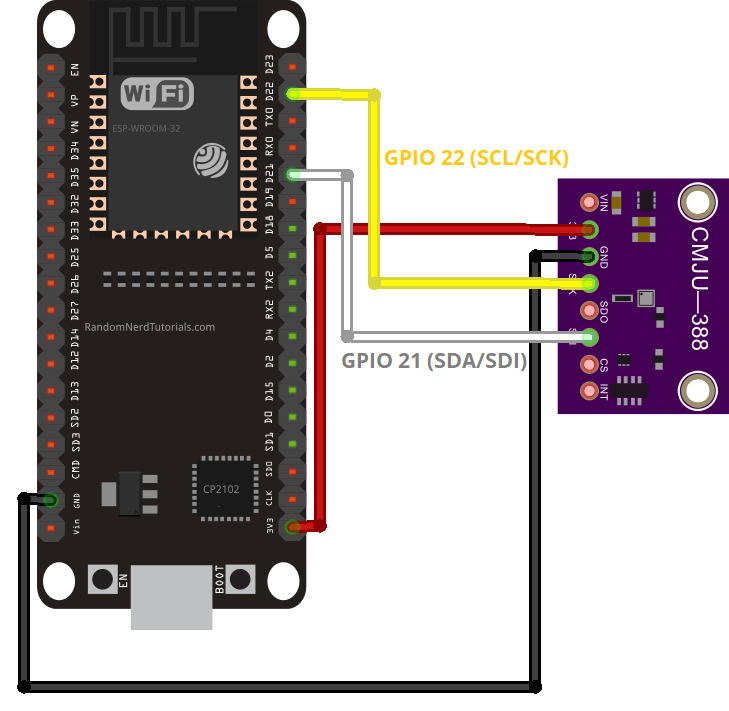
GPIO 22 (SCL) and GPIO 21 (SDA) are the default ESP32 I2C pins. You can use other pins as long as you set them properly in the code.
BMP388 SPI
To use SPI communication protocol, use the following pins:
| BMP388 | ESP32 |
| SCK | GPIO 18 |
| SDI (MOSI) | GPIO 23 |
| SDO (MISO) | GPIO 19 |
| CS (Chip Select) | GPIO 5 |
These are the default ESP32 SPI pins. You can use other pins as long as you set them properly in the code.
Parts Required
Schematic – ESP32 with BMP388
The BMP388 supports communication via either I2C or SPI protocols.
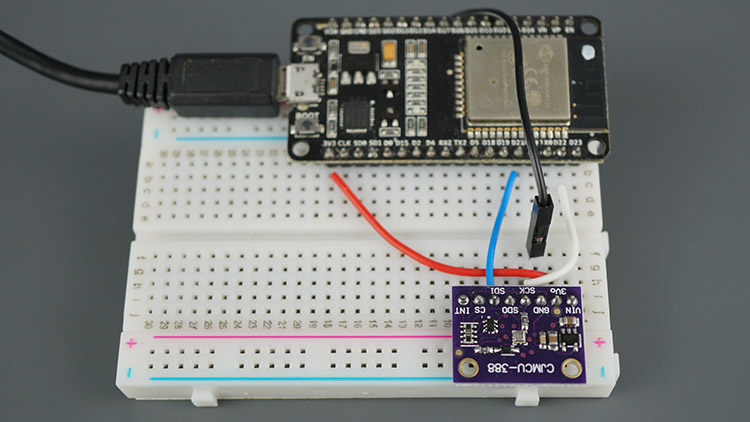
ESP32 with BMP388 via I2C
Refer to the following schematic diagram to connect the BMP388 to the ESP32 utilizing the default I2C pins.
ESP32 with BMP388 via SPI
Alternatively, if you prefer using the SPI communication protocol, follow the subsequent schematic diagram to connect the BMP388 to the ESP32 using the default SPI pins.

Installing the Adafruit BMP3XX Library
Various libraries are compatible with both the BMP388 sensor and the ESP32. In this tutorial, we’ll employ the Adafruit BMP3XX library.
Follow these steps to install the library in your Arduino IDE:
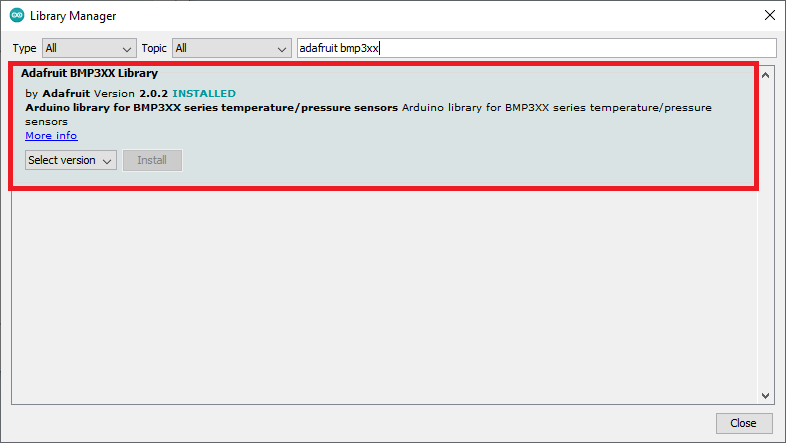
- Open your Arduino IDE and navigate to Sketch > Include Library > Manage Libraries. This action will open the Library Manager.
- In the search box of the Library Manager, look for “adafruit bmp3xx” and proceed to install the library.
Installing the Adafruit_Sensor Library
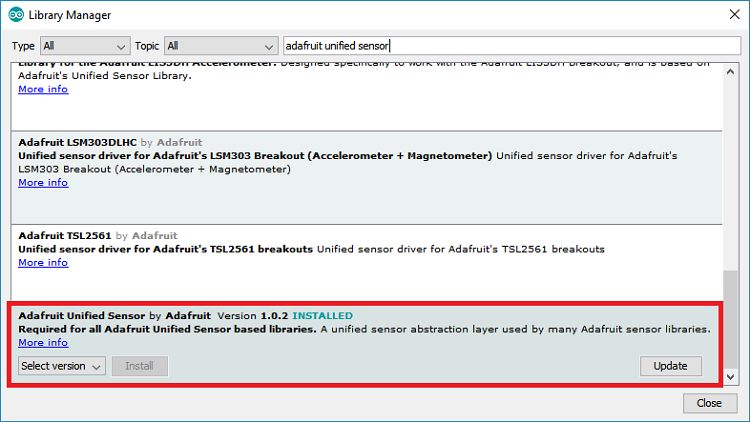
To utilize the BMP3XX library, it’s necessary to install the Adafruit_Sensor library as well. Here’s how to install it in your Arduino IDE:
- Go to Sketch > Include Library > Manage Libraries and input “Adafruit Unified Sensor” into the search box. Scroll down until you find the library and install it.
After successfully installing both libraries, restart your Arduino IDE.
Code – Reading BMP388 Pressure, Altitude and Temperature
The most effective approach to acquaint oneself with a new sensor is by starting with a basic example provided by the library.
Once the BMP3XX library is installed, launch the Arduino IDE and navigate to File > Examples > Adafruit BMP3XX Library > bmp3XX_simpletest. We’ve made necessary adjustments to ensure full compatibility with the ESP32.
#include <Wire.h>
#include <SPI.h>
#include <Adafruit_Sensor.h>
#include "Adafruit_BMP3XX.h"

#define BMP_SCK 18
#define BMP_MISO 19
#define BMP_MOSI 23
#define BMP_CS 5

#define SEALEVELPRESSURE_HPA (1013.25)

Adafruit_BMP3XX bmp;

void setup() {
  Serial.begin(115200);
  while (!Serial);
  Serial.println("Adafruit BMP388 / BMP390 test");

  if (!bmp.begin_I2C()) {   // hardware I2C mode, can pass in address & alt Wire
  //if (! bmp.begin_SPI(BMP_CS)) {  // hardware SPI mode
  //if (! bmp.begin_SPI(BMP_CS, BMP_SCK, BMP_MISO, BMP_MOSI)) {  // software SPI mode
    Serial.println("Could not find a valid BMP3 sensor, check wiring!");
    while (1);
  }

  // Set up oversampling and filter initialization
  bmp.setTemperatureOversampling(BMP3_OVERSAMPLING_8X);
  bmp.setPressureOversampling(BMP3_OVERSAMPLING_4X);
  bmp.setIIRFilterCoeff(BMP3_IIR_FILTER_COEFF_3);
  bmp.setOutputDataRate(BMP3_ODR_50_HZ);
}

void loop() {
  if (! bmp.performReading()) {
    Serial.println("Failed to perform reading :(");
    return;
  }
  Serial.print("Temperature = ");
  Serial.print(bmp.temperature);
  Serial.println(" *C");

  Serial.print("Pressure = ");
  Serial.print(bmp.pressure / 100.0);
  Serial.println(" hPa");

  Serial.print("Approx. Altitude = ");
  Serial.print(bmp.readAltitude(SEALEVELPRESSURE_HPA));
  Serial.println(" m");

  Serial.println();
  delay(2000);
}
Sea Level Pressure
For enhanced precision in pressure and altitude readings, we recommend adjusting the sea level pressure according to your location in the SEALEVELPRESSURE_HPA variable:
#define SEALEVELPRESSURE_HPA (1013.25)
The standard value is 1013.25 hPa. For more precise outcomes, verify the sea level pressure specific to your location. You can utilize this website to ascertain the sea level pressure.
How the Code Works
Keep reading this section to understand the inner workings of the code, or skip to the Demonstration section.
Libraries
The code commences by importing the essential libraries: the Wire library for utilizing I2C, the SPI library (if opting for SPI over I2C), and the Adafruit_Sensor, and Adafruit_BMP3XX libraries for interfacing with the BMP388 sensor.
#include <Wire.h>
#include <SPI.h>
#include <Adafruit_Sensor.h>
#include "Adafruit_BMP3XX.h"
SPI communication
Although we prefer utilizing the I2C communication protocol with the sensor, the code is configured to accommodate SPI if desired. The ensuing lines of code define the SPI pins.
#define BMP_SCK 18
#define BMP_MISO 19
#define BMP_MOSI 23
#define BMP_CS 5
Sea level pressure
A variable called SEALEVELPRESSURE_HPA is created.
#define SEALEVELPRESSURE_HPA (1013.25)
This variable stores the pressure at sea level in hectopascal (equivalent to millibar). It aids in estimating altitude for a given pressure by comparing it with the sea level pressure. While this example employs the default value, for precise outcomes, substitute it with the current sea level pressure at your location. You can verify the sea level pressure via this website.
setup()
In the setup() start a serial communication.
Serial.begin(115200);
Init BMP388 Sensor I2C
By default, this example utilizes the I2C communication protocol. The subsequent line initializes an Adafruit_BMP3XX object named bmp on the default ESP32 I2C pins: GPIO 22 (SCL) and GPIO 21 (SDA).
if (!bmp.begin_I2C()) { // hardware I2C mode, can pass in address & alt Wire
If you wish to use SPI instead, you must comment out the preceding line and uncomment one of the following lines for hardware SPI (utilize the default SPI pins and select the CS pin) or software SPI (employ any pins).
//if (! bmp.begin_SPI(BMP_CS)) {  // hardware SPI mode
//if (! bmp.begin_SPI(BMP_CS, BMP_SCK, BMP_MISO, BMP_MOSI)) {  // software SPI mode
Configure the following parameters (oversampling and filter) for the sensor.
// Set up oversampling and filter initialization
bmp.setTemperatureOversampling(BMP3_OVERSAMPLING_8X);
bmp.setPressureOversampling(BMP3_OVERSAMPLING_4X);
bmp.setIIRFilterCoeff(BMP3_IIR_FILTER_COEFF_3);
bmp.setOutputDataRate(BMP3_ODR_50_HZ);
To increase the resolution of the raw sensor data, it supports oversampling. We’ll use the default oversampling parameters, but you can change them.
setTemperatureOversampling(): set temperature oversampling.setPressureOversampling(): set pressure oversampling.
These methods can accept one of the following parameters:
BMP3_NO_OVERSAMPLINGBMP3_OVERSAMPLING_2XBMP3_OVERSAMPLING_4XBMP3_OVERSAMPLING_8XBMP3_OVERSAMPLING_16XBMP3_OVERSAMPLING_32X
The setIIRFilterCoeff() function sets the coefficient of the filter (in samples). It can be:
BMP3_IIR_FILTER_DISABLE(no filtering)BMP3_IIR_FILTER_COEFF_1BMP3_IIR_FILTER_COEFF_3BMP3_IIR_FILTER_COEFF_7BMP3_IIR_FILTER_COEFF_15BMP3_IIR_FILTER_COEFF_31BMP3_IIR_FILTER_COEFF_63BMP3_IIR_FILTER_COEFF_127
Set the output data rate with the setOutputDataRate() function. It can accept one of the following options:
BMP3_ODR_200_HZ, BMP3_ODR_100_HZ, BMP3_ODR_50_HZ, BMP3_ODR_25_HZ,BMP3_ODR_12_5_HZ, BMP3_ODR_6_25_HZ, BMP3_ODR_3_1_HZ, BMP3_ODR_1_5_HZ, BMP3_ODR_0_78_HZ, BMP3_ODR_0_39_HZ,BMP3_ODR_0_2_HZ, BMP3_ODR_0_1_HZ, BMP3_ODR_0_05_HZ, BMP3_ODR_0_02_HZ, BMP3_ODR_0_01_HZ, BMP3_ODR_0_006_HZ, BMP3_ODR_0_003_HZ, or BMP3_ODR_0_001_HZ
loop()
In the loop(), we’ll get measurements from the BMP388 sensor. First, tell the sensor to get new readings with bmp.performReading().
if (! bmp.performReading()) {
  Serial.println("Failed to perform reading :(");
  return;
}
Then, get and print the temperature, pressure and altitude readings as follows:
Serial.print("Temperature = ");
Serial.print(bmp.temperature);
Serial.println(" *C");

Serial.print("Pressure = ");
Serial.print(bmp.pressure / 100.0);
Serial.println(" hPa");

Serial.print("Approx. Altitude = ");
Serial.print(bmp.readAltitude(SEALEVELPRESSURE_HPA));
Serial.println(" m");
You get each specific reading as follows:
bmp.temperature: returns temperature readingbmp.pressure: returns pressure readingbmp.readAltitude (SEALEVELPRESSURE_HPA): returns altitude estimation
Demonstration
Once you’ve input the sea level pressure specific to your location, you can upload the code to your board. In your Arduino IDE, navigate to Tools > Boards and select the board you’re using. Then, under Tools > Port, select the COM port.
After uploading, open the Serial Monitor at a baud rate of 115200. The readings will be displayed in the Serial Monitor.
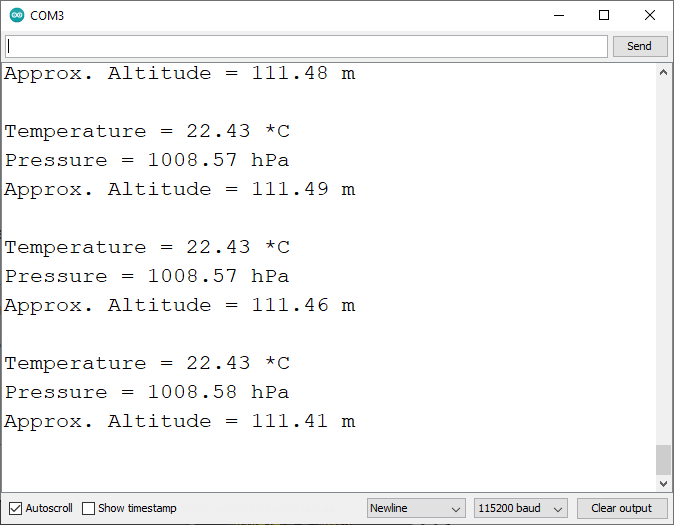
Note that any increase in the sensor’s altitude will be reflected in the altitude reading. The altitude estimation is quite accurate, capable of detecting small changes in the centimeters or inches range. You can verify this by comparing the obtained altitude with the actual altitude of your location. To determine your location’s altitude, you can utilize this website.
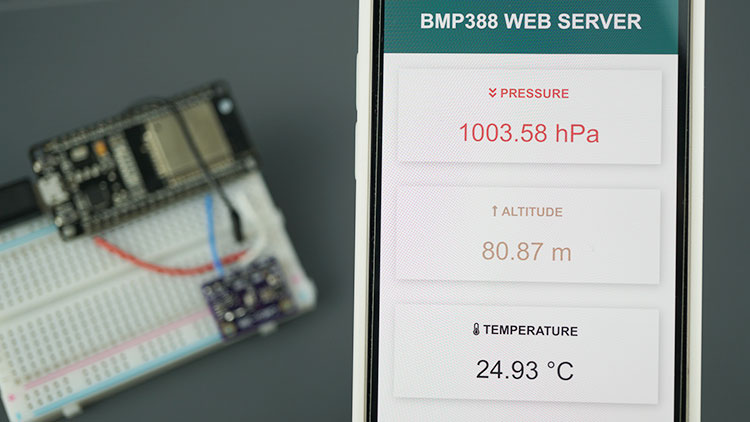
ESP32 Web Server with BMP388
This section presents an example of a web server that you can construct with the ESP32 to showcase BMP388 readings on a web page.
Library Installation – Async Web Server
To create the web server, you’ll need to install the following libraries. Click the links below to acquire the libraries.
Since these libraries are not accessible via the Arduino Library Manager, you’ll need to manually copy the library files to the Arduino Installation Libraries folder. Alternatively, within your Arduino IDE, navigate to Sketch > Include Library > Add .zip Library and select the libraries you’ve recently downloaded.
Code
Then, upload the following code to your board (type your SSID and password).
#include <Wire.h>
#include <SPI.h>
#include <Adafruit_Sensor.h>
#include <Adafruit_BMP3XX.h>
#include <WiFi.h>
#include <ESPAsyncWebServer.h>
// Replace with your network credentials
const char* ssid = "REPLACE_WITH_YOUR_SSID";
const char* password = "REPLACE_WITH_YOUR_PASSWORD";
//Uncomment if using SPI
/*#define BMP_SCK 18
#define BMP_MISO 19
#define BMP_MOSI 23
#define BMP_CS 5*/
#define SEALEVELPRESSURE_HPA (1013.25)
Adafruit_BMP3XX bmp;
float temp;
float pres;
float alt;
AsyncWebServer server(80);
AsyncEventSource events("/events");
unsigned long lastTime = 0;
unsigned long timerDelay = 30000; // send readings timer
void getBMPReadings(){
if (! bmp.performReading()) {
Serial.println("Failed to perform reading :(");
return;
}
temp = bmp.temperature;
pres = bmp.pressure / 100.0;
alt = bmp.readAltitude(SEALEVELPRESSURE_HPA);
}
String processor(const String& var){
getBMPReadings();
//Serial.println(var);
if(var == "TEMPERATURE"){
return String(temp);
}
else if(var == "PRESSURE"){
return String(pres);
}
else if(var == "ALTITUDE"){
return String(alt);
}
}
const char index_html[] PROGMEM = R"rawliteral(
<!DOCTYPE HTML><html>
<head>
<title>BMP388 Web Server</title>
<meta name="viewport" content="width=device-width, initial-scale=1">
<link rel="stylesheet" href="https://use.fontawesome.com/releases/v5.7.2/css/all.css" integrity="sha384-fnmOCqbTlWIlj8LyTjo7mOUStjsKC4pOpQbqyi7RrhN7udi9RwhKkMHpvLbHG9Sr" crossorigin="anonymous">
<link rel="icon" href="data:,">
<style>
html {font-family: Arial; display: inline-block; text-align: center;}
p { font-size: 1.2rem;}
body { margin: 0;}
.topnav { overflow: hidden; background-color: #0F7173; color: white; font-size: 1.4rem; }
.content { padding: 20px; }
.card { background-color: white; box-shadow: 2px 2px 12px 1px rgba(140,140,140,.5); }
.cards { max-width: 700px; margin: 0 auto; display: grid; grid-gap: 2rem; grid-template-columns: repeat(auto-fit, minmax(200px, 1fr)); }
.reading { font-size: 2rem; }
.card.temperature { color: #272932; }
.card.altitude { color: #D8A47F; }
.card.pressure { color: #F05D5E; }
</style>
</head>
<body>
<div class="topnav">
<h3>BMP388 WEB SERVER</h3>
</div>
<div class="content">
<div class="cards">
<div class="card pressure">
<h4><i class="fas fa-angle-double-down"></i> PRESSURE</h4><p><span class="reading"><span id="pres">%PRESSURE%</span> hPa</span></p>
</div>
<div class="card altitude">
<h4><i class="fas fa-long-arrow-alt-up"></i> ALTITUDE</h4><p><span class="reading"><span id="alt">%ALTITUDE%</span> m</span></p>
</div>
<div class="card temperature">
<h4><i class="fas fa-thermometer-half"></i> TEMPERATURE</h4><p><span class="reading"><span id="temp">%TEMPERATURE%</span> °C</span></p>
</div>
</div>
</div>
<script>
if (!!window.EventSource) {
var source = new EventSource('/events');
source.addEventListener('open', function(e) {
console.log("Events Connected");
}, false);
source.addEventListener('error', function(e) {
if (e.target.readyState != EventSource.OPEN) {
console.log("Events Disconnected");
}
}, false);
source.addEventListener('message', function(e) {
console.log("message", e.data);
}, false);
source.addEventListener('temperature', function(e) {
console.log("temperature", e.data);
document.getElementById("temp").innerHTML = e.data;
}, false);
source.addEventListener('pressure', function(e) {
console.log("pressure", e.data);
document.getElementById("pres").innerHTML = e.data;
}, false);
source.addEventListener('altitude', function(e) {
console.log("altitude", e.data);
document.getElementById("alt").innerHTML = e.data;
}, false);
}
</script>
</body>
</html>)rawliteral";
void setup() {
Serial.begin(115200);
WiFi.mode(WIFI_STA);
// Set device as a Wi-Fi Station
WiFi.begin(ssid, password);
while (WiFi.status() != WL_CONNECTED) {
delay(1000);
Serial.println("Setting as a Wi-Fi Station..");
}
Serial.print("Station IP Address: ");
Serial.println(WiFi.localIP());
Serial.println();
// Init BMEP388 sensor
if (!bmp.begin_I2C()) { // hardware I2C mode, can pass in address & alt Wire
//if (! bmp.begin_SPI(BMP_CS)) { // hardware SPI mode
//if (! bmp.begin_SPI(BMP_CS, BMP_SCK, BMP_MISO, BMP_MOSI)) { // software SPI mode
Serial.println("Could not find a valid BMP3 sensor, check wiring!");
while (1);
}
// Set up oversampling and filter initialization
bmp.setTemperatureOversampling(BMP3_OVERSAMPLING_8X);
bmp.setPressureOversampling(BMP3_OVERSAMPLING_4X);
bmp.setIIRFilterCoeff(BMP3_IIR_FILTER_COEFF_3);
bmp.setOutputDataRate(BMP3_ODR_50_HZ);
//Get readings when initializing
getBMPReadings();
// Handle Web Server
server.on("/", HTTP_GET, [](AsyncWebServerRequest *request){
request->send_P(200, "text/html", index_html, processor);
});
// Handle Web Server Events
events.onConnect([](AsyncEventSourceClient *client){
if(client->lastId()){
Serial.printf("Client reconnected! Last message ID that it got is: %u\n", client->lastId());
}
// send event with message "hello!", id current millis
// and set reconnect delay to 1 second
client->send("hello!", NULL, millis(), 10000);
});
server.addHandler(&events);
server.begin();
}
void loop() {
if ((millis() - lastTime) > timerDelay) {
getBMPReadings();
Serial.printf("Pressure = %.2f hPa \n", pres);
Serial.printf("Altitude = %.2f m \n", alt);
Serial.printf("Temperature = %.2f ºC \n", temp);
Serial.println();
// Send Events to the Web Server with the Sensor Readings
events.send("ping",NULL,millis());
events.send(String(pres).c_str(),"pressure",millis());
events.send(String(alt).c_str(),"altitude",millis());
events.send(String(temp).c_str(),"temperature",millis());
lastTime = millis();
}
}
Demonstration
Once the code is uploaded, launch the Serial Monitor with a baud rate of 115200 to obtain the ESP32 IP address.
Next, open a web browser and enter the IP address. This will grant you access to the web server, where you can view the latest sensor readings. You can access the web server from any device connected to your local network, be it a computer, tablet, or smartphone.
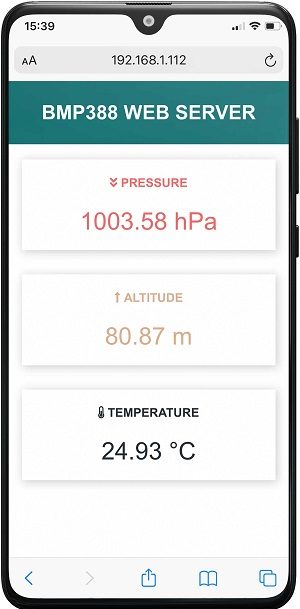
The sensor readings are automatically updated on the web server using Server-Sent Events. To gain a better understanding of how this works, you can refer to the Server-Sent Events tutorial.
Wrapping Up
The BMP388 is a compact and highly accurate pressure sensor that enables precise altitude estimation. Additionally, the sensor measures temperature, making it ideal for a variety of applications including outdoor/indoor navigation, drones, and weather stations.
In this tutorial, you’ve learned how to utilize the sensor with the ESP32 development board and Arduino IDE. We hope you’ve found this guide helpful in getting started. Furthermore, we offer guides for other popular sensors:
- Arduino BMP388 Barometric Pressure Sensor Integration Guide
- BMP388 Barometric Sensor Setup for ESP8266 NodeMCU (Arduino IDE)
- Step-by-Step: Connecting ESP32 with BMP180 Barometric Sensor
- Arduino BMP180 Guide: Barometric Pressure and Temperature


