
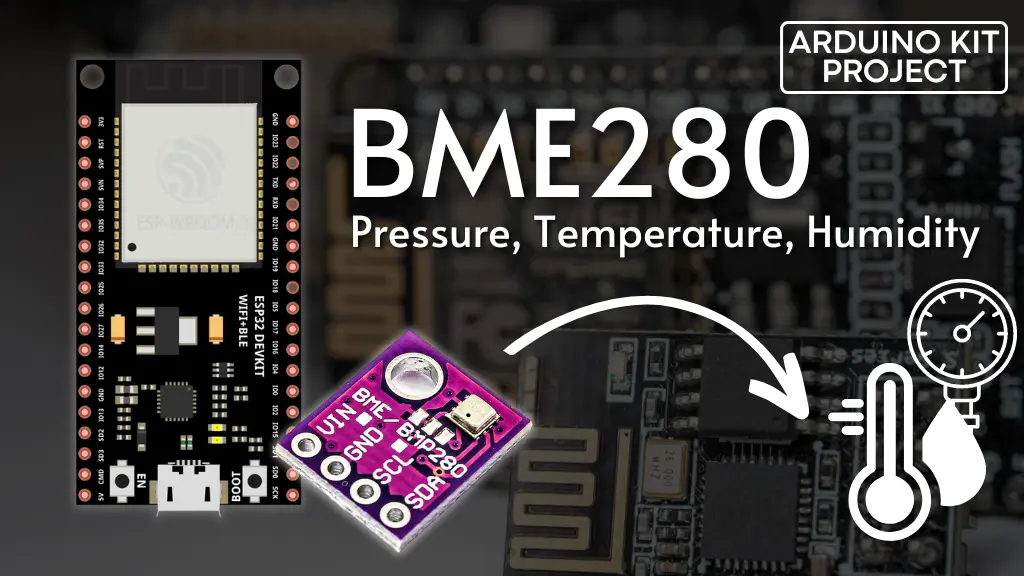
This manual demonstrates the utilization of the BME280 sensor module alongside the ESP32 for the purpose of reading pressure, temperature, humidity, and approximating altitude using the Arduino IDE. The BME280 sensor employs either the I2C or SPI communication protocol to exchange data with a microcontroller.
We will illustrate the process of connecting the sensor to the ESP32, installing the necessary libraries, and crafting a basic sketch to exhibit the sensor’s readings.
Prior to delving into this guide, it is imperative to have the ESP32 add-on integrated into your Arduino IDE. If you haven’t done so already, refer to the subsequent tutorial for instructions on installing the ESP32 on the Arduino IDE.
Introducing the BME280 Sensor Module
The BME280 sensor module is designed to capture barometric pressure, temperature, and humidity data. Additionally, due to the relationship between pressure and altitude, altitude estimation is also possible. Various iterations of this sensor module exist, with the one depicted in the figure below being the model we’re employing.
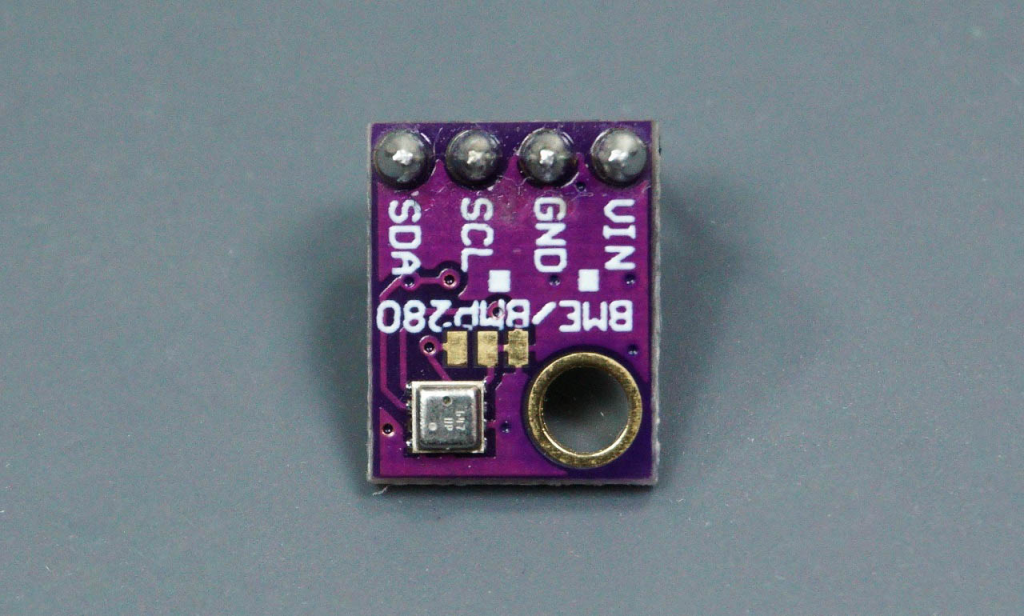
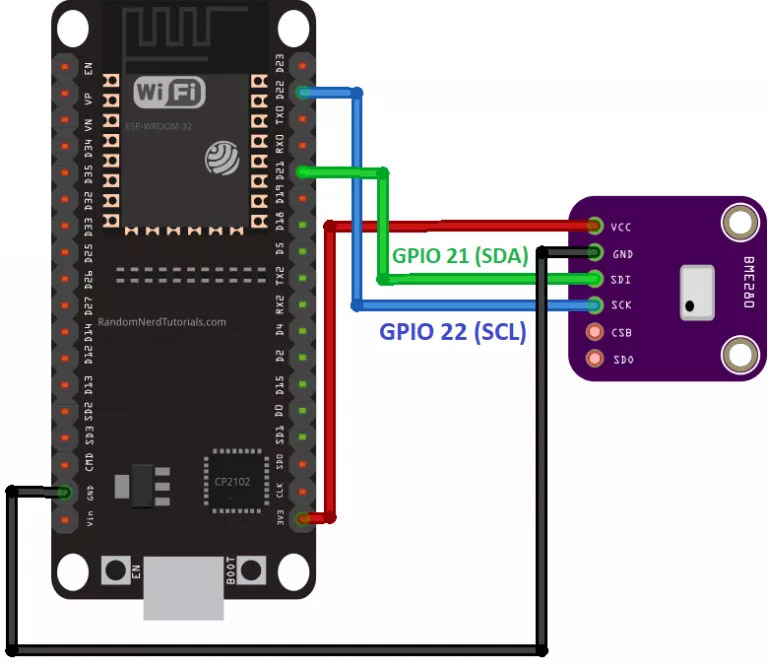
This sensor module utilizes the I2C communication protocol, simplifying the wiring process significantly. The default ESP32 I2C pins can be utilized, as outlined in the subsequent table:
| BME280 | ESP32 |
| Vin | 3.3V |
| GND | GND |
| SCL | GPIO 22 |
| SDA | GPIO 21 |
Different versions of this sensor module support either SPI or I2C communication protocols, such as the module depicted in the following figure:
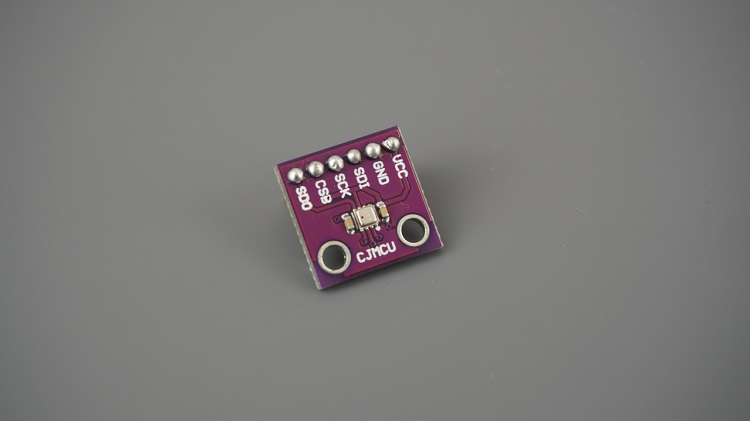
For those utilizing such sensors and opting for the I2C communication protocol, the following pins should be utilized:
| BME280 | ESP32 |
| SCK (SCL Pin) | GPIO 22 |
| SDI (SDA pin) | GPIO 21 |
For SPI communication protocol, the designated pins are as follows:
| BME280 | ESP32 |
| SCK (SPI Clock) | GPIO 18 |
| SDO (MISO) | GPIO 19 |
| SDI (MOSI) | GPIO 23 |
| CS (Chip Select) | GPIO 5 |
Parts Required
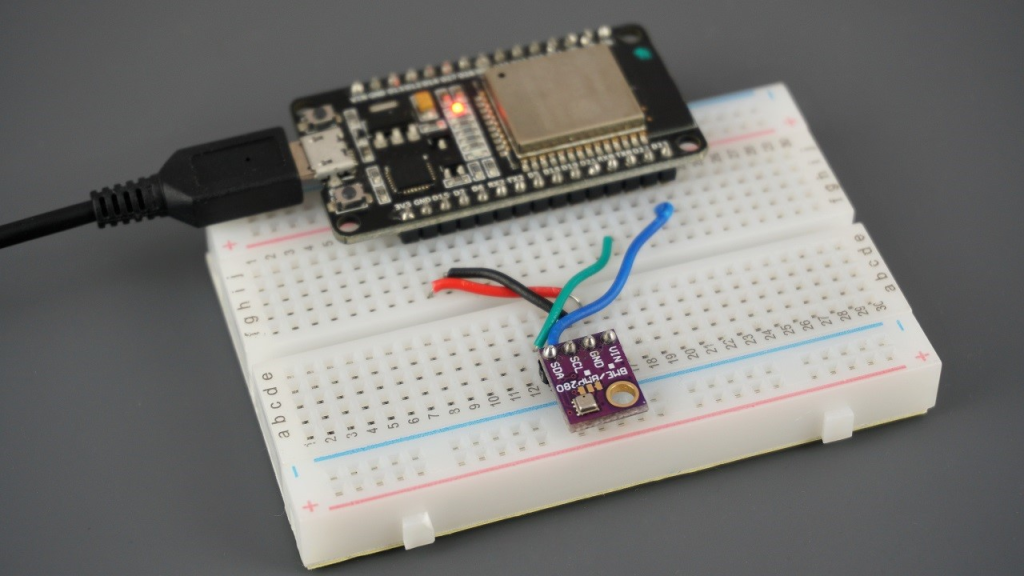
Schematic – ESP32 with BME280 via I2C
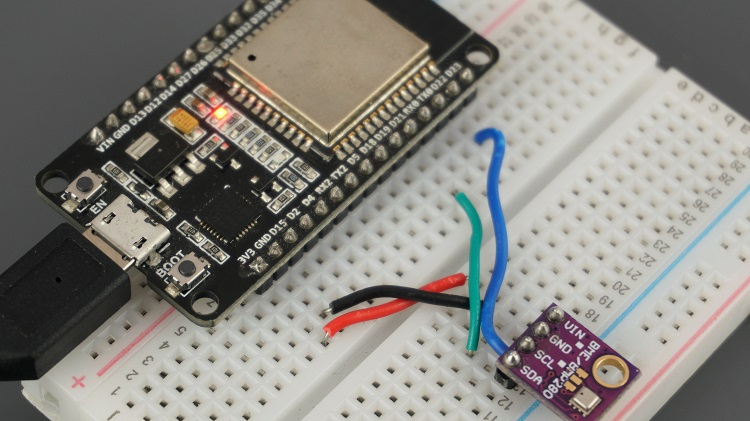
We will establish communication with the BME280 sensor module using the I2C protocol. To do so, connect the sensor to the ESP32’s SDA and SCL pins, as depicted in the schematic diagram below.
Library Installation for BME280
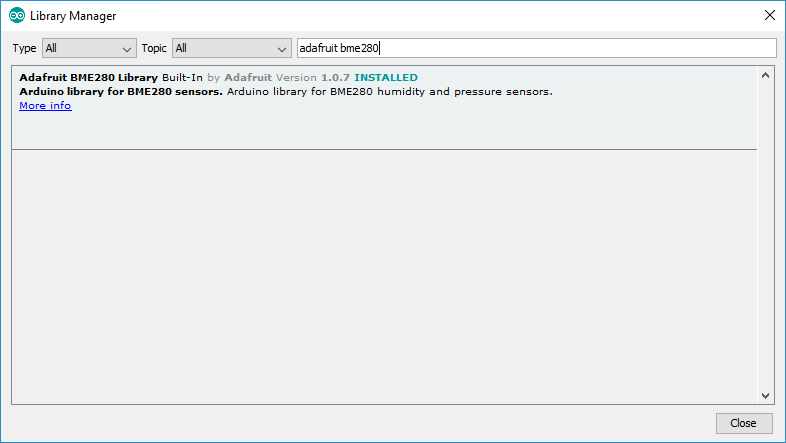
To obtain data from the BME280 sensor module, you’ll require the Adafruit_BME280 library. Follow these steps to install the library in your Arduino IDE:
Open your Arduino IDE and navigate to Sketch > Include Library > Manage Libraries. This action will prompt the Library Manager to open.
In the search box, enter “adafruit bme280” and proceed to install the library once it appears.
Installation of the Adafruit_Sensor Library
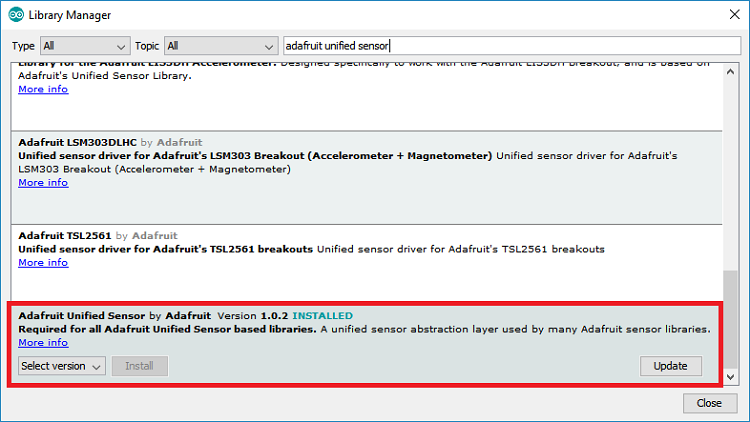
In addition to the BME280 library, you’ll also need to install the Adafruit_Sensor library to utilize it. Follow these steps to install the library in your Arduino IDE:
Go to Sketch > Include Library > Manage Libraries and enter “Adafruit Unified Sensor” in the search field.
Scroll down to locate the library and install it.
Upon completing the installation of both libraries, restart your Arduino IDE for the changes to take effect.
Reading Pressure, Temperature, and Humidity
To acquire readings of pressure, temperature, and humidity, we’ll utilize a sample sketch provided by the library.
Once the BME280 library and the Adafruit_Sensor library are installed, launch the Arduino IDE and navigate to File > Examples > Adafruit BME280 library > bme280 test.
#include <Wire.h>
#include <Adafruit_Sensor.h>
#include <Adafruit_BME280.h>

/*#include <SPI.h>
#define BME_SCK 18
#define BME_MISO 19
#define BME_MOSI 23
#define BME_CS 5*/

#define SEALEVELPRESSURE_HPA (1013.25)

Adafruit_BME280 bme; // I2C
//Adafruit_BME280 bme(BME_CS); // hardware SPI
//Adafruit_BME280 bme(BME_CS, BME_MOSI, BME_MISO, BME_SCK); // software SPI

unsigned long delayTime;

void setup() {
  Serial.begin(9600);
  Serial.println(F("BME280 test"));

  bool status;

  // default settings
  // (you can also pass in a Wire library object like &Wire2)
  status = bme.begin(0x76);
  if (!status) {
    Serial.println("Could not find a valid BME280 sensor, check wiring!");
    while (1);
  }

  Serial.println("-- Default Test --");
  delayTime = 1000;

  Serial.println();
}


void loop() {
  printValues();
  delay(delayTime);
}

void printValues() {
  Serial.print("Temperature = ");
  Serial.print(bme.readTemperature());
  Serial.println(" *C");

  // Convert temperature to Fahrenheit
  /*Serial.print("Temperature = ");
  Serial.print(1.8 * bme.readTemperature() + 32);
  Serial.println(" *F");*/

  Serial.print("Pressure = ");
  Serial.print(bme.readPressure() / 100.0F);
  Serial.println(" hPa");

  Serial.print("Approx. Altitude = ");
  Serial.print(bme.readAltitude(SEALEVELPRESSURE_HPA));
  Serial.println(" m");

  Serial.print("Humidity = ");
  Serial.print(bme.readHumidity());
  Serial.println(" %");

  Serial.println();
}
We’ve made necessary adjustments to the sketch to ensure full compatibility with the ESP32.
Code Explanation
Continue perusing this section to grasp the inner workings of the code, or skip ahead to the “Demonstration” section.
Libraries
The code initiates by importing essential libraries: the wire library for I2C usage, and the Adafruit_Sensor and Adafruit_BME280 libraries for interfacing with the BME280 sensor.
#include <Wire.h>
#include <Adafruit_Sensor.h>
#include <Adafruit_BME280.h>
SPI communication
Since we’re opting for I2C communication, the lines defining the SPI pins are commented out:
/*#include <SPI.h>
#define BME_SCK 18
#define BME_MISO 19
#define BME_MOSI 23
#define BME_CS 5*/
Note: If SPI communication is utilized, ESP32 SPI pins should be employed. For SPI communication on the ESP32, either the HSPI or VSPI pins can be utilized, as demonstrated in the subsequent table.
| SPI | MOSI | MISO | CLK | CS |
| HSPI | GPIO 13 | GPIO 12 | GPIO 14 | GPIO 15 |
| VSPI | GPIO 23 | GPIO 19 | GPIO 18 | GPIO 5 |
Sea level pressure
A variable named SEALEVELPRESSURE_HPA is established:
#define SEALEVELPRESSURE_HPA (1013.25)
This variable stores the sea level pressure in hectopascal (equivalent to millibar). It aids in estimating altitude by comparing a given pressure with the sea level pressure. Although the example employs the default value, for enhanced accuracy, substitute it with the current sea level pressure at your location.
I2C
By default, this example utilizes the I2C communication protocol. Simply create an Adafruit_BME280 object named bme:
Adafruit_BME280 bme; // I2C
To utilize SPI, comment out the preceding line and uncomment one of the following lines, contingent on whether hardware or software SPI is employed (hardware SPI utilizes the ESP32 default HSPI pins; software SPI utilizes the pins defined within the code).
//Adafruit_BME280 bme(BME_CS); // hardware SPI
//Adafruit_BME280 bme(BME_CS, BME_MOSI, BME_MISO, BME_SCK); // software SPI
setup()
Within the setup(), initialize serial communication:
Serial.begin(9600);
Then, initialize the sensor:
status = bme.begin(0x76);
if (!status) {
  Serial.println("Could not find a valid BME280 sensor, check wiring!");
  while (1);
}
0x76 address. If sensor readings are absent, verify the I2C address of your sensor. With the BME280 sensor connected to your ESP32, execute this I2C scanner sketch to ascertain the sensor’s address. Subsequently, modify the address if necessary.Printing values
Within the loop(), the printValues() function retrieves values from the BME280 and prints the outcomes in the Serial Monitor.
void loop() {
  printValues();
  delay(delayTime);
}
Reading temperature, humidity, pressure, and estimating altitude is as straightforward as utilizing the following methods on the bme object:
bme.readTemperature()– reads temperature in Celsius;bme.readHumidity()– reads absolute humidity;bme.readPressure()– reads pressure in hPa (hectoPascal = millibar);bme.readAltitude(SEALEVELPRESSURE_HPA)– estimates altitude in meters based on the pressure at sea level.
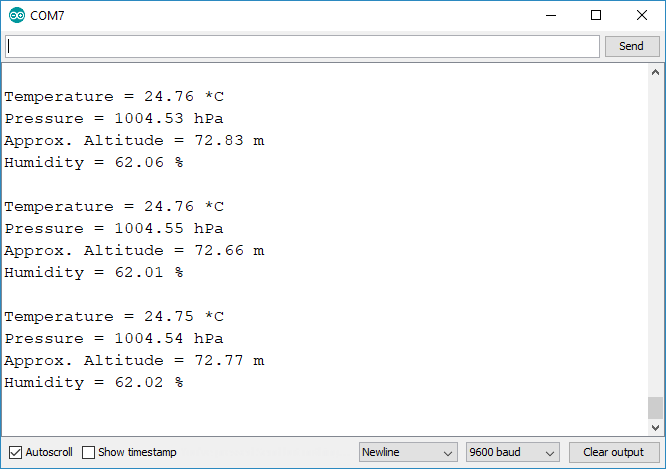
Demonstration
To observe the functionality, upload the code to your ESP32, and initiate the Serial Monitor at a baud rate of 9600. Press the on-board RST button to execute the code. You should observe the readings exhibited on the Serial Monitor.
Wrapping Up
This article served as a brief guide on acquiring pressure, temperature, and humidity readings from a BME280 sensor with the ESP32 using the Arduino IDE.
Now, you have the opportunity to expand this project further by presenting your sensor readings on an OLED display, crafting a datalogger, or setting up a web server to showcase the latest sensor readings. Here’s a compilation of projects that may aid in materializing these concepts:
- Ultimate Guide: Crafting an ESP8266 Weather Station Using BME280
- Interface BME280 with Arduino: Monitor Temp, Humidity, Pressure


