
Here’s a thorough tutorial on using the DS18B20 temperature sensor with ESP32 via Arduino IDE. We’ll demonstrate the wiring process, library installation, and coding for obtaining temperature readings from both single and multiple sensors. Additionally, we’ll create a basic web server to showcase these readings.
Introducing DS18B20 Temperature Sensor
The DS18B20 temperature sensor operates on a single-wire digital interface. This means it only needs one data line (and GND) to communicate with your ESP32.
It can draw power either from an external power source or from the data line itself (referred to as “parasite mode”), eliminating the need for an external power supply.
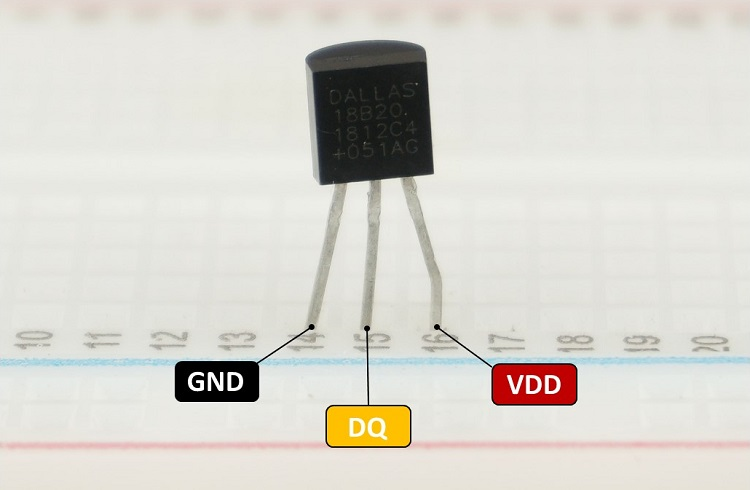
Each DS18B20 sensor comes with a unique 64-bit serial code. This feature enables you to connect multiple sensors to the same data wire, allowing you to obtain temperature readings from several sensors using just one GPIO pin.
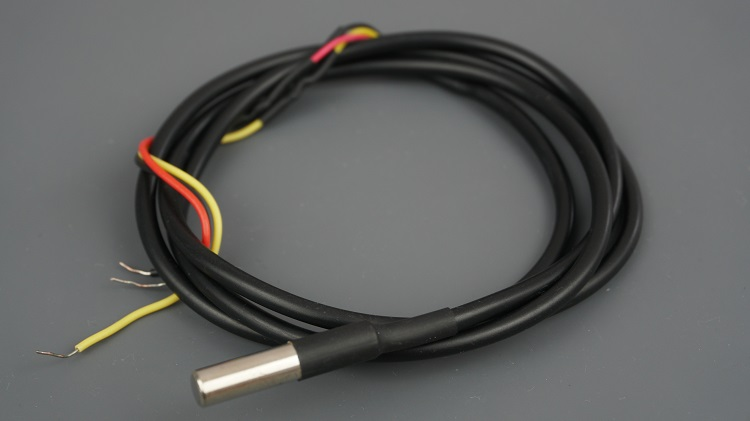
Additionally, the DS18B20 temperature sensor is available in a waterproof version.
Here’s a summary of the key specifications of the DS18B20 temperature sensor:
- Utilizes one-wire bus communication
- Power supply range: 3.0V to 5.5V
- Operating temperature range: -55ºC to +125ºC
- Accuracy of +/-0.5 ºC (within the range of -10ºC to 85ºC)
For further details, refer to the DS18B20 datasheet.
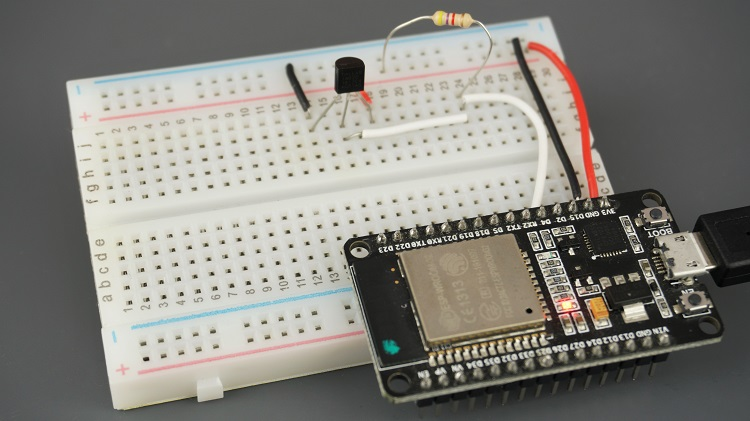
Schematic – ESP32
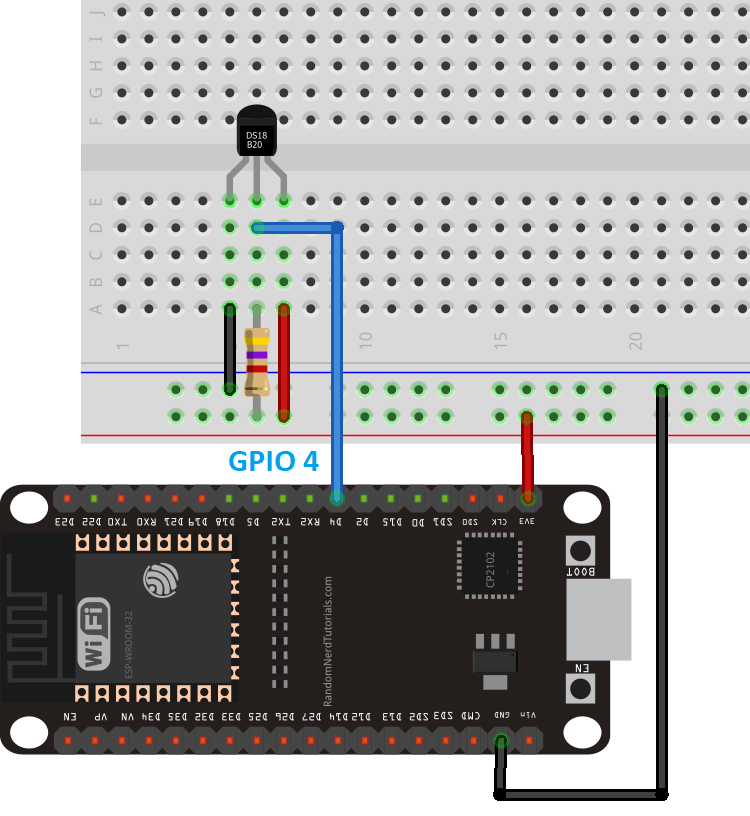
As noted earlier, the DS18B20 temperature sensor can be powered via the VDD pin (standard mode), or it can draw power from the data line (parasitic mode). You can select either mode.
If you’re utilizing an ESP32, refer to one of these two schematic diagrams.
Parasite Mode
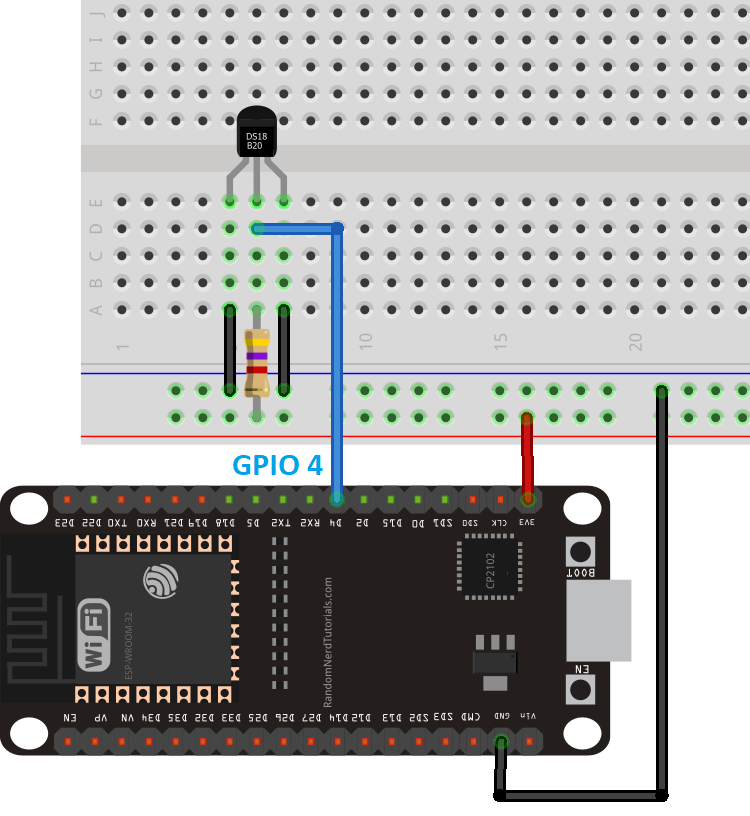
Normal Mode
Parts Required
Preparing Your Arduino IDE
We’ll be programming the ESP32 using Arduino IDE, so ensure you have the ESP32 add-on installed before proceeding:
Installing Libraries
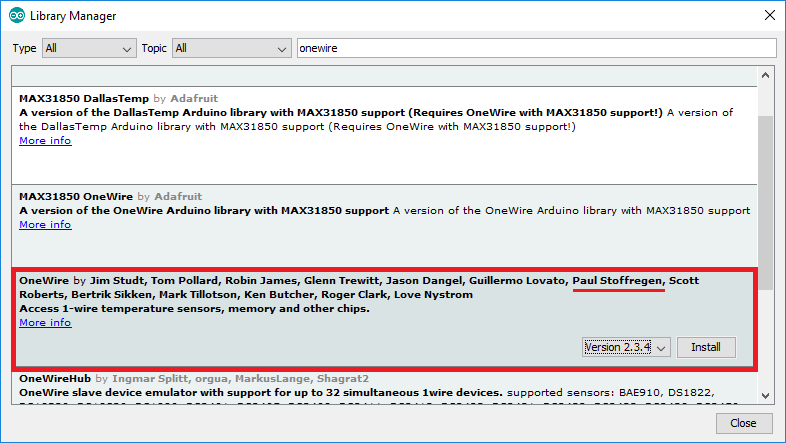
To interface with the DS18B20 temperature sensor, you’ll need to install the One Wire library by Paul Stoffregen and the Dallas Temperature library. Follow these steps to install the libraries:
Open your Arduino IDE and navigate to Sketch > Include Library > Manage Libraries. This will open the Library Manager.
In the search box, type “onewire” and install the OneWire library by Paul Stoffregen.
Next, search for “Dallas” and install the DallasTemperature library by Miles Burton.
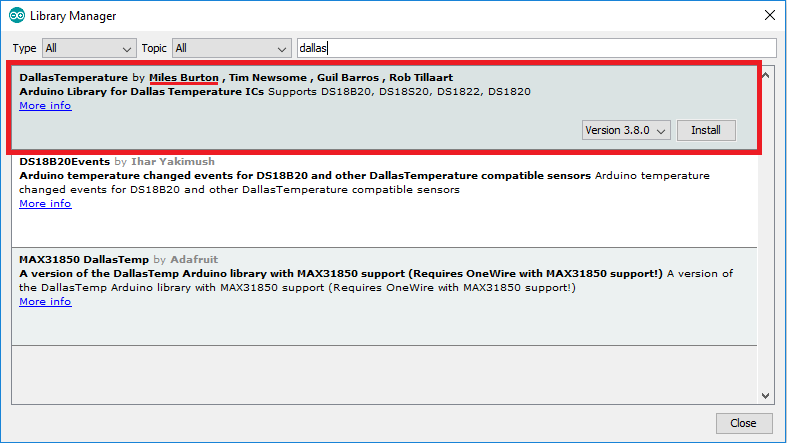
After installing the libraries, restart your Arduino IDE.
Code (Single DS18B20)
Once you’ve installed the necessary libraries, you can upload the code to the ESP32. The following code retrieves temperature data from the DS18B20 sensor and displays it on the Arduino IDE Serial Monitor.
#include <OneWire.h>
#include <DallasTemperature.h>

// GPIO where the DS18B20 is connected to
const int oneWireBus = 4;

// Setup a oneWire instance to communicate with any OneWire devices
OneWire oneWire(oneWireBus);

// Pass our oneWire reference to Dallas Temperature sensor
DallasTemperature sensors(&oneWire);

void setup() {
  // Start the Serial Monitor
  Serial.begin(115200);
  // Start the DS18B20 sensor
  sensors.begin();
}

void loop() {
  sensors.requestTemperatures();
  float temperatureC = sensors.getTempCByIndex(0);
  float temperatureF = sensors.getTempFByIndex(0);
  Serial.print(temperatureC);
  Serial.println("ºC");
  Serial.print(temperatureF);
  Serial.println("ºF");
  delay(5000);
}
There are numerous methods to obtain temperature readings from DS18B20 sensors. However, if you’re using a single sensor, this is one of the simplest and most straightforward approaches.
Code Explanation
Begin by including the OneWire and DallasTemperature libraries:
#include <OneWire.h>
#include <DallasTemperature.h>
Instantiate the necessary objects for the temperature sensor. The sensor is connected to GPIO 4.
// GPIO where the DS18B20 is connected to
const int oneWireBus = 4;

// Setup a oneWire instance to communicate with any OneWire devices
OneWire oneWire(oneWireBus);

// Pass our oneWire reference to Dallas Temperature sensor
DallasTemperature sensors(&oneWire);
In the setup() function, initialize the Serial Monitor with a baud rate of 115200:
Serial.begin(115200);
Initialize the DS18B20 temperature sensor:
sensors.begin();
Before retrieving the temperature, call the requestTemperatures() method:
sensors.requestTemperatures();
Then, retrieve the temperature in Celsius using the getTempCByIndex() method:
float temperatureC = sensors.getTempCByIndex(0);
Alternatively, use getTempFByIndex() to obtain the temperature in Fahrenheit:
float temperatureF = sensors.getTempFByIndex(0);
Both getTempCByIndex() and getTempFByIndex() methods require the index of the temperature sensor. Since we’re using only one sensor, its index is 0. For multiple sensors, utilize index 0 for one sensor, index 1 for another, and so forth.
Lastly, print the results in the Serial Monitor:
Serial.print(temperatureC);
Serial.println("ºC");
Serial.print(temperatureF);
Serial.println("ºF");
New temperature readings are requested every 5 seconds:
delay(5000);
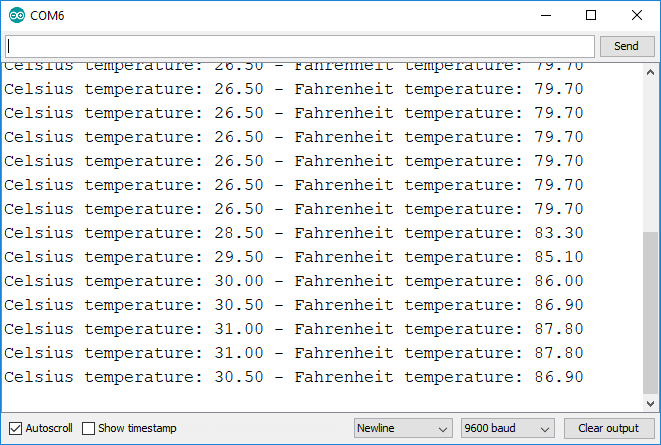
Demonstration
After uploading the code, you should get your sensor readings displayed in the Serial Monitor:
Obtaining Temperature from Multiple DS18B20 Temperature Sensors

The DS18B20 temperature sensor utilizes a one-wire protocol, with each sensor possessing a unique 64-bit serial code. Consequently, you can retrieve temperature data from multiple sensors using a single GPIO. Simply connect all data lines together, as illustrated in the following schematic diagram:

Code (Multiple DS18B20s)
Next, upload the provided code. It scans for all devices on GPIO 4 and prints the temperature for each one. (This sketch is based on an example provided by the DallasTemperature library).
#include <OneWire.h>
#include <DallasTemperature.h>

// Data wire is plugged TO GPIO 4
#define ONE_WIRE_BUS 4

// Setup a oneWire instance to communicate with any OneWire devices (not just Maxim/Dallas temperature ICs)
OneWire oneWire(ONE_WIRE_BUS);

// Pass our oneWire reference to Dallas Temperature.
DallasTemperature sensors(&oneWire);

// Number of temperature devices found
int numberOfDevices;

// We'll use this variable to store a found device address
DeviceAddress tempDeviceAddress;

void setup(){
  // start serial port
  Serial.begin(115200);

  // Start up the library
  sensors.begin();

  // Grab a count of devices on the wire
  numberOfDevices = sensors.getDeviceCount();

  // locate devices on the bus
  Serial.print("Locating devices...");
  Serial.print("Found ");
  Serial.print(numberOfDevices, DEC);
  Serial.println(" devices.");

  // Loop through each device, print out address
  for(int i=0;i<numberOfDevices; i++){
    // Search the wire for address
    if(sensors.getAddress(tempDeviceAddress, i)){
      Serial.print("Found device ");
      Serial.print(i, DEC);
      Serial.print(" with address: ");
      printAddress(tempDeviceAddress);
      Serial.println();
    } else {
      Serial.print("Found ghost device at ");
      Serial.print(i, DEC);
      Serial.print(" but could not detect address. Check power and cabling");
    }
  }
}

void loop(){
  sensors.requestTemperatures(); // Send the command to get temperatures

  // Loop through each device, print out temperature data
  for(int i=0;i<numberOfDevices; i++){
    // Search the wire for address
    if(sensors.getAddress(tempDeviceAddress, i)){
      // Output the device ID
      Serial.print("Temperature for device: ");
      Serial.println(i,DEC);
      // Print the data
      float tempC = sensors.getTempC(tempDeviceAddress);
      Serial.print("Temp C: ");
      Serial.print(tempC);
      Serial.print(" Temp F: ");
      Serial.println(DallasTemperature::toFahrenheit(tempC)); // Converts tempC to Fahrenheit
    }
  }
  delay(5000);
}

// function to print a device address
void printAddress(DeviceAddress deviceAddress) {
  for (uint8_t i = 0; i < 8; i++){
    if (deviceAddress[i] < 16) Serial.print("0");
      Serial.print(deviceAddress[i], HEX);
  }
}
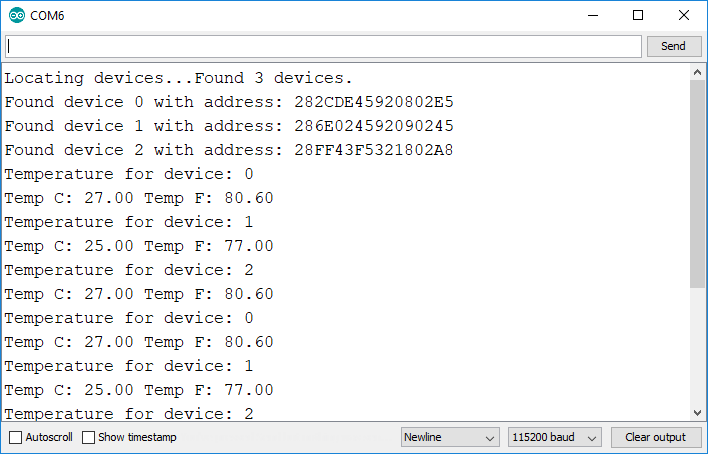
Demonstration
In this example, we’re using three DS18B20 temperature sensors. The results are displayed on the Arduino IDE Serial Monitor.
For a detailed guide on interfacing multiple DS18B20 temperature sensors with the ESP32, refer to the next tutorial.
Display DS18B20 Temperature Readings in a Web Server
To construct the web server, we’ll utilize the ESPAsyncWebServer library, which offers a straightforward method to develop an asynchronous web server. Creating an asynchronous web server presents several benefits. We suggest referring to the library documentation on its GitHub page for a quick overview.
Installation of ESPAsyncWebServer and AsyncTCP Libraries
To create the web server for this project, you must install the following libraries in your Arduino IDE:
- ESPAsyncWebServer (.zip folder)
- AsyncTCP (.zip folder)
Since the ESPAsyncWebServer, AsyncTCP, and ESPAsyncTCP libraries are not available for installation via the Arduino Library Manager, you’ll need to manually copy the library files to the Libraries folder within your Arduino installation directory. Alternatively, within your Arduino IDE, navigate to Sketch > Include Library > Add .zip Library and select the libraries you’ve recently downloaded.
Code (DS18B20 Async Web Server)
Launch your Arduino IDE and copy the code provided below.
// Import required libraries
#ifdef ESP32
#include <WiFi.h>
#include <ESPAsyncWebServer.h>
#else
#include <Arduino.h>
#include <ESP8266WiFi.h>
#include <Hash.h>
#include <ESPAsyncTCP.h>
#include <ESPAsyncWebServer.h>
#endif
#include <OneWire.h>
#include <DallasTemperature.h>
// Data wire is connected to GPIO 4
#define ONE_WIRE_BUS 4
// Setup a oneWire instance to communicate with any OneWire devices
OneWire oneWire(ONE_WIRE_BUS);
// Pass our oneWire reference to Dallas Temperature sensor
DallasTemperature sensors(&oneWire);
// Variables to store temperature values
String temperatureF = "";
String temperatureC = "";
// Timer variables
unsigned long lastTime = 0;
unsigned long timerDelay = 30000;
// Replace with your network credentials
const char* ssid = "REPLACE_WITH_YOUR_SSID";
const char* password = "REPLACE_WITH_YOUR_PASSWORD";
// Create AsyncWebServer object on port 80
AsyncWebServer server(80);
String readDSTemperatureC() {
// Call sensors.requestTemperatures() to issue a global temperature and Requests to all devices on the bus
sensors.requestTemperatures();
float tempC = sensors.getTempCByIndex(0);
if(tempC == -127.00) {
Serial.println("Failed to read from DS18B20 sensor");
return "--";
} else {
Serial.print("Temperature Celsius: ");
Serial.println(tempC);
}
return String(tempC);
}
String readDSTemperatureF() {
// Call sensors.requestTemperatures() to issue a global temperature and Requests to all devices on the bus
sensors.requestTemperatures();
float tempF = sensors.getTempFByIndex(0);
if(int(tempF) == -196){
Serial.println("Failed to read from DS18B20 sensor");
return "--";
} else {
Serial.print("Temperature Fahrenheit: ");
Serial.println(tempF);
}
return String(tempF);
}
const char index_html[] PROGMEM = R"rawliteral(
<!DOCTYPE HTML><html>
<head>
<meta name="viewport" content="width=device-width, initial-scale=1">
<link rel="stylesheet" href="https://use.fontawesome.com/releases/v5.7.2/css/all.css" integrity="sha384-fnmOCqbTlWIlj8LyTjo7mOUStjsKC4pOpQbqyi7RrhN7udi9RwhKkMHpvLbHG9Sr" crossorigin="anonymous">
<style>
html {
font-family: Arial;
display: inline-block;
margin: 0px auto;
text-align: center;
}
h2 { font-size: 3.0rem; }
p { font-size: 3.0rem; }
.units { font-size: 1.2rem; }
.ds-labels{
font-size: 1.5rem;
vertical-align:middle;
padding-bottom: 15px;
}
</style>
</head>
<body>
<h2>ESP DS18B20 Server</h2>
<p>
<i class="fas fa-thermometer-half" style="color:#059e8a;"></i>
<span class="ds-labels">Temperature Celsius</span>
<span id="temperaturec">%TEMPERATUREC%</span>
<sup class="units">°C</sup>
</p>
<p>
<i class="fas fa-thermometer-half" style="color:#059e8a;"></i>
<span class="ds-labels">Temperature Fahrenheit</span>
<span id="temperaturef">%TEMPERATUREF%</span>
<sup class="units">°F</sup>
</p>
</body>
<script>
setInterval(function ( ) {
var xhttp = new XMLHttpRequest();
xhttp.onreadystatechange = function() {
if (this.readyState == 4 && this.status == 200) {
document.getElementById("temperaturec").innerHTML = this.responseText;
}
};
xhttp.open("GET", "/temperaturec", true);
xhttp.send();
}, 10000) ;
setInterval(function ( ) {
var xhttp = new XMLHttpRequest();
xhttp.onreadystatechange = function() {
if (this.readyState == 4 && this.status == 200) {
document.getElementById("temperaturef").innerHTML = this.responseText;
}
};
xhttp.open("GET", "/temperaturef", true);
xhttp.send();
}, 10000) ;
</script>
</html>)rawliteral";
// Replaces placeholder with DS18B20 values
String processor(const String& var){
//Serial.println(var);
if(var == "TEMPERATUREC"){
return temperatureC;
}
else if(var == "TEMPERATUREF"){
return temperatureF;
}
return String();
}
void setup(){
// Serial port for debugging purposes
Serial.begin(115200);
Serial.println();
// Start up the DS18B20 library
sensors.begin();
temperatureC = readDSTemperatureC();
temperatureF = readDSTemperatureF();
// Connect to Wi-Fi
WiFi.begin(ssid, password);
Serial.println("Connecting to WiFi");
while (WiFi.status() != WL_CONNECTED) {
delay(500);
Serial.print(".");
}
Serial.println();
// Print ESP Local IP Address
Serial.println(WiFi.localIP());
// Route for root / web page
server.on("/", HTTP_GET, [](AsyncWebServerRequest *request){
request->send_P(200, "text/html", index_html, processor);
});
server.on("/temperaturec", HTTP_GET, [](AsyncWebServerRequest *request){
request->send_P(200, "text/plain", temperatureC.c_str());
});
server.on("/temperaturef", HTTP_GET, [](AsyncWebServerRequest *request){
request->send_P(200, "text/plain", temperatureF.c_str());
});
// Start server
server.begin();
}
void loop(){
if ((millis() - lastTime) > timerDelay) {
temperatureC = readDSTemperatureC();
temperatureF = readDSTemperatureF();
lastTime = millis();
}
}
Replace the placeholder with your network credentials in the following variables, and the code will function seamlessly.
const char* ssid = "REPLACE_WITH_YOUR_SSID"; const char* password = "REPLACE_WITH_YOUR_PASSWORD";
Code Explanation
Let’s delve into how the code operates. Read on to gain insight into its functionality, or skip ahead to the “Demonstration” section to observe the final outcome.
Importing libraries
Initially, import the necessary libraries for the ESP32 board:
#include <WiFi.h>
#include <ESPAsyncWebServer.h>
#include <OneWire.h>
#include <DallasTemperature.h>
Instantiate DS18B20 Sensor
Define the GPIO to which the DS18B20 data pin connects, in this case, it’s linked to GPIO 4.
#define ONE_WIRE_BUS 4
Instantiate the required instances to initialize the sensor:
// Setup a oneWire instance to communicate with any OneWire devices
OneWire oneWire(ONE_WIRE_BUS);

// Pass our oneWire reference to Dallas Temperature sensor
DallasTemperature sensors(&oneWire);
Setting your network credentials
Insert your network credentials into the following variables, enabling the ESP8266 to connect to your local network.
const char* ssid = "REPLACE_WITH_YOUR_SSID";
const char* password = "REPLACE_WITH_YOUR_PASSWORD";
Create an AsyncWebServer object on port 80.
AsyncWebServer server(80);
Read Temperature Functions
Then, we create two functions to read the temperature.
The readDSTemperatureC() function returns the readings in Celsius degrees.
String readDSTemperatureC() {
  // Call sensors.requestTemperatures() to issue a global temperature and Requests to all devices on the bus
  sensors.requestTemperatures();
  float tempC = sensors.getTempCByIndex(0);

  if(tempC == -127.00){
    Serial.println("Failed to read from DS18B20 sensor");
    return "--";
  } else {
    Serial.print("Temperature Celsius: ");
    Serial.println(tempC);
  }
  return String(tempC);
}
In case the sensor is not able to get a valid reading, it returns -127. So, we have an if statement that returns two dashes (–-) in case the sensor fails to get the readings.
if(tempC == -127.00){
  Serial.println("Failed to read from DS18B20 sensor");
  return "--";
The reaDSTemperatureF() function works in a similar way but returns the readings in Fahrenheit degrees.
The readings are returned as string type. To convert a float to a string, use the String() function.
return String(tempC);
Building the Web Page
The next step is building the web page. The HTML and CSS needed to build the web page are saved on the index_html variable.
In the HTML text we have TEMPERATUREC and TEMPERATUREF between % signs. This is a placeholder for the temperature values.
This means that this %TEMPERATUREC% text is like a variable that will be replaced by the actual temperature value from the sensor. The placeholders on the HTML text should go between % signs.
We’ve explained in great detail how the HTML and CSS used in this web server works in a previous tutorial. So, if you want to learn more, refer to the next project:
Processor
Now, we need to create the processor() function, that will replace the placeholders in our HTML text with the actual temperature values.
String processor(const String& var){
  //Serial.println(var);
  if(var == "TEMPERATUREC"){
    return readDSTemperatureC();
  }
  else if(var == "TEMPERATUREF"){
    return readDSTemperatureF();
  }
  return String();
}
When the web page is requested, we check if the HTML has any placeholders. If it finds the %TEMPERATUREC% placeholder, we return the temperature in Celsius by calling the readDSTemperatureC() function created previously.
if(var == "TEMPERATUREC"){
  return readDSTemperatureC();
}
If the placeholder is %TEMPERATUREF%, we return the temperature in Fahrenheit.
else if(var == "TEMPERATUREF"){
  return readDSTemperatureF();
}
setup()
In the setup(), initialize the Serial Monitor for debugging purposes.
Serial.begin(115200);
Initialize the DS18B20 temperature sensor.
sensors.begin();
Connect to your local network and print the ESP32 IP address.
WiFi.begin(ssid, password);
Serial.println("Connecting to WiFi");
while (WiFi.status() != WL_CONNECTED) {
  delay(500);
  Serial.print(".");
}
Serial.println();

// Print ESP8266 Local IP Address
Serial.println(WiFi.localIP());
Finally, add the next lines of code to handle the web server.
server.on("/", HTTP_GET, [](AsyncWebServerRequest *request){
  request->send_P(200, "text/html", index_html, processor);
});
server.on("/temperaturec", HTTP_GET, [](AsyncWebServerRequest *request){
  request->send_P(200, "text/plain", readDSTemperatureC().c_str());
});
server.on("/temperaturef", HTTP_GET, [](AsyncWebServerRequest *request){
  request->send_P(200, "text/plain", readDSTemperatureF().c_str());
});
When we make a request on the root URL, we send the HTML text that is stored in the index_html variable. We also need to pass the processor function, that will replace all the placeholders with the right values.
server.on("/", HTTP_GET, [](AsyncWebServerRequest *request){
  request->send_P(200, "text/html", index_html, processor);
});
We need to add two additional handlers to update the temperature readings. When we receive a request on the /temperaturec URL, we simply need to send the updated temperature value. It is plain text, and it should be sent as a char, so, we use the c_str() method.
server.on("/temperaturec", HTTP_GET, [](AsyncWebServerRequest *request){
  request->send_P(200, "text/plain", readDSTemperatureC().c_str());
});
The same process is repeated for the temperature in Fahrenheit.
server.on("/temperaturef", HTTP_GET, [](AsyncWebServerRequest *request){
  request->send_P(200, "text/plain", readDSTemperatureF().c_str());
});
Lastly, we can start the server.
server.begin();
Because this is an asynchronous web server, we don’t need to write anything in the loop().
void loop(){

}
That’s pretty much how the code works.
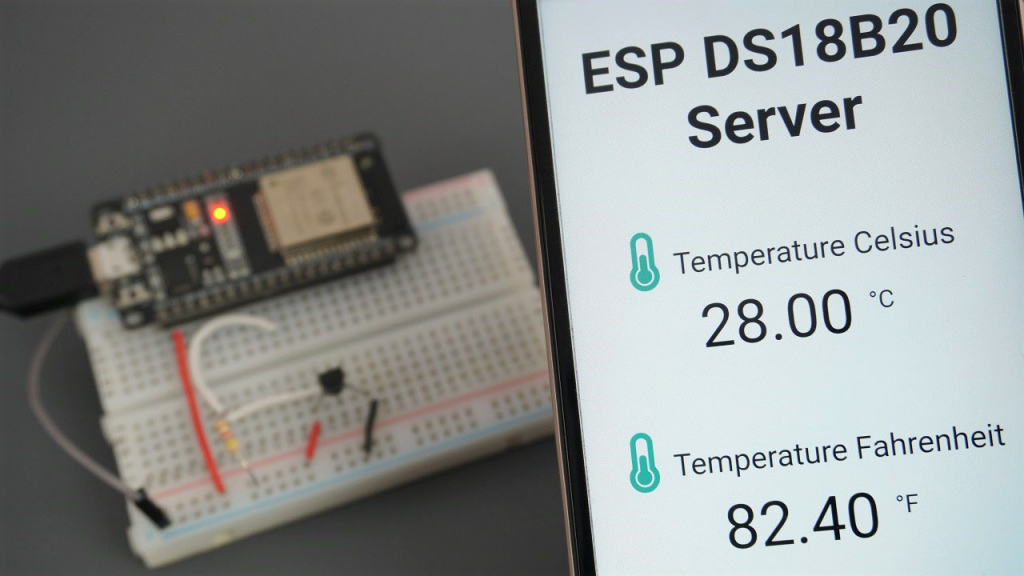
Demonstration
Once the code is uploaded, launch the Arduino IDE Serial Monitor at a baud rate of 115200. Press the ESP32 on-board RST button, and after a few seconds, your IP address should appear.
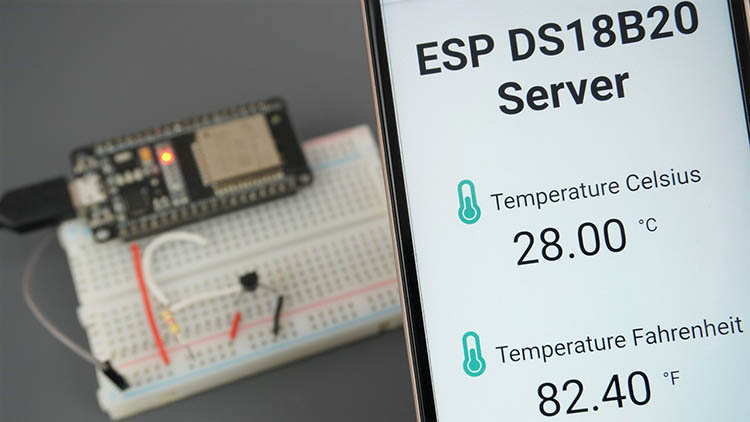
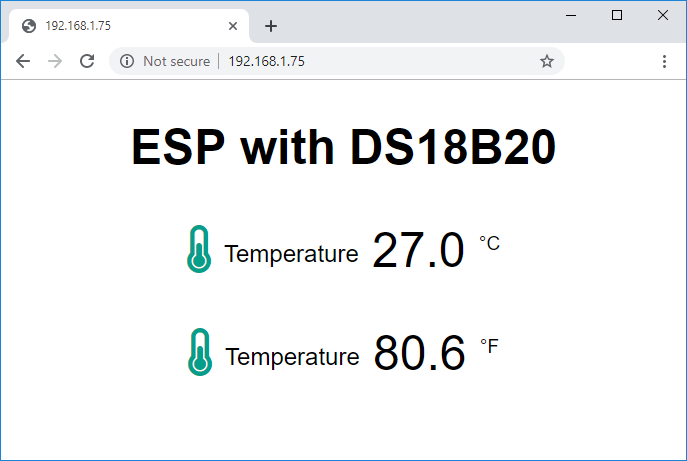
Within your local network, open a web browser and enter the ESP32 IP address.
Now, you’ll be able to view the temperature in both Celsius and Fahrenheit on your web server. The sensor readings will automatically update without requiring you to refresh the web page.
Wrapping Up
We trust you’ve found this tutorial valuable. We have guides for various other sensors and modules compatible with the ESP32 that you might find helpful:
- Enhanced Monitoring: Multiple DS18B20s on ESP8266 Web Server
- Step-by-Step: Interfacing Multiple DS18B20 Sensors with Arduino
- Complete Tutorial: Interfacing Arduino with DS18B20 Digital Sensor


