

If you are looking for a simple and cost-effective way to add temperature sensing to your Arduino project, the DS18B20 1-Wire Temperature Sensor is an excellent choice. These sensors offer good accuracy and do not require any external components to operate. With just a few connections and the appropriate Arduino code, you can quickly and easily incorporate temperature sensing into your project.
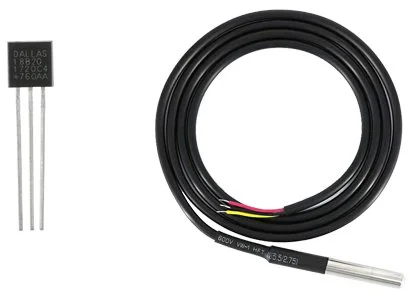
DS18B20 1-Wire Temperature Sensor
The DS18B20, manufactured by Dallas Semiconductor (now Maxim Integrated), is a temperature sensor that utilizes the 1-Wire® protocol. This means that it requires only one digital pin for communication with the microcontroller.
There are two common form factors for the DS18B20 arduino. One is a TO-92 package, similar to a transistor, while the other is a waterproof probe, ideal for measuring temperature in distant, underwater, or underground locations.
The DS18B20 temperature sensor offers good precision and does not rely on external components for operation. It has a wide temperature range from -55°C to +125°C and provides an accuracy of ±0.5°C.
The sensor’s resolution can be configured to 9, 10, 11, or 12 bits, with the default resolution being 12 bits, providing a precision of 0.0625°C.
Operating on a power supply of 3V to 5.5V, the DS18B20 consumes only 1mA during active temperature conversions.
Here are the specifications of the DS18B20 temperature sensor:
| Power Supply | 3V to 5.5V |
| Current Consumption | 1mA |
| Temperature Range | -55 to 125°C |
| Accuracy | ±0.5°C |
| Resolution | 9 to 12 bit (selectable) |
| Conversion Time | < 750ms |
Using Multiple DS18B20 Temperature Sensors on a Single Bus
An advantageous feature of the DS18B20 is its ability to accommodate multiple sensors on the same 1-Wire bus. Each DS18B20 possesses a unique 64-bit serial code, allowing for easy differentiation between sensors.
This capability becomes particularly valuable when managing multiple DS18B20 sensors dispersed across a wide area.
To learn how to read data from multiple DS18B20 temperature sensors, refer to this informative tutorial.
DS18B20 Sensor Pinout
The DS18B20 temperature sensor has a simple pinout configuration:

GND: This pin is the ground connection for the sensor.
DQ: It serves as the 1-Wire Data Bus and needs to be connected to a digital pin on the microcontroller.
VDD: This pin provides power to the sensor, with a voltage range of 3.3V to 5V.
Wiring a DS18B20 Temperature Sensor to an Arduino
To connect the DS18B20 temperature sensor to the Arduino, follow these simple steps:
- Connect the VDD pin of the DS18B20 to the 5V pin on the Arduino.
- Connect the GND pin of the DS18B20 to the ground (GND) pin on the Arduino.
- Connect the signal pin (DQ) of the DS18B20 arduino to digital pin 2 on the Arduino. Note: To ensure stable data transfer, you need to add a 4.7k pull-up resistor between the signal pin (DQ) and the VDD pin. Using the internal pull-ups on the Arduino will not work in this case.

If you are using the waterproof version of the DS18B20, follow these additional:
- Connect the red wire of the waterproof DS18B20 to the 5V pin on the Arduino.
- Connect the black wire of the waterproof DS18B20 to the ground (GND) pin on the Arduino.
- Connect the yellow wire of the waterproof DS18B20 to digital pin 2 on the Arduino. Note: Similar to the non-waterproof version, you still need to connect a 4.7k pull-up resistor between the signal wire (yellow) and the 5V pin.

Ensure that the connections are accurate and secure to prevent overheating or damage to the DS18B20 sensor.
Parts Required
Installing Library For DS18B20
To simplify the complex 1-Wire protocol and enable easy temperature readings from the DS18B20 sensor, we will use the DallasTemperature.h library. This library provides simple commands to interact with the sensor and obtain temperature data.
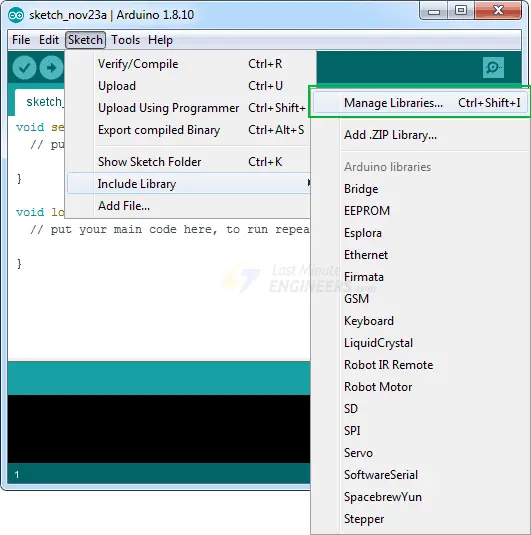
To install the library, follow these steps:
Open the Arduino IDE and navigate to Sketch > Include Library > Manage Libraries…
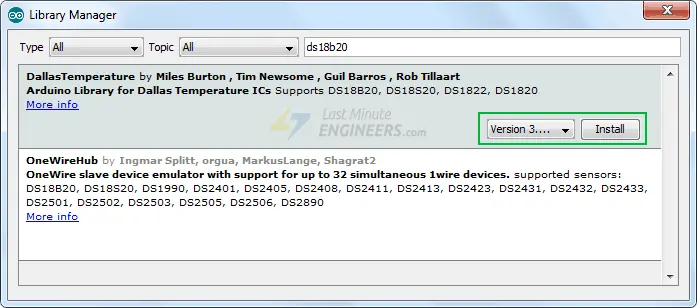
Wait for the Library Manager to download the library index and update the list of installed libraries.
In the search field, enter ‘ds18b20’ to filter the results.
Locate the entry for DallasTemperature by Miles Burton and click on it.
Click the Install button to install the library.
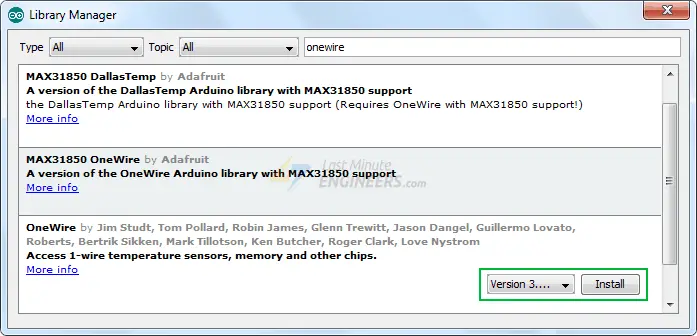
Note: The Dallas Temperature library requires the One Wire Library to communicate with any one-wire device, not just the DS18B20. Make sure to install the One Wire Library as well.
By installing these libraries, you can abstract away the complexities of the 1-Wire protocol and easily work with the DS18B20 temperature sensor.
Arduino Example Code
To help you grasp the process of reading temperature data from a DS18B20 Temperature Sensor, we have provided a comprehensive sketch below. This code can serve as a solid starting point for your own experiments and projects.
#include <OneWire.h>
#include <DallasTemperature.h>

// Data wire is plugged into digital pin 2 on the Arduino
#define ONE_WIRE_BUS 2

// Setup a oneWire instance to communicate with any OneWire device
OneWire oneWire(ONE_WIRE_BUS);

// Pass oneWire reference to DallasTemperature library
DallasTemperature sensors(&oneWire);

void setup(void)
{
  sensors.begin();	// Start up the library
  Serial.begin(9600);
}

void loop(void)
{
  // Send the command to get temperatures
  sensors.requestTemperatures();

  //print the temperature in Celsius
  Serial.print("Temperature: ");
  Serial.print(sensors.getTempCByIndex(0));
  Serial.print((char)176);//shows degrees character
  Serial.print("C  |  ");

  //print the temperature in Fahrenheit
  Serial.print((sensors.getTempCByIndex(0) * 9.0) / 5.0 + 32.0);
  Serial.print((char)176);//shows degrees character
  Serial.println("F");

  delay(500);
}
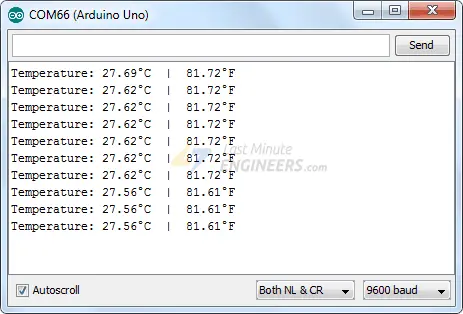
Upon running the sketch, you will see the temperature readings displayed on the serial monitor.
Code Explanation:
To begin, the sketch includes the necessary libraries, namely OneWire.h and DallasTemperature.h. The Arduino pin connected to the sensor’s signal pin is declared.
#include <OneWire.h>
#include <DallasTemperature.h>

#define ONE_WIRE_BUS 2
To establish communication with the DS18B20 sensor, two steps are taken. First, a one-wire object is created, passing the sensor’s signal pin as a parameter. Second, a DallasTemperature library object is created, passing the reference of the one-wire object as a parameter.
OneWire oneWire(ONE_WIRE_BUS);
DallasTemperature sensors(&oneWire);
In the setup section, serial communication with the PC is established by calling the begin() function. This function scans the bus for connected DS18B20 sensors and sets the bit resolution (12 bits) for each one.
void setup(void) {
  sensors.begin();	// Start up the library
  Serial.begin(9600);
}
In the loop section, the requestTemperatures() function is called, instructing all sensors on the bus to perform a temperature conversion.
Then, the getTempCByIndex(deviceIndex) function is called, where deviceIndex represents the location of the sensor on the bus. This function reads the temperature reading from the corresponding sensor and returns it.
If there is only one DS18B20 on the bus, set deviceIndex to 0.
void loop(void) {
  // Send the command to get temperatures
  sensors.requestTemperatures();

  //print the temperature in Celsius
  Serial.print("Temperature: ");
  Serial.print(sensors.getTempCByIndex(0));
  Serial.print((char)176);//shows degrees character
  Serial.print("C  |  ");

  //print the temperature in Fahrenheit
  Serial.print((sensors.getTempCByIndex(0) * 9.0) / 5.0 + 32.0);
  Serial.print((char)176);//shows degrees character
  Serial.println("F");

  delay(500);
}
Other useful functions in the DallasTemperature.h library
The DallasTemperature object provides several handy functions that can be utilized. Here are some of them:
- The
setResolution()function allows you to set the resolution of the DS18B20’s internal ADC. You can choose between 9, 10, 11, or 12 bits, which correspond to temperature precisions of 0.5°C, 0.25°C, 0.125°C, and 0.0625°C, respectively.
- The
getWaitForConversion()function retrieves the value of the waitForConversion flag. This flag is helpful for determining if a temperature conversion is still in progress or has been completed.
- The
setHighAlarmTemp()andsetLowAlarmTemp()functions are used to configure the high and low temperature alarm thresholds in degrees Celsius for a specific device. The temperature range for setting alarms is -55°C to 125°C.
- The
hasAlarm()function returns a boolean value indicating whether the temperature reading has exceeded either the high or low alarm threshold for the device. If an alarm is triggered, it returns true.
Related article
- Arduino BMP180 Guide: Barometric Pressure and Temperature
- Arduino DHT11 Sensor Tutorial: How to Interface and Read Data
- Arduino DHT11 and DHT22 Sensor Interface: Step-by-Step Guide
- Optimizing Temperature & Humidity Monitoring: Arduino SHT31 Sensor
- Using TMP36 Temperature Sensor: Arduino Interfacing Guide


