

This guide demonstrates the utilization of the DHT11 and DHT22 temperature and humidity sensors with the ESP32 using Arduino IDE. It includes a brief overview of these sensors, their pinout, wiring diagram, and concludes with the Arduino sketch.
DHT11 and DHT22 Temperature and Humidity Sensors
The DHT11 and DHT22 sensors serve the purpose of measuring temperature and relative humidity, commonly favored by makers and electronics enthusiasts.

These sensors integrate a chip responsible for analog to digital conversion, generating a digital signal conveying temperature and humidity data. This attribute makes them highly compatible with any microcontroller.
For those interested in integrating these sensors with an Arduino board, the following tutorial provides detailed guidance:
DHT11 vs DHT22
Although the DHT11 and DHT22 are akin in functionality, they diverge in their specifications. The table below juxtaposes key specifications of these temperature and humidity sensors. For a comprehensive analysis, refer to the respective datasheets.
| DHT11 | DHT22 | |
| Temperature range | 0 to 50 ºC +/-2 ºC | -40 to 80 ºC +/-0.5ºC |
| Humidity range | 20 to 90% +/-5% | 0 to 100% +/-2% |
| Resolution | Humidity: 1% Temperature: 1ºC | Humidity: 0.1% Temperature: 0.1ºC |
| Operating voltage | 3 – 5.5 V DC | 3 – 6 V DC |
| Current supply | 0.5 – 2.5 mA | 1 – 1.5 mA |
| Sampling period | 1 second | 2 seconds |
The DHT22 sensor boasts superior resolution and a broader measurement range for temperature and humidity. Yet, it comes at a slightly higher cost and supports readings at intervals of 2 seconds only.
Conversely, the DHT11 offers a narrower range and lower accuracy, but enables sensor readings every second and is comparatively more economical.
Despite their disparities, both sensors operate similarly, allowing the use of identical code for temperature and humidity readings, contingent upon specifying the sensor type within the code.
DHT Pinout
DHT sensors feature four pins, depicted in the accompanying diagram. Yet, if you acquire a DHT sensor on a breakout board, it typically arrives with three pins and includes an internal pull-up resistor on pin 2.
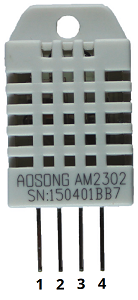
The table below illustrates the pinout for DHT22/DHT11. When oriented towards you, pin numbering commences from 1 on the left to the right.
| DHT pin | Connect to |
| 1 | 3.3V |
| 2 | Any digital GPIO; also connect a 10k Ohm pull-up resistor |
| 3 | Don’t connect |
| 4 | GND |
Schematic Diagram
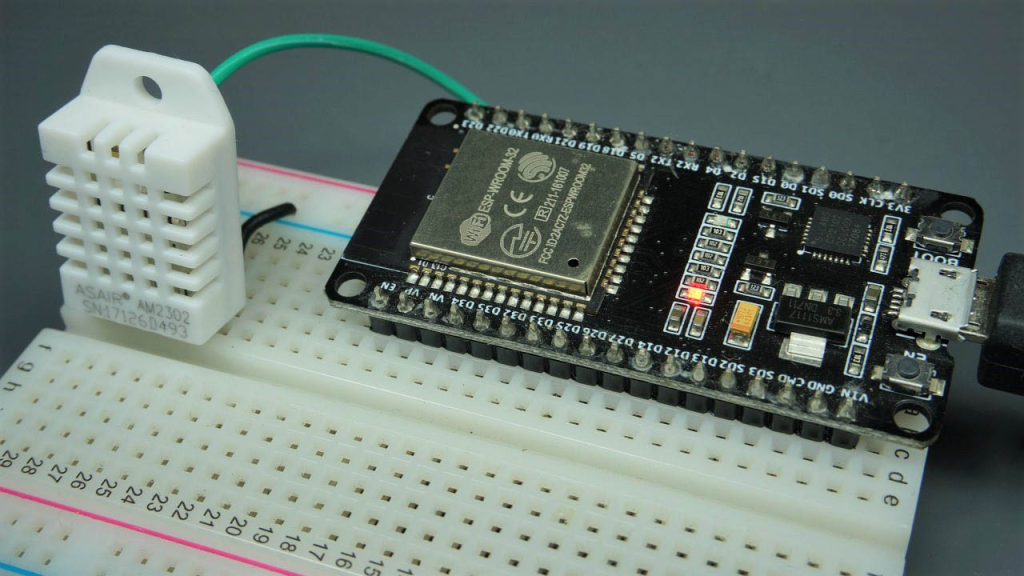
Connect the DHT22 or DHT11 sensor to the ESP32 development board following the schematic diagram provided below.
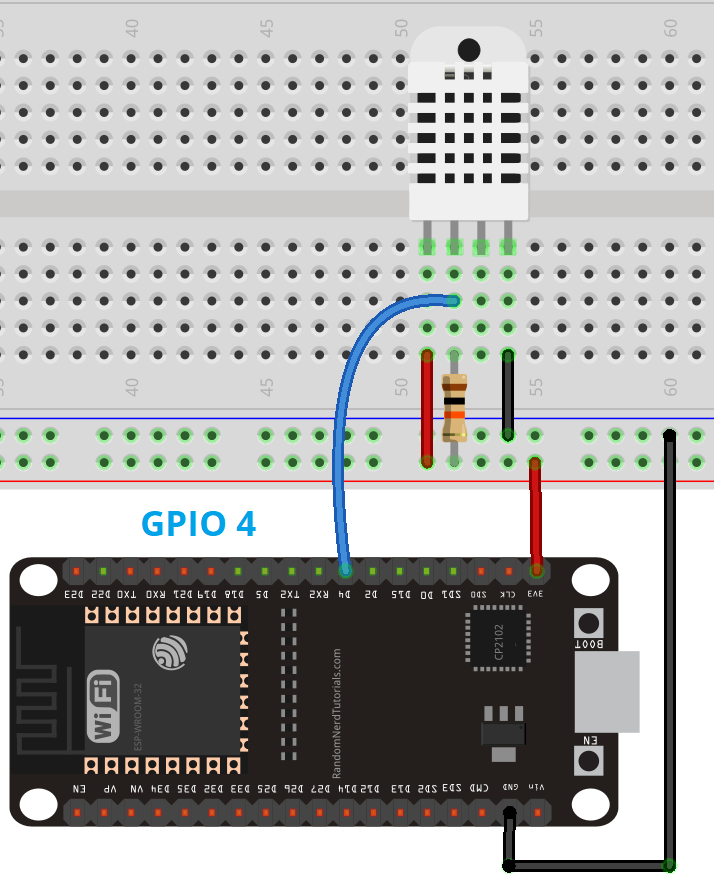
In this instance, we’re linking the DHT data pin to GPIO 4. Nevertheless, any other suitable digital pin can be utilized.
Parts Required
| Component Name | Buy Now |
| ESP32-WROOM-32 Development | Amazon |
| DHT11 Temperature Humidity Sensor Module | Amazon |
| DHT22 Temperature And Humidity Sensor Module | Amazon |
Installing Libraries
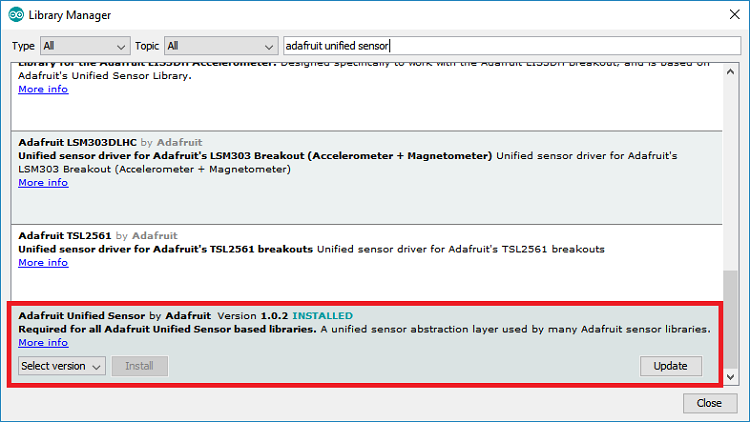
To facilitate DHT sensor readings, we’ll employ the DHT library developed by Adafruit. Additionally, the Adafruit Unified Sensor library must be installed for proper functionality. Execute the subsequent steps to install these libraries:
Launch your Arduino IDE and navigate to Sketch > Include Library > Manage Libraries. This action will prompt the Library Manager to open.
Utilize the search box to look for “DHT” and install the DHT library developed by Adafruit.
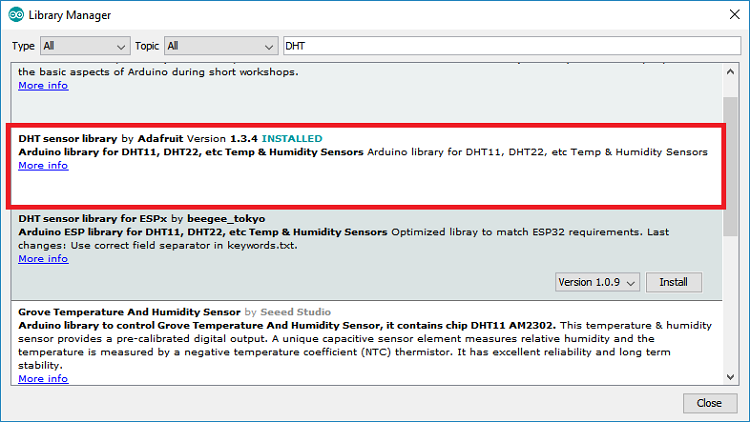
Following the installation of the DHT library, search for “Adafruit Unified Sensor” in the search box. Scroll down to locate the library and proceed to install it.

Once the libraries are installed, restart your Arduino IDE to finalize the installation process.
ESP32 Temperature and Humidity Reading Sketch
To acquire temperature and humidity readings from the DHT sensor, we’ll utilize an example script based on the Adafruit DHT library. Copy the code snippet below into your Arduino IDE:
#include "DHT.h"

#define DHTPIN 4     // Digital pin connected to the DHT sensor
// Feather HUZZAH ESP8266 note: use pins 3, 4, 5, 12, 13 or 14 --
// Pin 15 can work but DHT must be disconnected during program upload.

// Uncomment whatever type you're using!
//#define DHTTYPE DHT11   // DHT 11
#define DHTTYPE DHT22   // DHT 22  (AM2302), AM2321
//#define DHTTYPE DHT21   // DHT 21 (AM2301)

// Connect pin 1 (on the left) of the sensor to +5V
// NOTE: If using a board with 3.3V logic like an Arduino Due connect pin 1
// to 3.3V instead of 5V!
// Connect pin 2 of the sensor to whatever your DHTPIN is
// Connect pin 4 (on the right) of the sensor to GROUND
// Connect a 10K resistor from pin 2 (data) to pin 1 (power) of the sensor

// Initialize DHT sensor.
// Note that older versions of this library took an optional third parameter to
// tweak the timings for faster processors.  This parameter is no longer needed
// as the current DHT reading algorithm adjusts itself to work on faster procs.
DHT dht(DHTPIN, DHTTYPE);

void setup() {
  Serial.begin(9600);
  Serial.println(F("DHTxx test!"));

  dht.begin();
}

void loop() {
  // Wait a few seconds between measurements.
  delay(2000);

  // Reading temperature or humidity takes about 250 milliseconds!
  // Sensor readings may also be up to 2 seconds 'old' (its a very slow sensor)
  float h = dht.readHumidity();
  // Read temperature as Celsius (the default)
  float t = dht.readTemperature();
  // Read temperature as Fahrenheit (isFahrenheit = true)
  float f = dht.readTemperature(true);

  // Check if any reads failed and exit early (to try again).
  if (isnan(h) || isnan(t) || isnan(f)) {
    Serial.println(F("Failed to read from DHT sensor!"));
    return;
  }

  // Compute heat index in Fahrenheit (the default)
  float hif = dht.computeHeatIndex(f, h);
  // Compute heat index in Celsius (isFahreheit = false)
  float hic = dht.computeHeatIndex(t, h, false);

  Serial.print(F("Humidity: "));
  Serial.print(h);
  Serial.print(F("%  Temperature: "));
  Serial.print(t);
  Serial.print(F("°C "));
  Serial.print(f);
  Serial.print(F("°F  Heat index: "));
  Serial.print(hic);
  Serial.print(F("°C "));
  Serial.print(hif);
  Serial.println(F("°F"));
}
The code contains numerous comments with pertinent details. Peruse the comments for further insight into the functionality. Continue reading to comprehend the code’s operation.
Code Explanation
Begin by importing the DHT library:
#include "DHT.h"
Next, designate the digital pin connected to the DHT sensor’s data pin. Here, it’s linked to GPIO 4:
#define DHTPIN 4 // Digital pin connected to the DHT sensor
Then, specify the type of DHT sensor being used. The library supports DHT11, DHT22, and DHT21. Uncomment the appropriate sensor type and comment out the others. For this example, the DHT22 sensor is utilized:
//#define DHTTYPE DHT11   // DHT 11
#define DHTTYPE DHT22   // DHT 22  (AM2302), AM2321
//#define DHTTYPE DHT21   // DHT 21 (AM2301)
Instantiate a DHT object named “dht” on the pin and with the specified sensor type:
DHT dht(DHTPIN, DHTTYPE);
In the setup(), initialize Serial debugging at a baud rate of 9600 and print a message in the Serial Monitor:
Serial.begin(9600);
Serial.println(F("DHTxx test!"));
Finally, initialize the DHT sensor:
dht.begin();
Within the loop(), start with a 2000 ms (2 seconds) delay to accommodate the DHT22’s maximum sampling period:
delay(2000);
Retrieve the humidity and temperature readings, storing them in float variables “h,” “t,” and “f“:
float h = dht.readHumidity();
// Read temperature as Celsius (the default)
float t = dht.readTemperature();
To obtain temperature in Fahrenheit degrees, pass the “true” parameter to the readTemperature() method:
float f = dht.readTemperature(true);
An if statement verifies if the sensor provided valid temperature and humidity readings:
if (isnan(h) || isnan(t) || isnan(f)) {
   Serial.println(F("Failed to read from DHT sensor!"));
   return;
After retrieving humidity and temperature, compute the heat index using the library’s method. The heat index can be acquired in Celsius and Fahrenheit:
// Compute heat index in Fahrenheit (the default)
float hif = dht.computeHeatIndex(f, h);
// Compute heat index in Celsius (isFahreheit = false)
float hic = dht.computeHeatIndex(t, h, false);
Lastly, print all readings on the Serial Monitor:
Serial.print(F("Humidity: "));
Serial.print(h);
Serial.print(F("%  Temperature: "));
Serial.print(t);
Serial.print(F("°C "));
Serial.print(f);
Serial.print(F("°F  Heat index: "));
Serial.print(hic);
Serial.print(F("°C "));
Serial.print(hif);
Serial.println(F("°F"));
Demonstration
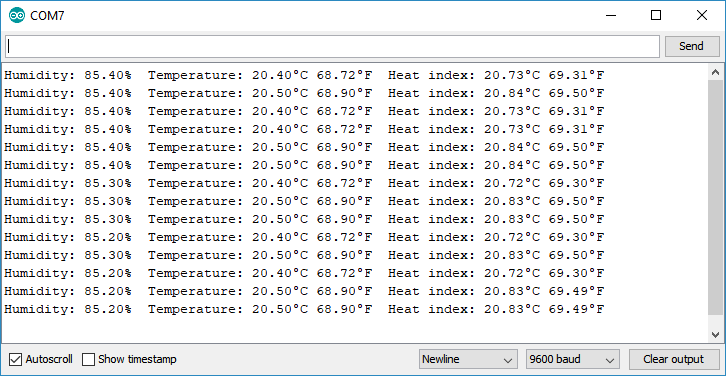
Upload the code to your ESP32 board, ensuring that you have selected the correct board and COM port in your Arduino IDE settings.
Once the code is uploaded, launch the Serial Monitor at a baud rate of 9600. Every two seconds, you should observe the most recent temperature and humidity readings displayed in the Serial Monitor.
Troubleshooting – Failed to read from DHT sensor
If you encounter an error message in your Serial Monitor while attempting to retrieve temperature and humidity data from the DHT11/DHT22 sensor, follow these steps to troubleshoot the issue (or refer to our dedicated DHT Troubleshooting Guide).
Error Message: “Failed to read from DHT sensor!” or “Nan” Readings
If your DHT sensor produces the error message “Failed to read from DHT sensor!” or returns “Nan” readings, consider the following troubleshooting tips:

- Wiring: Verify the wiring and pin assignments in your electronics project. If the circuit is correctly connected and tested, proceed to the next troubleshooting steps.
- Power: Ensure that the DHT sensor is receiving sufficient power. The DHT11 operates within a range of 3V to 5.5V, while the DHT22 operates within a range of 3V to 6V. If powered from the ESP32’s 3.3V pin, try using a 5V power source as a potential solution.
- USB Port or Cable: Sometimes, powering the ESP32 directly from a PC USB port may not provide adequate power. Attempt connecting it to a USB hub powered by an external source. Consider replacing the USB cable with a better or shorter one, as insufficient power supply can lead to issues.
- Power Source: In cases where the ESP may not be supplying enough power to read from the DHT sensor, switch to a power source that provides higher current.
- Sensor Type: Ensure that the correct sensor type is uncommented/commented in your code. For example, if using the DHT22 sensor, ensure the corresponding line is uncommented:
//#define DHTTYPE DHT11   // DHT 11
#define DHTTYPE DHT22   // DHT 22  (AM2302), AM2321
//#define DHTTYPE DHT21   // DHT 21 (AM2301)
- Sampling Rate: The DHT sensor’s slow reading speed (up to 2 seconds) may require adjustments in the timing between readings. Increasing the time between readings could potentially resolve the issue.
- Faulty Sensor: Occasionally, inexpensive sensors may appear functional but could be damaged. Even with correct circuitry and code, a faulty sensor will fail to provide readings. Try using a different sensor to determine if the issue persists.
- Incorrect Baud Rate or Failed Code Upload: If nothing appears in the Arduino IDE Serial Monitor, ensure that the correct baud rate and COM port are selected. Verify that the code has been successfully uploaded.
During our project development, similar DHT-related issues were consistently resolved by implementing one of the methods described above.
Fatal Error: “Adafruit_Sensor.h: No such file or directory”
Another common error encountered during code compilation is:
fatal error: Adafruit_Sensor.h: No such file or directory
#include <Adafruit_Sensor.h>
To resolve this error, install the Adafruit Unified Sensor driver library. In the Arduino IDE, search for “Adafruit Unified Sensor” in the library manager, install it, and restart the IDE. After installation, the code should compile without encountering the error message.
Wrapping Up
In this tutorial, you’ve acquired the know-how to obtain temperature and humidity data from a DHT11 or DHT22 sensor utilizing the ESP32 and Arduino IDE. The process of retrieving temperature and humidity readings with the Adafruit DHT library is straightforward, involving the use of the readTemperature() and readHumidity() methods on a DHT object.
Now, you’re primed to elevate this project by showcasing your sensor readings on a web server accessible through your smartphone’s browser. Discover how to construct a web server with the ESP32 to showcase your sensor readings:
- Arduino DHT11 Sensor Tutorial: How to Interface and Read Data
- Arduino DHT11 and DHT22 Sensor Interface: Step-by-Step Guide
- DHT11/DHT22 Interface with ESP8266 NodeMCU Web Server: Step-by-Step


