
Begin using Firebase promptly with the ESP8266 NodeMCU board. Firebase is a platform developed by Google for mobile application development, offering a range of services to handle data from iOS, Android, or web applications. You will initiate a Firebase project with a realtime database (RTDB) and gain proficiency in storing and retrieving values from the database using your ESP8266 board.
In a subsequent tutorial, you will discover how to craft a Firebase web application accessible from any location, enabling you to oversee and manage your ESP8266 via Firebase’s realtime database.
What exactly is Firebase?
Firebase serves as Google’s platform for mobile application development, aiding in the creation, enhancement, and expansion of your app. It offers a suite of services designed to manage data from any Android, iOS, or web application.
The subsequent passage eloquently outlines the benefits of utilizing Firebase:
This excerpt is extracted from an article; we suggest giving it a read for a deeper comprehension of Firebase’s capabilities and functionalities.
Leveraging the ESP8266, you can establish a connection and interact with your Firebase project, enabling the creation of applications to manage the ESP8266 via Firebase from any location globally.
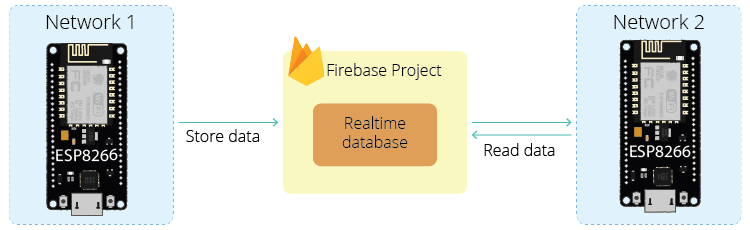
In this tutorial, we’ll set up a Firebase project featuring a realtime database and utilize the ESP8266 to both store and retrieve data from said database. The ESP8266 can seamlessly interact with the database from anywhere worldwide, provided it maintains an internet connection.
This functionality permits scenarios such as having two ESP8266 boards situated in different networks, with one board storing data while the other retrieves the most recent data, among other possibilities.
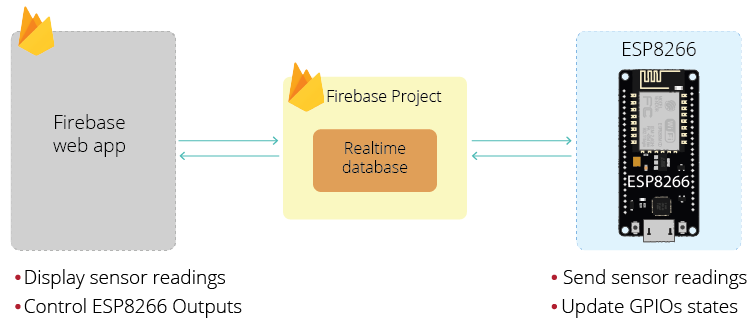
Subsequently, we will delve into creating a web application using Firebase to control the ESP8266, facilitating tasks such as displaying sensor readings or managing outputs from any location across the globe.
Project Overview
This tutorial will guide you through the process of creating a Firebase project with a realtime database and demonstrate how to store and retrieve data from the database using the ESP8266.
To begin this project, you must first set up a Firebase account and create a realtime database for your project. Afterwards, you’ll proceed to program the ESP8266 to interact with the database. This tutorial is divided into three main sections.
- Create a Firebase Project
- ESP8266: Store data to the Firebase Realtime Database
- ESP8266: Read data from the Firebase Realtime Database
Let’s get started!
Parts Required
| Component Name | Buy Now |
| ESP8266 NodeMCU CP2102 | Amazon |
Set Up a Firebase Account and Create a New Project
1.Create a New Project
Follow the instructions below to create a new project on Firebase.
- Navigate to Firebase and sign in using a Google Account.
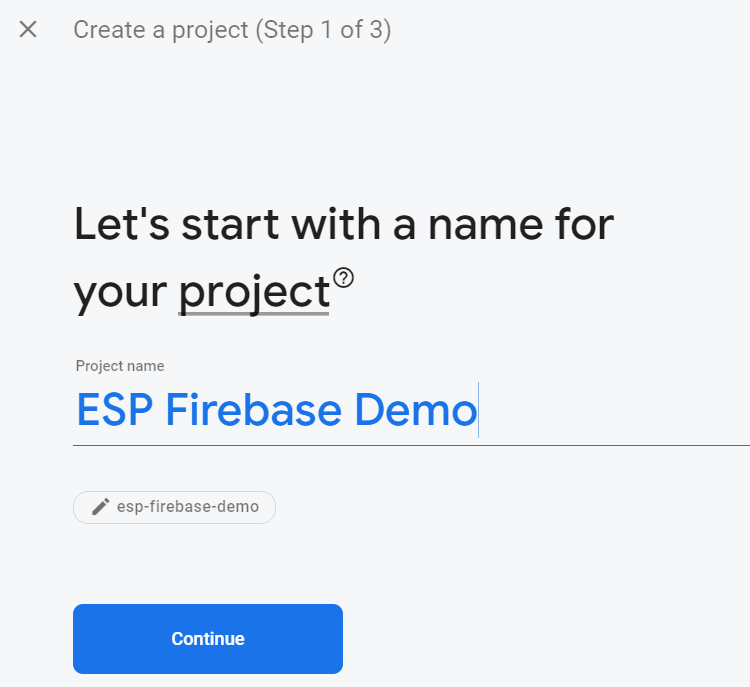
- Click “Get Started,” then “Add project” to initiate a new project.
- Assign a name to your project, e.g., “ESP Firebase Demo.”
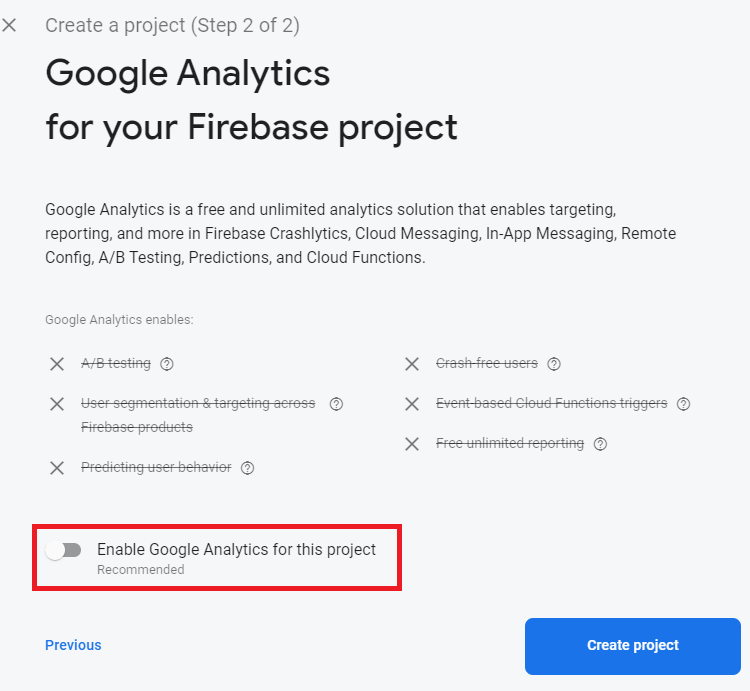
- Disable the “Enable Google Analytics” option for this project and click “Create project.”
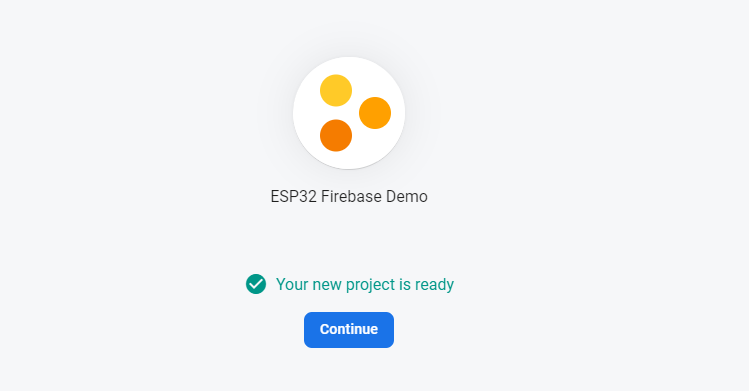
- Allow a few moments for the project setup. Once complete, click “Continue.”
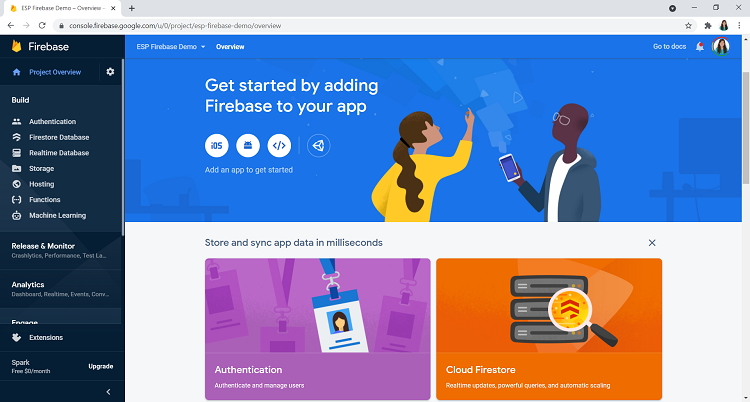
- You’ll be directed to your Project console page.
2. Set Authentication Methods
Authentication methods must be configured for your app.
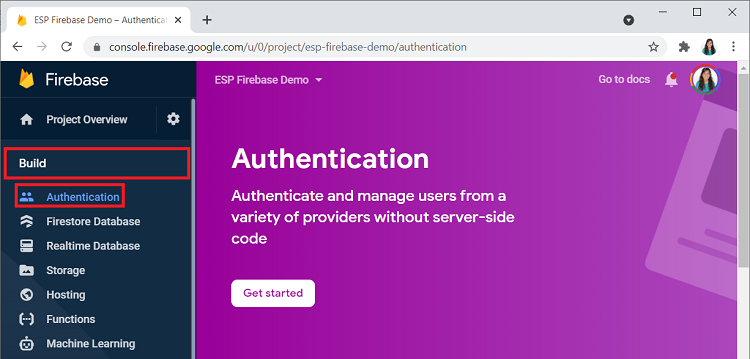
- On the left sidebar, click on “Authentication,” then “Get started.”
- Various authentication methods are available, such as email and password, Google Account, Facebook account, among others.
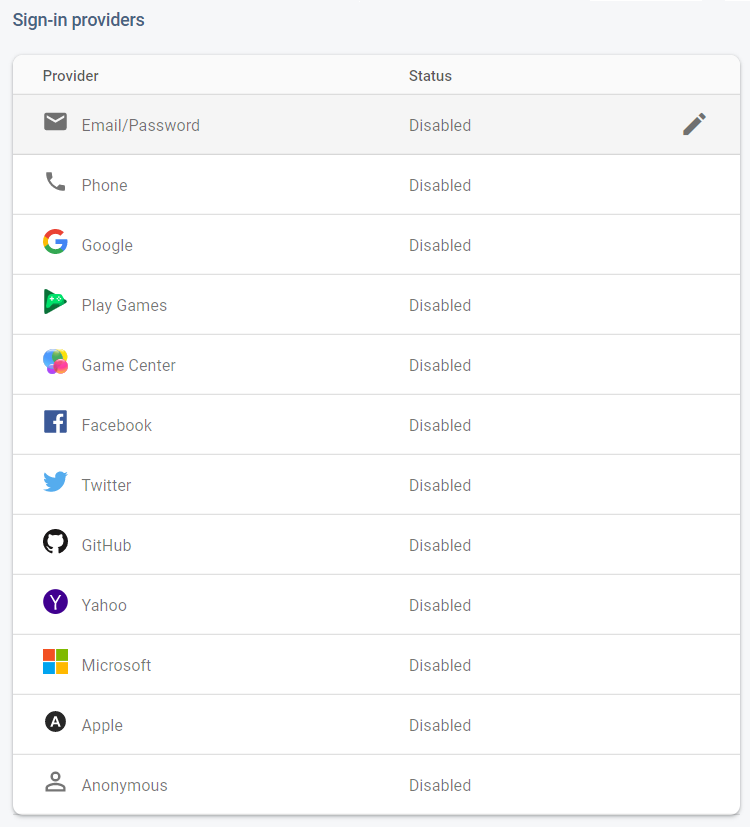
- For testing purposes, select the “Anonymous” user option (requires authentication without necessitating users to sign in initially by generating temporary anonymous accounts). Enable this option and click “Save.”

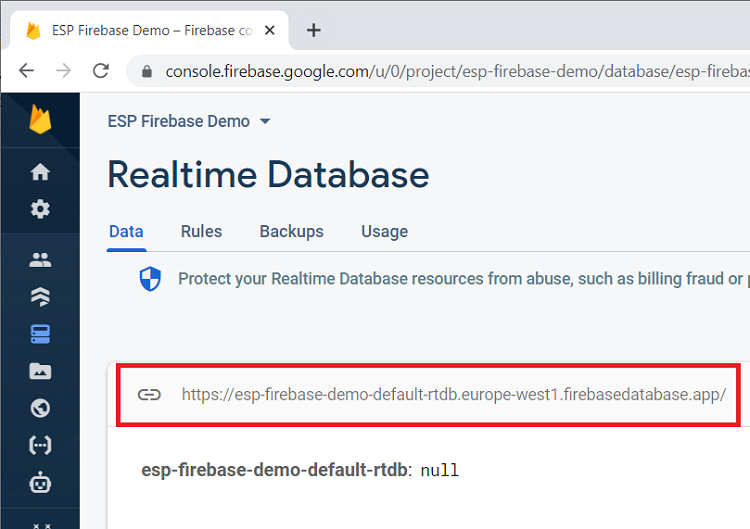
3. Creating a Realtime Database
Proceed to create a Realtime Database for your project using the following steps.
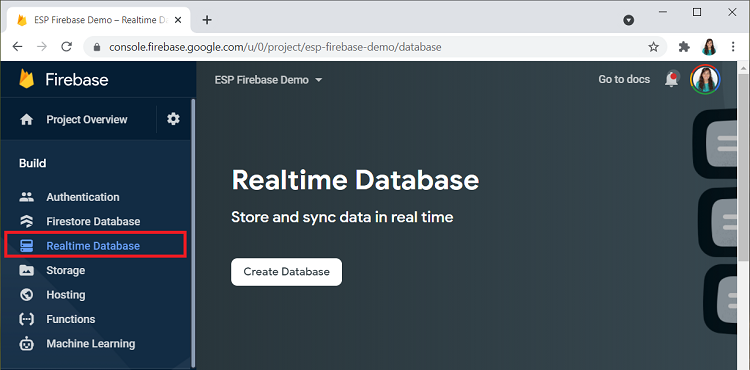
- On the left sidebar, click on “Realtime Database,” then “Create Database.”
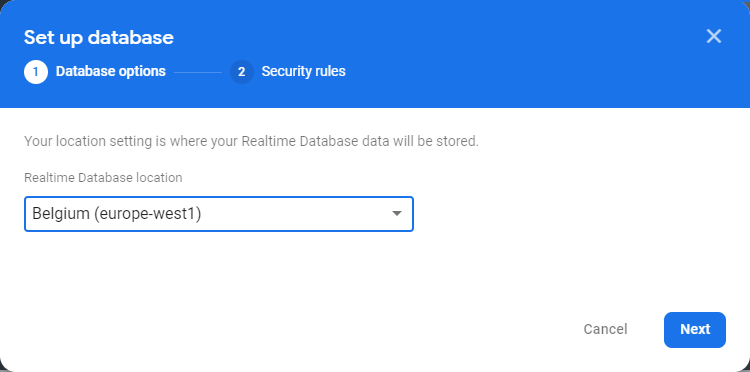
- Choose the location for your database, selecting the one closest to your region.
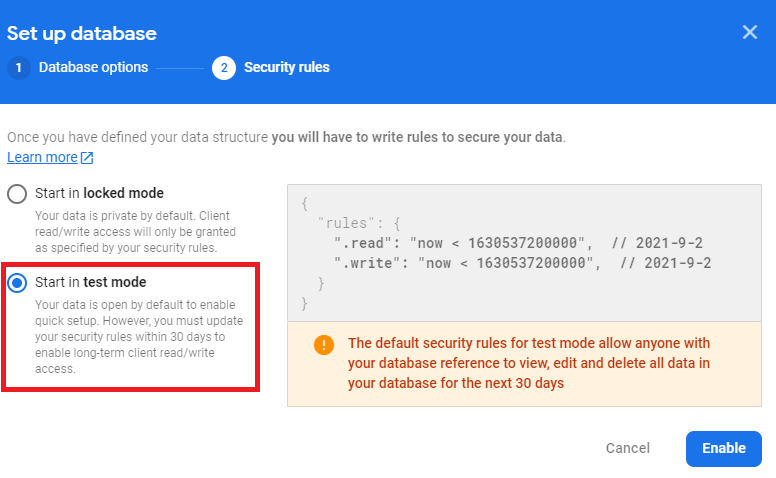
- Configure security rules for your database. For testing, opt for “Start in test mode.” Subsequent tutorials will cover securing your database using database rules.
- Your database is now established. Ensure to copy and save the database URL, highlighted in the provided image, as it will be required later in your ESP8266 code.
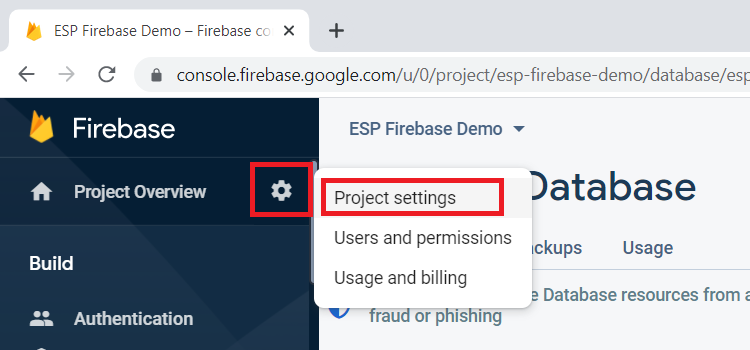
4. Get Project API Key
Obtain your project’s API key by following the steps below.
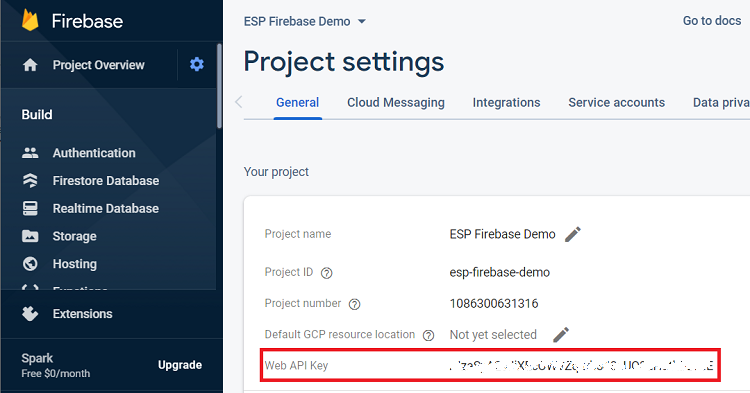
- On the left sidebar, click on “Project Settings.”
- Copy the API Key to a secure location for future reference.
With these steps completed, you are now prepared to interface the ESP8266 with the database.
Program the ESP8266 to Interface with Firebase
With the Firebase Realtime Database now established, you’ll proceed to understand how to connect the ESP8266 with the database.
To program the ESP8266, you can utilize Arduino IDE, VS Code with the PlatformIO extension, or other compatible software.
Please note: For Firebase projects, we recommend employing VS Code with the PlatformIO extension. This combination offers comprehensive tools for developing web applications to act as a bridge between the ESP8266 and Firebase. However, in this tutorial, we won’t be constructing the web application, so you can opt for Arduino IDE.
Install the Firebase-ESP-Client Library
The Firebase-ESP-Client library provides numerous examples for integrating Firebase with ESP8266 and ESP32 boards.
In this tutorial, we’ll focus on straightforward examples for storing and retrieving data from the database. The library also features numerous other examples, accessible here, along with comprehensive documentation on its usage.
Installation – VS Code + PlatformIO
If you’re using VS Code with the PlatformIO extension, follow these steps to install the library:
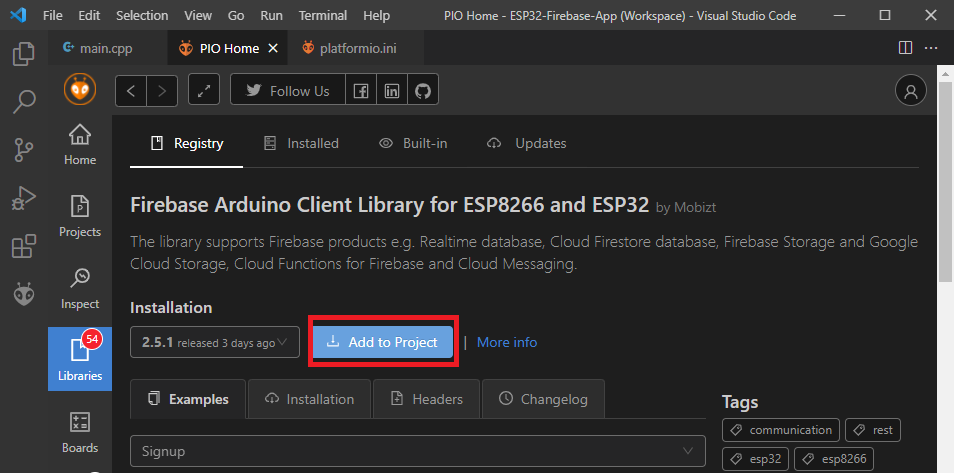
- Click on the PIO Home icon, then select the Libraries tab.
- Search for “Firebase ESP Client.”
- Choose the Firebase Arduino Client Library for ESP8266 and ESP32.
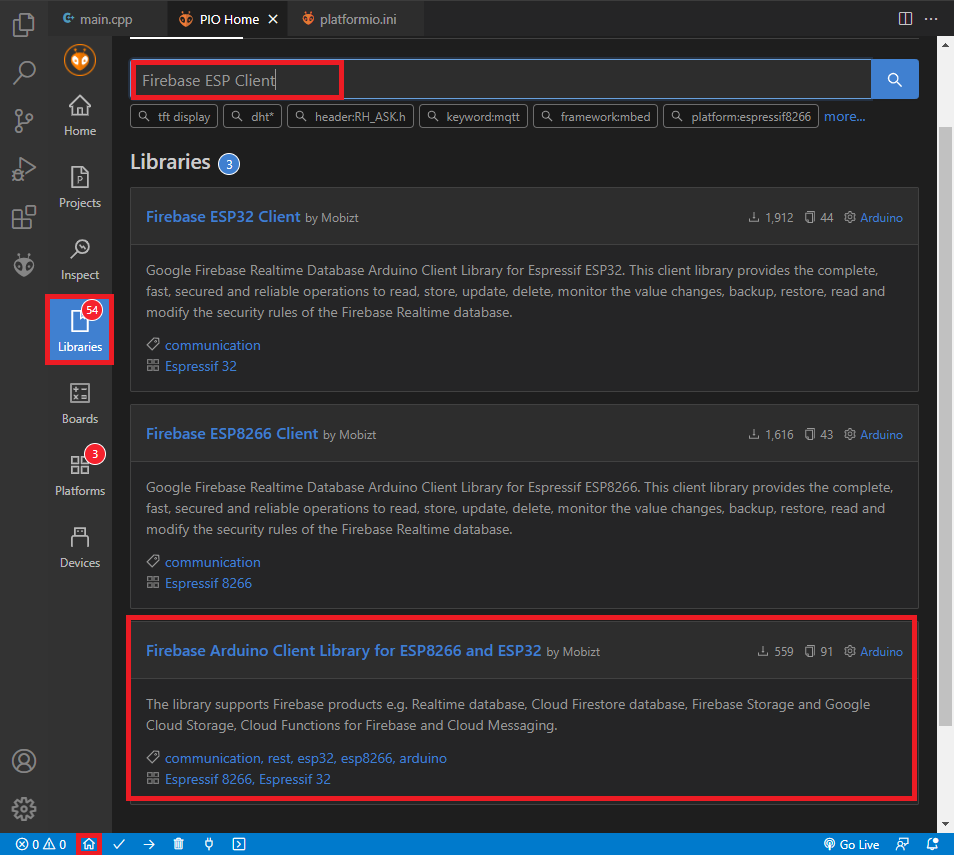
- Click Add to Project and select the project you’re currently working on. Additionally, adjust the monitor speed to 115200 by adding the following line to the platformio.ini file of your project:
monitor_speed = 115200
Installation – Arduino IDE
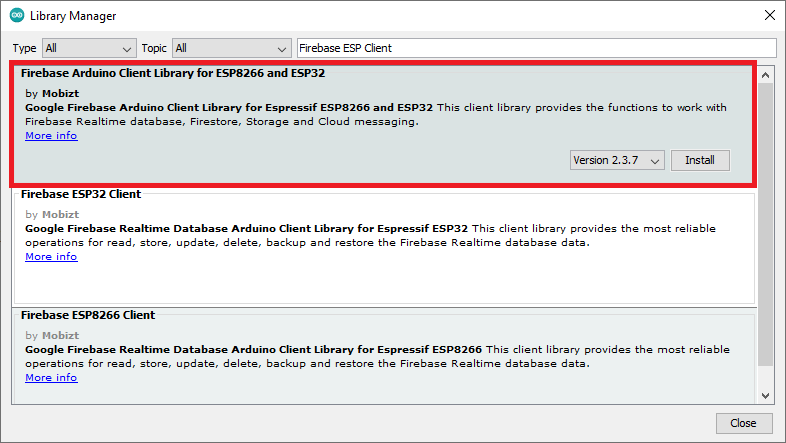
For Arduino IDE users, here’s how to install the library:
- Navigate to Sketch > Include Library > Manage Libraries.
- Search for Firebase ESP Client and install the Firebase Arduino Client Library for ESP8266 and ESP32 by Mobitz.
With the library successfully installed, you’re now ready to commence programming the ESP8266 board to interact with the database
ESP8266 Store Data to Firebase Database
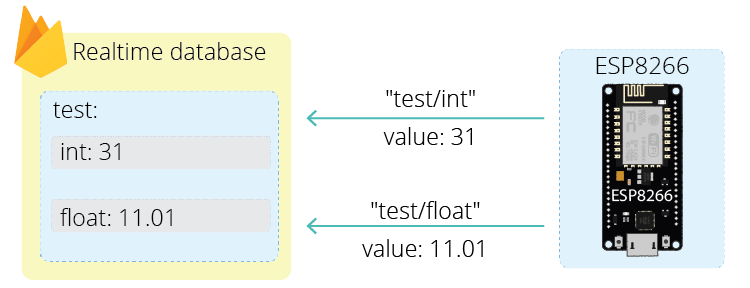
Paste the following code into your Arduino IDE. This sketch inserts an integer and a floating-point number into the database every 15 seconds. It serves as a simple example illustrating how to connect the ESP8266 to the database and store data. This code is also compatible with ESP32 boards.
#include <Arduino.h>
#if defined(ESP32)
  #include <WiFi.h>
#elif defined(ESP8266)
  #include <ESP8266WiFi.h>
#endif
#include <Firebase_ESP_Client.h>

//Provide the token generation process info.
#include "addons/TokenHelper.h"
//Provide the RTDB payload printing info and other helper functions.
#include "addons/RTDBHelper.h"

// Insert your network credentials
#define WIFI_SSID "REPLACE_WITH_YOUR_SSID"
#define WIFI_PASSWORD "REPLACE_WITH_YOUR_PASSWORD"

// Insert Firebase project API Key
#define API_KEY "REPLACE_WITH_YOUR_FIREBASE_PROJECT_API_KEY"

// Insert RTDB URLefine the RTDB URL */
#define DATABASE_URL "REPLACE_WITH_YOUR_FIREBASE_DATABASE_URL"

//Define Firebase Data object
FirebaseData fbdo;

FirebaseAuth auth;
FirebaseConfig config;

unsigned long sendDataPrevMillis = 0;
int count = 0;
bool signupOK = false;

void setup(){
  Serial.begin(115200);
  WiFi.begin(WIFI_SSID, WIFI_PASSWORD);
  Serial.print("Connecting to Wi-Fi");
  while (WiFi.status() != WL_CONNECTED){
    Serial.print(".");
    delay(300);
  }
  Serial.println();
  Serial.print("Connected with IP: ");
  Serial.println(WiFi.localIP());
  Serial.println();

  /* Assign the api key (required) */
  config.api_key = API_KEY;

  /* Assign the RTDB URL (required) */
  config.database_url = DATABASE_URL;

  /* Sign up */
  if (Firebase.signUp(&config, &auth, "", "")){
    Serial.println("ok");
    signupOK = true;
  }
  else{
    Serial.printf("%s\n", config.signer.signupError.message.c_str());
  }

  /* Assign the callback function for the long running token generation task */
  config.token_status_callback = tokenStatusCallback; //see addons/TokenHelper.h

  Firebase.begin(&config, &auth);
  Firebase.reconnectWiFi(true);
}

void loop(){
  if (Firebase.ready() && signupOK && (millis() - sendDataPrevMillis > 15000 || sendDataPrevMillis == 0)){
    sendDataPrevMillis = millis();
    // Write an Int number on the database path test/int
    if (Firebase.RTDB.setInt(&fbdo, "test/int", count)){
      Serial.println("PASSED");
      Serial.println("PATH: " + fbdo.dataPath());
      Serial.println("TYPE: " + fbdo.dataType());
    }
    else {
      Serial.println("FAILED");
      Serial.println("REASON: " + fbdo.errorReason());
    }
    count++;

    // Write an Float number on the database path test/float
    if (Firebase.RTDB.setFloat(&fbdo, "test/float", 0.01 + random(0,100))){
      Serial.println("PASSED");
      Serial.println("PATH: " + fbdo.dataPath());
      Serial.println("TYPE: " + fbdo.dataType());
    }
    else {
      Serial.println("FAILED");
      Serial.println("REASON: " + fbdo.errorReason());
    }
  }
}
Ensure you insert your network credentials, database URL, and project API key for the project to function correctly.
This code is adapted from the basic example provided by the library. Additional examples can be found here.
Code Explanation
Begin by including the necessary libraries: ESP8266WiFi.h for connecting the ESP8266 to the internet (or WiFi.h for ESP32 boards) and Firebase_ESP_Client.h for interfacing the boards with Firebase.
#include <Arduino.h>
#if defined(ESP32)
#include <WiFi.h>
#elif defined(ESP8266)
#include <ESP8266WiFi.h>
#endif
#include <Firebase_ESP_Client.h>
Additionally, include TokenHelper.h and RTDBHelper.h for the Firebase library to function correctly.
//Provide the token generation process info.
#include "addons/TokenHelper.h"
//Provide the RTDB payload printing info and other helper functions.
#include "addons/RTDBHelper.h"
Insert your network credentials, Firebase project API key, and database URL.
#define WIFI_SSID "REPLACE_WITH_YOUR_SSID"
#define WIFI_PASSWORD "REPLACE_WITH_YOUR_PASSWORD"

#define API_KEY "REPLACE_WITH_YOUR_FIREBASE_PROJECT_API_KEY"

#define DATABASE_URL "REPLACE_WITH_YOUR_FIREBASE_DATABASE_URL"
In the setup(), establish a connection between your board and the network.
Serial.begin(115200);
WiFi.begin(WIFI_SSID, WIFI_PASSWORD);
Serial.print("Connecting to Wi-Fi");
while (WiFi.status() != WL_CONNECTED){
  Serial.print(".");
  delay(300);
}
Serial.println();
Serial.print("Connected with IP: ");
Serial.println(WiFi.localIP());
Serial.println();
Assign the API key and the database URL to the Firebase configuration.
config.api_key = API_KEY;

config.database_url = DATABASE_URL;
Manage the signup process for an anonymous user. Utilize the signUp() method, leaving the last two arguments empty for anonymous user signup.
if (Firebase.signUp(&config, &auth, "", "")){
  Serial.println("ok");
  signupOK = true;
}
else{
  Serial.printf("%s\n", config.signer.signupError.message.c_str());
}
If the sign-in is successful, update the signupOK variable to true.
signupOK = true;
In the loop(), data is periodically sent to the database if signup is successful and everything is set up.
if (Firebase.ready() && signupOK && (millis() - sendDataPrevMillis > 15000 || sendDataPrevMillis == 0)){
Data is sent to the Firebase RTDB using functions such as setInt() or setFloat(), depending on the data type.
if (Firebase.RTDB.setInt(&fbdo, "test/int", count)) {
  Serial.println("PASSED");
  Serial.println("PATH: " + fbdo.dataPath());
  Serial.println("TYPE: " + fbdo.dataType());
}
else {
  Serial.println("FAILED");
  Serial.println("REASON: " + fbdo.errorReason());
}
A similar process is followed for storing float values.
if (Firebase.RTDB.setFloat(&fbdo, "test/float", 0.01 + random(0, 100))) {
  Serial.println("PASSED");
  Serial.println("PATH: " + fbdo.dataPath());
  Serial.println("TYPE: " + fbdo.dataType());
}
else {
  Serial.println("FAILED");
  Serial.println("REASON: " + fbdo.errorReason());
}
Send Data to the Database
As mentioned in the library documentation, to store data at a specific node in the Firebase RTDB (realtime database), use the following functions: set, setInt, setFloat, setDouble, setString, setJSON, setArray, setBlob, and setFile.
These functions return a boolean value indicating the success of the operation, which will be true if all of the following conditions are met:
- Server returns HTTP status code 200.
- The data types matched between request and response.Only setBlob and setFile functions that make a silent request to Firebase server, thus no payload response returned.
In our example, we’ll send an integer number, so we need to use the setInt() function as follows:
Firebase.RTDB.setInt(&fbdo, "test/int", count)
The second argument is the database node path, and the last argument is the value you want to pass to that database path—you can choose any other database path. In this case, we’re passing the value saved in the count variable.
Here’s the complete snippet that stores the value in the database and prints a success or failed message.
if (Firebase.RTDB.setInt(&fbdo, "test/int", count)) {
  Serial.println("PASSED");
  Serial.println("PATH: " + fbdo.dataPath());
  Serial.println("TYPE: " + fbdo.dataType());
}
else {
  Serial.println("FAILED");
  Serial.println("REASON: " + fbdo.errorReason());
}
We proceed in a similar way to store a float value. We’re storing a random float value on the test/float path.
// Write an Float number on the database path test/float
if (Firebase.RTDB.setFloat(&fbdo, "test/float", 0.01 + random(0, 100))) {
  Serial.println("PASSED");
  Serial.println("PATH: " + fbdo.dataPath());
  Serial.println("TYPE: " + fbdo.dataType());
}
else {
  Serial.println("FAILED");
  Serial.println("REASON: " + fbdo.errorReason());
}
Demonstration
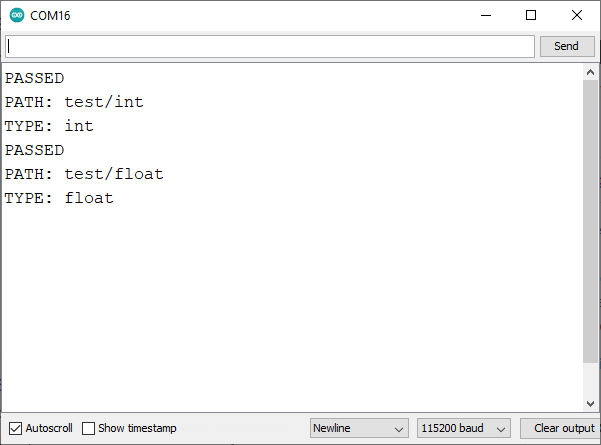
After uploading the code to your ESP8266 board and ensuring correct credentials, open the Serial Monitor at a baud rate of 115200 and press the board’s reset button.
If everything works as expected, values should be stored in the database, and success messages will be displayed.
Navigate to your project’s Firebase Realtime Database to view the stored values. A new value should be saved every 15 seconds.
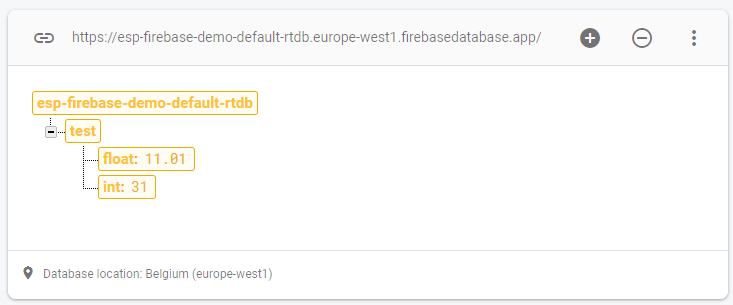
Congratulations! You’ve successfully stored data in Firebase’s realtime database using the ESP8266. Next, you’ll learn to read values from different database node paths.
ESP8266 Read From Firebase Database
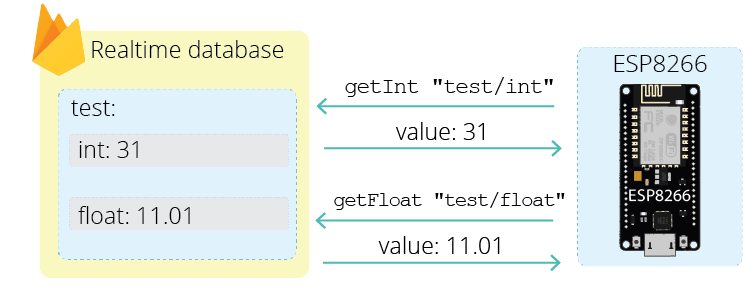
This section covers how to read data from the database, specifically the data stored in the previous section. Recall that we saved an integer value in the test/int path and a floating-point value in the test/float path.
The following example retrieves the values stored in the database. Upload the provided code to your board. You can use the same ESP8266 board or another board to retrieve the data posted by the previous board.
#include <Arduino.h>
#if defined(ESP32)
  #include <WiFi.h>
#elif defined(ESP8266)
  #include <ESP8266WiFi.h>
#endif
#include <Firebase_ESP_Client.h>

//Provide the token generation process info.
#include "addons/TokenHelper.h"
//Provide the RTDB payload printing info and other helper functions.
#include "addons/RTDBHelper.h"

// Insert your network credentials
#define WIFI_SSID "REPLACE_WITH_YOUR_SSID"
#define WIFI_PASSWORD "REPLACE_WITH_YOUR_PASSWORD"

// Insert Firebase project API Key
#define API_KEY "REPLACE_WITH_YOUR_FIREBASE_PROJECT_API_KEY"

// Insert RTDB URLefine the RTDB URL */
#define DATABASE_URL "REPLACE_WITH_YOUR_FIREBASE_DATABASE_URL"

//Define Firebase Data object
FirebaseData fbdo;

FirebaseAuth auth;
FirebaseConfig config;

unsigned long sendDataPrevMillis = 0;
int intValue;
float floatValue;
bool signupOK = false;

void setup() {
  Serial.begin(115200);
  WiFi.begin(WIFI_SSID, WIFI_PASSWORD);
  Serial.print("Connecting to Wi-Fi");
  while (WiFi.status() != WL_CONNECTED) {
    Serial.print(".");
    delay(300);
  }
  Serial.println();
  Serial.print("Connected with IP: ");
  Serial.println(WiFi.localIP());
  Serial.println();

  /* Assign the api key (required) */
  config.api_key = API_KEY;

  /* Assign the RTDB URL (required) */
  config.database_url = DATABASE_URL;

  /* Sign up */
  if (Firebase.signUp(&config, &auth, "", "")) {
    Serial.println("ok");
    signupOK = true;
  }
  else {
    Serial.printf("%s\n", config.signer.signupError.message.c_str());
  }

  /* Assign the callback function for the long running token generation task */
  config.token_status_callback = tokenStatusCallback; //see addons/TokenHelper.h

  Firebase.begin(&config, &auth);
  Firebase.reconnectWiFi(true);
}

void loop() {
  if (Firebase.ready() && signupOK && (millis() - sendDataPrevMillis > 15000 || sendDataPrevMillis == 0)) {
    sendDataPrevMillis = millis();
    if (Firebase.RTDB.getInt(&fbdo, "/test/int")) {
      if (fbdo.dataType() == "int") {
        intValue = fbdo.intData();
        Serial.println(intValue);
      }
    }
    else {
      Serial.println(fbdo.errorReason());
    }

    if (Firebase.RTDB.getFloat(&fbdo, "/test/float")) {
      if (fbdo.dataType() == "float") {
        floatValue = fbdo.floatData();
        Serial.println(floatValue);
      }
    }
    else {
      Serial.println(fbdo.errorReason());
    }
  }
}
Ensure you insert your network credentials, database URL, and API key.
How the Code Functions
This code closely resembles the example from the preceding section but is focused on retrieving data from the database. Let’s delve into the pertinent aspects for this section.
Data from a designated node in Firebase Realtime Database (RTDB) can be retrieved using functions such as get, getInt, getFloat, getDouble, getBool, getString, getJSON, getArray, getBlob, and getFile.
These functions return a boolean value indicating the success of the operation, which will be true under the following conditions:
- The server returns HTTP status code 200.
- The data types match between the request and response.
The payload (response) from the database can be accessed using various functions provided by the Firebase Data object, such as fbdo.intData, fbdo.floatData, fbdo.doubleData, fbdo.boolData, fbdo.stringData, fbdo.jsonString, fbdo.jsonObject, fbdo.jsonObjectPtr, fbdo.jsonArray, fbdo.jsonArrayPtr, fbdo.jsonData (for retaining parse/get result), and fbdo.blobData.
Using a function that doesn’t correspond to the data type in the database will return an empty result (string, object, or array).
You can ascertain the data type of the returned payload using fbdo.getDataType.
The following code snippet demonstrates how to retrieve an integer value stored in the test/int node. Initially, the getInt() function is utilized; subsequently, the data type is checked with fbdo.dataType(), and finally, the value stored in that node is obtained using fbdo.intData().
if (Firebase.RTDB.getInt(&fbdo, "/test/int")) {
  if (fbdo.dataType() == "int") {
    intValue = fbdo.intData();
    Serial.println(intValue);
  }
}
else {
  Serial.println(fbdo.errorReason());
}
A similar approach is employed to retrieve the floating-point value:
 if (Firebase.RTDB.getFloat(&fbdo, "/test/float")) {
  if (fbdo.dataType() == "float") {
    floatValue = fbdo.floatData();
    Serial.println(floatValue);
  }
}
else {
  Serial.println(fbdo.errorReason());
}
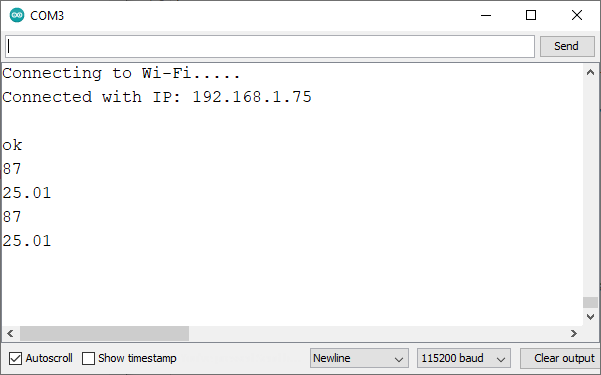
Demonstration
After uploading the code to your board and ensuring correct credentials, open the Serial Monitor at a baud rate of 115200. After a few seconds, the retrieved values from the database will be printed.
Conclusion
Well done! In this tutorial, you’ve successfully set up a Firebase project with a Realtime Database and gained insight into storing and retrieving data from the database using the ESP8266 NodeMCU board.
For simplicity, we’ve stored sample values in the database. The goal is to eventually store practical data such as sensor readings or GPIO states.
Next, you can access this database with another ESP8266 to retrieve the data or create a Firebase web app. This web app could utilize the data for displaying sensor readings or controlling the ESP8266 GPIOs remotely from any location. We’ll explore how to create a Firebase Web App in a forthcoming tutorial, so stay tuned!
We trust you’ve found this tutorial helpful.
- ESP8266 NodeMCU Email Tutorial: SMTP Server Setup for HTML, Text, and Attachments (Arduino)
- Smart LED Control: ESP8266 Empowers WS2812B LEDs via WLED
- Control IoT Devices: ESP8266 NodeMCU Async Web Server Tutorial
- ESP8266 NTP Server: Fetching Accurate Date & Time with NodeMCU


