

This guide demonstrates the utilization of Server-Sent Events (SSE) in an ESP8266 NodeMCU Web Server, programmed using the Arduino IDE. SSE enables the browser to receive ongoing updates from a server through an HTTP connection. This functionality proves beneficial for transmitting updated sensor readings directly to the browser. As soon as a new reading becomes available, the ESP8266 forwards it to the client, allowing for automatic updates of the web page without requiring additional requests.
Introducing Server Sent Events (SSE)
Server Sent Events (SSE) enable the client to automatically receive updates from a server via an HTTP connection.
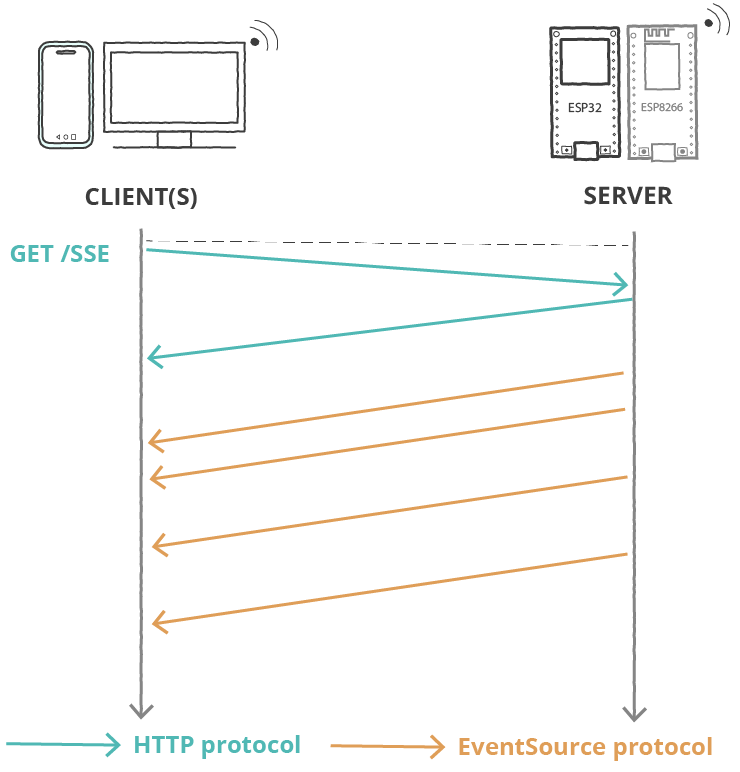
The client triggers the SSE connection, and the server utilizes the event source protocol to dispatch updates to the client. While the client can receive updates from the server, it cannot transmit any data to the server beyond the initial handshake.
This functionality proves beneficial for transmitting updated sensor readings directly to the browser. Whenever a new reading becomes available, the ESP8266 dispatches it to the client, enabling the web page to update automatically without necessitating additional requests. Beyond sensor readings, various types of data, such as GPIO states or notifications indicating motion detection, can be transmitted for project-specific needs.
Project Overview
This project involves building a web page for displaying sensor data using an ESP8266 web server.

- The web page showcases three cards exhibiting BME280 temperature, humidity, and pressure readings.
- The ESP8266 retrieves fresh sensor data every 30 seconds.
- Upon acquiring new data, the server transmits it to the client via server-sent events.
- The client dynamically updates the web page in response to the received data.
- This facilitates automatic updating of the web page whenever new sensor readings become available.
How it Works?
The diagram below illustrates the functioning of Server Sent Events in updating the web page.
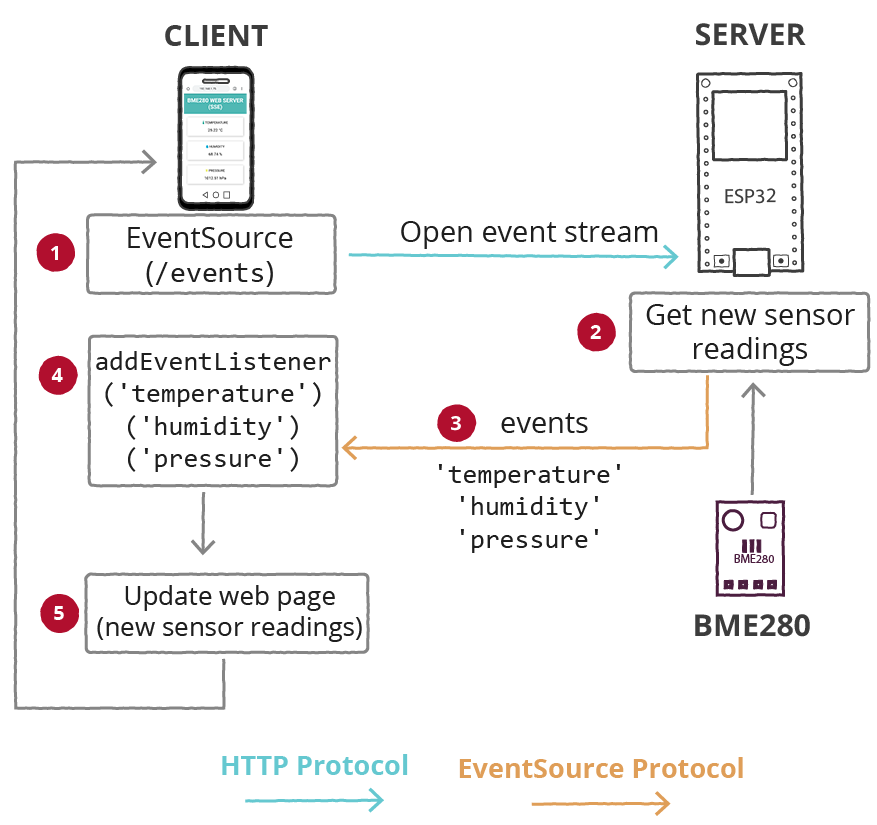
- The client initiates an SSE connection, while the server utilizes the event source protocol on the /events URL to dispatch updates to the client.
- The ESP8266 acquires fresh sensor readings and dispatches them as events named ‘temperature’, ‘humidity’, and ‘pressure’ to the client.
- The client, equipped with event listeners for the server’s dispatched events, receives the updated sensor readings.
- It then proceeds to update the web page with the latest readings accordingly.
Preparing Arduino IDE
We will utilize the Arduino IDE to program the ESP8266 board, so ensure that you have it installed on your system.
Installing Libraries – Async Web Server
For constructing the web server, we will employ the ESPAsyncWebServer library. This library necessitates the ESPAsyncTCP library for seamless operation. Click on the links provided below to download the libraries:
Since these libraries are not accessible via the Arduino Library Manager, you must manually copy the library files to the Libraries folder within your Arduino installation directory. Alternatively, within your Arduino IDE, navigate to Sketch > Include Library > Add .zip Library, and select the libraries you have downloaded.
Installing Libraries – BME280 Sensor
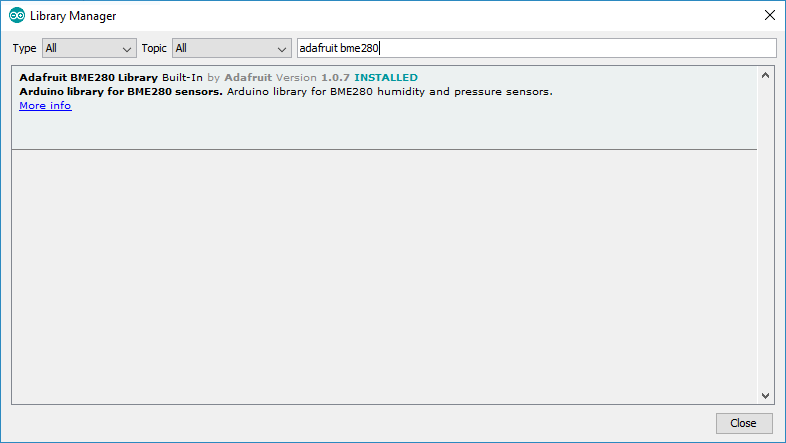
To retrieve readings from the BME280 sensor module, we will utilize the Adafruit_BME280 library. Additionally, you will need to install the Adafruit_Sensor library. Follow the steps below to install these libraries in your Arduino IDE:
- Launch your Arduino IDE and navigate to Sketch > Include Library > Manage Libraries. This action will open the Library Manager.
- In the search box, type “adafruit bme280” and install the library from the search results.
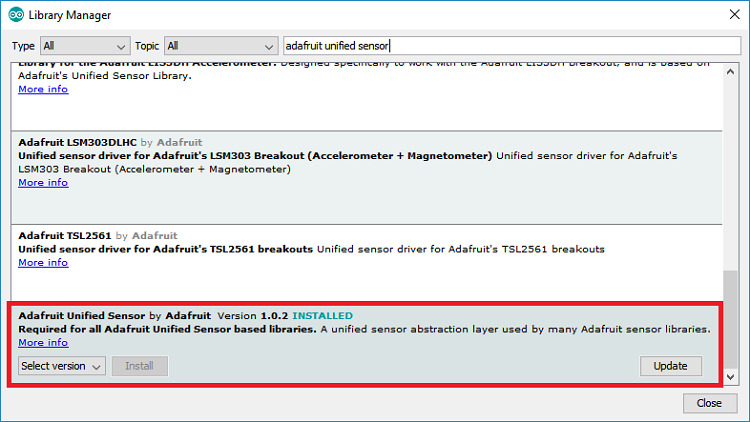
To utilize the BME280 library effectively, you must also install the Adafruit Unified Sensor library. Follow the steps outlined below to install this library in your Arduino IDE:
- Search for “Adafruit Unified Sensor” in the search box. Scroll down to locate the library and proceed to install it.
Upon completing the installation of these libraries, restart your Arduino IDE to ensure proper integration.
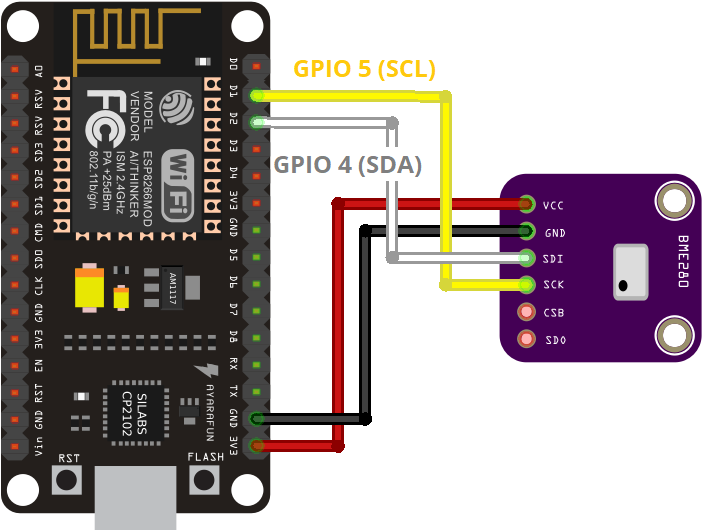
Schematic – ESP8266 with BME280 using I2C
We will be employing I2C communication to interface with the BME280 sensor module. To do so, connect the sensor to the ESP8266 SDA and SCL pins as depicted in the following schematic diagram.
Code for ESP8266 Web Server using Server Sent Events (SSE)
Please replicate the provided code into your Arduino IDE.
#include <ESP8266WiFi.h>
#include <ESPAsyncTCP.h>
#include <ESPAsyncWebServer.h>
#include <Adafruit_BME280.h>
#include <Adafruit_Sensor.h>
// Replace with your network credentials
const char* ssid = "REPLACE_WITH_YOUR_SSID";
const char* password = "REPLACE_WITH_YOUR_PASSWORD";
// Create AsyncWebServer object on port 80
AsyncWebServer server(80);
// Create an Event Source on /events
AsyncEventSource events("/events");
// Timer variables
unsigned long lastTime = 0;
unsigned long timerDelay = 30000;
// Create a sensor object
Adafruit_BME280 bme; // BME280 connect to ESP32 I2C (GPIO 21 = SDA, GPIO 22 = SCL)
float temperature;
float humidity;
float pressure;
// Init BME280
void initBME(){
if (!bme.begin(0x76)) {
Serial.println("Could not find a valid BME280 sensor, check wiring!");
while (1);
}
}
void getSensorReadings(){
temperature = bme.readTemperature();
// Convert temperature to Fahrenheit
//temperature = 1.8 * bme.readTemperature() + 32;
humidity = bme.readHumidity();
pressure = bme.readPressure()/ 100.0F;
}
// Initialize WiFi
void initWiFi() {
WiFi.mode(WIFI_STA);
WiFi.begin(ssid, password);
Serial.print("Connecting to WiFi ..");
while (WiFi.status() != WL_CONNECTED) {
Serial.print('.');
delay(1000);
}
Serial.println(WiFi.localIP());
}
String processor(const String& var){
getSensorReadings();
//Serial.println(var);
if(var == "TEMPERATURE"){
return String(temperature);
}
else if(var == "HUMIDITY"){
return String(humidity);
}
else if(var == "PRESSURE"){
return String(pressure);
}
return String();
}
const char index_html[] PROGMEM = R"rawliteral(
<!DOCTYPE HTML><html>
<head>
<title>ESP Web Server</title>
<meta name="viewport" content="width=device-width, initial-scale=1">
<link rel="stylesheet" href="https://use.fontawesome.com/releases/v5.7.2/css/all.css" integrity="sha384-fnmOCqbTlWIlj8LyTjo7mOUStjsKC4pOpQbqyi7RrhN7udi9RwhKkMHpvLbHG9Sr" crossorigin="anonymous">
<link rel="icon" href="data:,">
<style>
html {font-family: Arial; display: inline-block; text-align: center;}
p { font-size: 1.2rem;}
body { margin: 0;}
.topnav { overflow: hidden; background-color: #50B8B4; color: white; font-size: 1rem; }
.content { padding: 20px; }
.card { background-color: white; box-shadow: 2px 2px 12px 1px rgba(140,140,140,.5); }
.cards { max-width: 800px; margin: 0 auto; display: grid; grid-gap: 2rem; grid-template-columns: repeat(auto-fit, minmax(200px, 1fr)); }
.reading { font-size: 1.4rem; }
</style>
</head>
<body>
<div class="topnav">
<h1>BME280 WEB SERVER (SSE)</h1>
</div>
<div class="content">
<div class="cards">
<div class="card">
<p><i class="fas fa-thermometer-half" style="color:#059e8a;"></i> TEMPERATURE</p><p><span class="reading"><span id="temp">%TEMPERATURE%</span> °C</span></p>
</div>
<div class="card">
<p><i class="fas fa-tint" style="color:#00add6;"></i> HUMIDITY</p><p><span class="reading"><span id="hum">%HUMIDITY%</span> %</span></p>
</div>
<div class="card">
<p><i class="fas fa-angle-double-down" style="color:#e1e437;"></i> PRESSURE</p><p><span class="reading"><span id="pres">%PRESSURE%</span> hPa</span></p>
</div>
</div>
</div>
<script>
if (!!window.EventSource) {
var source = new EventSource('/events');
source.addEventListener('open', function(e) {
console.log("Events Connected");
}, false);
source.addEventListener('error', function(e) {
if (e.target.readyState != EventSource.OPEN) {
console.log("Events Disconnected");
}
}, false);
source.addEventListener('message', function(e) {
console.log("message", e.data);
}, false);
source.addEventListener('temperature', function(e) {
console.log("temperature", e.data);
document.getElementById("temp").innerHTML = e.data;
}, false);
source.addEventListener('humidity', function(e) {
console.log("humidity", e.data);
document.getElementById("hum").innerHTML = e.data;
}, false);
source.addEventListener('pressure', function(e) {
console.log("pressure", e.data);
document.getElementById("pres").innerHTML = e.data;
}, false);
}
</script>
</body>
</html>)rawliteral";
void setup() {
Serial.begin(115200);
initWiFi();
initBME();
// Handle Web Server
server.on("/", HTTP_GET, [](AsyncWebServerRequest *request){
request->send_P(200, "text/html", index_html, processor);
});
// Handle Web Server Events
events.onConnect([](AsyncEventSourceClient *client){
if(client->lastId()){
Serial.printf("Client reconnected! Last message ID that it got is: %u\n", client->lastId());
}
// send event with message "hello!", id current millis
// and set reconnect delay to 1 second
client->send("hello!", NULL, millis(), 10000);
});
server.addHandler(&events);
server.begin();
}
void loop() {
if ((millis() - lastTime) > timerDelay) {
getSensorReadings();
Serial.printf("Temperature = %.2f ºC \n", temperature);
Serial.printf("Humidity = %.2f \n", humidity);
Serial.printf("Pressure = %.2f hPa \n", pressure);
Serial.println();
// Send Events to the Web Server with the Sensor Readings
events.send("ping",NULL,millis());
events.send(String(temperature).c_str(),"temperature",millis());
events.send(String(humidity).c_str(),"humidity",millis());
events.send(String(pressure).c_str(),"pressure",millis());
lastTime = millis();
}
}
Insert your network credentials in the following variables and the code will work straight away.
const char* ssid = "REPLACE_WITH_YOUR_SSID"; const char* password = "REPLACE_WITH_YOUR_PASSWORD";
How the Code Works
Continue reading to understand the inner workings of the code or proceed directly to the Demonstration section.
Including Libraries
The Adafruit_Sensor and Adafruit_BME280 libraries are essential for interfacing with the BME280 sensor.
#include <Adafruit_BME280.h>
#include <Adafruit_Sensor.h>
The WiFi, ESPAsyncWebServer, and AsyncTCP libraries are utilized to establish the web server.
#include <WiFi.h>
#include "ESPAsyncWebServer.h"
Network Credentials
Input your network credentials into the designated variables below to enable the ESP8266 to connect to your local Wi-Fi network.
const char* ssid = "REPLACE_WITH_YOUR_SSID";
const char* password = "REPLACE_WITH_YOUR_PASSWORD";
AsyncWebServer and AsyncEventSource
Instantiate an AsyncWebServer object on port 80.
AsyncWebServer server(80);
The subsequent line generates a new event source at /events.
AsyncEventSource events("/events");
Declaring Variables
The variables lastTime and timerDelay are designated to update sensor readings every X seconds. For instance, in this setup, new sensor readings are obtained every 30 seconds (30000 milliseconds). You can adjust this interval by modifying the timerDelay variable.
unsigned long lastTime = 0;
unsigned long timerDelay = 30000;
Instantiate an Adafruit_BME280 object named bme using the default ESP8266 I2C pins.
Adafruit_BME280 bme;
The float variables temperature, humidity, and pressure are utilized to store the readings obtained from the BME280 sensor.
float temperature;
float humidity;
float pressure;
Initialize BME280
The initBME() function initializes the BME280 sensor. If the sensor is not detected, an error message is printed, and the program halts.
void initBME(){
  if (!bme.begin(0x76)) {
    Serial.println("Could not find a valid BME280 sensor, check wiring!");
    while (1);
  }
}
Obtaining BME280 Readings
The getSensorReadings() function retrieves temperature, humidity, and pressure readings from the BME280 sensor and stores them in the temperature, humidity, and pressure variables, respectively.
void getSensorReadings(){
  temperature = bme.readTemperature();
  // Convert temperature to Fahrenheit
  //temperature = 1.8 * bme.readTemperature() + 32;
  humidity = bme.readHumidity();
  pressure = bme.readPressure()/ 100.0F;
}
Initialize Wi-Fi
The initWiFi() function configures the ESP8266 as a Wi-Fi station and establishes a connection to your router using the previously defined ssid and password.
void initWiFi() {
  WiFi.mode(WIFI_STA);
  WiFi.begin(ssid, password);
  Serial.print("Connecting to WiFi ..");
  while (WiFi.status() != WL_CONNECTED) {
    Serial.print('.');
    delay(1000);
  }
  Serial.println(WiFi.localIP());
}
Processor
The processor() function replaces any placeholders within the HTML text utilized for constructing the web page with the current sensor readings before transmitting it to the browser.
String processor(const String& var){
  getSensorReadings();
  //Serial.println(var);
  if(var == "TEMPERATURE"){
    return String(temperature);
  }
  else if(var == "HUMIDITY"){
    return String(humidity);
  }
  else if(var == "PRESSURE"){
    return String(pressure);
  }
}
This enables the display of current sensor readings on the web page when initially accessed. Otherwise, without this function, a blank space would be visible until new readings are available (which may take some time depending on the delay time specified in the code).
Web Page Construction
The index_html variable encapsulates all HTML, CSS, and JavaScript required for constructing the web page.
<!DOCTYPE HTML>
<html>
<head>
<title>ESP Web Server</title>
<meta name="viewport" content="width=device-width, initial-scale=1">
<link rel="stylesheet" href="https://use.fontawesome.com/releases/v5.7.2/css/all.css" integrity="sha384-fnmOCqbTlWIlj8LyTjo7mOUStjsKC4pOpQbqyi7RrhN7udi9RwhKkMHpvLbHG9Sr" crossorigin="anonymous">
<link rel="icon" href="data:,">
<style>
  html {
    font-family: Arial;
    display: inline-block;
    text-align: center;
  }
  p {
    font-size: 1.2rem;
  }
  body {
    margin: 0;
  }
  .topnav {
    overflow: hidden;
    background-color: #50B8B4;
    color: white;
    font-size: 1rem;
  }
  .content {
    padding: 20px;
  }
  .card {
    background-color: white;
    box-shadow: 2px 2px 12px 1px rgba(140,140,140,.5);
  }
  .cards {
    max-width: 800px;
    margin: 0 auto;
    display: grid;
    grid-gap: 2rem;
    grid-template-columns: repeat(auto-fit, minmax(200px, 1fr)); }
  .reading {
    font-size: 1.4rem;
  }
</style>
</head>
<body>
<div class="topnav">
<h1>BME280 WEB SERVER (SSE)</h1>
</div>
<div class="content">
<div class="cards">
<div class="card">
<p><i class="fas fa-thermometer-half" style="color:#059e8a;"></i> TEMPERATURE</p>
<p><span class="reading"><span id="temp">%TEMPERATURE%</span> °C</span></p>
</div>
<div class="card">
<p><i class="fas fa-tint" style="color:#00add6;"></i> HUMIDITY</p>
<p><span class="reading"><span id="hum">%HUMIDITY%</span> %</span></p>
</div>
<div class="card">
<p><i class="fas fa-angle-double-down" style="color:#e1e437;"></i> PRESSURE</p><p><span class="reading"><span id="pres">%PRESSURE%</span> hPa</span></p>
</div>
</div>
</div>
<script>
if (!!window.EventSource) {
  var source = new EventSource('/events');
  source.addEventListener('open', function(e) {
    console.log("Events Connected");
  }, false);
  source.addEventListener('error', function(e) {
    if (e.target.readyState != EventSource.OPEN) {
      console.log("Events Disconnected");
    }
  }, false);

  source.addEventListener('message', function(e) {
    console.log("message", e.data);
  }, false);

  source.addEventListener('temperature', function(e) {
    console.log("temperature", e.data);
    document.getElementById("temp").innerHTML = e.data;
  }, false);

  source.addEventListener('humidity', function(e) {
    console.log("humidity", e.data);
    document.getElementById("hum").innerHTML = e.data;
  }, false);

  source.addEventListener('pressure', function(e) {
    console.log("pressure", e.data);
    document.getElementById("pres").innerHTML = e.data;
  }, false);
}
</script>
</body>
</html>
Detailed discussion on HTML and CSS functionality is omitted here. We’ll focus solely on how to manage events sent by the server.
CSS
Enclosed within the <style> </style> tags are the CSS styles used to design the web page. Feel free to customize these styles to achieve your desired appearance. We won’t delve into a detailed explanation of the CSS for this web page as it is beyond the scope of this tutorial.
<style>
html {
font-family: Arial;
display: inline-block;
text-align: center;
}
p {
font-size: 1.2rem;
}
body {
margin: 0;
}
.topnav {
overflow: hidden;
background-color: #50B8B4;
color: white;
font-size: 1rem;
}
.content {
padding: 20px;
}
.card {
background-color: white;
box-shadow: 2px 2px 12px 1px rgba(140,140,140,.5);
}
.cards {
max-width: 800px;
margin: 0 auto;
display: grid;
grid-gap: 2rem;
grid-template-columns: repeat(auto-fit, minmax(200px, 1fr)); }
.reading {
font-size: 1.4rem;
}
</style>
HTML
Contained within the <body> </body> tags is the visible content of the web page.
<body>
<div class="topnav">
<h1>BME280 WEB SERVER (SSE)</h1>
</div>
<div class="content">
<div class="cards">
<div class="card">
<p><i class="fas fa-thermometer-half" style="color:#059e8a;"></i> TEMPERATURE</p>
<p><span class="reading"><span id="temp">%TEMPERATURE%</span> °C</span></p>
</div>
<div class="card">
<p><i class="fas fa-tint" style="color:#00add6;"></i> HUMIDITY</p>
<p><span class="reading"><span id="hum">%HUMIDITY%</span> %</span></p>
</div>
<div class="card">
<p><i class="fas fa-angle-double-down" style="color:#e1e437;"></i> PRESSURE</p><p><span class="reading"><span id="pres">%PRESSURE%</span> hPa</span></p>
</div>
</div>
</div>
The heading 1 displays the text “BME280 WEB SERVER (SSE)” which appears in the top bar. You can freely modify this text.
<h1>BME280 WEB SERVER (SSE)</h1>
Subsequently, the sensor readings are displayed within separate div tags. Let’s examine the paragraphs displaying the temperature:
<p><i class="fas fa-thermometer-half" style="color:#059e8a;"></i> TEMPERATURE</p> <p><span class="reading"><span id="temp">%TEMPERATURE%</span> °C</span></p>
The first paragraph simply presents the text “TEMPERATURE”. We define the color and include an icon.
In the second paragraph, you’ll notice that the %TEMPERATURE% placeholder is enclosed within <span id=”temp”> </span> tags. The id attribute in HTML specifies a unique identifier for an HTML element. It is utilized to reference a specific style or can be accessed by JavaScript for manipulation. When the client receives a new event containing the latest temperature reading, it updates the HTML element with the id “temp” accordingly.
A similar process is followed to update the other readings.
JavaScript – EventSource
The JavaScript code enclosed within the <script> </script> tags is responsible for initiating an EventSource connection with the server and managing the events received from the server.
<script>
if (!!window.EventSource) {
  var source = new EventSource('/events');
source.addEventListener('open', function(e) {
  console.log("Events Connected");
}, false);

source.addEventListener('error', function(e) {
  if (e.target.readyState != EventSource.OPEN) {
    console.log("Events Disconnected");
  }
}, false);

source.addEventListener('message', function(e) {
  console.log("message", e.data);
}, false);
source.addEventListener('temperature', function(e) {
console.log("temperature", e.data);
document.getElementById("temp").innerHTML = e.data;
}, false);
source.addEventListener('humidity', function(e) {
console.log("humidity", e.data);
document.getElementById("hum").innerHTML = e.data;
}, false);
source.addEventListener('pressure', function(e) {
console.log("pressure", e.data);
document.getElementById("pres").innerHTML = e.data;
}, false);
}
</script>
Detailed discussion on the functionality of JavaScript is omitted here. We’ll solely focus on its role in handling server sent events.
Handle Events
Instantiate a new EventSource object and specify the URL of the page sending updates, which, in this case, is ‘/events’.
if (!!window.EventSource) {
var source = new EventSource('/events');
Once an event source is created, you can start listening for messages from the server using addEventListener().
The following are default event listeners, as outlined in the AsyncWebServer documentation.
source.addEventListener('open', function(e) {
console.log("Events Connected");
}, false);
source.addEventListener('error', function(e) {
if (e.target.readyState != EventSource.OPEN) {
console.log("Events Disconnected");
}
}, false);
source.addEventListener('message', function(e) {
console.log("message", e.data);
}, false);
Subsequently, add an event listener for “temperature”.
source.addEventListener('temperature', function(e) {
When a new temperature reading becomes available, the ESP8266 dispatches an event (“temperature”) to the client. The following lines handle the actions when the browser receives this event.
console.log("temperature", e.data);
document.getElementById("temp").innerHTML = e.data;
In essence, this prints the new readings in the browser console and updates the element with the corresponding id (“temp”) on the web page with the received data.
A similar process is carried out for humidity and pressure.
source.addEventListener('humidity', function(e) {
  console.log("humidity", e.data);
  document.getElementById("hum").innerHTML = e.data;
}, false);

source.addEventListener('pressure', function(e) {
  console.log("pressure", e.data);
  document.getElementById("pres").innerHTML = e.data;
}, false);

source.addEventListener('gas', function(e) {
  console.log("gas", e.data);
  document.getElementById("gas").innerHTML = e.data;
}, false);
setup()
Within the setup(), initialize the Serial Monitor, Wi-Fi, and the BME280 sensor.
Serial.begin(115200);
initWiFi();
initBME();
Handle Requests
When accessing the ESP8266 IP address on the root / URL, send the text stored in the index_html variable to construct the web page and pass the processor as an argument, ensuring all placeholders are replaced with the latest sensor readings.
server.on("/", HTTP_GET, [](AsyncWebServerRequest *request){
  request->send_P(200, "text/html", index_html, processor);
});
Server Event Source
Configure the event source on the server.
// Handle Web Server Events
events.onConnect([](AsyncEventSourceClient *client){
  if(client->lastId()){
    Serial.printf("Client reconnected! Last message ID that it got is: %u\n", client->lastId());
  }
  // send event with message "hello!", id current millis
  // and set reconnect delay to 1 second
  client->send("hello!", NULL, millis(), 10000);
});
server.addHandler(&events);
Lastly, start the server.
server.begin();
loop()
In the loop(), obtain new sensor readings:
getSensorReadings();
Print the new readings in the Serial Monitor.
Serial.printf("Temperature = %.2f ºC \n", temperature);
Serial.printf("Humidity = %.2f % \n", humidity);
Serial.printf("Pressure = %.2f hPa \n", pressure);
Serial.println();
Finally, dispatch events to the browser with the newest sensor readings to update the web page.
// Send Events to the Web Server with the Sensor Readings
events.send("ping",NULL,millis());
events.send(String(temperature).c_str(),"temperature",millis());
events.send(String(humidity).c_str(),"humidity",millis());
events.send(String(pressure).c_str(),"pressure",millis());
Demonstration
After inputting your network credentials into the ssid and password variables, upload the code to your board. Ensure you’ve selected the correct board and COM port.
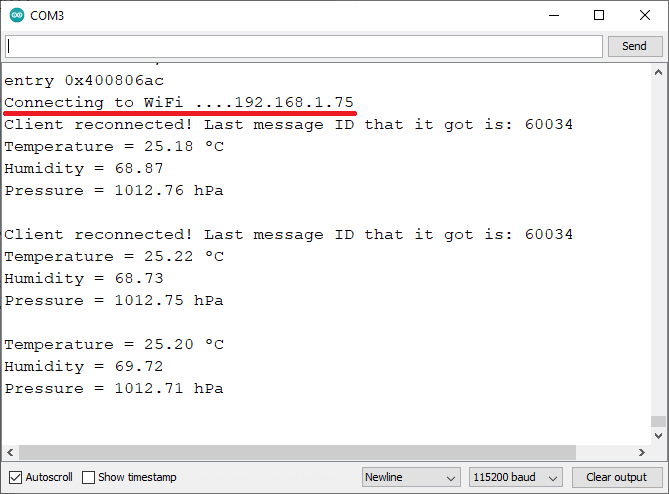
Upon uploading the code, launch the Serial Monitor at a baud rate of 115200 and press the EN/RST button on the board. The ESP IP address will be displayed.
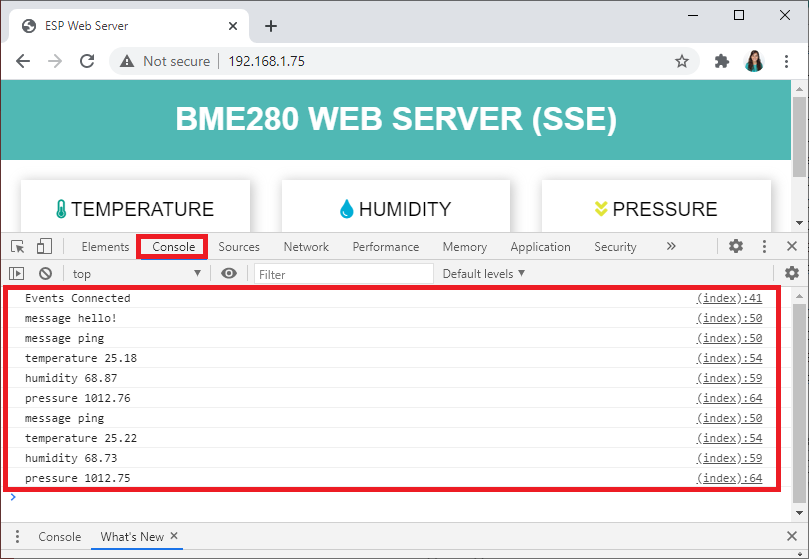
Next, open a browser on your local network and enter the ESP8266 IP address. You should gain access to the web page for monitoring sensor readings.

The readings are automatically updated every 30 seconds.
Simultaneously, you’ll observe new sensor readings in the Serial Monitor, as shown in the previous screenshot. Additionally, you can verify if the client is receiving the events. In your browser, open the console by pressing Ctrl+Shift+J.
Wrapping Up
In this tutorial, you’ve gained insight into utilizing Server-Sent Events with the ESP8266. Server Sent Events enable a web page (client) to receive updates from a server, facilitating the automatic display of new sensor readings on the web server page as they become available.
To delve deeper into the ESP8266, explore our additional resources:
- Control IoT Devices: ESP8266 NodeMCU Async Web Server Tutorial
- BMP388 Barometric Sensor Setup for ESP8266 NodeMCU (Arduino IDE)
- Arduino IDE Tutorial: Using HC-SR04 Ultrasonic Sensor with ESP8266 NodeMCU
- Master DC Motor Control: ESP8266 NodeMCU and L298N Driver Tutorial


