In this guide, you will discover the process of sending emails using the ESP8266 NodeMCU board and an SMTP server. We will demonstrate sending emails containing plain text, HTML formatted text, and also cover sending attachments such as images and .txt files. The programming will be done on the ESP8266 NodeMCU board using the Arduino core.
Parts Required
| Component Name | Buy Now |
| ESP8266 NodeMCU CP2102 | Amazon |
Introducing SMTP Servers
SMTP, short for Simple Mail Transfer Protocol, is an internet standard used for email transmission. To send emails using an ESP8266, you must connect it to an SMTP Server.
ESP-Mail-Client Library
For sending emails with the ESP8266 NodeMCU board, we’ll utilize the ESP-Mail-Client library. This library enables the ESP8266 to send and receive emails with or without attachments via SMTP and IMAP servers. If you find this library useful for your projects, consider supporting the developer’s efforts—visit the library’s GitHub page.
In this tutorial, we’ll utilize SMTP to send emails both with and without attachments. For instance, we’ll send an image (.png) and a text (.txt) file. The files intended for email transmission can be stored in the ESP8266 Filesystem (SPIFFS or LittleFS) or on a microSD card (which is not covered in this tutorial).
Installing the ESP-Mail-Client Library
Prior to proceeding with this tutorial, you must install the ESP-Mail-Client library.
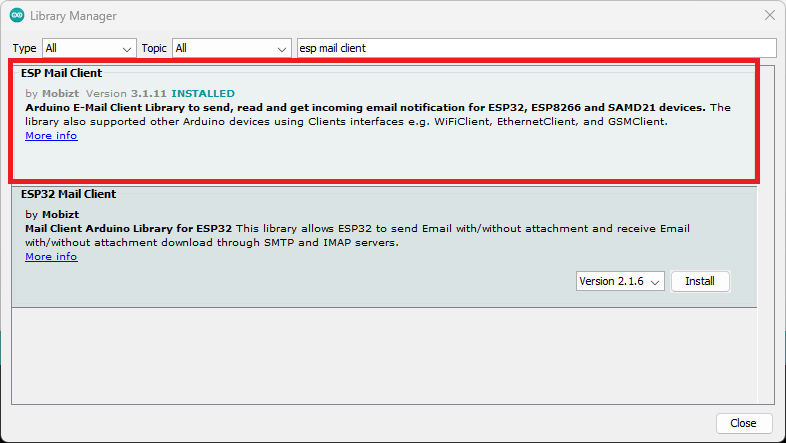
Navigate to Sketch > Include Library > Manage Libraries and search for ESP Mail Client. Install the ESP Mail Client library developed by Mobizt.
Sender Email (New Account)
We strongly advise creating a new email account to send emails to your primary personal email address. Avoid using your main personal email for sending emails via ESP8266. In the event of code errors or unintentional excessive requests, you risk being banned or having your account temporarily suspended.
We’ll utilize a newly established Gmail.com account for sending emails, though any other email provider can be used. The recipient email can be your personal email without any issues.
Create a Sender Email Account
Establish a fresh email account specifically for sending emails with the ESP8266. If opting for a Gmail account, visit this link to create a new one.
Create an App Password
An app password is required for ESP32 to send emails using your Gmail account. An App Password is a 16-digit code that grants access to a less secure app or device to your Google Account. Learn more about sign-in with app passwords here.
App passwords are only applicable to accounts with 2-step verification enabled.
- Access your Google Account.
- From the navigation panel, choose Security.
- Under “Signing in to Google,” select 2-Step Verification > Get started.
- Follow the on-screen instructions.
Once 2-step verification is activated, proceed to create an app password.
- Access your Google Account.
- From the navigation panel, choose Security.
- Under “Signing in to Google,” select App Passwords.
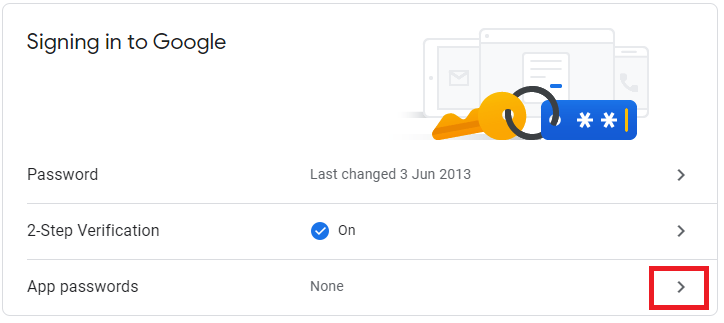
- In the Select app field, opt for mail. For the device, select Other and assign it a name, such as ESP32. Then, click Generate. A window will appear with a password that will be utilized with the ESP32 or ESP8266 to send emails. Save this password, despite indications that it needn’t be remembered, as it will be needed later.
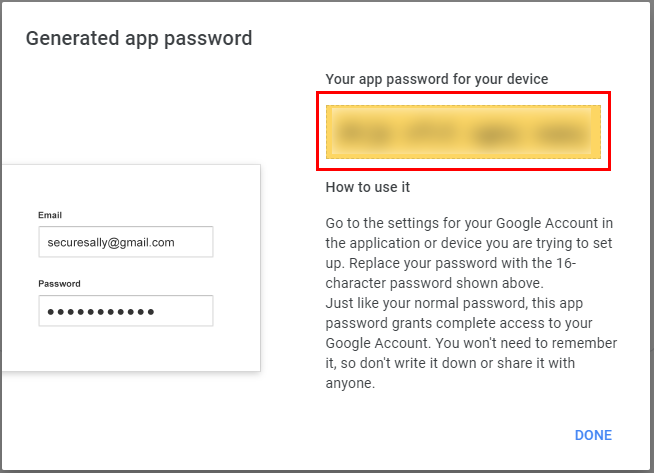
Now, you possess an app password for utilization in the ESP32 code to send emails.
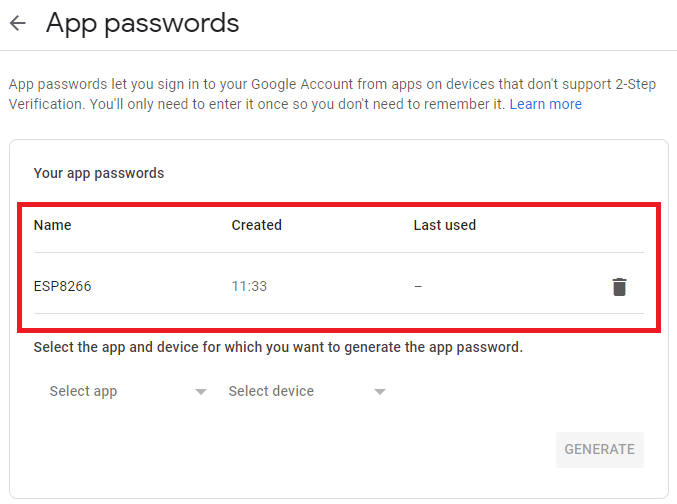
For other email providers, refer to their guidelines for creating an app password, which can typically be found through a quick Google search “your_email_provider + create app password.”
Gmail SMTP Server Settings
For Gmail accounts, the following are the SMTP Server details:
- SMTP Server: smtp.gmail.com
- SMTP username: Complete Gmail address
- SMTP password: Your Gmail password
- SMTP port (TLS): 587
- SMTP port (SSL): 465
- SMTP TLS/SSL required: yes
Outlook SMTP Server Settings
For Outlook accounts, these are the SMTP Server settings:
- SMTP Server: smtp.office365.com
- SMTP Username: Complete Outlook email address
- SMTP Password: Your Outlook password
- SMTP Port: 587
- SMTP TLS/SSL Required: Yes
Live or Hotmail SMTP Server Settings
For Live or Hotmail accounts, these are the SMTP Server settings:
- SMTP Server: smtp.live.com
- SMTP Username: Complete Live/Hotmail email address
- SMTP Password: Your Windows Live Hotmail password
- SMTP Port: 587
- SMTP TLS/SSL Required: Yes
For other email providers, search for their SMTP Server settings. Now, you’re prepared to start sending emails with your ESP8266.
In your Arduino IDE, navigate to File > Examples > ESP-Mail-Client and explore the provided examples. You’ll need to input your email details (sender and recipient accounts), the SMTP server settings, and your SSID and password.
Sending an Email with HTML or Raw Text using ESP8266
The provided code facilitates the sending of an email via an SMTP Server, capable of transmitting either HTML or raw text. For demonstration purposes, the ESP8266 is configured to send an email upon booting. However, you will need to customize the code to suit your specific project requirements.
Before uploading the code, certain modifications are necessary to ensure its functionality for your setup.
#include <Arduino.h>
#if defined(ESP32)
  #include <WiFi.h>
#elif defined(ESP8266)
  #include <ESP8266WiFi.h>
#endif
#include <ESP_Mail_Client.h>

#define WIFI_SSID "REPLACE_WITH_YOUR_SSID"
#define WIFI_PASSWORD "REPLACE_WITH_YOUR_PASSWORD"

/** The smtp host name e.g. smtp.gmail.com for GMail or smtp.office365.com for Outlook or smtp.mail.yahoo.com */
#define SMTP_HOST "smtp.gmail.com"
#define SMTP_PORT 465

/* The sign in credentials */
#define AUTHOR_EMAIL "YOUR_EMAIL@XXXX.com"
#define AUTHOR_PASSWORD "YOUR_EMAIL_APP_PASS"

/* Recipient's email*/
#define RECIPIENT_EMAIL "RECIPIENTE_EMAIL@XXXX.com"

/* Declare the global used SMTPSession object for SMTP transport */
SMTPSession smtp;

/* Callback function to get the Email sending status */
void smtpCallback(SMTP_Status status);

void setup(){
  Serial.begin(115200);
  Serial.println();
  WiFi.begin(WIFI_SSID, WIFI_PASSWORD);
  Serial.print("Connecting to Wi-Fi");
  while (WiFi.status() != WL_CONNECTED){
    Serial.print(".");
    delay(300);
  }
  Serial.println();
  Serial.print("Connected with IP: ");
  Serial.println(WiFi.localIP());
  Serial.println();

  /*  Set the network reconnection option */
  MailClient.networkReconnect(true);

  /** Enable the debug via Serial port
   * 0 for no debugging
   * 1 for basic level debugging
   *
   * Debug port can be changed via ESP_MAIL_DEFAULT_DEBUG_PORT in ESP_Mail_FS.h
   */
  smtp.debug(1);

  /* Set the callback function to get the sending results */
  smtp.callback(smtpCallback);

  /* Declare the Session_Config for user defined session credentials */
  Session_Config config;

  /* Set the session config */
  config.server.host_name = SMTP_HOST;
  config.server.port = SMTP_PORT;
  config.login.email = AUTHOR_EMAIL;
  config.login.password = AUTHOR_PASSWORD;
  config.login.user_domain = "";

  /*
  Set the NTP config time
  For times east of the Prime Meridian use 0-12
  For times west of the Prime Meridian add 12 to the offset.
  Ex. American/Denver GMT would be -6. 6 + 12 = 18
  See https://en.wikipedia.org/wiki/Time_zone for a list of the GMT/UTC timezone offsets
  */
  config.time.ntp_server = F("pool.ntp.org,time.nist.gov");
  config.time.gmt_offset = 3;
  config.time.day_light_offset = 0;

  /* Declare the message class */
  SMTP_Message message;

  /* Set the message headers */
  message.sender.name = F("ESP");
  message.sender.email = AUTHOR_EMAIL;
  message.subject = F("ESP Test Email");
  message.addRecipient(F("Sara"), RECIPIENT_EMAIL);

  /*Send HTML message*/
  /*String htmlMsg = "<div style=\"color:#2f4468;\"><h1>Hello World!</h1><p>- Sent from ESP board</p></div>";
  message.html.content = htmlMsg.c_str();
  message.html.content = htmlMsg.c_str();
  message.text.charSet = "us-ascii";
  message.html.transfer_encoding = Content_Transfer_Encoding::enc_7bit;*/


  //Send raw text message
  String textMsg = "Hello World! - Sent from ESP board";
  message.text.content = textMsg.c_str();
  message.text.charSet = "us-ascii";
  message.text.transfer_encoding = Content_Transfer_Encoding::enc_7bit;

  message.priority = esp_mail_smtp_priority::esp_mail_smtp_priority_low;
  message.response.notify = esp_mail_smtp_notify_success | esp_mail_smtp_notify_failure | esp_mail_smtp_notify_delay;


  /* Connect to the server */
  if (!smtp.connect(&config)){
    ESP_MAIL_PRINTF("Connection error, Status Code: %d, Error Code: %d, Reason: %s", smtp.statusCode(), smtp.errorCode(), smtp.errorReason().c_str());
    return;
  }

  if (!smtp.isLoggedIn()){
    Serial.println("\nNot yet logged in.");
  }
  else{
    if (smtp.isAuthenticated())
      Serial.println("\nSuccessfully logged in.");
    else
      Serial.println("\nConnected with no Auth.");
  }

  /* Start sending Email and close the session */
  if (!MailClient.sendMail(&smtp, &message))
    ESP_MAIL_PRINTF("Error, Status Code: %d, Error Code: %d, Reason: %s", smtp.statusCode(), smtp.errorCode(), smtp.errorReason().c_str());

}

void loop(){
}

/* Callback function to get the Email sending status */
void smtpCallback(SMTP_Status status){
  /* Print the current status */
  Serial.println(status.info());

  /* Print the sending result */
  if (status.success()){
    // ESP_MAIL_PRINTF used in the examples is for format printing via debug Serial port
    // that works for all supported Arduino platform SDKs e.g. AVR, SAMD, ESP32 and ESP8266.
    // In ESP8266 and ESP32, you can use Serial.printf directly.

    Serial.println("----------------");
    ESP_MAIL_PRINTF("Message sent success: %d\n", status.completedCount());
    ESP_MAIL_PRINTF("Message sent failed: %d\n", status.failedCount());
    Serial.println("----------------\n");

    for (size_t i = 0; i < smtp.sendingResult.size(); i++)
    {
      /* Get the result item */
      SMTP_Result result = smtp.sendingResult.getItem(i);

      // In case, ESP32, ESP8266 and SAMD device, the timestamp get from result.timestamp should be valid if
      // your device time was synched with NTP server.
      // Other devices may show invalid timestamp as the device time was not set i.e. it will show Jan 1, 1970.
      // You can call smtp.setSystemTime(xxx) to set device time manually. Where xxx is timestamp (seconds since Jan 1, 1970)

      ESP_MAIL_PRINTF("Message No: %d\n", i + 1);
      ESP_MAIL_PRINTF("Status: %s\n", result.completed ? "success" : "failed");
      ESP_MAIL_PRINTF("Date/Time: %s\n", MailClient.Time.getDateTimeString(result.timestamp, "%B %d, %Y %H:%M:%S").c_str());
      ESP_MAIL_PRINTF("Recipient: %s\n", result.recipients.c_str());
      ESP_MAIL_PRINTF("Subject: %s\n", result.subject.c_str());
    }
    Serial.println("----------------\n");

    // You need to clear sending result as the memory usage will grow up.
    smtp.sendingResult.clear();
  }
}
Ensure to insert your network credentials and configure parameters such as the sender email, SMTP Server details, recipient, and message accordingly.
Code Explanation
This code is adapted from a library-provided example, extensively commented to elucidate each line’s functionality. Let’s focus on the pertinent segments necessitating modification or customization.
Begin by inserting your network credentials within the subsequent lines:
#define WIFI_SSID "REPLACE_WITH_YOUR_SSID"
#define WIFI_PASSWORD "REPLACE_WITH_YOUR_PASSWORD"
Configure your SMTP server settings. If utilizing a Gmail account for email transmission, utilize the following settings:
#define SMTP_HOST "smtp.gmail.com"
#define SMTP_PORT 465
Provide the sign-in credentials for the sender email (complete email address and previously generated APP password):
#define AUTHOR_EMAIL "YOUR_EMAIL@XXXX.com"
#define AUTHOR_PASSWORD "YOUR_EMAIL_PASS"
Insert the recipient email address:
#define RECIPIENT_EMAIL "RECIPIENTE_EMAIL@XXXX.com"
You might need to adjust the gmt_offset variable depending on your geographical location to ensure the email is timestamped accurately.
config.time.ntp_server = F("pool.ntp.org,time.nist.gov");
config.time.gmt_offset = 3;
config.time.day_light_offset = 0;
Set the message headers within the setup() function—specifying sender name, sender email, email subject, recipient name, and recipient email:
/* Set the message headers */
message.sender.name = "ESP";
message.sender.email = AUTHOR_EMAIL;
message.subject = "ESP Test Email";
message.addRecipient("Sara", RECIPIENT_EMAIL);
Define the content of the message (raw text) within the textMsg variable:
//Send raw text message
String textMsg = "Hello World! - Sent from ESP board";
message.text.content = textMsg.c_str();
message.text.charSet = "us-ascii";
message.text.transfer_encoding = Content_Transfer_Encoding::enc_7bit;
If opting to send HTML text, uncomment the following lines, and insert your HTML text within the htmlMsg variable:
/*Send HTML message*/
/*String htmlMsg = "<div style=\"color:#2f4468;\"><h1>Hello World!</h1><p>- Sent from ESP board</p></div>";
message.html.content = htmlMsg.c_str();
message.html.content = htmlMsg.c_str();
message.text.charSet = "us-ascii";
message.html.transfer_encoding = Content_Transfer_Encoding::enc_7bit;*/
Subsequently, the message is sent via the following lines:
if (!MailClient.sendMail(&smtp, &message))
    Serial.println("Error sending Email, " + smtp.errorReason());
Demonstration
Upload the code to your ESP8266. Upon completion, open the Serial Monitor at a baud rate of 115200.
If execution proceeds as anticipated, you should receive a similar message within the Serial Monitor.
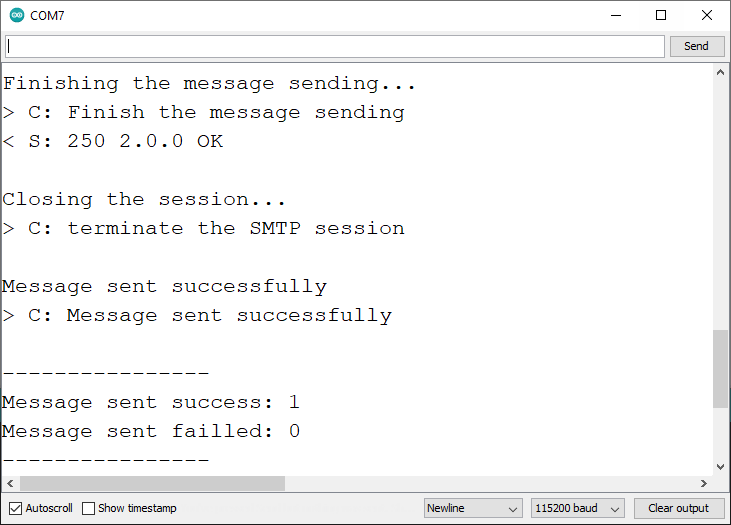
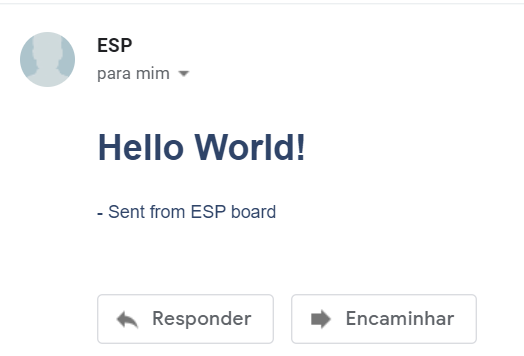
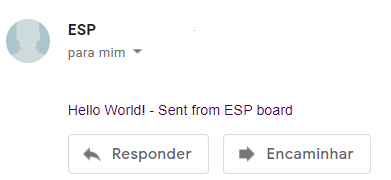
Check your designated email account; an email from your ESP8266 board should be present.

For messages sent with HTML text enabled, the email will display accordingly. Alternatively, if raw text messaging is selected, the received email will reflect the configured content.
Send Attachments via Email with ESP8266 (Arduino IDE)
This section will guide you through the process of attaching files to emails sent by the ESP8266. We’ll demonstrate how to include .txt files or pictures, which can be particularly handy for transmitting sensor readings or other data.
Ensure that the files intended for attachment are saved in the ESP8266 filesystem (either SPIFFS or LittleFS). By default, the library utilizes LittleFS. While it’s also possible to attach files stored on a microSD card, this aspect won’t be covered in this tutorial.
Upload files to LittleFS
To include files as attachments in emails, they must first be saved in the ESP8266 filesystem. The library defaults to using LittleFS. To upload files to LittleFS via the Arduino IDE, you’ll need to install a Filesystem Uploader Plugin. Refer to the following tutorial for instructions on installing and uploading files to the ESP8266 filesystem:
If you’re utilizing VS Code + PlatformIO, follow the subsequent tutorial to learn how to upload files to LittleFS:
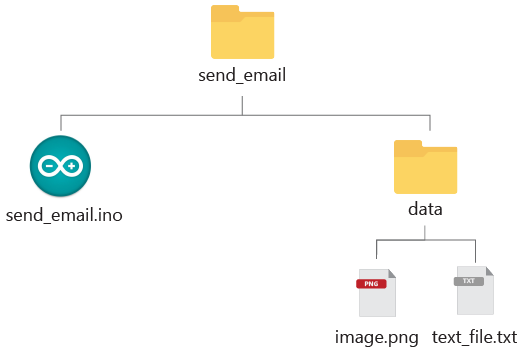
Begin by creating a new Arduino sketch and saving it. Navigate to Sketch > Show Sketch folder. Within the Arduino sketch folder, establish a directory named data. Transfer a .png file and a .txt file to your data folder.
Alternatively, you can download the project folder by clicking here.
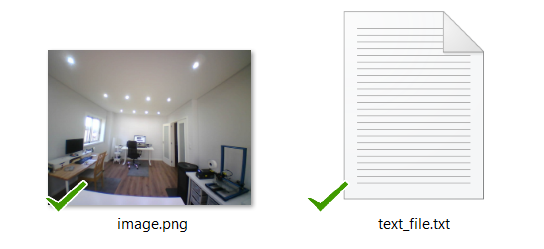
The files we’ll be attaching are:
Your folder structure should resemble the following (download project folder):
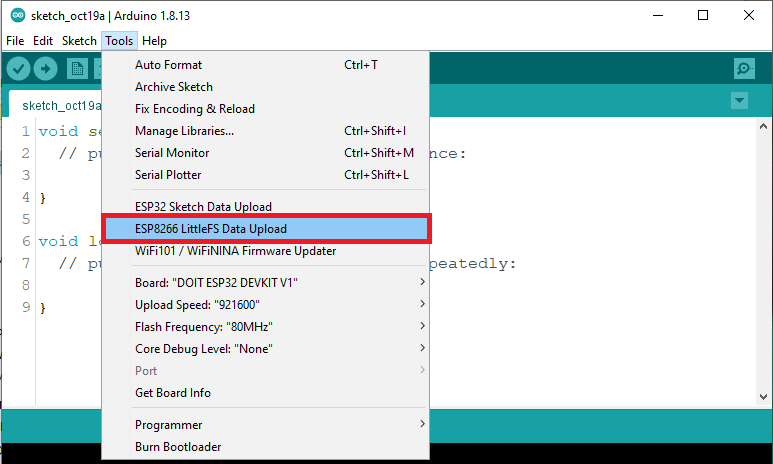
Once the files are relocated to the data folder, within your Arduino IDE, proceed to Tools > ESP8266 LittleFS Data Upload, and await the completion of file uploading.
A success message should appear in the debugging window upon successful file upload. If the files were uploaded without issues, proceed to the next section.

Code
The following code sends an email with a .txt file and a picture attached. Before uploading the code, make sure you insert your sender email settings as well as your recipient email.
#include <Arduino.h>
#if defined(ESP32)
  #include <WiFi.h>
#elif defined(ESP8266)
  #include <ESP8266WiFi.h>
#endif
#include <ESP_Mail_Client.h>

#define WIFI_SSID "REPLACE_WITH_YOUR_SSID"
#define WIFI_PASSWORD "REPLACE_WITH_YOUR_PASSWORD"

#define SMTP_HOST "smtp.gmail.com"

/** The smtp port e.g.
 * 25  or esp_mail_smtp_port_25
 * 465 or esp_mail_smtp_port_465
 * 587 or esp_mail_smtp_port_587
*/
#define SMTP_PORT 465

/* The sign in credentials */
#define AUTHOR_EMAIL "YOUR_EMAIL@XXXX.com"
#define AUTHOR_PASSWORD "YOUR_EMAIL_APP_PASS"

/* Recipient's email*/
#define RECIPIENT_EMAIL "RECIPIENTE_EMAIL@XXXX.com"

/* The SMTP Session object used for Email sending */
SMTPSession smtp;

/* Callback function to get the Email sending status */
void smtpCallback(SMTP_Status status);

void setup(){
  Serial.begin(115200);
  Serial.println();
  Serial.print("Connecting to AP");
  WiFi.begin(WIFI_SSID, WIFI_PASSWORD);
  while (WiFi.status() != WL_CONNECTED){
    Serial.print(".");
    delay(200);
  }
  Serial.println("");
  Serial.println("WiFi connected.");
  Serial.println("IP address: ");
  Serial.println(WiFi.localIP());
  Serial.println();

  // Init filesystem
  ESP_MAIL_DEFAULT_FLASH_FS.begin();

  /** Enable the debug via Serial port
   * none debug or 0
   * basic debug or 1
  */
  smtp.debug(1);

  /* Set the callback function to get the sending results */
  smtp.callback(smtpCallback);

  /* Declare the Session_Config for user defined session credentials */
  Session_Config config;

  /* Set the session config */
  config.server.host_name = SMTP_HOST;
  config.server.port = SMTP_PORT;
  config.login.email = AUTHOR_EMAIL;
  config.login.password = AUTHOR_PASSWORD;
  config.login.user_domain = "mydomain.net";

  /*
  Set the NTP config time
  For times east of the Prime Meridian use 0-12
  For times west of the Prime Meridian add 12 to the offset.
  Ex. American/Denver GMT would be -6. 6 + 12 = 18
  See https://en.wikipedia.org/wiki/Time_zone for a list of the GMT/UTC timezone offsets
  */
  config.time.ntp_server = F("pool.ntp.org,time.nist.gov");
  config.time.gmt_offset = 3;
  config.time.day_light_offset = 0;

  /* Declare the message class */
  SMTP_Message message;

  /* Enable the chunked data transfer with pipelining for large message if server supported */
  message.enable.chunking = true;

  /* Set the message headers */
  message.sender.name = "ESP Mail";
  message.sender.email = AUTHOR_EMAIL;

  message.subject = F("Test sending Email with attachments and inline images from Flash");
  message.addRecipient(F("Sara"), RECIPIENT_EMAIL);

  /** Two alternative content versions are sending in this example e.g. plain text and html */
  String htmlMsg = "This message contains attachments: image and text file.";
  message.html.content = htmlMsg.c_str();
  message.html.charSet = "utf-8";
  message.html.transfer_encoding = Content_Transfer_Encoding::enc_qp;

  message.priority = esp_mail_smtp_priority::esp_mail_smtp_priority_normal;
  message.response.notify = esp_mail_smtp_notify_success | esp_mail_smtp_notify_failure | esp_mail_smtp_notify_delay;

  /* The attachment data item */
  SMTP_Attachment att;

  /** Set the attachment info e.g.
   * file name, MIME type, file path, file storage type,
   * transfer encoding and content encoding
  */
  att.descr.filename = "image.png";
  att.descr.mime = "image/png"; //binary data
  att.file.path = "/image.png";
  att.file.storage_type = esp_mail_file_storage_type_flash;
  att.descr.transfer_encoding = Content_Transfer_Encoding::enc_base64;

  /* Add attachment to the message */
  message.addAttachment(att);

  message.resetAttachItem(att);
  att.descr.filename = "text_file.txt";
  att.descr.mime = "text/plain";
  att.file.path = "/text_file.txt";
  att.file.storage_type = esp_mail_file_storage_type_flash;
  att.descr.transfer_encoding = Content_Transfer_Encoding::enc_base64;

  /* Add attachment to the message */
  message.addAttachment(att);

  /* Connect to server with the session config */
  if (!smtp.connect(&config)){
    ESP_MAIL_PRINTF("Connection error, Status Code: %d, Error Code: %d, Reason: %s", smtp.statusCode(), smtp.errorCode(), smtp.errorReason().c_str());
    return;
  }

  if (!smtp.isLoggedIn()){
    Serial.println("\nNot yet logged in.");
  }
  else{
    if (smtp.isAuthenticated())
      Serial.println("\nSuccessfully logged in.");
    else
      Serial.println("\nConnected with no Auth.");
  }

  /* Start sending the Email and close the session */
  if (!MailClient.sendMail(&smtp, &message, true))
    Serial.println("Error sending Email, " + smtp.errorReason());
}

void loop(){
}

/* Callback function to get the Email sending status */
void smtpCallback(SMTP_Status status){
  /* Print the current status */
  Serial.println(status.info());

  /* Print the sending result */
  if (status.success()){
    Serial.println("----------------");
    ESP_MAIL_PRINTF("Message sent success: %d\n", status.completedCount());
    ESP_MAIL_PRINTF("Message sent failled: %d\n", status.failedCount());
    Serial.println("----------------\n");
    struct tm dt;

    for (size_t i = 0; i < smtp.sendingResult.size(); i++){
      /* Get the result item */
      SMTP_Result result = smtp.sendingResult.getItem(i);
      time_t ts = (time_t)result.timestamp;
      localtime_r(&ts, &dt);

      ESP_MAIL_PRINTF("Message No: %d\n", i + 1);
      ESP_MAIL_PRINTF("Status: %s\n", result.completed ? "success" : "failed");
      ESP_MAIL_PRINTF("Date/Time: %d/%d/%d %d:%d:%d\n", dt.tm_year + 1900, dt.tm_mon + 1, dt.tm_mday, dt.tm_hour, dt.tm_min, dt.tm_sec);
      ESP_MAIL_PRINTF("Recipient: %s\n", result.recipients.c_str());
      ESP_MAIL_PRINTF("Subject: %s\n", result.subject.c_str());
    }
    Serial.println("----------------\n");

    // You need to clear sending result as the memory usage will grow up.
    smtp.sendingResult.clear();
  }
}
Code Explanation
This code closely resembles the previous example, thus we’ll focus solely on the relevant sections pertaining to sending attachments.
Within the setup() function, initialize the filesystem using the ESP Mail Client library method. The library defaults to using LittleFS for the ESP32 (you can adjust this default within the library file ESP_Mail_FS.h).
// Init filesystem
ESP_MAIL_DEFAULT_FLASH_FS.begin();
To create an attachment, follow these steps:
/* The attachment data item */
SMTP_Attachment att;
Next, specify the attachment details: filename, MIME type, file path, file storage type, and transfer encoding. In the subsequent lines, we demonstrate sending the image file.
att.descr.filename = "image.png";
att.descr.mime = "image/png";
att.file.path = "/image.png";
att.file.storage_type = esp_mail_file_storage_type_flash;
att.descr.transfer_encoding = Content_Transfer_Encoding::enc_base64;
Subsequently, add the attachment to the message:
message.addAttachment(att);
For sending multiple attachments, after adding the previous attachment, call the following line:
message.resetAttachItem(att);
Then, specify the details of the additional attachment (text file):
att.descr.filename = "text_file.txt";
att.descr.mime = "text/plain";
att.file.path = "/text_file.txt";
att.file.storage_type = esp_mail_file_storage_type_flash;
att.descr.transfer_encoding = Content_Transfer_Encoding::enc_base64;
And add this attachment to the message:
message.addAttachment(att);
If you want to send more attachments, you need to call the following line before adding the next attachment:
message.resetAttachItem(att);
Then, enter the details of the other attachment (text file):
att.descr.filename = "text_file.txt";
att.descr.mime = "text/plain";
att.file.path = "/text_file.txt";
att.file.storage_type = esp_mail_file_storage_type_flash;
att.descr.transfer_encoding = Content_Transfer_Encoding::enc_base64;
And add this attachment to the message:
message.addAttachment(att);
Finally, you just need to send the message as you did with the previous example:
if (!MailClient.sendMail(&smtp, &message, true))
  Serial.println("Error sending Email, " + smtp.errorReason());
Demonstration
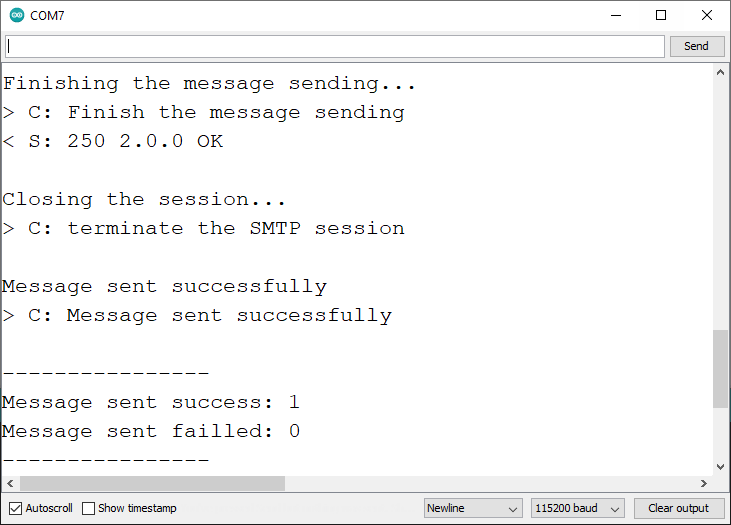
Upon uploading the code, open the Serial Monitor at a baud rate of 115200. If everything proceeds as anticipated, a similar message should appear in the Serial Monitor.
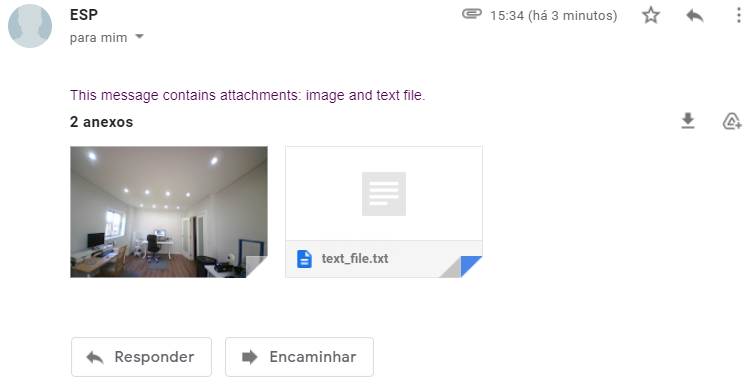
Navigate to your inbox; you should receive the message containing the specified attachments.
Wrapping Up
In this tutorial, you’ve learned how to send emails using the ESP8266 NodeMCU board and an SMTP Server. You’ve gained insight into sending HTML text, raw text, and attachments.
Now, the next step is to adapt the code for your own projects. For instance, it can be invaluable for transmitting sensor readings from the past hour, issuing notifications upon motion detection, and much more.
Further your knowledge of the ESP8266 with our available resources:

