

Avoid allowing smartphone weather applications or commercial weather stations, which often provide data from stations located far away, to disrupt your outdoor activities. Take control with this IoT project and become your own weather forecaster!
Utilizing the ESP8266 NodeMCU as the central control device, this project seamlessly connects to your existing WiFi network and establishes a Web Server. Whenever a connected device accesses this server, the ESP8266 retrieves data on temperature, humidity, barometric pressure, and altitude from the BME280 sensor, delivering it to the device’s web browser through a user-friendly interface. Intrigued? Let’s dive in!
BME280 Temperature, Humidity and Pressure Sensor
Let’s start by examining the BME280 Temperature, Humidity, and Pressure Sensor module.
The BME280 represents the latest advancement in digital temperature, humidity, and pressure sensing technology developed by Bosch. It succeeds previous sensor models such as BMP180, BMP085, or BMP183.
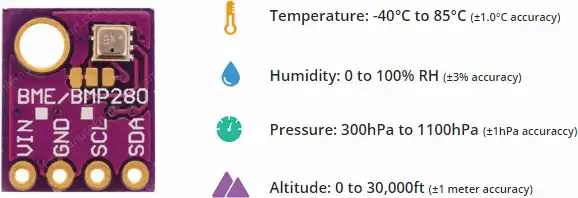
Operating within a voltage range of 3.3V to 5V, the BME280 module is ideally suited for interfacing with 3.3V microcontrollers like the ESP8266.
Communication with the module is facilitated through a straightforward two-wire I2C interface. By default, the BME280 module operates at an I2C address of 0x76, although it can be easily configured to 0x77 using a specific procedure.
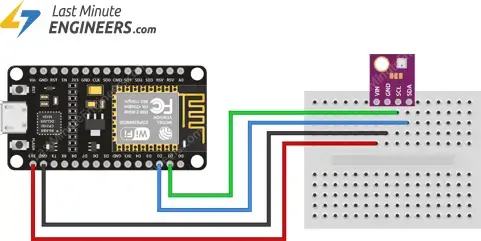
Wiring BME280 Sensor to ESP8266 NodeMCU
The connections are quite straightforward. Start by linking the VIN pin to the 3.3V output on the ESP8266 NodeMCU and connect GND to the ground.
Then, attach the SCL pin to the I2C clock pin (D1) on your ESP8266 and connect the SDA pin to the I2C data pin (D2) on your ESP8266.
The diagram below illustrates how everything should be wired.
Parts Required
Preparing the Arduino IDE
To program the ESP8266 NodeMCU using the Arduino IDE, you’ll need to install an add-on. If you haven’t done so already, follow the tutorial below to set up your Arduino IDE to work with the ESP8266.
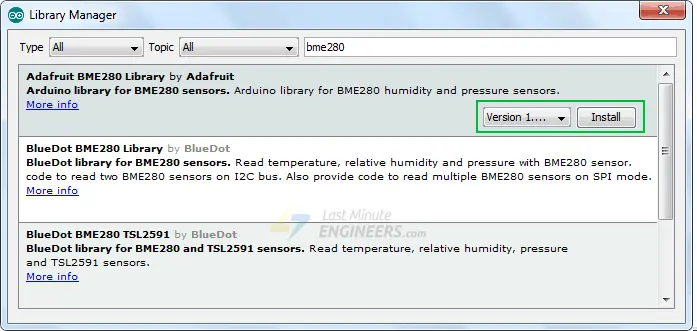
Installing Library For BME280
Communicating with a BME280 module involves some complexity. Luckily, the Adafruit BME280 Library simplifies this process, allowing us to issue straightforward commands to retrieve temperature, relative humidity, and barometric pressure data.
To install the library, navigate to Arduino IDE > Sketch > Include Library > Manage Libraries… Wait for the Library Manager to update its list of installed libraries.
Filter your search by typing ‘bme280’. You should see a couple of entries. Look for Adafruit BME280 Library by Adafruit, click on it, and select Install.
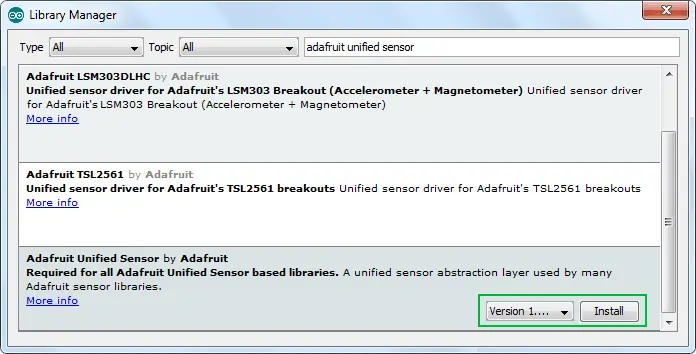
Since the BME280 sensor library relies on the Adafruit Sensor support backend, search the library manager for Adafruit Unified Sensor and install it as well (you may need to scroll a bit).
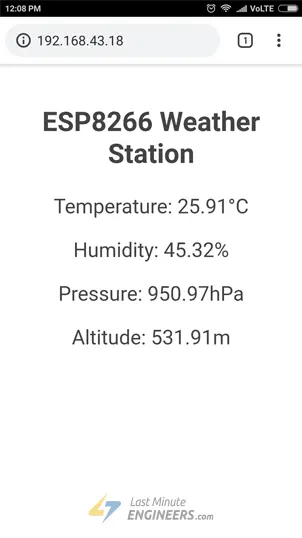
Displaying Temperature, Humidity, Pressure & Altitude On ESP8266 Web Server
Let’s set up our ESP8266 to function as a Station (STA) mode and establish a web server to serve web pages to any connected clients within the existing network.
If you’re interested in learning how to create a web server with the ESP8266 in AP/STA mode, check out this tutorial.
Before uploading the sketch, you need to make a modification to ensure it works for you. Update the following two variables with your network credentials, allowing the ESP8266 to connect to your existing network.
const char* ssid = "YourNetworkName";  // Enter SSID here
const char* password = "YourPassword";  //Enter Password here
Once you’ve made these changes, proceed to test out the sketch.
#include <ESP8266WebServer.h>
#include <Wire.h>
#include <Adafruit_Sensor.h>
#include <Adafruit_BME280.h>
#define SEALEVELPRESSURE_HPA (1013.25)

Adafruit_BME280 bme;

float temperature, humidity, pressure, altitude;
/*Put your SSID & Password*/
const char* ssid = "YourNetworkName";  // Enter SSID here
const char* password = "YourPassword";  //Enter Password here

ESP8266WebServer server(80);
void setup() {
Serial.begin(115200);
delay(100);

bme.begin(0x76);
Serial.println("Connecting to ");
Serial.println(ssid);

//connect to your local wi-fi network
WiFi.begin(ssid, password);
//check wi-fi is connected to wi-fi network
  while (WiFi.status() != WL_CONNECTED) {
  delay(1000);
  Serial.print(".");
  }
Serial.println("");
  Serial.println("WiFi connected..!");
  Serial.print("Got IP: ");  Serial.println(WiFi.localIP());
server.on("/", handle_OnConnect);
server.onNotFound(handle_NotFound);
server.begin();
Serial.println("HTTP server started");
}
void loop() {
server.handleClient();
}
void handle_OnConnect() {
  temperature = bme.readTemperature();
  humidity = bme.readHumidity();
  pressure = bme.readPressure() / 100.0F;
  altitude = bme.readAltitude(SEALEVELPRESSURE_HPA);
  server.send(200, "text/html", SendHTML(temperature,humidity,pressure,altitude));
}
void handle_NotFound(){
  server.send(404, "text/plain", "Not found");
}
String SendHTML(float temperature,float humidity,float pressure,float altitude){
  String ptr = "<!DOCTYPE html> <html>\n";
ptr +="<head><meta name=\"viewport\" content=\"width=device-width, initial-scale=1.0, user-scalable=no\">\n";
ptr +="<title>ESP8266 Weather Station</title>\n";
ptr +="<style>html { font-family: Helvetica; display: inline-block; margin: 0px auto; text-align: center;}\n";
ptr +="body{margin-top: 50px;} h1 {color: #444444;margin: 50px auto 30px;}\n";
ptr +="p {font-size: 24px;color: #444444;margin-bottom: 10px;}\n";
ptr +="</style>\n";
ptr +="</head>\n";
ptr +="<body>\n";
ptr +="<div id=\"webpage\">\n";
ptr +="<h1>ESP8266 Weather Station</h1>\n";
ptr +="<p>Temperature: ";
ptr +=temperature;
ptr +="°C</p>";
ptr +="<p>Humidity: ";
ptr +=humidity;
ptr +="%</p>";
ptr +="<p>Pressure: ";
ptr +=pressure;
ptr +="hPa</p>";
ptr +="<p>Altitude: ";
ptr +=altitude;
ptr +="m</p>";
ptr +="</div>\n";
ptr +="</body>\n";
ptr +="</html>\n";
return ptr;
}
Accessing the Web Server
Once you’ve uploaded the sketch, open the Serial Monitor with a baud rate of 115200. Then, press the EN button on the NodeMCU. If everything is functioning correctly, it will display the dynamic IP address acquired from your router and indicate that the HTTP server has started.
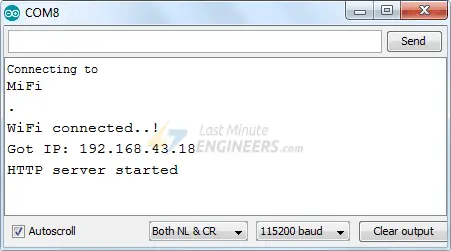
Open a web browser and enter the IP address displayed on the serial monitor. The ESP8266 will then present a web page featuring temperature, humidity, pressure, and altitude data from the BME280 sensor.
Explanation of the Code in Detail
The code begins by including several libraries.
The ESP8266WebServer.h library offers ESP8266-specific WiFi methods that we use to connect to the network. It also provides methods to set up a server and handle incoming HTTP requests without worrying about low-level implementation details.
The Wire.h library communicates with any I2C device, not just the BME280.
The Adafruit_BME280.h and Adafruit_Sensor.h libraries are hardware-specific libraries that handle lower-level functions.
#include <ESP8266WebServer.h> #include <Wire.h> #include <Adafruit_Sensor.h> #include <Adafruit_BME280.h>
Next, we create an object of the sensor and variables to store temperature, humidity, pressure, and altitude.
#define SEALEVELPRESSURE_HPA (1013.25) Adafruit_BME280 bme; float temperature, humidity, pressure, altitude;
As we are configuring the ESP8266 in Station (STA) mode, it will join an existing WiFi network. Hence, we need to provide it with your network’s SSID & Password. Next, we start the web server at port 80.
/*Put your SSID & Password*/ const char* ssid = "YourNetworkName"; // Enter SSID here const char* password = "YourPassword"; //Enter Password here ESP8266WebServer server(80);
Inside Setup() Function
Inside the Setup() function, we configure our HTTP server before actually running it.
First, we initialize serial communication with the PC and initialize the BME object using the begin() function. It initializes the I2C interface with the given I2C Address (0x76) and checks if the chip ID is correct. It then resets the chip using soft-reset and waits for the sensor for calibration after wake-up.
Serial.begin(115200); delay(100); bme.begin(0x76);
Now, we need to join the WiFi network using WiFi.begin() function. The function takes the SSID (Network Name) and password as parameters.
Serial.println("Connecting to ");
Serial.println(ssid);
//connect to your local wi-fi network
WiFi.begin(ssid, password);
While the ESP8266 tries to connect to the network, we can check the connectivity status with WiFi.status() function.
//check wi-fi is connected to wi-fi network
while (WiFi.status() != WL_CONNECTED) {
delay(1000);
Serial.print(".");
}
Once the ESP8266 is connected to the network, the sketch prints the IP address assigned to the ESP8266 by displaying WiFi.localIP() value on the serial monitor.
Serial.println("");
Serial.println("WiFi connected..!");
Serial.print("Got IP: "); Serial.println(WiFi.localIP());
In order to handle incoming HTTP requests, we need to specify which code to execute when a URL is hit. To do so, we use the on method. This method takes two parameters. The first one is a URL path, and the second one is the name of the function which we want to execute when that URL is hit.
The code below indicates that when a server receives an HTTP request on the root (/) path, it will trigger the handle_OnConnect function. Note that the URL specified is a relative path.
server.on("/", handle_OnConnect);
We haven’t specified what the server should do if the client requests any URL other than specified with server.on. It should respond with an HTTP status 404 (Not Found) and a message for the user. We put this in a function as well and use server.onNotFound to tell it that it should execute it when it receives a request for a URL that wasn’t specified with server.on
server.onNotFound(handle_NotFound);
Now, to start our server, we call the begin method on the server object.
server.begin();
Serial.println("HTTP server started");
Inside Loop() Function
To handle the actual incoming HTTP requests, we need to call the handleClient() method on the server object.
server.handleClient();
Next, we need to create a function we attached to the root (/) URL with server.on Remember?
At the start of this function, we get the temperature, humidity, pressure & altitude readings from the sensor. In order to respond to the HTTP request, we use the send method. Although the method can be called with a different set of arguments, its simplest form consists of the HTTP response code, the content type, and the content.
In our case, we are sending the code 200 (one of the HTTP status codes), which corresponds to the OK response. Then, we are specifying the content type as “text/html“, and finally, we are calling SendHTML() custom function which creates a dynamic HTML page containing temperature, humidity, pressure & altitude readings.
void handle_OnConnect() {
temperature = bme.readTemperature();
humidity = bme.readHumidity();
pressure = bme.readPressure() / 100.0F;
altitude = bme.readAltitude(SEALEVELPRESSURE_HPA);
server.send(200, "text/html", SendHTML(temperature,humidity,pressure,altitude));
}
Likewise, we need to create a function to handle 404 Error page.
void handle_NotFound(){
server.send(404, "text/plain", "Not found");
}
Displaying the HTML Web Page
The SendHTML() function is responsible for generating a web page whenever the ESP8266 web server gets a request from a web client. It merely concatenates HTML code into a big string and returns it to the server.send() function we discussed earlier. The function takes temperature, humidity, pressure & altitude readings as parameters to dynamically generate the HTML content.
The first text you should always send is the <!DOCTYPE> declaration that indicates that we’re sending HTML code.
String SendHTML(float temperature,float humidity,float pressure,float altitude){
String ptr = "<!DOCTYPE html> <html>\n";
Next, the <meta> viewport element makes the web page responsive in any web browser, while the title tag sets the title of the page.
ptr +="<head><meta name=\"viewport\" content=\"width=device-width, initial-scale=1.0, user-scalable=no\">\n"; ptr +="<title>ESP8266 Weather Station</title>\n";
Styling the Web Page
Next, we have some CSS to style the web page appearance. We choose the Helvetica font, define the content to be displayed as an inline-block, and aligned at the center.
ptr +="<style>html { font-family: Helvetica; display: inline-block; margin: 0px auto; text-align: center;}\n";
The following code sets the color, font, and margin around the body, H1, and p tags.
ptr +="body{margin-top: 50px;} h1 {color: #444444;margin: 50px auto 30px;}\n";
ptr +="p {font-size: 24px;color: #444444;margin-bottom: 10px;}\n";
ptr +="</style>\n";
ptr +="</head>\n";
ptr +="<body>\n";
Setting the Web Page Heading
Next, the heading of the web page is set; you can change this text to anything that suits your application.
ptr +="<div id=\"webpage\">\n"; ptr +="<h1>ESP8266 Weather Station</h1>\n";
Displaying Readings on Web Page
To dynamically display temperature, humidity, pressure & altitude readings, we put those values in paragraph tag. To display degree symbol, we use HTML entity °
ptr +="<p>Temperature: "; ptr +=temperature; ptr +="°C</p>"; ptr +="<p>Humidity: "; ptr +=humidity; ptr +="%</p>"; ptr +="<p>Pressure: "; ptr +=pressure; ptr +="hPa</p>"; ptr +="<p>Altitude: "; ptr +=altitude; ptr +="m</p>"; ptr +="</div>\n"; ptr +="</body>\n"; ptr +="</html>\n"; return ptr; }
Enhancing Web Page Appearance for a Professional Look
Many programmers find design daunting, but with a bit of effort, you can make your web page appear more appealing and polished. The screenshot below offers a glimpse of what we aim to achieve.
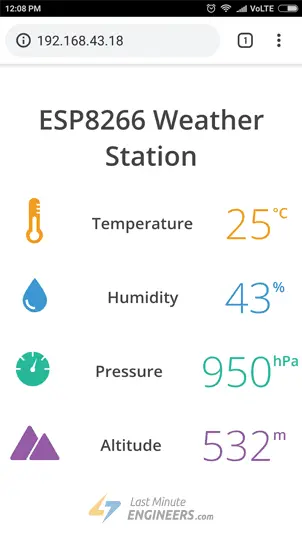
Impressive, isn’t it? Without delay, let’s add some style to our previous HTML page. Simply replace the existing SendHTML() function in your sketch with the code below.
String SendHTML(float temperature,float humidity,float pressure,float altitude){
String ptr = "<!DOCTYPE html>";
ptr +="<html>";
ptr +="<head>";
ptr +="<title>ESP8266 Weather Station</title>";
ptr +="<meta name='viewport' content='width=device-width, initial-scale=1.0'>";
ptr +="<link href='https://fonts.googleapis.com/css?family=Open+Sans:300,400,600' rel='stylesheet'>";
ptr +="<style>";
ptr +="html { font-family: 'Open Sans', sans-serif; display: block; margin: 0px auto; text-align: center;color: #444444;}";
ptr +="body{margin: 0px;} ";
ptr +="h1 {margin: 50px auto 30px;} ";
ptr +=".side-by-side{display: table-cell;vertical-align: middle;position: relative;}";
ptr +=".text{font-weight: 600;font-size: 19px;width: 200px;}";
ptr +=".reading{font-weight: 300;font-size: 50px;padding-right: 25px;}";
ptr +=".temperature .reading{color: #F29C1F;}";
ptr +=".humidity .reading{color: #3B97D3;}";
ptr +=".pressure .reading{color: #26B99A;}";
ptr +=".altitude .reading{color: #955BA5;}";
ptr +=".superscript{font-size: 17px;font-weight: 600;position: absolute;top: 10px;}";
ptr +=".data{padding: 10px;}";
ptr +=".container{display: table;margin: 0 auto;}";
ptr +=".icon{width:65px}";
ptr +="</style>";
ptr +="</head>";
ptr +="<body>";
ptr +="<h1>ESP8266 Weather Station</h1>";
ptr +="<div class='container'>";
ptr +="<div class='data temperature'>";
ptr +="<div class='side-by-side icon'>";
ptr +="<svg enable-background='new 0 0 19.438 54.003'height=54.003px id=Layer_1 version=1.1 viewBox='0 0 19.438 54.003'width=19.438px x=0px xml:space=preserve xmlns=http://www.w3.org/2000/svg xmlns:xlink=http://www.w3.org/1999/xlink y=0px><g><path d='M11.976,8.82v-2h4.084V6.063C16.06,2.715,13.345,0,9.996,0H9.313C5.965,0,3.252,2.715,3.252,6.063v30.982";
ptr +="C1.261,38.825,0,41.403,0,44.286c0,5.367,4.351,9.718,9.719,9.718c5.368,0,9.719-4.351,9.719-9.718";
ptr +="c0-2.943-1.312-5.574-3.378-7.355V18.436h-3.914v-2h3.914v-2.808h-4.084v-2h4.084V8.82H11.976z M15.302,44.833";
ptr +="c0,3.083-2.5,5.583-5.583,5.583s-5.583-2.5-5.583-5.583c0-2.279,1.368-4.236,3.326-5.104V24.257C7.462,23.01,8.472,22,9.719,22";
ptr +="s2.257,1.01,2.257,2.257V39.73C13.934,40.597,15.302,42.554,15.302,44.833z'fill=#F29C21 /></g></svg>";
ptr +="</div>";
ptr +="<div class='side-by-side text'>Temperature</div>";
ptr +="<div class='side-by-side reading'>";
ptr +=(int)temperature;
ptr +="<span class='superscript'>°C</span></div>";
ptr +="</div>";
ptr +="<div class='data humidity'>";
ptr +="<div class='side-by-side icon'>";
ptr +="<svg enable-background='new 0 0 29.235 40.64'height=40.64px id=Layer_1 version=1.1 viewBox='0 0 29.235 40.64'width=29.235px x=0px xml:space=preserve xmlns=http://www.w3.org/2000/svg xmlns:xlink=http://www.w3.org/1999/xlink y=0px><path d='M14.618,0C14.618,0,0,17.95,0,26.022C0,34.096,6.544,40.64,14.618,40.64s14.617-6.544,14.617-14.617";
ptr +="C29.235,17.95,14.618,0,14.618,0z M13.667,37.135c-5.604,0-10.162-4.56-10.162-10.162c0-0.787,0.638-1.426,1.426-1.426";
ptr +="c0.787,0,1.425,0.639,1.425,1.426c0,4.031,3.28,7.312,7.311,7.312c0.787,0,1.425,0.638,1.425,1.425";
ptr +="C15.093,36.497,14.455,37.135,13.667,37.135z'fill=#3C97D3 /></svg>";
ptr +="</div>";
ptr +="<div class='side-by-side text'>Humidity</div>";
ptr +="<div class='side-by-side reading'>";
ptr +=(int)humidity;
ptr +="<span class='superscript'>%</span></div>";
ptr +="</div>";
ptr +="<div class='data pressure'>";
ptr +="<div class='side-by-side icon'>";
ptr +="<svg enable-background='new 0 0 40.542 40.541'height=40.541px id=Layer_1 version=1.1 viewBox='0 0 40.542 40.541'width=40.542px x=0px xml:space=preserve xmlns=http://www.w3.org/2000/svg xmlns:xlink=http://www.w3.org/1999/xlink y=0px><g><path d='M34.313,20.271c0-0.552,0.447-1,1-1h5.178c-0.236-4.841-2.163-9.228-5.214-12.593l-3.425,3.424";
ptr +="c-0.195,0.195-0.451,0.293-0.707,0.293s-0.512-0.098-0.707-0.293c-0.391-0.391-0.391-1.023,0-1.414l3.425-3.424";
ptr +="c-3.375-3.059-7.776-4.987-12.634-5.215c0.015,0.067,0.041,0.13,0.041,0.202v4.687c0,0.552-0.447,1-1,1s-1-0.448-1-1V0.25";
ptr +="c0-0.071,0.026-0.134,0.041-0.202C14.39,0.279,9.936,2.256,6.544,5.385l3.576,3.577c0.391,0.391,0.391,1.024,0,1.414";
ptr +="c-0.195,0.195-0.451,0.293-0.707,0.293s-0.512-0.098-0.707-0.293L5.142,6.812c-2.98,3.348-4.858,7.682-5.092,12.459h4.804";
ptr +="c0.552,0,1,0.448,1,1s-0.448,1-1,1H0.05c0.525,10.728,9.362,19.271,20.22,19.271c10.857,0,19.696-8.543,20.22-19.271h-5.178";
ptr +="C34.76,21.271,34.313,20.823,34.313,20.271z M23.084,22.037c-0.559,1.561-2.274,2.372-3.833,1.814";
ptr +="c-1.561-0.557-2.373-2.272-1.815-3.833c0.372-1.041,1.263-1.737,2.277-1.928L25.2,7.202L22.497,19.05";
ptr +="C23.196,19.843,23.464,20.973,23.084,22.037z'fill=#26B999 /></g></svg>";
ptr +="</div>";
ptr +="<div class='side-by-side text'>Pressure</div>";
ptr +="<div class='side-by-side reading'>";
ptr +=(int)pressure;
ptr +="<span class='superscript'>hPa</span></div>";
ptr +="</div>";
ptr +="<div class='data altitude'>";
ptr +="<div class='side-by-side icon'>";
ptr +="<svg enable-background='new 0 0 58.422 40.639'height=40.639px id=Layer_1 version=1.1 viewBox='0 0 58.422 40.639'width=58.422px x=0px xml:space=preserve xmlns=http://www.w3.org/2000/svg xmlns:xlink=http://www.w3.org/1999/xlink y=0px><g><path d='M58.203,37.754l0.007-0.004L42.09,9.935l-0.001,0.001c-0.356-0.543-0.969-0.902-1.667-0.902";
ptr +="c-0.655,0-1.231,0.32-1.595,0.808l-0.011-0.007l-0.039,0.067c-0.021,0.03-0.035,0.063-0.054,0.094L22.78,37.692l0.008,0.004";
ptr +="c-0.149,0.28-0.242,0.594-0.242,0.934c0,1.102,0.894,1.995,1.994,1.995v0.015h31.888c1.101,0,1.994-0.893,1.994-1.994";
ptr +="C58.422,38.323,58.339,38.024,58.203,37.754z'fill=#955BA5 /><path d='M19.704,38.674l-0.013-0.004l13.544-23.522L25.13,1.156l-0.002,0.001C24.671,0.459,23.885,0,22.985,0";
ptr +="c-0.84,0-1.582,0.41-2.051,1.038l-0.016-0.01L20.87,1.114c-0.025,0.039-0.046,0.082-0.068,0.124L0.299,36.851l0.013,0.004";
ptr +="C0.117,37.215,0,37.62,0,38.059c0,1.412,1.147,2.565,2.565,2.565v0.015h16.989c-0.091-0.256-0.149-0.526-0.149-0.813";
ptr +="C19.405,39.407,19.518,39.019,19.704,38.674z'fill=#955BA5 /></g></svg>";
ptr +="</div>";
ptr +="<div class='side-by-side text'>Altitude</div>";
ptr +="<div class='side-by-side reading'>";
ptr +=(int)altitude;
ptr +="<span class='superscript'>m</span></div>";
ptr +="</div>";
ptr +="</div>";
ptr +="</body>";
ptr +="</html>";
return ptr;
}
Comparing this function with the previous one reveals the following changes:
We’ve utilized the Google-commissioned Open Sans web font for our page, enhancing its readability. Note that an active internet connection is required on the device to access Google fonts, as they are loaded dynamically.
ptr +="<link href='https://fonts.googleapis.com/css?family=Open+Sans:300,400,600' rel='stylesheet'>";
The icons used for displaying temperature, humidity, pressure, and altitude readings are Scalable Vector Graphics (SVG) defined within <svg> tags. Creating SVGs doesn’t demand special programming skills. You can utilize tools like Google SVG Editor to create graphics for your page. We’ve incorporated these SVG icons for visual representation.

Improvement to the Code – Auto Page Refresh
One enhancement you can make to our code is to automatically refresh the page to update sensor values. By adding a single meta tag to your HTML document, you can instruct the browser to reload the page at a specified interval.
<meta http-equiv="refresh" content="2" >
Place this code within the <head> tag of your document. This meta tag will tell the browser to refresh every two seconds. Pretty neat!
Dynamically load Sensor Data with AJAX
Refreshing a web page might not be practical, especially if the page is heavy. A more efficient method is to use Asynchronous JavaScript and XML (AJAX) to request data from the server in the background without refreshing the page.
The XMLHttpRequest object in JavaScript is commonly used to execute AJAX requests on web pages. It performs a silent GET request to the server and updates elements on the page. AJAX isn’t a new technology or a different language; it’s just existing technologies used in new ways. Additionally, AJAX enables:
- Requesting data from a server after the page has loaded.
- Receiving data from a server after the page has loaded.
- Sending data to a server in the background.
Here is the AJAX script that we’ll use. Place this script just before the closing </head> tag.
ptr +="<script>\n";
ptr +="setInterval(loadDoc,1000);\n";
ptr +="function loadDoc() {\n";
ptr +="var xhttp = new XMLHttpRequest();\n";
ptr +="xhttp.onreadystatechange = function() {\n";
ptr +="if (this.readyState == 4 && this.status == 200) {\n";
ptr +="document.body.innerHTML =this.responseText}\n";
ptr +="};\n";
ptr +="xhttp.open(\"GET\", \"/\", true);\n";
ptr +="xhttp.send();\n";
ptr +="}\n";
ptr +="</script>\n";
The script starts with the <script> tag, as an AJAX script is simply JavaScript code and needs to be enclosed within <script> tags. To repeatedly call this function, we use the JavaScript setInterval() function, which takes two parameters: the function to be executed and the time interval (in milliseconds) at which to execute it.
ptr +="<script>\n";
ptr +="setInterval(loadDoc,1000);\n";
The core of this script is the loadDoc() function. Inside this function, we create an XMLHttpRequest() object to request data from the web server.
ptr +="function loadDoc() {\n";
ptr +="var xhttp = new XMLHttpRequest();\n";
The xhttp.onreadystatechange function is called every time the readyState changes. The readyState property holds the status of the XMLHttpRequest, which can have values from 0 to 4 indicating various states of the request. Similarly, the status property holds the status of the XMLHttpRequest object, where a status of 200 indicates success.
ptr +="xhttp.onreadystatechange = function() {\n";
ptr +="if (this.readyState == 4 && this.status == 200) {\n";
ptr +="document.body.innerHTML =this.responseText}\n";
ptr +="};\n";
Finally, we initiate the HTTP request using the open() and send() functions.
ptr +="xhttp.open(\"GET\", \"/\", true);\n";
ptr +="xhttp.send();\n";
ptr +="}\n";
This script effectively updates the content of the <body> tag with the response from the server, allowing for dynamic updating of sensor data without refreshing the entire page.
Related article
- ESP8266 NodeMCU Email Tutorial: SMTP Server Setup for HTML, Text, and Attachments (Arduino)
- Firebase Data Logging: ESP8266 NodeMCU Sensor Integration
- Beginner’s Guide to ESP8266 NodeMCU and Firebase (Realtime Database)
- Smart LED Control: ESP8266 Empowers WS2812B LEDs via WLED
- Control IoT Devices: ESP8266 NodeMCU Async Web Server Tutorial
- ESP8266 NTP Server: Fetching Accurate Date & Time with NodeMCU


