

ESP32 is an excellent development board for building intelligent IoT projects, and incorporating touch functionality can further enhance their smartness.
With ESP32, you have access to 10 GPIOs specifically designed for capacitive touch sensing. These GPIOs can be utilized to upgrade existing projects with simple push buttons or to create innovative applications such as light switches, musical instruments, or interactive surfaces.
In this guide, we will explore how to effectively handle these touch-sensing pins and integrate them into your projects.
How ESP32 senses Touch?
The ESP32 employs the electrical characteristics of the human body to detect touch input. When a touch-sensing pin comes into contact with a finger, a slight electrical charge is drawn towards the point of contact.
This variation in capacitance leads to changes in an analog signal. Subsequently, the ESP32 utilizes two successive approximation ADCs (SAR ADCs) to convert this analog signal into a digital numerical representation.
ESP32 Touch Pins
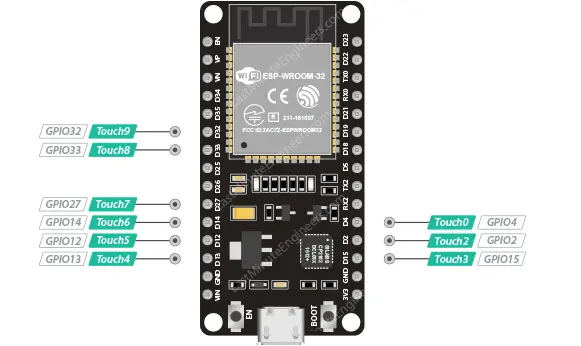
The ESP32 is equipped with 10 GPIOs dedicated to capacitive touch sensing. These GPIOs allow the ESP32 to detect changes in capacitance when a capacitive load, such as human skin, is in proximity to these pins.
However, it’s worth noting that not all 10 touch-sensing GPIOs are available through the pin headers on the ESP32 development board. In some cases, only a subset of these touch pins may be broken out and accessible for use on the specific board you are using.
Reading the Touch Sensor
Reading the touch sensor is a simple process. In the Arduino IDE, you can utilize the touchRead() function, which requires specifying the GPIO pin number you wish to read.
To read the touch sensor, use the following syntax:
touchRead(GPIOPin);
Hardware Hookup
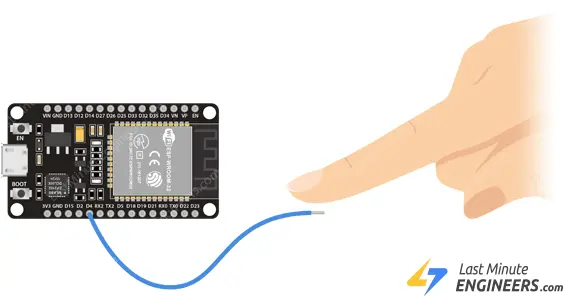
Now, let’s move from theory to practice with a hands-on example.
We will connect a wire to Touch #0, which corresponds to GPIO #4. You can attach any conductive object
Parts Required
| Component Name | Buy Now |
| ESP32-WROOM-32 Development | Amazon |
Example Code
To observe the touch functionality in action, let’s work with an example from the library. Open your Arduino IDE and follow these steps: navigate to File > Examples > ESP32 > Touch, and open the TouchRead sketch.
This example focuses on reading touch pin 0 and displaying the results on the serial monitor.
// ESP32 Touch Test
// Just test touch pin - Touch0 is T0 which is on GPIO 4.

void setup() {
  Serial.begin(115200);
  delay(1000); // give me time to bring up serial monitor
  Serial.println("ESP32 Touch Test");
}

void loop() {
  Serial.print("Touch: ");
  Serial.println(touchRead(4));  // get touch value on GPIO 4
  delay(1000);
}
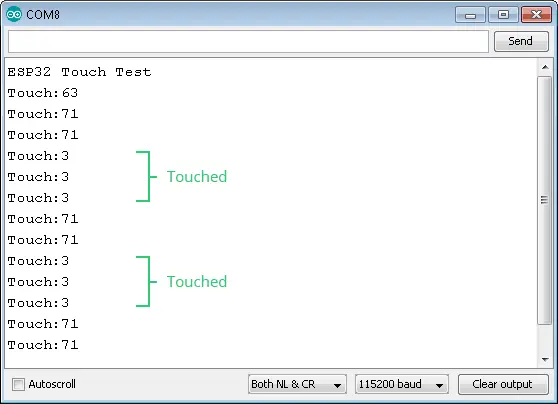
Once you have uploaded the sketch, open the serial monitor with a baud rate of 115200 and press the EN button on the ESP32.
Now, try touching the metal part of the wire and observe how it responds to the touch. The serial monitor will display the corresponding touch values.
Code Explanation:
The code provided is clear and easy to understand. Here is a breakdown of its functionality:
In the setup() function, the serial communication between the ESP32 and the PC is initiated using the Serial.begin(115200) command. This allows for data transmission and communication via the serial port.
Serial.begin(115200);
Inside the loop() function, the touchRead() function is utilized to obtain the touch value from a specific pin. In this case, the GPIO #4 is passed as an argument to the touchRead() function. Alternatively, you can also use the touch sensor number T0.
Serial.println(touchRead(4));
ESP32 Project – Touch-activated LED
Let’s create a project to showcase the capabilities of the ESP32’s touch pins by building a touch-activated LED circuit. In this example, we will design a setup where an LED will illuminate when you touch the corresponding GPIO pin.
This project serves as a starting point and can be expanded to control various devices, such as opening doors, activating relays, or controlling other types of lighting.
Determining the Threshold
Before proceeding, it’s essential to understand the touch readings provided by the ESP32. Take note of the readings displayed in the serial monitor when you touch and release the pin.
After running the initial sketch, you will notice approximate readings in the serial monitor:
- When the pin is touched, the reading will be around 3.
- When the pin is not touched, the reading will be around 71.
Based on these values, we can establish a threshold. When the reading drops below this threshold, we will trigger the LED. For this particular project, a threshold value of 30 seems appropriate.
Example Code
Below is a simple code that turns on the on-board LED when you touch the pin once and turns it off when you touch it again.
// set pin numbers
const int touchPin = 4;
const int ledPin = 2;

const int threshold = 30;  // set the threshold

int ledState = LOW;         // the current state of the output pin
int touchState;             // the current reading from the input pin
int lastTouchState = LOW;   // the previous reading from the input pin

unsigned long lastDebounceTime = 0;  // the last time the output pin was toggled
unsigned long debounceDelay = 50;    // the debounce time; increase if the output flickers

void setup() {
  pinMode(ledPin, OUTPUT);

  // set initial LED state
  digitalWrite(ledPin, ledState);
}

void loop() {
  // read the state of the pin
  int reading = touchRead(touchPin);

  // binarize touch reading for easy operation
  if (reading < threshold) {
    reading = HIGH;
  } else{
    reading = LOW;
  }

  // If the pin is touched:
  if (reading != lastTouchState) {
    // reset the debouncing timer
    lastDebounceTime = millis();
  }

  if ((millis() - lastDebounceTime) > debounceDelay) {
    // whatever the reading is at, it's been there for longer than the debounce
    // delay, so take it as the actual current state:

    // if the touch state has changed:
    if (reading != touchState) {
      touchState = reading;

      // only toggle the LED if the new touch state is HIGH
      if (touchState == HIGH) {
        ledState = !ledState;
      }
    }
  }

  // set the LED:
  digitalWrite(ledPin, ledState);

  // save the reading. Next time through the loop, it'll be the lastTouchState:
  lastTouchState = reading;
}
Upload the sketch to your ESP32. You should see the LED toggle every time you touch the wire.
Related article
- ESP32 Pinout Reference: Simplify Hardware Connections with Ease
- Essential ESP32 ADC Basics: Analog-to-Digital Converter Explained
- Step-by-Step Tutorial: Setting Up ESP32 Board in Arduino IDE


