

Each ESP32 has a unique MAC address embedded in its chip, crucial for facilitating device communication. However, there may be occasions where you need to assign a new MAC address to your ESP32, such as for network security measures like implementing a MAC address whitelist that restricts network access to specific devices.
This tutorial will guide you through the process of identifying your ESP32’s current MAC address and setting a new one.
Parts Required
| Component Name | Buy Now |
| ESP32-WROOM-32 Development | Amazon |
What’s a MAC Address?
A MAC (Media Access Control) address is a unique identifier for a network device, composed of 12 hexadecimal characters grouped into pairs, like AA:BB:CC:DD:EE:FF.
Every device that connects to a network has a network interface controller (NIC), which contains the circuitry required for communication via network protocols like Wi-Fi, Bluetooth, or Ethernet. During production, manufacturers assign a unique MAC address to each NIC, which is permanently stored in the device’s hardware.
MAC addresses are essential for sending and receiving data over a network. While IP addresses identify a network connection, MAC addresses identify hardware. Unlike IP addresses, which frequently change, MAC addresses are static and used only within the local network.
Although typically embedded in the device’s hardware, many systems, including the ESP32, allow the MAC address to be overridden through software. However, this custom MAC address is temporary and will revert to the manufacturer default upon resetting the chip, unless you program the ESP32 to set it on every boot.
MAC Address on ESP32
The ESP32 includes several MAC addresses, each corresponding to a different network interface:
- Wi-Fi Station (STA)
- Wi-Fi Access Point (AP)
- Bluetooth Interface (Classic and BLE)
- Ethernet
The Base MAC Address, stored in eFuse or external storage, serves as the foundation for generating the MAC addresses for these interfaces.
- The Wi-Fi Station (STA) uses the Base MAC Address.
- The Wi-Fi Access Point (AP) MAC address is generated by incrementing the last octet of the Base MAC Address by one.
- The Bluetooth MAC address is derived by adding two to the last octet of the Base MAC Address.
- The Ethernet MAC address is created by adding three to the last octet of the Base MAC Address.
| Interface | MAC Address | Example |
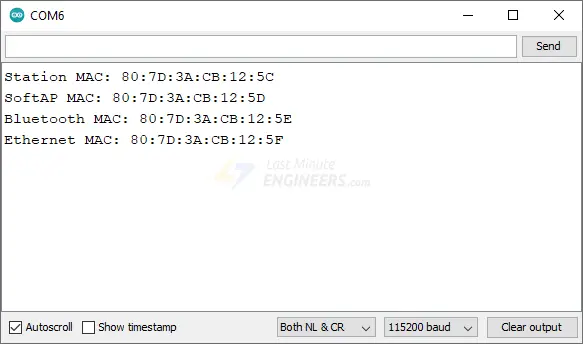
| Wi-Fi Station | base_mac | 80:7D:3A:CB:12:5C |
| Wi-Fi SoftAP | base_mac +1 to the last octet | 80:7D:3A:CB:12:5D |
| Bluetooth | base_mac +2 to the last octet | 80:7D:3A:CB:12:5E |
| Ethernet | base_mac +3 to the last octet | 80:7D:3A:CB:12:5F |
For more information, please refer to the Espressif documentation.
Finding the MAC Address
To find the MAC address on an ESP32, you can use either the Espressif IoT Development Framework (ESP-IDF) or the Arduino IDE. This example uses the Arduino IDE.
First, ensure you have the ESP32 board support installed in your Arduino IDE.
Here is a simple sketch to print out the MAC addresses of the device:
#include <WiFi.h>

void setup(){
  Serial.begin(115200);

  // Variable to store the MAC address
  uint8_t baseMac[6];

  // Get MAC address of the WiFi station interface
  esp_read_mac(baseMac, ESP_MAC_WIFI_STA);
  Serial.print("Station MAC: ");
  for (int i = 0; i < 5; i++) {
    Serial.printf("%02X:", baseMac[i]);
  }
  Serial.printf("%02X\n", baseMac[5]);

  // Get the MAC address of the Wi-Fi AP interface
  esp_read_mac(baseMac, ESP_MAC_WIFI_SOFTAP);
  Serial.print("SoftAP MAC: ");
  for (int i = 0; i < 5; i++) {
    Serial.printf("%02X:", baseMac[i]);
  }
  Serial.printf("%02X\n", baseMac[5]);

  // Get the MAC address of the Bluetooth interface
  esp_read_mac(baseMac, ESP_MAC_BT);
  Serial.print("Bluetooth MAC: ");
  for (int i = 0; i < 5; i++) {
    Serial.printf("%02X:", baseMac[i]);
  }
  Serial.printf("%02X\n", baseMac[5]);

  // Get the MAC address of the Ethernet interface
  esp_read_mac(baseMac, ESP_MAC_ETH);
  Serial.print("Ethernet MAC: ");
  for (int i = 0; i < 5; i++) {
    Serial.printf("%02X:", baseMac[i]);
  }
  Serial.printf("%02X\n", baseMac[5]);
}

void loop(){
}
After uploading the code, open the Serial Monitor and set the baud rate to 115200. Press the EN button on the ESP32, and you should see the MAC addresses for each network interface printed to the Serial Monitor.
Code Explanation
The code starts by including the WiFi library, which provides the necessary functions for Wi-Fi operations on the ESP32:
#include <WiFi.h>
Inside the setup() function, serial communication is initiated at a baud rate of 115200 bps:
Serial.begin(115200);
A variable named baseMac is declared to store the MAC address. This variable is an array of six uint8_t elements, which are unsigned 8-bit integers, ideal for holding MAC address bytes ranging from 00 to FF (hex):
uint8_t baseMac[6];
The ESP32’s built-in function esp_read_mac() is called with baseMac and ESP_MAC_WIFI_STA as arguments to read the Wi-Fi Station interface’s MAC address and store it in the baseMac array:
esp_read_mac(baseMac, ESP_MAC_WIFI_STA);
The Serial Monitor prints “Station MAC: ” followed by the MAC address. A for loop iterates through the first five elements of the baseMac array, formatting each byte into two hexadecimal digits followed by a colon. The sixth element is printed without a trailing colon, marking the end of the MAC address:
Serial.print("Station MAC: ");
for (int i = 0; i < 5; i++) {
  Serial.printf("%02X:", baseMac[i]);
}
Serial.printf("%02X\n", baseMac[5]);
This process is repeated for the Wi-Fi AP MAC address using the ESP_MAC_WIFI_SOFTAP argument to read the MAC address for the Wi-Fi Access Point interface:
esp_read_mac(baseMac, ESP_MAC_WIFI_SOFTAP);
Serial.print("SoftAP MAC: ");
for (int i = 0; i < 5; i++) {
  Serial.printf("%02X:", baseMac[i]);
}
Serial.printf("%02X\n", baseMac[5]);
Next, the Bluetooth interface MAC is obtained by calling esp_read_mac() with ESP_MAC_BT:
esp_read_mac(baseMac, ESP_MAC_BT);
Serial.print("Bluetooth MAC: ");
for (int i = 0; i < 5; i++) {
  Serial.printf("%02X:", baseMac[i]);
}
Serial.printf("%02X\n", baseMac[5]);
Similarly, the Ethernet interface MAC is read using ESP_MAC_ETH:
esp_read_mac(baseMac, ESP_MAC_ETH);
Serial.print("Ethernet MAC: ");
for (int i = 0; i < 5; i++) {
  Serial.printf("%02X:", baseMac[i]);
}
Serial.printf("%02X\n", baseMac[5]);
The loop() function is empty because the MAC addresses are printed only once when the ESP32 is reset:
void loop() {
  // Nothing to do here
}
Changing the MAC Address
The following code changes the base MAC address of an ESP32 and displays the updated MAC addresses for each network interface.
You only need to change the base MAC address on the ESP32, as all other MAC addresses for different network interfaces (Wi-Fi AP, Bluetooth, and Ethernet) are derived from this base address.
Before uploading the code, update the newMAC variable with your custom MAC address:
uint8_t newMAC[] = {0xDE, 0xAD, 0xBE, 0xEF, 0xFE, 0xED};
After making the change, upload the code.
#include <WiFi.h>
#include <esp_wifi.h>

// Define your new MAC address
uint8_t newMAC[] = {0xDE, 0xAD, 0xBE, 0xEF, 0xFE, 0xED};

void setup() {
  Serial.begin(115200);

  // Disable WiFi
  WiFi.mode(WIFI_OFF);

  Serial.println("[OLD]---");
  displayMACAddresses();

  // Set the new MAC address
  if (esp_base_mac_addr_set(newMAC) == ESP_OK) {
    Serial.println("MAC address set successfully");
  } else {
    Serial.println("Failed to set MAC address");
  }

  Serial.println();
  Serial.println("[NEW]---");
  displayMACAddresses();
}

void loop() {
  // Nothing to do here
}

void displayMACAddresses() {
  uint8_t baseMac[6];

  // Get and print MAC address for WiFi station
  esp_read_mac(baseMac, ESP_MAC_WIFI_STA);
  Serial.print("Station MAC: ");
  printMAC(baseMac);

  // Get and print MAC address for WiFi AP
  esp_read_mac(baseMac, ESP_MAC_WIFI_SOFTAP);
  Serial.print("SoftAP MAC: ");
  printMAC(baseMac);

  // Get and print MAC address for Bluetooth
  esp_read_mac(baseMac, ESP_MAC_BT);
  Serial.print("Bluetooth MAC: ");
  printMAC(baseMac);

  // Get and print MAC address for Ethernet
  esp_read_mac(baseMac, ESP_MAC_ETH);
  Serial.print("Ethernet MAC: ");
  printMAC(baseMac);

  Serial.println();
}

void printMAC(uint8_t* mac) {
  for (int i = 0; i < 5; i++) {
    Serial.printf("%02X:", mac[i]);
  }
  Serial.printf("%02X\n", mac[5]);
}
After uploading the code, open the Serial Monitor and set the baud rate to 115200. Press the EN button on the ESP32. You should see both the old and new MAC addresses for the Wi-Fi station, Wi-Fi access point, Bluetooth, and Ethernet interfaces.
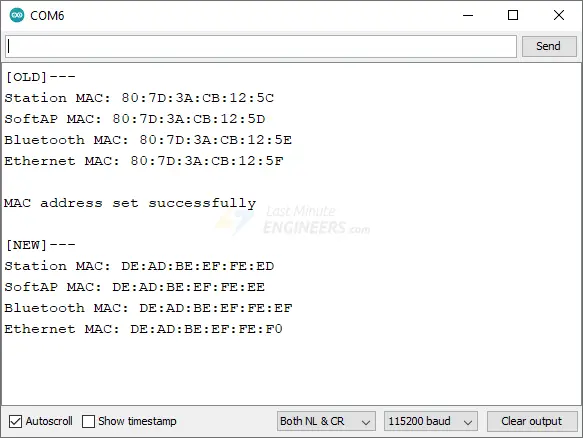
Keep in mind that these changes do not permanently overwrite the manufacturer-set MAC address. Each time you reset the board or upload new code, it will revert to its default MAC address unless you program the ESP32 to set it on every boot.
Code Explanation
The code starts by including the WiFi.h and esp_wifi.h libraries, which provide the necessary functions for Wi-Fi operations and ESP32-specific Wi-Fi features:
#include <WiFi.h>
#include <esp_wifi.h>
A new MAC address is defined as an array of six hexadecimal bytes:
uint8_t newMAC[] = {0xDE, 0xAD, 0xBE, 0xEF, 0xFE, 0xED};
In the setup() function, the Serial Monitor is initialized, and Wi-Fi is turned off to ensure the new MAC address is set before any Wi-Fi activity begins:
WiFi.mode(WIFI_OFF);
Next, the displayMACAddresses() function is called to print the current MAC addresses for various interfaces. This function wraps the code segment that retrieves and prints the MAC addresses for modularity and reusability:
displayMACAddresses();
The esp_base_mac_addr_set() function is called with the new MAC address. A success or failure message is printed based on the outcome:
if (esp_base_mac_addr_set(newMAC) == ESP_OK) {
  Serial.println("MAC address set successfully");
} else {
  Serial.println("Failed to set MAC address");
}
After setting the new MAC address, the displayMACAddresses() function is called again to display the new MAC addresses:
displayMACAddresses();
Finally, the loop() function is left empty because the code only needs to run once at startup:
void loop() {
  // Nothing to do here
}
Related article
- ESP32 Upload Error: Fix “Failed to Connect, Timed Out” Issue Fast
- How to Assign a Fixed IP Address to Your ESP32 Device
- Learn How to Set Up mDNS on ESP32 in Minutes
- ESP32 vs. ESP8266: Which Microcontroller Fits Your Requirements?
- Firebase Authentication with ESP32/ESP8266: Email and Password Guide


