
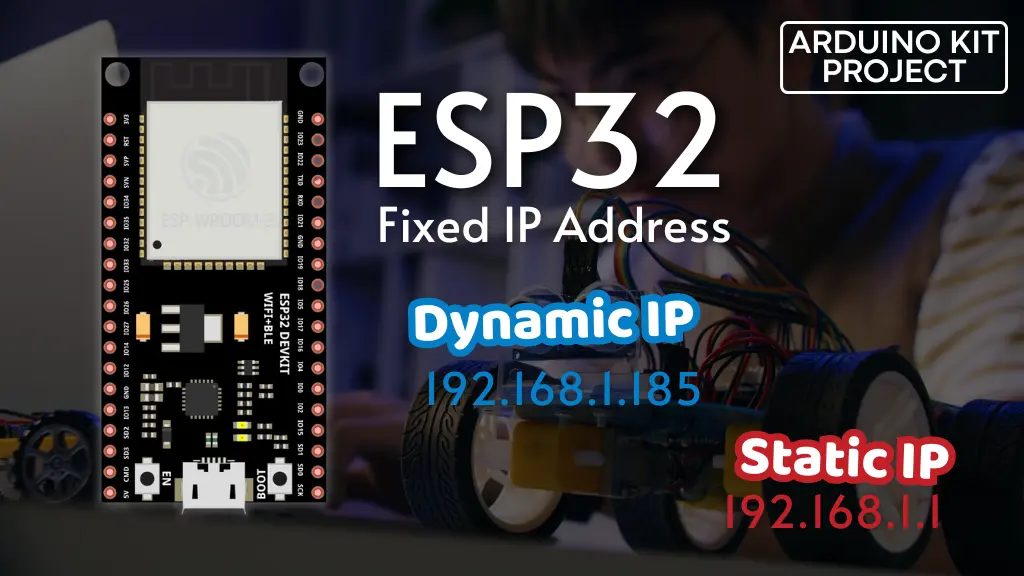
If you’ve ever run a web server on an ESP32, you might have noticed an annoying issue: every time you restart the ESP32, its IP address can change based on the router’s current assignment. This means you constantly need to check the serial monitor to find the new IP address, which is quite inconvenient.
This is where static IP addresses become helpful. By assigning a static IP address, you ensure that your web server always has the same IP address, even after restarting the ESP32. This also helps to avoid confusion if you have multiple ESP32 devices on your network.
Thankfully, setting a static IP address is a straightforward and quick process once you know how to do it. We’ll walk you through the steps to configure a static IP address on your ESP32. Let’s get started!
Step 1 – Set Up the Arduino IDE
First, ensure you have the ESP32 add-on installed in the Arduino IDE, as we will use it to program the ESP32.
Step 2 – Connect the ESP32 to your Computer
Use a micro-USB cable to connect your ESP32 board to your computer.

Step 3 – Obtain Current Network Settings
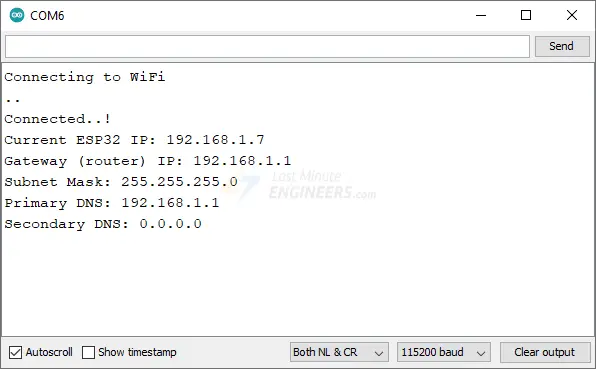
Before assigning a static IP, it’s essential to check the current network settings (IP, Gateway, Subnet, and DNS) assigned by your router. This helps avoid IP conflicts. To get the ESP32’s current network settings, upload the following sketch to your ESP32.
First, update these variables with your actual WiFi SSID and password:
const char* ssid = "YourNetworkName";  // Enter SSID here
const char* password = "YourPassword";  //Enter Password here
Then, upload this code:
#include <WiFi.h>

// Replace with your network credentials
const char* ssid = "YourNetworkName";  // Enter SSID here
const char* password = "YourPassword";  //Enter Password here

void setup() {
  Serial.begin(115200);

  Serial.print("Connecting to ");
  Serial.println(ssid);

  // Connect to Wi-Fi
  WiFi.begin(ssid, password);

  while (WiFi.status() != WL_CONNECTED) {
    delay(1000);
    Serial.print(".");
  }

  Serial.println("");
  Serial.println("Connected..!");

  Serial.print("Current ESP32 IP: ");
  Serial.println(WiFi.localIP());
  Serial.print("Gateway (router) IP: ");
  Serial.println(WiFi.gatewayIP());
  Serial.print("Subnet Mask: " );
  Serial.println(WiFi.subnetMask());
  Serial.print("Primary DNS: ");
  Serial.println(WiFi.dnsIP(0));
  Serial.print("Secondary DNS: ");
  Serial.println(WiFi.dnsIP(1));
}

void loop() {
}
After uploading the code, open the Serial Monitor and set the baud rate to 115200. Press the EN button on the ESP32. It may take a few moments to connect to your network, after which the ESP32’s current network settings will be displayed in the Serial Monitor. Note these settings down.
Step 4 – Set a Static IP Address
With the current network settings in hand, you can now configure a static IP address for your ESP32.
Update the sketch below to include the static IP configuration. You’ll need to specify the static IP address, Gateway, Subnet Mask, and optionally the DNS settings.
IPAddress staticIP(192, 168, 1, 100); // ESP32 static IP
IPAddress gateway(192, 168, 1, 1);    // IP Address of your network gateway (router)
IPAddress subnet(255, 255, 255, 0);   // Subnet mask
IPAddress primaryDNS(192, 168, 1, 1); // Primary DNS (optional)
IPAddress secondaryDNS(0, 0, 0, 0);   // Secondary DNS (optional)
Choose a static IP address that is within your network’s subnet but outside the range your router typically assigns to avoid conflicts.
Modify the sketch as shown below and upload it to your ESP32:
#include <WiFi.h>

// Replace with your network credentials
const char* ssid = "Your_SSID";
const char* password = "Your_PASSWORD";

// Static IP configuration
IPAddress staticIP(192, 168, 1, 100); // ESP32 static IP
IPAddress gateway(192, 168, 1, 1);    // IP Address of your network gateway (router)
IPAddress subnet(255, 255, 255, 0);   // Subnet mask
IPAddress primaryDNS(192, 168, 1, 1); // Primary DNS (optional)
IPAddress secondaryDNS(0, 0, 0, 0);   // Secondary DNS (optional)

void setup() {
  Serial.begin(115200);

  // Connect to Wi-Fi
  WiFi.begin(ssid, password);
  while (WiFi.status() != WL_CONNECTED) {
    delay(1000);
    Serial.println("Connecting to WiFi...");
  }

  // Configuring static IP
  if(!WiFi.config(staticIP, gateway, subnet, primaryDNS, secondaryDNS)) {
    Serial.println("Failed to configure Static IP");
  } else {
    Serial.println("Static IP configured!");
  }

  Serial.print("ESP32 IP Address: ");
  Serial.println(WiFi.localIP());  // Print the ESP32 IP address to Serial Monitor
}

void loop() {
  // Nothing to do here
}
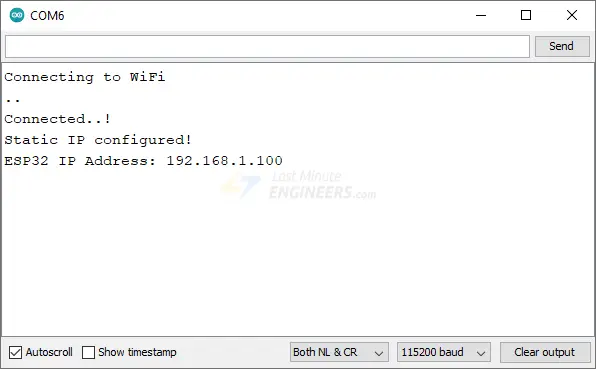
Step 5 – Testing
After uploading the code to your ESP32, check the Serial Monitor to confirm that the ESP32 is now using the static IP address you configured.
While setting a static IP for your ESP32 is effective, there’s another approach: mDNS (Multicast DNS). This method has several advantages over static IP.
mDNS allows you to access the web server running on your ESP32 using a user-friendly hostname, like “esp32.local,” instead of an IP address. If the IP address of your ESP32 changes, mDNS automatically resolves the new IP to the same hostname, eliminating the need to track IP changes.
For a detailed guide on implementing mDNS on your ESP32, check out our comprehensive tutorial here:
Parts Required
| Component Name | Buy Now |
| ESP32-WROOM-32 Development | Amazon |
Detailed Code Explanation
The sketch starts by including the WiFi.h library, which provides functions to connect the ESP32 to a Wi-Fi network and configure its IP settings.
#include <WiFi.h>
Next, constants for the Wi-Fi SSID (ssid) and password (password) are defined. Replace these with the name and password of your Wi-Fi network.
const char* ssid = "Your_SSID";
const char* password = "Your_PASSWORD";
Then, IPAddress objects are created for the static IP, gateway, subnet mask, and optionally, primary and secondary DNS servers. These objects store the respective addresses and are used later to configure the ESP32’s network settings.
// Static IP configuration
IPAddress staticIP(192, 168, 1, 100); // ESP32 static IP
IPAddress gateway(192, 168, 1, 1);    // IP Address of your network gateway (router)
IPAddress subnet(255, 255, 255, 0);   // Subnet mask
IPAddress primaryDNS(192, 168, 1, 1); // Primary DNS (optional)
IPAddress secondaryDNS(0, 0, 0, 0);   // Secondary DNS (optional)
Inside the setup() function, serial communication is initiated with the computer.
Serial.begin(115200);
The ESP32 then attempts to connect to the Wi-Fi network using WiFi.begin(ssid, password). A while loop ensures the ESP32 keeps trying to connect until it succeeds.
WiFi.begin(ssid, password);
while (WiFi.status() != WL_CONNECTED) {
  delay(1000);
  Serial.print(".");
}
Once connected to Wi-Fi, the ESP32 is configured to use the previously defined static IP, gateway, subnet mask, and DNS servers using the WiFi.config() function. If there’s an issue configuring the static IP, a message is printed to the Serial Monitor.
if(!WiFi.config(staticIP, gateway, subnet, primaryDNS, secondaryDNS)) {
  Serial.println("Failed to configure Static IP");
} else {
  Serial.println("Static IP configured!");
}
After setting the IP configuration, the ESP32’s current IP address is printed to the Serial Monitor using WiFi.localIP(). If everything goes as planned, this should display the static IP address that was set.
Serial.print("ESP32 IP Address: ");
Serial.println(WiFi.localIP());
The IP configuration is handled in the setup() function, and since there’s nothing left to do continuously, the loop() function is kept empty.
void loop() {
}
Related article
- ESP8266 NodeMCU with MPU-6050: Monitor Acceleration, Gyroscope, and Temp
- Node-RED & MQTT with ESP8266: Easy Publish and Subscribe Tutorial
- ESP8266 NodeMCU and BME680 Sensor Tutorial: Read Gas, Pressure, Humidity, Temp
- Firebase Authentication with ESP32/ESP8266: Email and Password Guide


