

The BME680 is a digital sensor that measures gas, pressure, humidity, and temperature. This guide will show you how to use the BME680 sensor module with the ESP8266 NodeMCU board using the Arduino IDE. The sensor communicates with the microcontroller via I2C or SPI protocols.
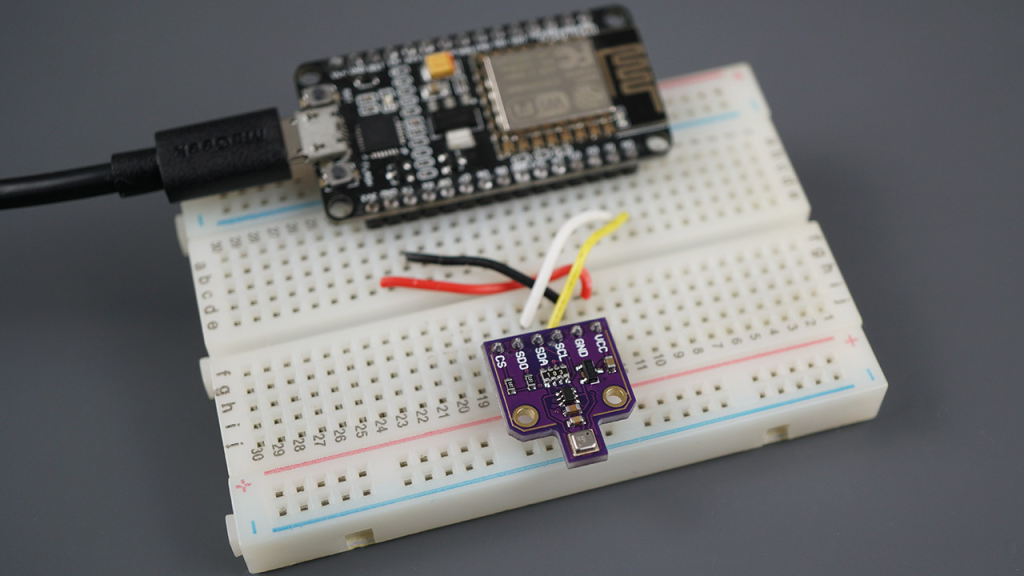
You will learn how to connect the sensor to the ESP8266 NodeMCU board, install the necessary libraries, use a simple sketch to display sensor readings in the Serial Monitor, and set up a web server to monitor the sensor remotely.
Introducing the BME680 Environmental Sensor Module
The BME680 integrates gas, pressure, humidity, and temperature sensors. Its gas sensor can detect various volatile organic compounds (VOCs), making it suitable for indoor air quality monitoring.
BME680 Capabilities
The BME680 is a multi-functional digital sensor that measures:
- Temperature
- Humidity
- Barometric pressure
- Gas: Volatile Organic Compounds (VOCs) like ethanol and carbon monoxide
Gas Sensor Details
The BME680 features a MOX (Metal-oxide) sensor that detects VOCs in the air. This sensor provides a qualitative indication of the total VOCs/contaminants in the environment, though it does not identify specific gases.
MOX sensors have a metal-oxide surface, a sensing chip to measure conductivity changes, and a heater. They detect VOCs by adsorbing oxygen molecules on the sensitive layer. The BME680 reacts to most indoor air pollutants (excluding CO2).
When the sensor encounters reducing gases, the oxygen molecules react, increasing surface conductivity. The BME680 outputs resistance values as raw signals, which vary with VOC concentration:
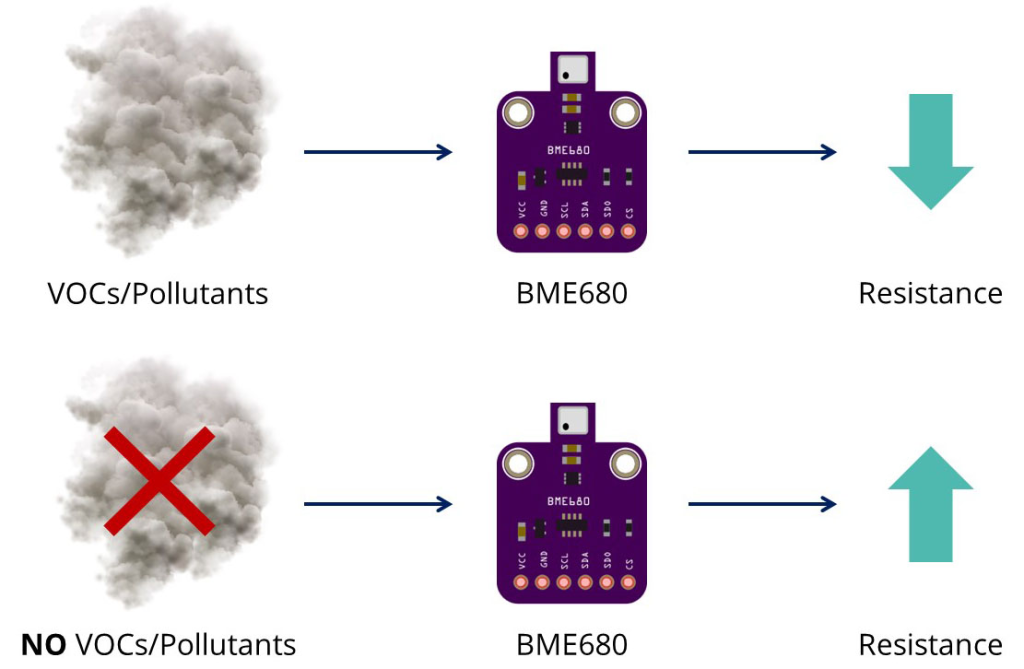
- Higher VOC concentration → Lower resistance
- Lower VOC concentration → Higher resistance
The sensor’s surface reactions (and thus resistance) are also influenced by temperature and humidity.
Important Information About the Gas Sensor
The gas sensor provides a qualitative assessment of VOC levels in the air, allowing you to track trends and compare results to determine if air quality is improving or worsening. For precise measurements, calibrate the sensor against known sources and create a calibration curve.
When first using the sensor, run it for 48 hours before collecting accurate data. Additionally, it is recommended to run the sensor for 30 minutes before taking gas readings.
BME680 Accuracy
Here’s the accuracy of the temperature, humidity and pressure sensors of the BME680:
| Sensor | Accuracy |
| Temperature | +/- 1.0ºC |
| Humidity | +/- 3% |
| Pressure | +/- 1 hPa |
BME680 Operation Range
The following table shows the operation range for the temperature, humidity and pressure sensors for the BME680.
| Sensor | Operation Range |
| Temperature | -40 to 85 ºC |
| Humidity | 0 to 100 % |
| Pressure | 300 to 1100 hPa |
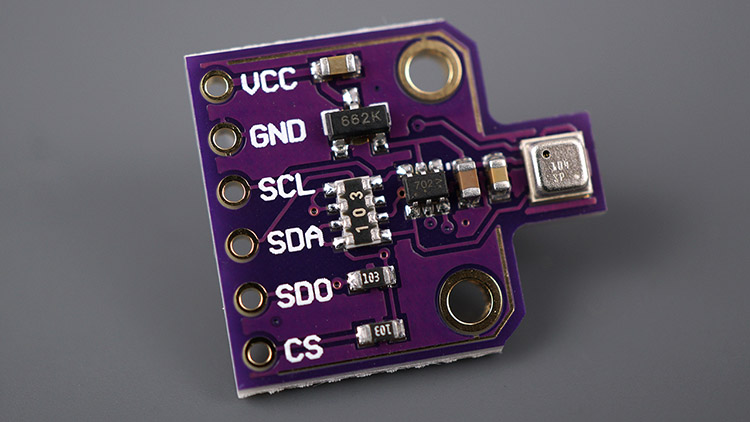
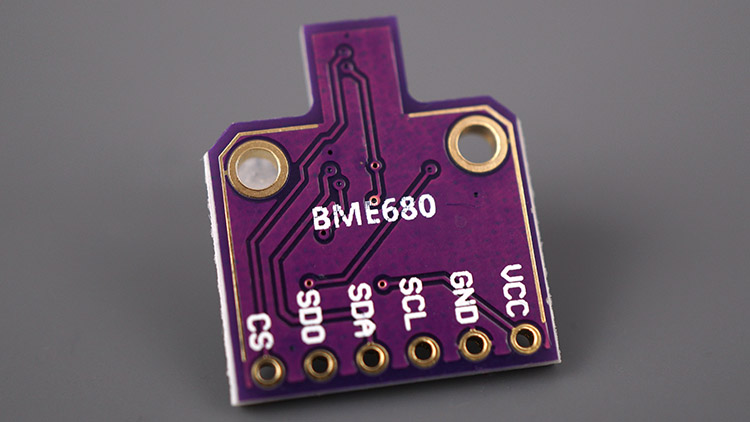
BME680 Pinout
Here’s the BME680 Pinout:
| VCC | Powers the sensor |
| GND | Common GND |
| SCL | SCL pin for I2C communication SCK pin for SPI communication |
| SDA | SDA pin for I2C communication SDI (MISO) pin for SPI communication |
| SDO | SDO (MOSI) pin for SPI communication |
| CS | Chip select pin for SPI communication |
BME680 Interface
The BME680 supports I2C and SPI Interfaces.
BME680 I2C
To use I2C communication protocol, use the following pins:
| BME680 | ESP8266 |
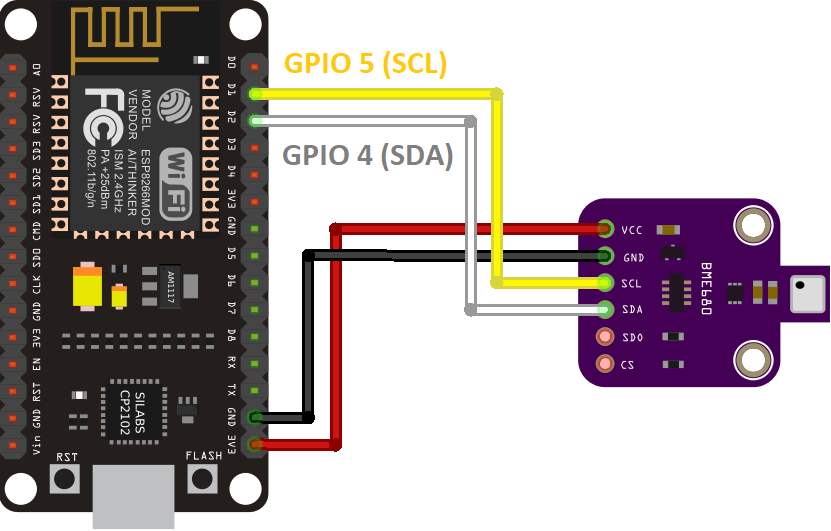
| SCL | GPIO 5 (D1) |
| SDA | GPIO 4 (D2) |
GPIO 5 (SCL) and GPIO 4 (SDA) are the default ESP8266 I2C pins. You can use other pins as long as you set them properly on code.
BME680 SPI
To use SPI communication protocol, use the following pins:
| BME680 | ESP8266 |
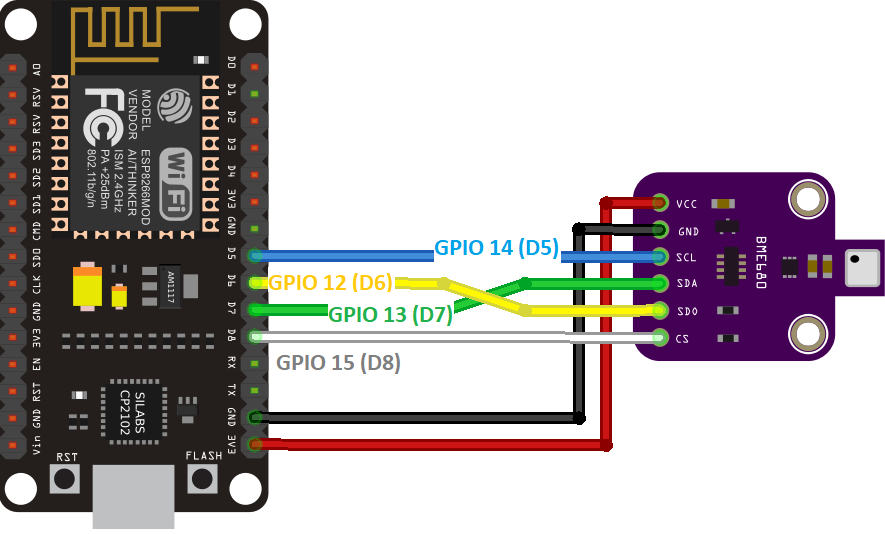
| SCL (SCK SPI Clock) | GPIO 14 (D5) |
| SDA (SDI MOSI) | GPIO 13 (D7) |
| SDO (MISO) | GPIO 12 (D6) |
| CS (Chip Select) | GPIO 15 (D8) |
These are the default ESP8266 SPI pins. You can use other pins as long as you set them properly in the code.
Parts Required
| Component Name | Buy Now |
| ESP8266 NodeMCU CP2102 | Amazon |
| BME680 Digital Temperature Humidity Pressure Sensor | Amazon |
Schematic – ESP8266 NodeMCU with BME680
The BME680 sensor can use either I2C or SPI communication protocols.
ESP8266 with BME680 using I2C
To connect the BME680 to the ESP8266 using the default I2C pins, follow the schematic diagram below.
ESP8266 with BME680 using SPI
If you prefer to use the SPI communication protocol, follow the corresponding schematic diagram to connect the BME680 to the ESP8266 using the default SPI pins.
Preparing Arduino IDE
Installing the BME680 Library
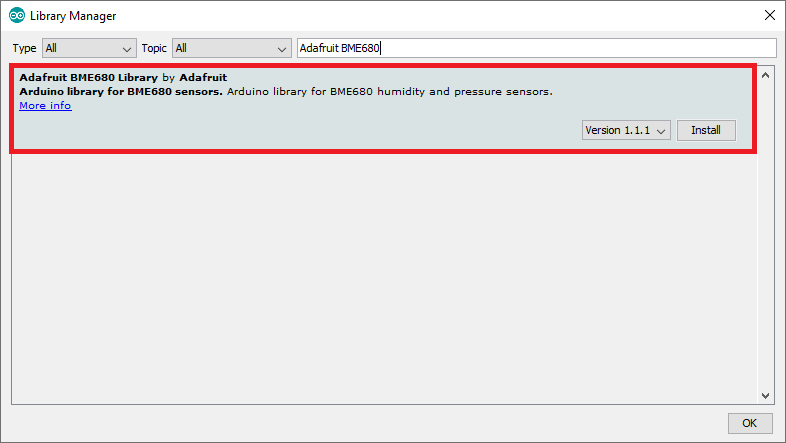
To read data from the BME680 sensor, we’ll use the Adafruit_BME680 library. Follow these steps to install the library in the Arduino IDE:
- Open the Arduino IDE and navigate to Sketch > Include Library > Manage Libraries to open the Library Manager.
- Search for “adafruit bme680” in the search box and install the library.
Installing the Adafruit_Sensor Library
The BME680 library requires the Adafruit_Sensor library. To install it, follow these steps:
- Go to Sketch > Include Library > Manage Libraries and type “Adafruit Unified Sensor” in the search box.
- Scroll down to find the library and install it.
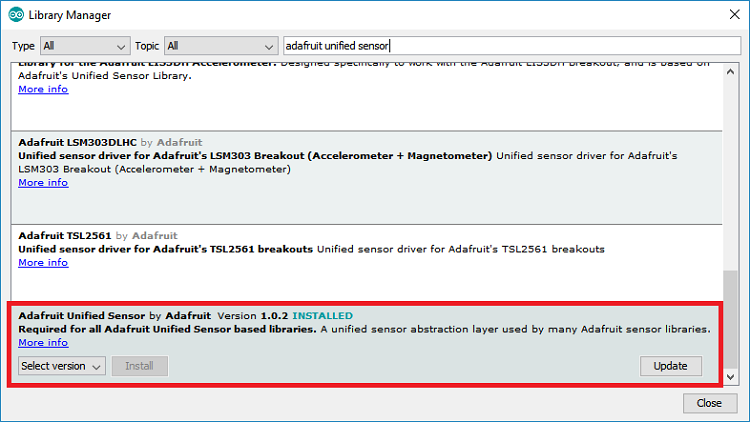
After installing these libraries, restart your Arduino IDE.
Code – Reading BME680 Gas, Pressure, Humidity and Temperature
To read gas, pressure, temperature, and humidity from the BME680, we will use an example sketch provided by the library.
After installing the BME680 and Adafruit_Sensor libraries, open the Arduino IDE and navigate to File > Examples > Adafruit BME680 Library > bme680async.
Here’s the code to get you started:
#include <Wire.h>
#include <SPI.h>
#include <Adafruit_Sensor.h>
#include "Adafruit_BME680.h"

/*#define BME_SCK 14
#define BME_MISO 12
#define BME_MOSI 13
#define BME_CS 15*/

#define SEALEVELPRESSURE_HPA (1013.25)

Adafruit_BME680 bme; // I2C
//Adafruit_BME680 bme(BME_CS); // hardware SPI
//Adafruit_BME680 bme(BME_CS, BME_MOSI, BME_MISO, BME_SCK);

void setup() {
  Serial.begin(115200);
  while (!Serial);
  Serial.println(F("BME680 async test"));

  if (!bme.begin()) {
    Serial.println(F("Could not find a valid BME680 sensor, check wiring!"));
    while (1);
  }

  // Set up oversampling and filter initialization
  bme.setTemperatureOversampling(BME680_OS_8X);
  bme.setHumidityOversampling(BME680_OS_2X);
  bme.setPressureOversampling(BME680_OS_4X);
  bme.setIIRFilterSize(BME680_FILTER_SIZE_3);
  bme.setGasHeater(320, 150); // 320*C for 150 ms
}

void loop() {
  // Tell BME680 to begin measurement.
  unsigned long endTime = bme.beginReading();
  if (endTime == 0) {
    Serial.println(F("Failed to begin reading :("));
    return;
  }
  Serial.print(F("Reading started at "));
  Serial.print(millis());
  Serial.print(F(" and will finish at "));
  Serial.println(endTime);

  Serial.println(F("You can do other work during BME680 measurement."));
  delay(50); // This represents parallel work.
  // There's no need to delay() until millis() >= endTime: bme.endReading()
  // takes care of that. It's okay for parallel work to take longer than
  // BME680's measurement time.

  // Obtain measurement results from BME680. Note that this operation isn't
  // instantaneous even if milli() >= endTime due to I2C/SPI latency.
  if (!bme.endReading()) {
    Serial.println(F("Failed to complete reading :("));
    return;
  }
  Serial.print(F("Reading completed at "));
  Serial.println(millis());

  Serial.print(F("Temperature = "));
  Serial.print(bme.temperature);
  Serial.println(F(" *C"));

  Serial.print(F("Pressure = "));
  Serial.print(bme.pressure / 100.0);
  Serial.println(F(" hPa"));

  Serial.print(F("Humidity = "));
  Serial.print(bme.humidity);
  Serial.println(F(" %"));

  Serial.print(F("Gas = "));
  Serial.print(bme.gas_resistance / 1000.0);
  Serial.println(F(" KOhms"));

  Serial.print(F("Approx. Altitude = "));
  Serial.print(bme.readAltitude(SEALEVELPRESSURE_HPA));
  Serial.println(F(" m"));

  Serial.println();
  delay(2000);
}
We’ve modified this sketch to ensure full compatibility with the ESP8266.
Code Explanation
Read this section to understand the code, or skip to the Demonstration section.
Libraries
The code begins by including the necessary libraries: the Wire library for I2C communication, the SPI library for SPI communication, and the Adafruit_Sensor and Adafruit_BME680 libraries to interface with the BME680 sensor.
#include <Wire.h>
#include <SPI.h>
#include <Adafruit_Sensor.h>
#include "Adafruit_BME680.h"
SPI Communication
Although we prefer I2C communication, the code is ready for SPI. To use SPI, uncomment the lines defining the SPI pins.
/*#define BME_SCK 14
#define BME_MISO 12
#define BME_MOSI 13
#define BME_CS 15*/
Sea Level Pressure
A variable, SEALEVELPRESSURE_HPA, stores the sea level pressure in hectopascals, used to estimate altitude.
#define SEALEVELPRESSURE_HPA (1013.25)
Replace this value with the current sea level pressure at your location for accurate altitude measurements.
I2C Communication
By default, the code uses I2C communication. An Adafruit_BME680 object named bme is created using the default ESP8266 I2C pins: GPIO 5 (SCL) and GPIO 4 (SDA).
Adafruit_BME680 bme; // I2C
To switch to SPI, comment out the above line and uncomment the following line.
//Adafruit_BME680 bme(BME_CS, BME_MOSI, BME_MISO, BME_SCK); // software SPI
Setup Function
In the setup() function, serial communication is initiated.
Serial.begin(115200);
Initialize BME680 Sensor
Initialize the BME680 sensor:
if (!bme.begin()) {
  Serial.println(F("Could not find a valid BME680 sensor, check wiring!"));
  while (1);
}
Set the sensor parameters (oversampling, filter, and gas heater):
bme.setTemperatureOversampling(BME680_OS_8X);
bme.setHumidityOversampling(BME680_OS_2X);
bme.setPressureOversampling(BME680_OS_4X);
bme.setIIRFilterSize(BME680_FILTER_SIZE_3);
bme.setGasHeater(320, 150); // 320°C for 150 ms
Oversampling
The sensor supports oversampling to increase data resolution. The methods accept these parameters:
BME680_OS_NONE: turn off readingBME680_OS_1XBME680_OS_2XBME680_OS_4XBME680_OS_8XBME680_OS_16X
IIR Filter
The setIIRFilterSize() method sets the IIR filter size:
BME680_FILTER_SIZE_0(no filtering)BME680_FILTER_SIZE_1BME680_FILTER_SIZE_3BME680_FILTER_SIZE_7BME680_FILTER_SIZE_15BME680_FILTER_SIZE_31BME680_FILTER_SIZE_63BME680_FILTER_SIZE_127
Gas Heater
The gas sensor includes a heater. Use setGasHeater() to set the heater profile:
- Heater temperature (in degrees Celsius)
- Duration (in milliseconds)
We use the default: 320°C for 150 ms.
Loop Function
In the loop(), obtain measurements from the BME680 sensor.
First, start an asynchronous reading with bme.beginReading(), which returns the time when the reading will be ready.
unsigned long endTime = bme.beginReading();
if (endTime == 0) {
  Serial.println(F("Failed to begin reading :("));
  return;
}
Serial.print(F("Reading started at "));
Serial.print(millis());
Serial.print(F(" and will finish at "));
Serial.println(endTime);
Then, call endReading() to end the asynchronous reading. If the reading is still in progress, it will block until complete.
if (!bme.endReading()) {
  Serial.println(F("Failed to complete reading :("));
  return;
}
Retrieve the readings:
bme.temperature: temperaturebme.pressure: pressurebme.humidity: humiditybme.gas_resistance: gas resistance
Print the values:
Serial.print(F("Temperature = "));
Serial.print(bme.temperature);
Serial.println(F(" *C"));

Serial.print(F("Pressure = "));
Serial.print(bme.pressure / 100.0);
Serial.println(F(" hPa"));

Serial.print(F("Humidity = "));
Serial.print(bme.humidity);
Serial.println(F(" %"));

Serial.print(F("Gas = "));
Serial.print(bme.gas_resistance / 1000.0);
Serial.println(F(" KOhms"));

Serial.print(F("Approx. Altitude = "));
Serial.print(bme.readAltitude(SEALEVELPRESSURE_HPA));
Serial.println(F(" m"));
Demonstration
Upload the code to your ESP8266 board. Select your ESP8266 board under Tools > Board and choose the correct port under Tools > Port. Then, click the upload button.
After uploading, open the Serial Monitor at a baud rate of 115200 and press the RST button on your board. The sensor measurements will be displayed.
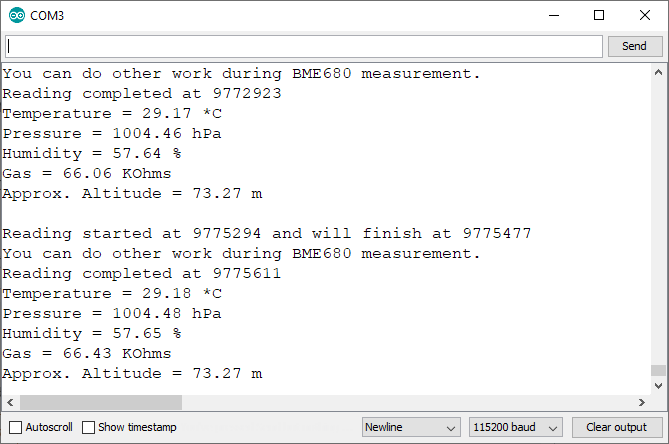
Code – ESP8266 NodeMCU Web Server with BME680
This section provides an example of a web server using the ESP8266 to display BME680 readings.
Installing Libraries – Async Web Server
To build the web server, you need to install the following libraries:
These libraries are not available through the Arduino Library Manager. Download the library files and copy them to the Arduino libraries folder. Alternatively, in the Arduino IDE, go to Sketch > Include Library > Add .ZIP Library and select the downloaded libraries.
Code
Then, upload the following code to your board (type your SSID and password).
#include <Wire.h>
#include <SPI.h>
#include <Adafruit_Sensor.h>
#include "Adafruit_BME680.h"
#include <ESP8266WiFi.h>
#include "ESPAsyncWebServer.h"
// Replace with your network credentials
const char* ssid = "REPLACE_WITH_YOUR_SSID";
const char* password = "REPLACE_WITH_YOUR_PASSWORD";
//Uncomment if using SPI
/*#define BME_SCK 14
#define BME_MISO 12
#define BME_MOSI 13
#define BME_CS 15*/
Adafruit_BME680 bme; // I2C
//Adafruit_BME680 bme(BME_CS); // hardware SPI
//Adafruit_BME680 bme(BME_CS, BME_MOSI, BME_MISO, BME_SCK);
float temperature;
float humidity;
float pressure;
float gasResistance;
AsyncWebServer server(80);
AsyncEventSource events("/events");
unsigned long lastTime = 0;
unsigned long timerDelay = 30000; // send readings timer
void getBME680Readings(){
// Tell BME680 to begin measurement.
unsigned long endTime = bme.beginReading();
if (endTime == 0) {
Serial.println(F("Failed to begin reading :("));
return;
}
if (!bme.endReading()) {
Serial.println(F("Failed to complete reading :("));
return;
}
temperature = bme.temperature;
pressure = bme.pressure / 100.0;
humidity = bme.humidity;
gasResistance = bme.gas_resistance / 1000.0;
}
String processor(const String& var){
getBME680Readings();
//Serial.println(var);
if(var == "TEMPERATURE"){
return String(temperature);
}
else if(var == "HUMIDITY"){
return String(humidity);
}
else if(var == "PRESSURE"){
return String(pressure);
}
else if(var == "GAS"){
return String(gasResistance);
}
return String();
}
const char index_html[] PROGMEM = R"rawliteral(
<!DOCTYPE HTML><html>
<head>
<title>BME680 Web Server</title>
<meta name="viewport" content="width=device-width, initial-scale=1">
<link rel="stylesheet" href="https://use.fontawesome.com/releases/v5.7.2/css/all.css" integrity="sha384-fnmOCqbTlWIlj8LyTjo7mOUStjsKC4pOpQbqyi7RrhN7udi9RwhKkMHpvLbHG9Sr" crossorigin="anonymous">
<link rel="icon" href="data:,">
<style>
html {font-family: Arial; display: inline-block; text-align: center;}
p { font-size: 1.2rem;}
body { margin: 0;}
.topnav { overflow: hidden; background-color: #4B1D3F; color: white; font-size: 1.7rem; }
.content { padding: 20px; }
.card { background-color: white; box-shadow: 2px 2px 12px 1px rgba(140,140,140,.5); }
.cards { max-width: 700px; margin: 0 auto; display: grid; grid-gap: 2rem; grid-template-columns: repeat(auto-fit, minmax(300px, 1fr)); }
.reading { font-size: 2.8rem; }
.card.temperature { color: #0e7c7b; }
.card.humidity { color: #17bebb; }
.card.pressure { color: #3fca6b; }
.card.gas { color: #d62246; }
</style>
</head>
<body>
<div class="topnav">
<h3>BME680 WEB SERVER</h3>
</div>
<div class="content">
<div class="cards">
<div class="card temperature">
<h4><i class="fas fa-thermometer-half"></i> TEMPERATURE</h4><p><span class="reading"><span id="temp">%TEMPERATURE%</span> °C</span></p>
</div>
<div class="card humidity">
<h4><i class="fas fa-tint"></i> HUMIDITY</h4><p><span class="reading"><span id="hum">%HUMIDITY%</span> %</span></p>
</div>
<div class="card pressure">
<h4><i class="fas fa-angle-double-down"></i> PRESSURE</h4><p><span class="reading"><span id="pres">%PRESSURE%</span> hPa</span></p>
</div>
<div class="card gas">
<h4><i class="fas fa-wind"></i> GAS</h4><p><span class="reading"><span id="gas">%GAS%</span> KΩ</span></p>
</div>
</div>
</div>
<script>
if (!!window.EventSource) {
var source = new EventSource('/events');
source.addEventListener('open', function(e) {
console.log("Events Connected");
}, false);
source.addEventListener('error', function(e) {
if (e.target.readyState != EventSource.OPEN) {
console.log("Events Disconnected");
}
}, false);
source.addEventListener('message', function(e) {
console.log("message", e.data);
}, false);
source.addEventListener('temperature', function(e) {
console.log("temperature", e.data);
document.getElementById("temp").innerHTML = e.data;
}, false);
source.addEventListener('humidity', function(e) {
console.log("humidity", e.data);
document.getElementById("hum").innerHTML = e.data;
}, false);
source.addEventListener('pressure', function(e) {
console.log("pressure", e.data);
document.getElementById("pres").innerHTML = e.data;
}, false);
source.addEventListener('gas', function(e) {
console.log("gas", e.data);
document.getElementById("gas").innerHTML = e.data;
}, false);
}
</script>
</body>
</html>)rawliteral";
void setup() {
Serial.begin(115200);
// Set the device as a Station and Soft Access Point simultaneously
WiFi.mode(WIFI_AP_STA);
// Set device as a Wi-Fi Station
WiFi.begin(ssid, password);
while (WiFi.status() != WL_CONNECTED) {
delay(1000);
Serial.println("Setting as a Wi-Fi Station..");
}
Serial.print("Station IP Address: ");
Serial.println(WiFi.localIP());
Serial.println();
// Init BME680 sensor
if (!bme.begin()) {
Serial.println(F("Could not find a valid BME680 sensor, check wiring!"));
while (1);
}
// Set up oversampling and filter initialization
bme.setTemperatureOversampling(BME680_OS_8X);
bme.setHumidityOversampling(BME680_OS_2X);
bme.setPressureOversampling(BME680_OS_4X);
bme.setIIRFilterSize(BME680_FILTER_SIZE_3);
bme.setGasHeater(320, 150); // 320*C for 150 ms
// Handle Web Server
server.on("/", HTTP_GET, [](AsyncWebServerRequest *request){
request->send_P(200, "text/html", index_html, processor);
});
// Handle Web Server Events
events.onConnect([](AsyncEventSourceClient *client){
if(client->lastId()){
Serial.printf("Client reconnected! Last message ID that it got is: %u\n", client->lastId());
}
// send event with message "hello!", id current millis
// and set reconnect delay to 1 second
client->send("hello!", NULL, millis(), 10000);
});
server.addHandler(&events);
server.begin();
}
void loop() {
if ((millis() - lastTime) > timerDelay) {
getBME680Readings();
Serial.printf("Temperature = %.2f ºC \n", temperature);
Serial.printf("Humidity = %.2f % \n", humidity);
Serial.printf("Pressure = %.2f hPa \n", pressure);
Serial.printf("Gas Resistance = %.2f KOhm \n", gasResistance);
Serial.println();
// Send Events to the Web Server with the Sensor Readings
events.send("ping",NULL,millis());
events.send(String(temperature).c_str(),"temperature",millis());
events.send(String(humidity).c_str(),"humidity",millis());
events.send(String(pressure).c_str(),"pressure",millis());
events.send(String(gasResistance).c_str(),"gas",millis());
lastTime = millis();
}
}
Demonstration
After uploading the code, open the Serial Monitor at a baud rate of 115200 to find the ESP8266 IP address.
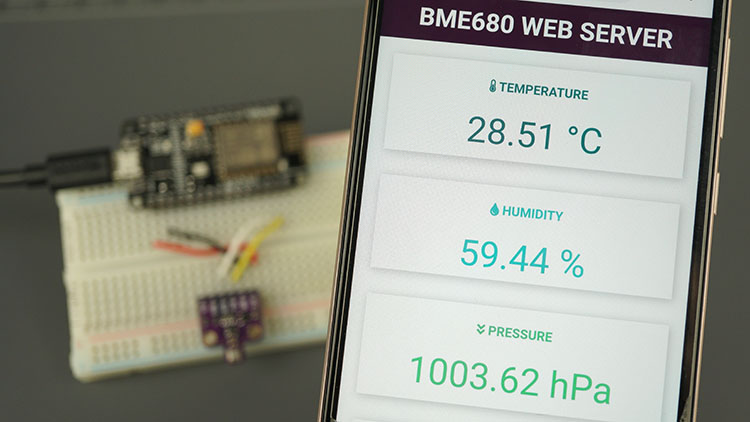
Enter this IP address in a web browser. This will give you access to the web server, displaying the latest sensor readings. You can view the web server on any device (computer, tablet, or smartphone) connected to your local network.
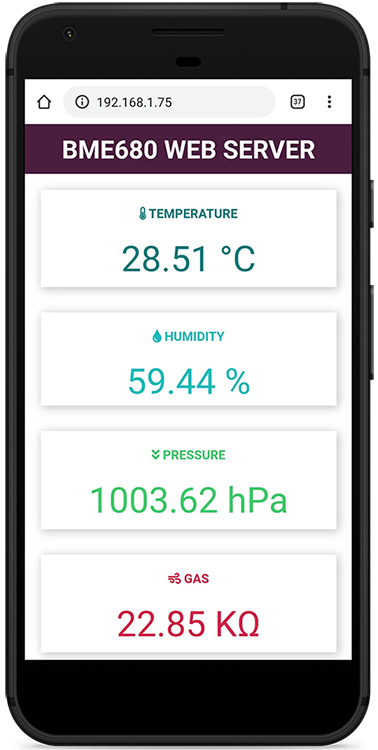
The readings on the web server are updated automatically using Server-Sent Events.
Wrapping Up
The BME680 sensor module is a versatile 4-in-1 digital sensor that measures gas, pressure, temperature, and humidity. It features a MOX sensor that detects various VOC gases, providing a qualitative assessment of the total VOCs/contaminants in the air, making it suitable for indoor air quality monitoring.
We hope this guide has been helpful. Check out our other guides for popular sensors.
- Publish BME680 Sensor Data with ESP32 MQTT (Temperature, Humidity, Pressure, Gas)
- ESP32 Environmental Sensor: BME680 Gas, Pressure, Humidity, Temperature
- Monitor Indoor Air Quality: Interface BME680 Sensor with Arduino


