
In this guide, you’ll learn how to use your ESP32 or ESP8266 board to authenticate with Firebase using an email and password. This process is useful for controlling access to your Firebase project by restricting or granting permissions to specific users. It also allows for multiple users to access the same project. Additionally, this setup helps you implement database rules to safeguard your project’s data.
What is Firebase?
Firebase is a mobile application development platform by Google that assists in building, enhancing, and expanding your app. It offers a variety of services for managing data across Android, iOS, or web applications, such as authentication, real-time database, hosting, and more. This tutorial will specifically focus on the authentication service.
Parts Required
Project Overview
- Create Firebase Project
- Set Authentication Methods
- Get Project API Key
- Authentication with ESP32/ESP8266
1. Create Firebase Project
- Visit Firebase and log in with your Google Account.
- Click “Get Started” and then “Add project” to create a new project.
- Name your project, e.g., “ESP Firebase Demo.”
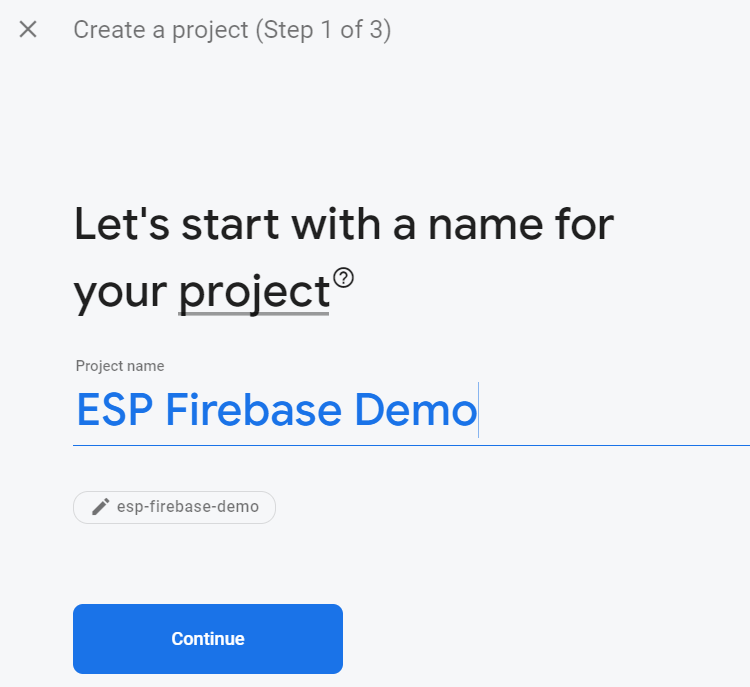
- Disable the “Enable Google Analytics” option and click “Create project.”
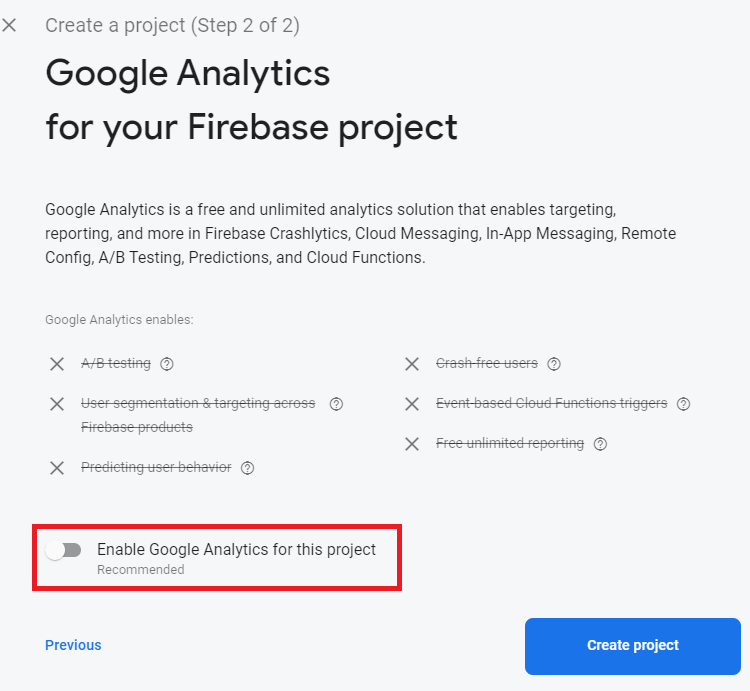
- Wait a few seconds for the setup, then click “Continue.”
- You will be redirected to your Project console page.
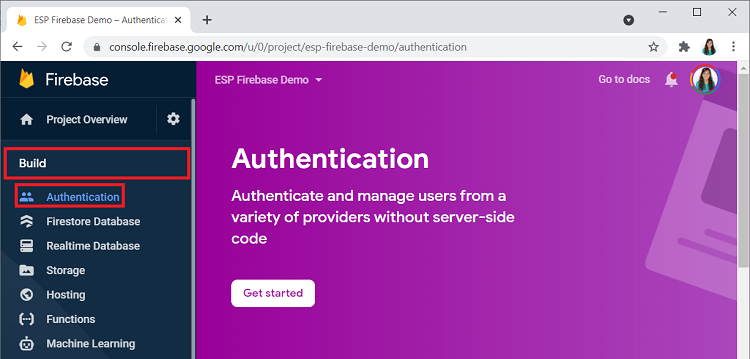
2. Set Authentication Methods
To enable email and password authentication, follow these steps:
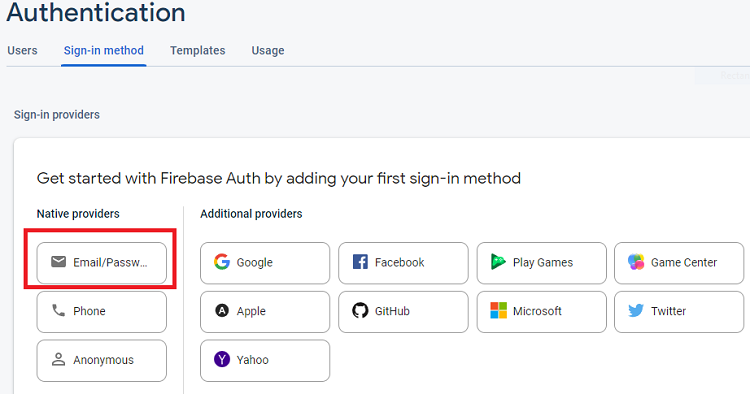
- In the left sidebar, click “Authentication” and then “Get started.”
- Select the “Email/Password” option.
Enable this authentication method and click “Save.”
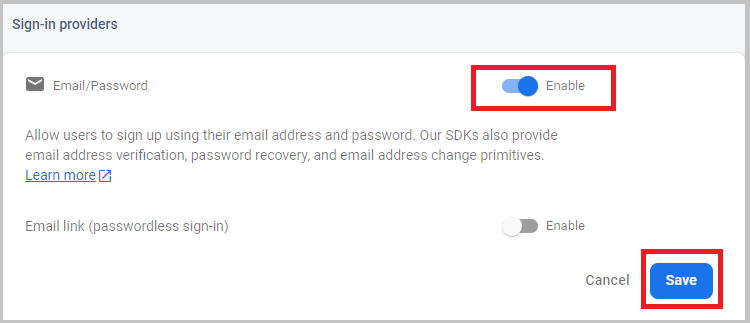
- Email and password authentication is now enabled.

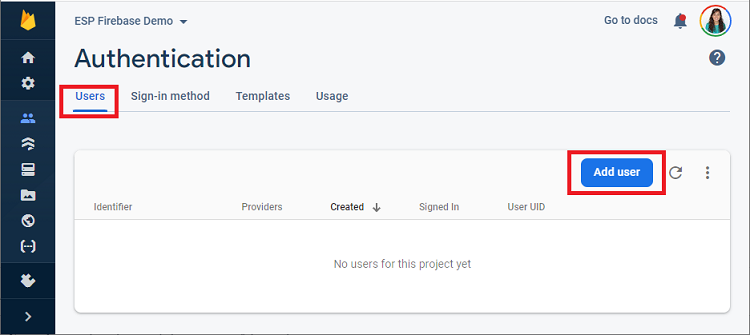
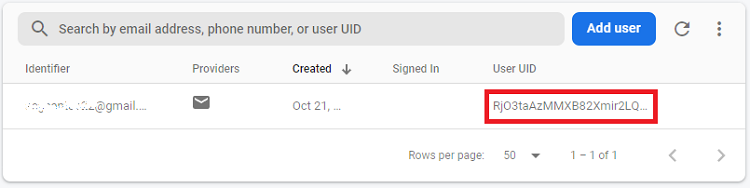
- Add a user by going to the “Users” tab within the “Authentication” section, then click “Add User.”
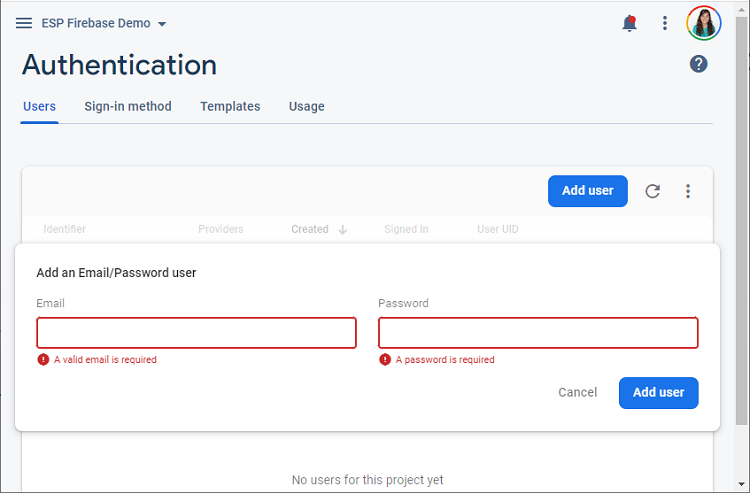
- Enter an email address for the authorized user (it can be your Google account or another email). Create a password for signing in to your app and accessing the database. Save this password securely. Click “Add user.”
- A new user is added to the “Users” table.
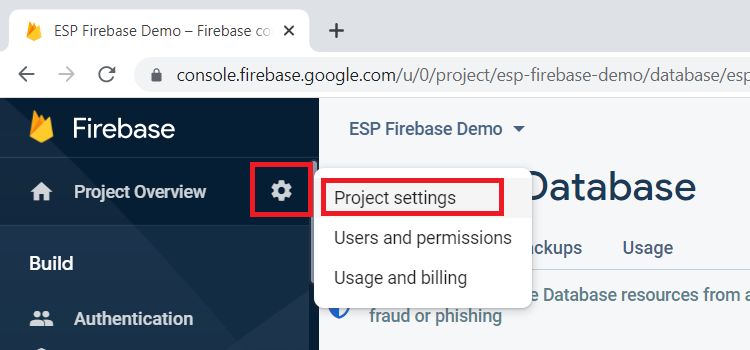
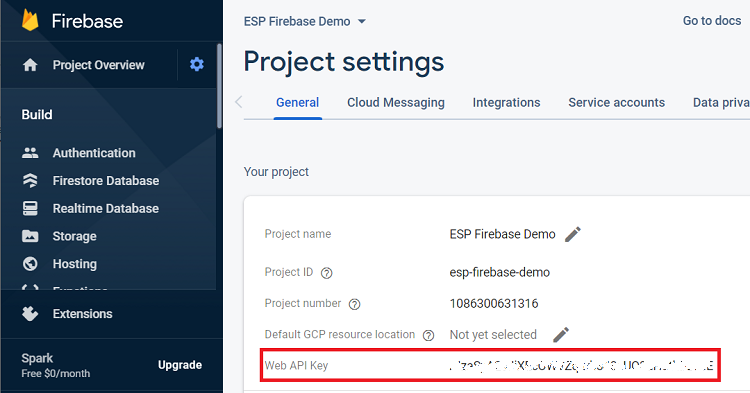
3. Get Project API Key
To connect your ESP32 or ESP8266 boards to your Firebase project, you need the project API key. Follow these steps to obtain it:
- In the left sidebar, click on “Project Settings.”
- Copy the Web API Key and save it securely for later use.
4. Authentication with ESP32/ESP8266
Now that your Firebase project is set up and authentication methods are configured, you can log in with the ESP32 using the authorized user’s email and password.
To program the ESP32, you can use Arduino IDE, VS Code with the PlatformIO extension, or other suitable software.
Install the Firebase-ESP-Client Library
To use Firebase with the ESP32 or ESP8266, install the Firebase-ESP-Client library, which includes many examples and detailed documentation.
Installation – VS Code + PlatformIO
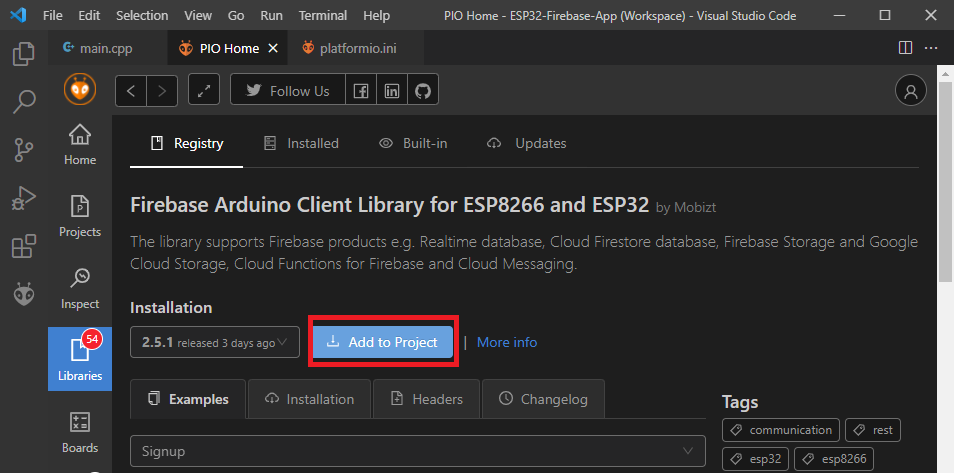
- Click on the PIO Home icon and select the Libraries tab.
- Search for “Firebase ESP Client” and select the “Firebase Arduino Client Library for ESP8266 and ESP32.”
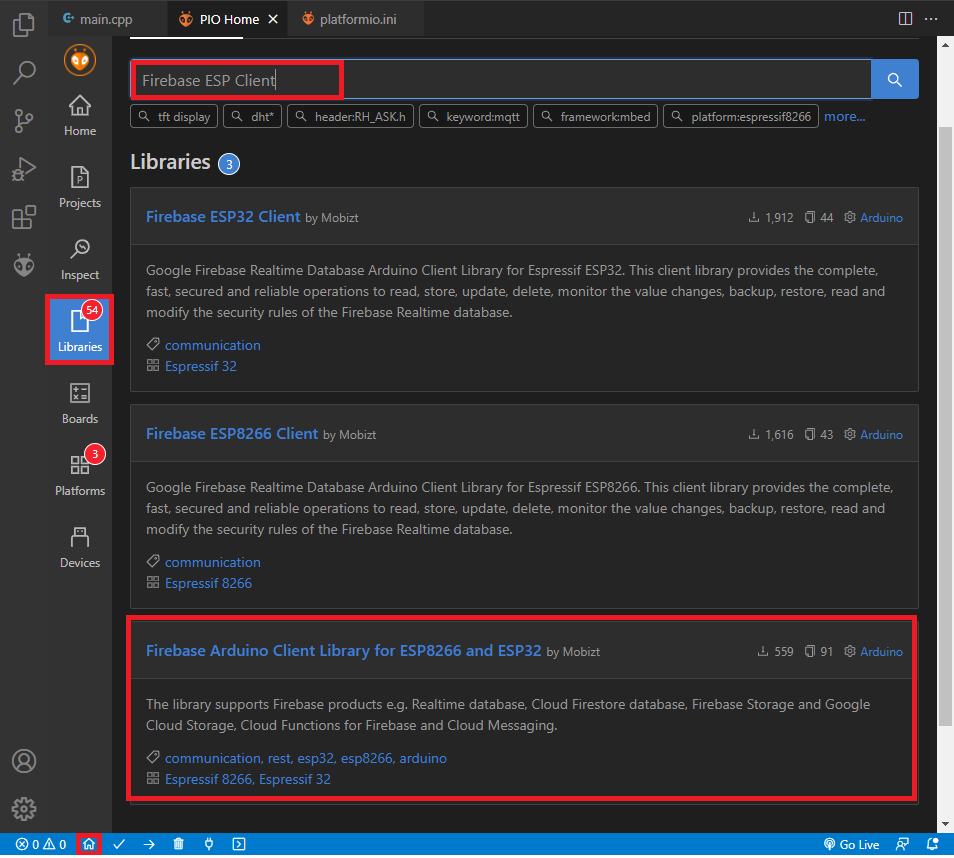
- Click “Add to Project” and choose your project.
- Set the monitor speed to 115200 by adding this line to your
platformio.inifile:
monitor_speed = 115200
Installation – Arduino IDE
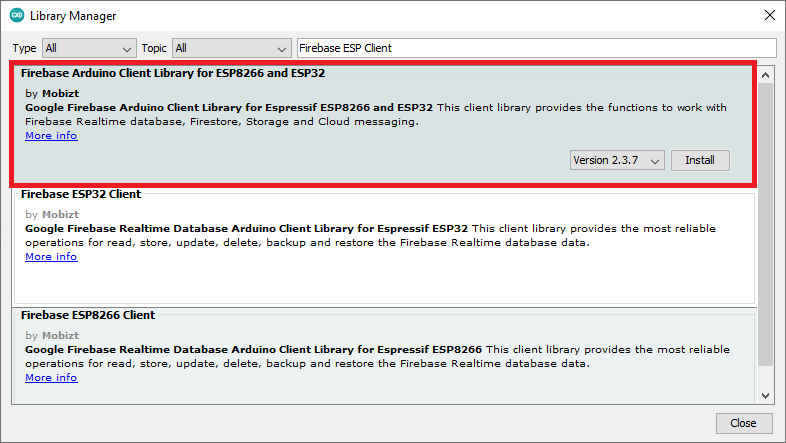
- Go to Sketch > Include Library > Manage Libraries.
- Search for “Firebase ESP Client” and install the “Firebase Arduino Client Library for ESP8266 and ESP32” by Mobitz.
Now, you’re ready to program your ESP32 or ESP8266 to interact with the Firebase database.
ESP32/ESP8266 Firebase Authentication Email/Password
Copy the following code to the Arduino IDE or to the main.cpp file if you’re using VS Code:
#include <Arduino.h>
#if defined(ESP32)
  #include <WiFi.h>
#elif defined(ESP8266)
  #include <ESP8266WiFi.h>
#endif
#include <Firebase_ESP_Client.h>

// Provide the token generation process info.
#include "addons/TokenHelper.h"
// Provide the RTDB payload printing info and other helper functions.
#include "addons/RTDBHelper.h"

// Insert your network credentials
#define WIFI_SSID "REPLACE_WITH_YOUR_SSID"
#define WIFI_PASSWORD "REPLACE_WITH_YOUR_PASSWORD"

// Insert Firebase project API Key
#define API_KEY "REPLACE_WITH_YOUR_FIREBASE_PROJECT_API_KEY"

// Insert Authorized Email and Corresponding Password
#define USER_EMAIL "email@example.com"
#define USER_PASSWORD "your_user_password"

// Define Firebase objects
FirebaseData fbdo;
FirebaseAuth auth;
FirebaseConfig config;

// Variable to save USER UID
String uid;

// Initialize WiFi
void initWiFi() {
  WiFi.begin(WIFI_SSID, WIFI_PASSWORD);
  Serial.print("Connecting to WiFi ..");
  while (WiFi.status() != WL_CONNECTED) {
    Serial.print('.');
    delay(1000);
  }
  Serial.println(WiFi.localIP());
  Serial.println();
}

void setup(){
  Serial.begin(115200);

  // Initialize WiFi
  initWiFi();

  // Assign the api key (required)
  config.api_key = API_KEY;

  // Assign the user sign in credentials
  auth.user.email = USER_EMAIL;
  auth.user.password = USER_PASSWORD;

  Firebase.reconnectWiFi(true);
  fbdo.setResponseSize(4096);

  // Assign the callback function for the long running token generation task
  config.token_status_callback = tokenStatusCallback; //see addons/TokenHelper.h

  // Assign the maximum retry of token generation
  config.max_token_generation_retry = 5;

  // Initialize the library with the Firebase authen and config
  Firebase.begin(&config, &auth);

  // Getting the user UID might take a few seconds
  Serial.println("Getting User UID");
  while ((auth.token.uid) == "") {
    Serial.print('.');
    delay(1000);
  }
  // Print user UID
  uid = auth.token.uid.c_str();
  Serial.print("User UID: ");
  Serial.print(uid);
}

void loop(){
  if (Firebase.isTokenExpired()){
    Firebase.refreshToken(&config);
    Serial.println("Refresh token");
  }
}
Replace the placeholders with your network credentials, database URL, and project API key.
This code is based on the authentication example provided by the Firebase-ESP-Client library. For more examples, refer to the library’s documentation.
Code Explanation
Read on to understand how the code functions, or skip to the demonstration section.
Include Libraries
First, include the necessary libraries. Use WiFi.h to connect the ESP32 to the internet (or ESP8266WiFi.h for the ESP8266 board) and Firebase_ESP_Client.h to interface the boards with Firebase.
#include <Arduino.h>
#if defined(ESP32)
  #include <WiFi.h>
#elif defined(ESP8266)
  #include <ESP8266WiFi.h>
#endif
#include <Firebase_ESP_Client.h>
Additionally, include the following headers required by the Firebase library:
// Provide the token generation process info.
#include "addons/TokenHelper.h"
// Provide the RTDB payload printing info and other helper functions.
#include "addons/RTDBHelper.h"
Network Credentials
Include your network credentials to allow your boards to connect to the internet.
// Insert your network credentials
#define WIFI_SSID "REPLACE_WITH_YOUR_SSID"
#define WIFI_PASSWORD "REPLACE_WITH_YOUR_PASSWORD"
Firebase Project API Key and User Credentials
Insert your Firebase project API key:
#define API_KEY "REPLACE_WITH_YOUR_PROJECT_API_KEY"
Add the authorized user’s email and password:
// Insert Authorized Email and Corresponding Password
#define USER_EMAIL "REPLACE_WITH_THE_USER_EMAIL"
#define USER_PASSWORD "REPLACE_WITH_THE_USER_PASSWORD"
Firebase Objects and Variables
Define the necessary Firebase objects and a variable to store the user UID:
FirebaseData fbdo;
FirebaseAuth auth;
FirebaseConfig config;
String uid;
initWiFi()
The initWiFi() function connects your ESP board to the internet using the provided network credentials. This function should be called in the setup() to initialize WiFi.
void initWiFi() {
  WiFi.begin(WIFI_SSID, WIFI_PASSWORD);
  Serial.print("Connecting to WiFi ..");
  while (WiFi.status() != WL_CONNECTED) {
    Serial.print('.');
    delay(1000);
  }
  Serial.println(WiFi.localIP());
  Serial.println();
}
setup()
In the setup() function, initialize the Serial Monitor for debugging at a baud rate of 115200:
Serial.begin(115200);
Initialize WiFi:
initWiFi();
Assign the API key to the Firebase configuration:
config.api_key = API_KEY;
Assign the email and password to the Firebase authentication object:
auth.user.email = USER_EMAIL;
auth.user.password = USER_PASSWORD;
Add the token status callback and the maximum retry settings to the configuration object:
config.token_status_callback = tokenStatusCallback; // see addons/TokenHelper.h
config.max_token_generation_retry = 5;
Initialize the Firebase library with the configuration and authentication settings:
Firebase.begin(&config, &auth);
Retrieve the user UID, which may take a few seconds. Use a while loop to wait until the UID is obtained:
Serial.println("Getting User UID");
while ((auth.token.uid) == "") {
  Serial.print('.');
  delay(1000);
}
Save the user UID in the uid variable and print it to the Serial Monitor:
uid = auth.token.uid.c_str();
Serial.print("User UID: ");
Serial.print(uid);
Demonstration
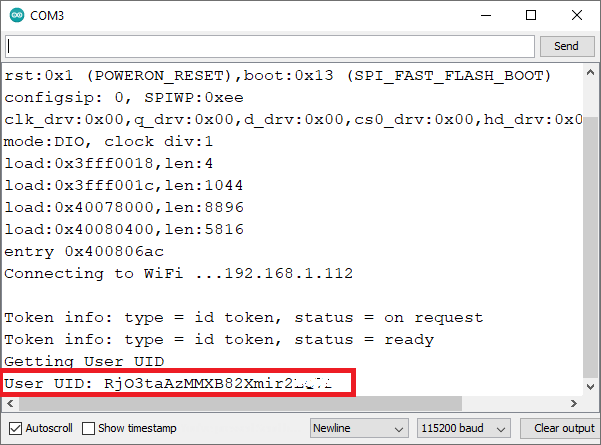
After uploading the code, open the Serial Monitor at a baud rate of 115200.
platformio.ini file to set the baud rate, then save the file:monitor_speed = 115200
Reset your board by pressing the on-board EN/RST button.
The ESP32/ESP8266 will authenticate the user and retrieve its UID.
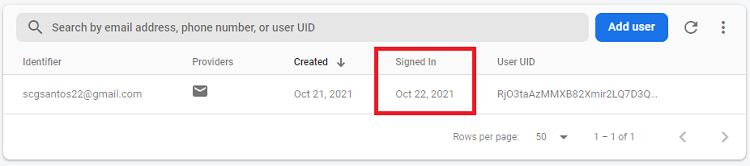
Next, go to your Firebase project console to verify the sign-in. Navigate to Authentication > Users. You should see the current date in the Signed In field, and the User UID should match the UID printed by your ESP board in the Serial Monitor.
Congratulations! You’ve successfully signed in your ESP32/ESP8266 board as a user. You can now combine this example with previous tutorials to send sensor readings to the database as an authorized user:
Wrapping Up
In this tutorial, you learned how to set up the ESP32/ESP8266 board as a user to access your Firebase project using email and password authentication. This example can be applied to more advanced projects.
Configuring the ESP as a user allows you to manage user identification to enable or restrict access to the Firebase project, database, or specific database nodes, and set up database rules.
In a future tutorial, we will show you how to use this feature to enforce database rules and create a web app with login/logout functionalities to control data access. Stay tuned.
- Firebase Data Logging: ESP8266 NodeMCU Sensor Integration
- Beginner’s Guide to ESP8266 NodeMCU and Firebase (Realtime Database)


