

This guide will teach you how to send sensor readings from the ESP32 to ThingSpeak. For this demonstration, we’ll use a BME280 sensor, but you can adapt the examples for any other sensor. The ESP32 board will be programmed with the Arduino core.
ThingSpeak lets you publish your sensor data to their website and visualize it in charts with timestamps, allowing you to access your readings from anywhere globally.
Project Overview
There are multiple ways to send sensor data to ThingSpeak. In this tutorial, we’ll use one of the simplest methods—utilizing the thingspeak-arduino library. This library offers functions to easily send sensor data to single or multiple fields. You can find examples on the library’s GitHub page.
For demonstration purposes, we’ll use the BME280 sensor, but you can adapt the code for any sensor.
Preparing Arduino IDE
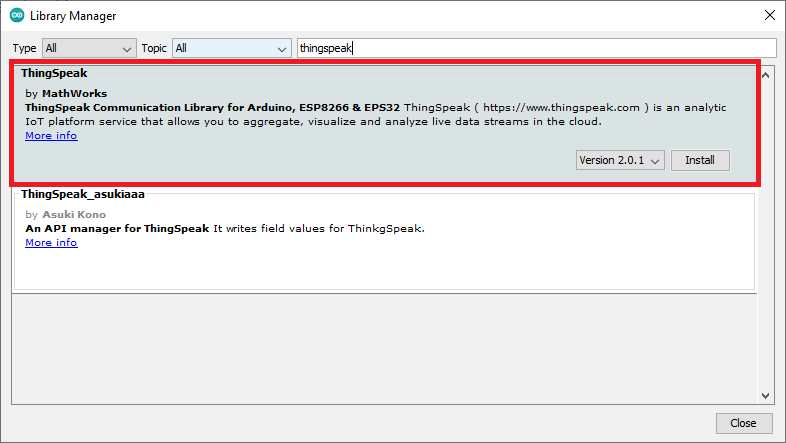
Installing the ThingSpeak Library
To send sensor data to ThingSpeak, we’ll use the thingspeak-arduino library. Install this library via the Arduino Library Manager by following these steps: navigate to Sketch > Include Library > Manage Libraries…, then search for “ThingSpeak” in the Library Manager and install the ThingSpeak library by MathWorks.
Installing BME280 Libraries
Since we’ll be using a BME280 sensor to publish sensor readings, you also need to install the necessary libraries to interface with this sensor.
You can install these libraries using the Arduino Library Manager. Go to Sketch > Include Library > Manage Libraries, then search for and install each library by name.
Installing Libraries (VS Code + PlatformIO)
If you’re using VS Code with the PlatformIO extension, add the following lines to the platformio.ini file to include the libraries:
lib_deps = mathworks/ThingSpeak@^2.0.0
            adafruit/Adafruit Unified Sensor @ ^1.1.4
            adafruit/Adafruit BME280 Library @ ^2.1.2
Building the Circuit
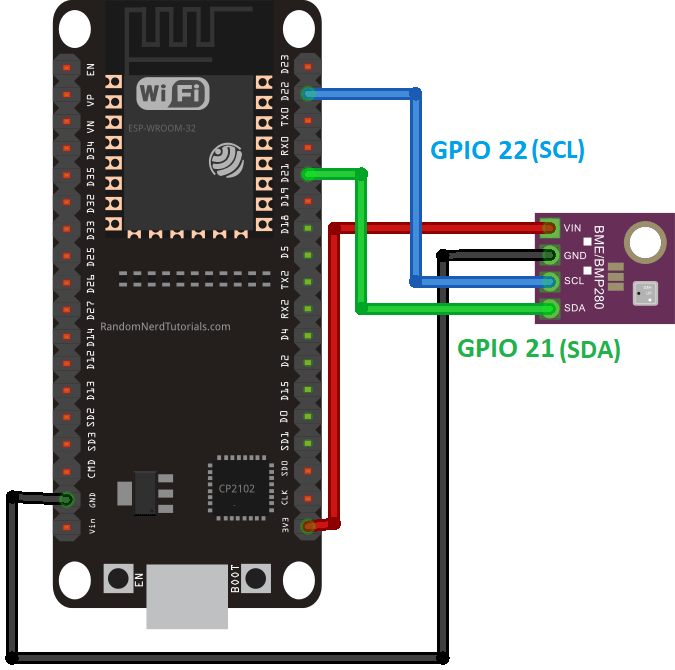
To demonstrate how to send data to ThingSpeak, we’ll use a BME280 sensor. You need to connect the BME280 sensor to your ESP32.
Parts Required
Schematic Diagram
We’ll use I2C communication with the BME280 sensor module. Connect the sensor to the default ESP32 SCL (GPIO 22) and SDA (GPIO 21) pins, as shown in the schematic diagram.
ThingSpeak – Getting Started
Visit ThingSpeak and click the “Get Started For Free” button to create a new account. This account is linked to a MathWorks account. If you already have a MathWorks account, log in with those credentials.
Creating a New Channel
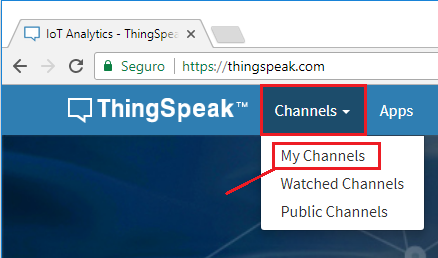
Once your account is set up, sign in, go to the “Channels” tab, and select “My Channels”. Click the “New Channel” button to create a new channel.

Enter a name and description for your channel. For this example, we’ll publish temperature data. If you want to publish multiple readings (like humidity and pressure), you can enable additional fields as explained later in this tutorial.
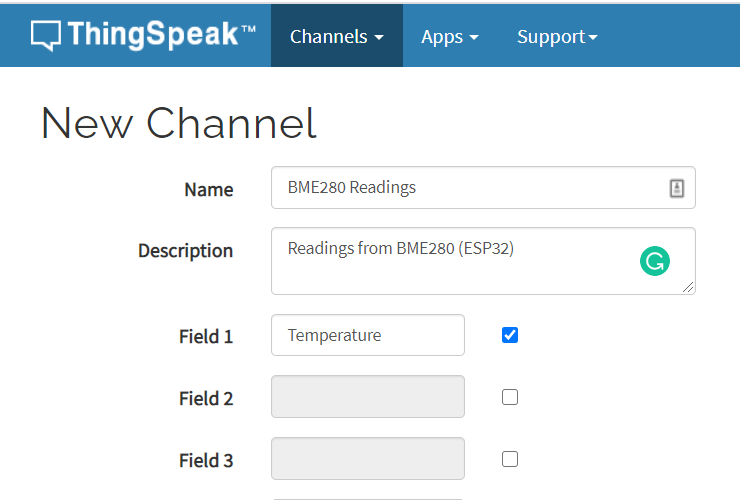
Click the “Save Channel” button to create and save your new channel.
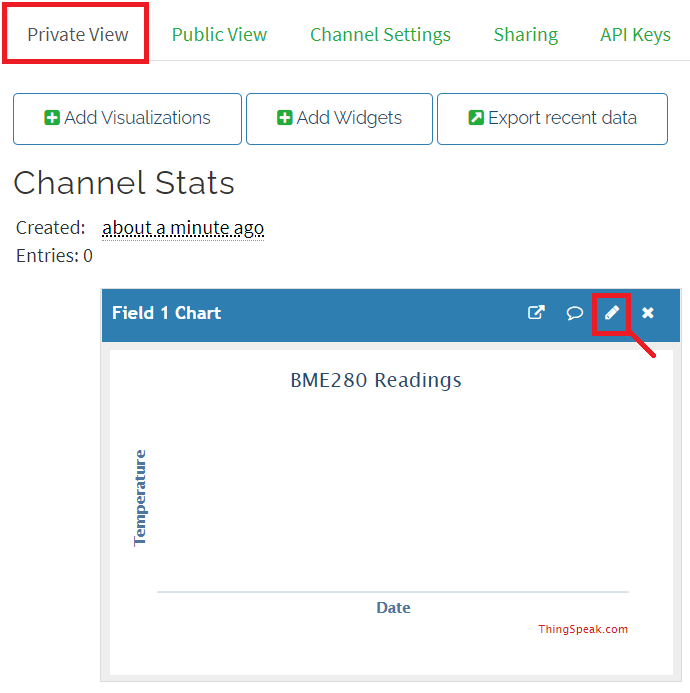
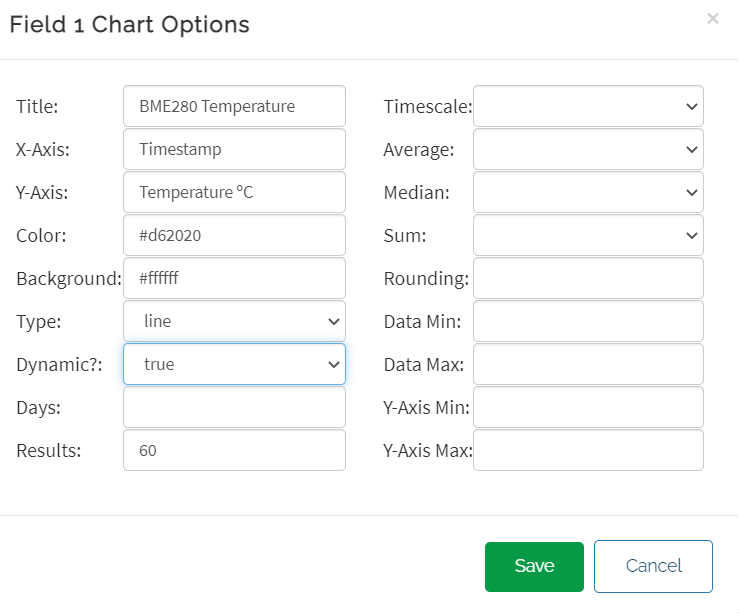
Customizing the Chart
You can customize the chart by going to your “Private View” tab and clicking the edit icon. Here, you can set a title for your chart, change the background color, adjust the x and y axes, and more. When finished, click the “Save” button.
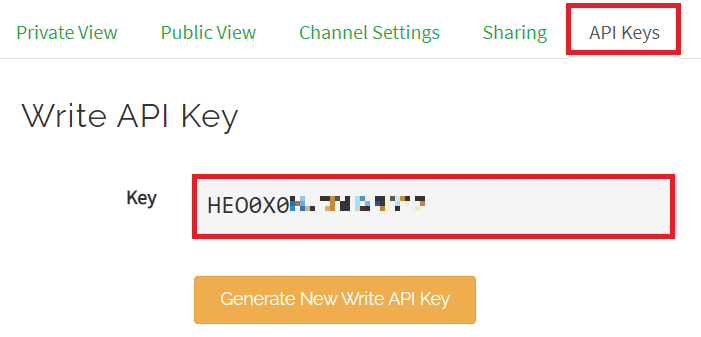
API Key
To send data from the ESP32 to ThingSpeak, you need the Write API Key. Open the “API Keys” tab and copy the Write API Key to a secure location, as you will need it shortly.
ESP32 Publish Sensor Readings to ThingSpeak – Code
Copy the following code to your Arduino IDE (or to the main.cpp file if you’re using PlatformIO).
#include <WiFi.h>
#include "ThingSpeak.h"
#include <Adafruit_BME280.h>
#include <Adafruit_Sensor.h>

const char* ssid = "REPLACE_WITH_YOUR_SSID";   // your network SSID (name)
const char* password = "REPLACE_WITH_YOUR_PASSWORD";   // your network password

WiFiClient  client;

unsigned long myChannelNumber = X;
const char * myWriteAPIKey = "XXXXXXXXXXXXXXXX";

// Timer variables
unsigned long lastTime = 0;
unsigned long timerDelay = 30000;

// Variable to hold temperature readings
float temperatureC;
//uncomment if you want to get temperature in Fahrenheit
//float temperatureF;

// Create a sensor object
Adafruit_BME280 bme; //BME280 connect to ESP32 I2C (GPIO 21 = SDA, GPIO 22 = SCL)

void initBME(){
  if (!bme.begin(0x76)) {
    Serial.println("Could not find a valid BME280 sensor, check wiring!");
    while (1);
  }
}

void setup() {
  Serial.begin(115200);  //Initialize serial
  initBME();

  WiFi.mode(WIFI_STA);

  ThingSpeak.begin(client);  // Initialize ThingSpeak
}

void loop() {
  if ((millis() - lastTime) > timerDelay) {

    // Connect or reconnect to WiFi
    if(WiFi.status() != WL_CONNECTED){
      Serial.print("Attempting to connect");
      while(WiFi.status() != WL_CONNECTED){
        WiFi.begin(ssid, password);
        delay(5000);
      }
      Serial.println("\nConnected.");
    }

    // Get a new temperature reading
    temperatureC = bme.readTemperature();
    Serial.print("Temperature (ºC): ");
    Serial.println(temperatureC);

    //uncomment if you want to get temperature in Fahrenheit
    /*temperatureF = 1.8 * bme.readTemperature() + 32;
    Serial.print("Temperature (ºC): ");
    Serial.println(temperatureF);*/


    // Write to ThingSpeak. There are up to 8 fields in a channel, allowing you to store up to 8 different
    // pieces of information in a channel.  Here, we write to field 1.
    int x = ThingSpeak.writeField(myChannelNumber, 1, temperatureC, myWriteAPIKey);
    //uncomment if you want to get temperature in Fahrenheit
    //int x = ThingSpeak.writeField(myChannelNumber, 1, temperatureF, myWriteAPIKey);

    if(x == 200){
      Serial.println("Channel update successful.");
    }
    else{
      Serial.println("Problem updating channel. HTTP error code " + String(x));
    }
    lastTime = millis();
  }
}
To make the code work, you need to insert your network credentials in the following variables:
const char* ssid = "REPLACE_WITH_YOUR_SSID";
const char* password = "REPLACE_WITH_YOUR_PASSWORD";
You need to insert the number of the channel that you’re publishing to. If you only have one channel created in ThingSpeak, the channel number is 1. Otherwise, you can see the number of the channel on the Private View tab.
unsigned long myChannelNumber = 1;
Finally, you need to insert the Write API key you’ve gotten from the previous steps:
const char * myWriteAPIKey = "XXXXXXXXXXXXXXXX";
Code Explanation
First, include the necessary libraries:
#include <WiFi.h>
#include "ThingSpeak.h"
#include <Adafruit_BME280.h>
#include <Adafruit_Sensor.h>
Enter your network credentials in the following variables:
const char* ssid = "REPLACE_WITH_YOUR_SSID";
const char* password = "REPLACE_WITH_YOUR_PASSWORD";
Create a Wi-Fi client to connect to ThingSpeak.
WiFiClient client;
Specify your channel number and write API key:
unsigned long myChannelNumber = 1;
const char * myWriteAPIKey = "XXXXXXXXXXXXXXXX";
Set the frequency for publishing readings. Here, readings are published every 30 seconds (30000 milliseconds), but you can adjust this interval:
unsigned long lastTime = 0;
unsigned long timerDelay = 30000;
The temperatureC variable will hold the temperature value in Celsius:
float temperatureC;
To get the temperature in Fahrenheit, uncomment the following line:
//float temperatureF;
Create an Adafruit_BME280 object named bme for the default ESP32 I2C pins:
Adafruit_BME280 bme; //BME280 connect to ESP32 I2C (GPIO 21 = SDA, GPIO 22 = SCL)
The initBME() function initializes the BME280 sensor:
void initBME(){
  if (!bme.begin(0x76)) {
    Serial.println("Could not find a valid BME280 sensor, check wiring!");
    while (1);
  }
}
In the setup() function, initialize the Serial Monitor and the BME280 sensor, set the ESP32 as a Wi-Fi station, and initialize ThingSpeak:
void setup() {
  Serial.begin(115200);  // Initialize serial
  initBME();  // Initialize BME280 sensor
  WiFi.mode(WIFI_STA);  // Set ESP32 as a Wi-Fi station
  ThingSpeak.begin(client);  // Initialize ThingSpeak
}
In the loop(), ensure the ESP32 is connected to Wi-Fi, get a new temperature reading, and print it to the Serial Monitor. Finally, write the data to ThingSpeak:
void loop() {
  // Connect or reconnect to WiFi
  if(WiFi.status() != WL_CONNECTED){
    Serial.print("Attempting to connect");
    while(WiFi.status() != WL_CONNECTED){
      WiFi.begin(ssid, password);
      delay(5000);
    }
    Serial.println("\nConnected.");
  }

  // Get temperature reading in Celsius
  temperatureC = bme.readTemperature();

  // Uncomment for temperature in Fahrenheit
  /*temperatureF = 1.8 * bme.readTemperature() + 32;
  Serial.print("Temperature (ºF): ");
  Serial.println(temperatureF);*/

  // Publish to ThingSpeak
  int x = ThingSpeak.writeField(myChannelNumber, 1, temperatureC, myWriteAPIKey);
  if(x == 200){
    Serial.println("Channel update successful.");
  } else {
    Serial.println("Problem updating channel. HTTP error code " + String(x));
  }

  // Uncomment to publish in Fahrenheit
  // int x = ThingSpeak.writeField(myChannelNumber, 1, temperatureF, myWriteAPIKey);

  delay(timerDelay);
}
Demonstration
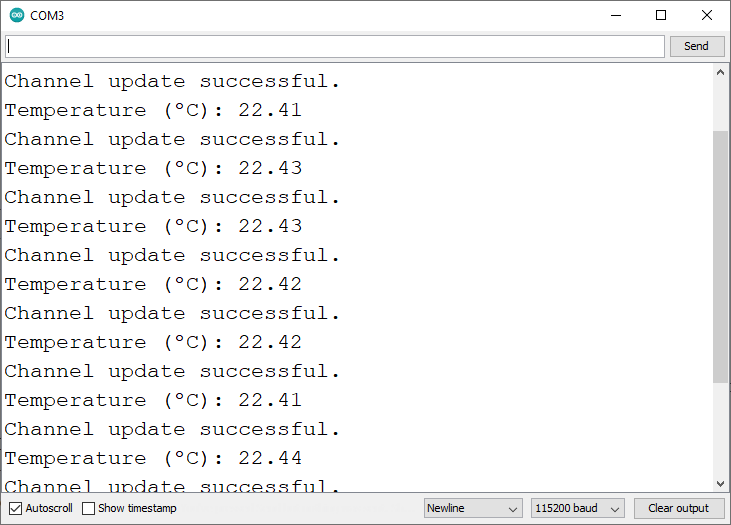
After entering your network credentials, channel number, and API key, upload the code to your board. Open the Serial Monitor at a baud rate of 115200, and press the on-board RST button. After 30 seconds, it should connect to Wi-Fi and start publishing the readings to ThingSpeak.
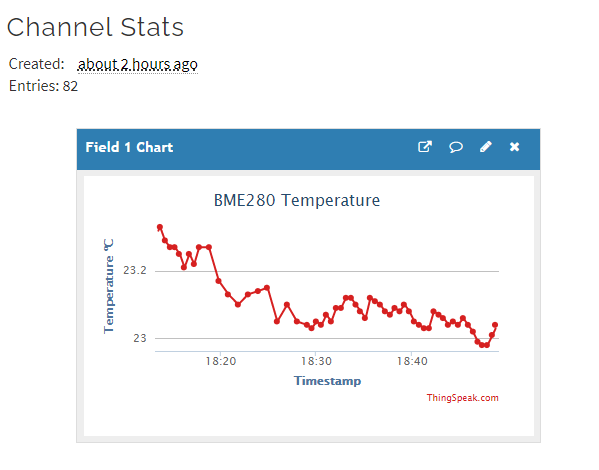
Visit your ThingSpeak account and navigate to the channel you created to see the temperature readings being published and displayed on the chart. You can now access these readings from anywhere by logging into your ThingSpeak account.
Sending Multiple Fields (Temperature, Humidity, and Pressure)
In this section, you’ll learn how to send multiple values simultaneously: temperature, humidity, and pressure.
Enable Multiple Fields in ThingSpeak
First, you need to add more fields in your ThingSpeak account. To do this, go to your Channel Settings and add additional fields as needed. For this example, we’ll add two more fields: one for humidity and another for pressure.
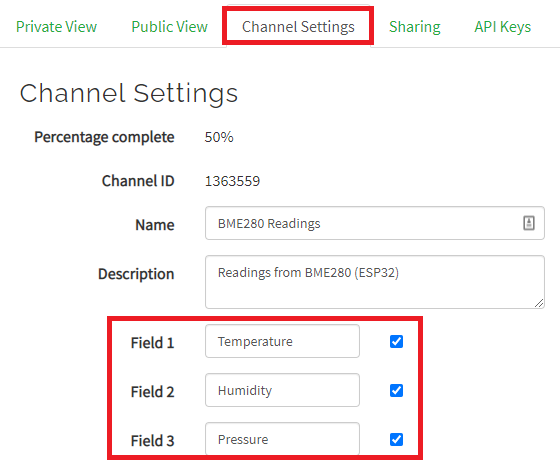
After adding the fields, save your changes by clicking the Save Channel button.
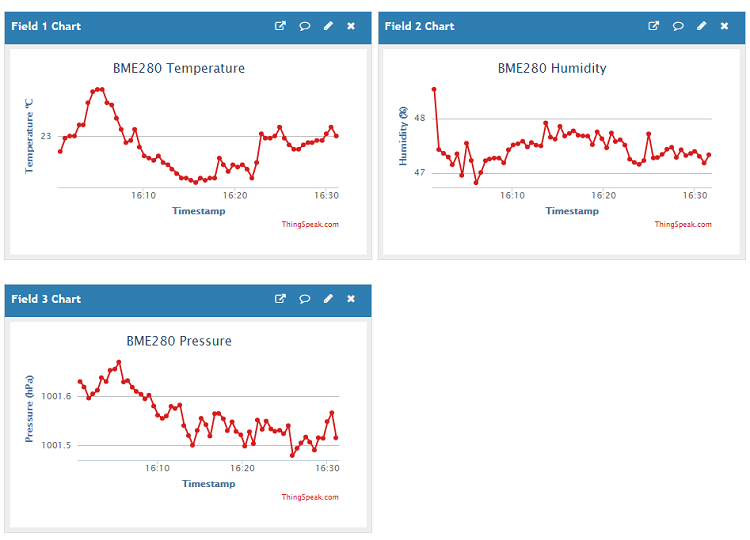
In the Private View tab, you should now see three charts. You can edit these charts to add titles and label the axes accordingly.
ESP32: Write Multiple Fields to ThingSpeak – Code
The code below demonstrates how to send multiple fields (temperature, humidity, and pressure from the BME280 sensor) to ThingSpeak.
#include <WiFi.h>
#include "ThingSpeak.h"
#include <Adafruit_BME280.h>
#include <Adafruit_Sensor.h>

const char* ssid = "REPLACE_WITH_YOUR_SSID";   // your network SSID (name)
const char* password = "REPLACE_WITH_YOUR_PASSWORD";   // your network password

WiFiClient client;

unsigned long myChannelNumber = X;
const char* myWriteAPIKey = "XXXXXXXXXXXXXXXX";

// Timer variables
unsigned long lastTime = 0;
unsigned long timerDelay = 30000;

// Variables to hold sensor readings
float temperatureC;
float humidity;
float pressure;
// Uncomment if you want to get temperature in Fahrenheit
// float temperatureF;

// Create a sensor object
Adafruit_BME280 bme; // BME280 connected to ESP32 I2C (GPIO 21 = SDA, GPIO 22 = SCL)

void initBME() {
  if (!bme.begin(0x76)) {
    Serial.println("Could not find a valid BME280 sensor, check wiring!");
    while (1);
  }
}

void setup() {
  Serial.begin(115200);  // Initialize serial
  initBME();
  WiFi.mode(WIFI_STA);
  ThingSpeak.begin(client);  // Initialize ThingSpeak
}

void loop() {
  if ((millis() - lastTime) > timerDelay) {
    // Connect or reconnect to WiFi
    if (WiFi.status() != WL_CONNECTED) {
      Serial.print("Attempting to connect");
      while (WiFi.status() != WL_CONNECTED) {
        WiFi.begin(ssid, password);
        delay(5000);
      }
      Serial.println("\nConnected.");
    }

    // Get new sensor readings
    temperatureC = bme.readTemperature();
    Serial.print("Temperature (ºC): ");
    Serial.println(temperatureC);
    humidity = bme.readHumidity();
    Serial.print("Humidity (%): ");
    Serial.println(humidity);
    pressure = bme.readPressure() / 100.0F;
    Serial.print("Pressure (hPa): ");
    Serial.println(pressure);

    // Uncomment if you want to get temperature in Fahrenheit
    // temperatureF = 1.8 * bme.readTemperature() + 32;
    // Serial.print("Temperature (ºF): ");
    // Serial.println(temperatureF);

    // Set the fields with the values
    ThingSpeak.setField(1, temperatureC);
    // ThingSpeak.setField(1, temperatureF);
    ThingSpeak.setField(2, humidity);
    ThingSpeak.setField(3, pressure);

    // Write to ThingSpeak
    int x = ThingSpeak.writeFields(myChannelNumber, myWriteAPIKey);
    if (x == 200) {
      Serial.println("Channel update successful.");
    } else {
      Serial.println("Problem updating channel. HTTP error code " + String(x));
    }
    lastTime = millis();
  }
}
This code closely resembles the previous example but is modified to send multiple fields. Let’s break down the key parts:
Create Variables for Sensor Readings
float temperatureC;
float humidity;
float pressure;
Get New Sensor Readings in the loop()
// Get a new temperature reading
temperatureC = bme.readTemperature();
Serial.print("Temperature (ºC): ");
Serial.println(temperatureC);
humidity = bme.readHumidity();
Serial.print("Humidity (%): ");
Serial.println(humidity);
pressure = bme.readPressure() / 100.0F;
Serial.print("Pressure (hPa): ");
Serial.println(pressure);
Assign Values to Fields
Assign each value to the appropriate field using the setField() method, specifying the field number and the value:
// Set the fields with the values
ThingSpeak.setField(1, temperatureC);
// ThingSpeak.setField(1, temperatureF);
ThingSpeak.setField(2, humidity);
ThingSpeak.setField(3, pressure);
Write to ThingSpeak
Use the writeFields() method with your channel number and write API key:
int x = ThingSpeak.writeFields(myChannelNumber, myWriteAPIKey);
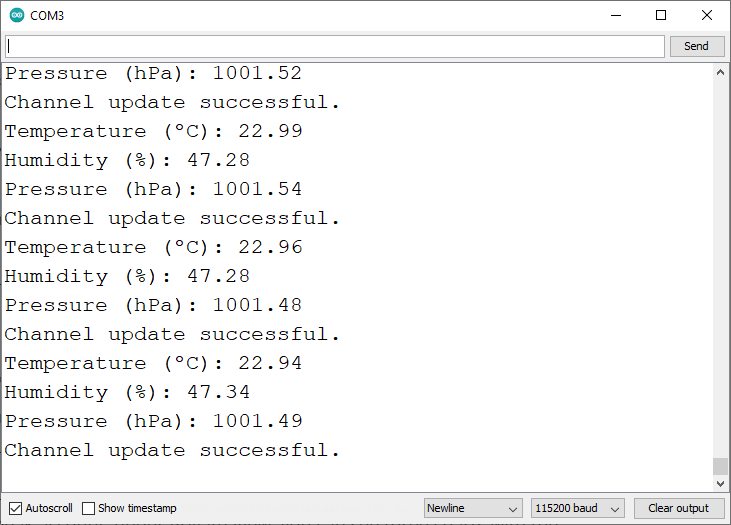
After configuring your network credentials, channel number, and API key, upload the code to your ESP32. Open the Serial Monitor at a baud rate of 115200 and press the on-board RST button. The ESP32 should connect to Wi-Fi and begin publishing sensor readings to ThingSpeak every 30 seconds. Check your ThingSpeak account to see the updated charts for temperature, humidity, and pressure.
Demonstration
Upload the provided code to your board, ensuring you have inserted your network credentials, Write API Key, and channel number. Once uploaded, the board should connect successfully and start sending readings.
Check your ThingSpeak account under the Private View tab to see the three charts displaying the sensor data.
Wrapping Up
In this tutorial, you learned how to publish readings from a BME280 sensor to ThingSpeak using the ESP32 and the thingspeak-arduino library. You can modify these examples to send readings from different sensors or data sources. We have tutorials available for many popular sensors:
- Arduino IDE: ESP32 BME280 Sensor Setup (Temp, Humidity, Pressure)
- Ultimate Guide: Crafting an ESP8266 Weather Station Using BME280
- Interface BME280 with Arduino: Monitor Temp, Humidity, Pressure
- Publish BME680 Sensor Data with ESP32 MQTT (Temperature, Humidity, Pressure, Gas)


