This project will teach you how to set up a web server using the ESP8266 NodeMCU board while simultaneously utilizing the ESP-NOW communication protocol. Multiple ESP8266 boards will be able to transmit sensor data via ESP-NOW to a single ESP8266 receiver, which will then showcase all the readings on a web server. Programming for the boards will be done through the Arduino IDE.
Using ESP-NOW and Wi-Fi Simultaneously
When employing both Wi-Fi for hosting a web server and ESP-NOW for receiving sensor data from other boards simultaneously, several considerations must be made:
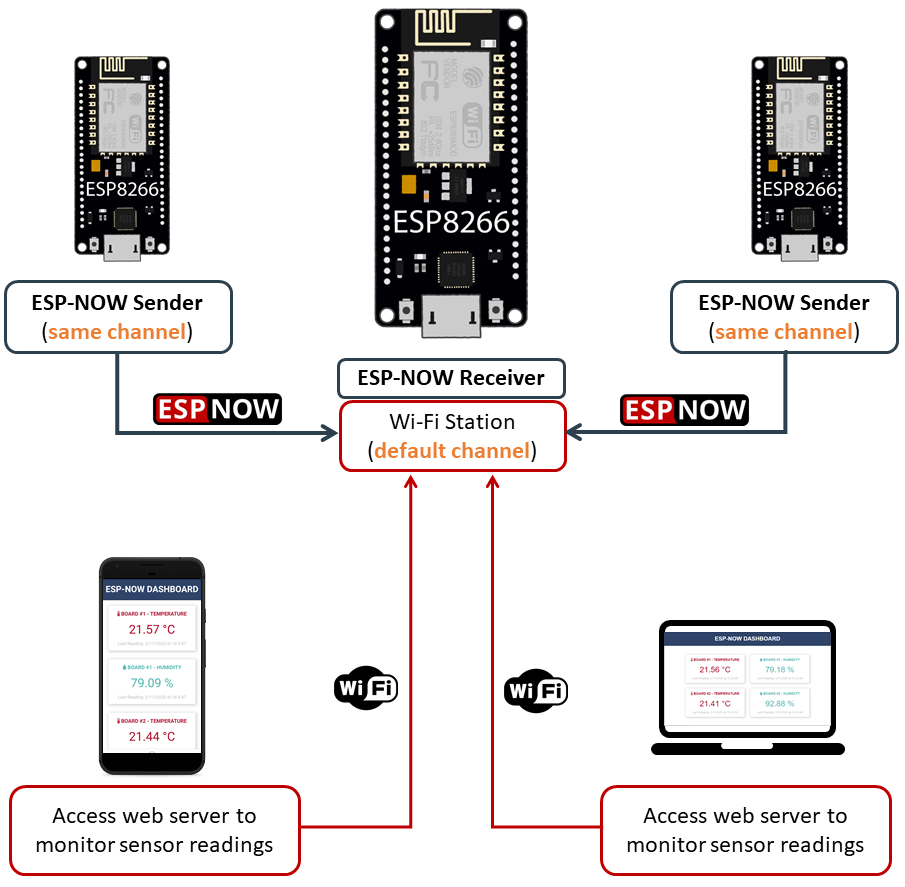
- The ESP8266 sender boards need to operate on the same Wi-Fi channel as the receiver board.
- The Wi-Fi channel for the receiver board is automatically determined by your Wi-Fi router.
- The Wi-Fi mode for the receiver board must be set to access point and station (WIFI_AP_STA).
- You can manually configure the sender boards to operate on the same Wi-Fi channel, or you can incorporate a simple code snippet on each sender board to align its Wi-Fi channel with that of the receiver board.
Project Overview
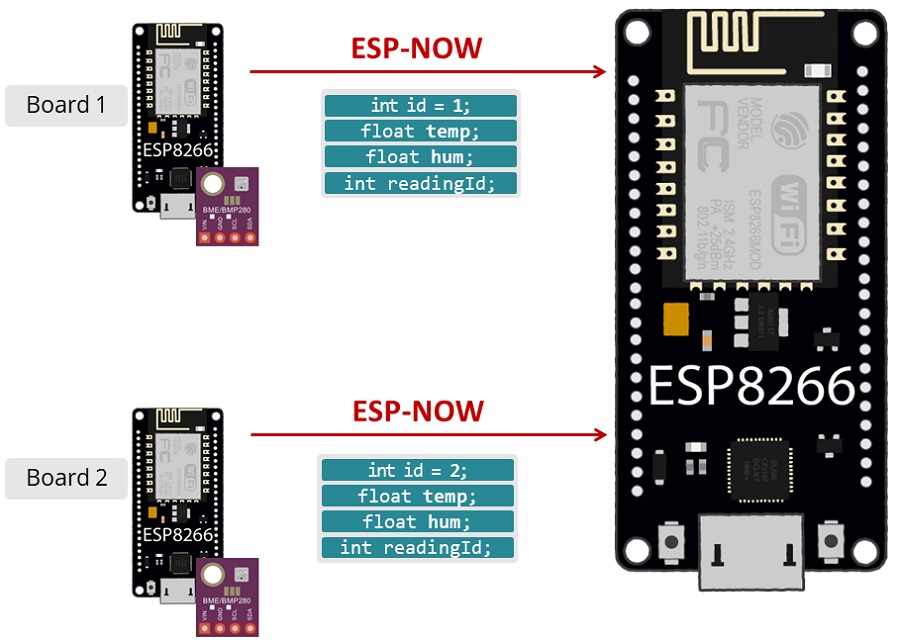
The project we’ll be building is outlined in the following diagram at a high level:
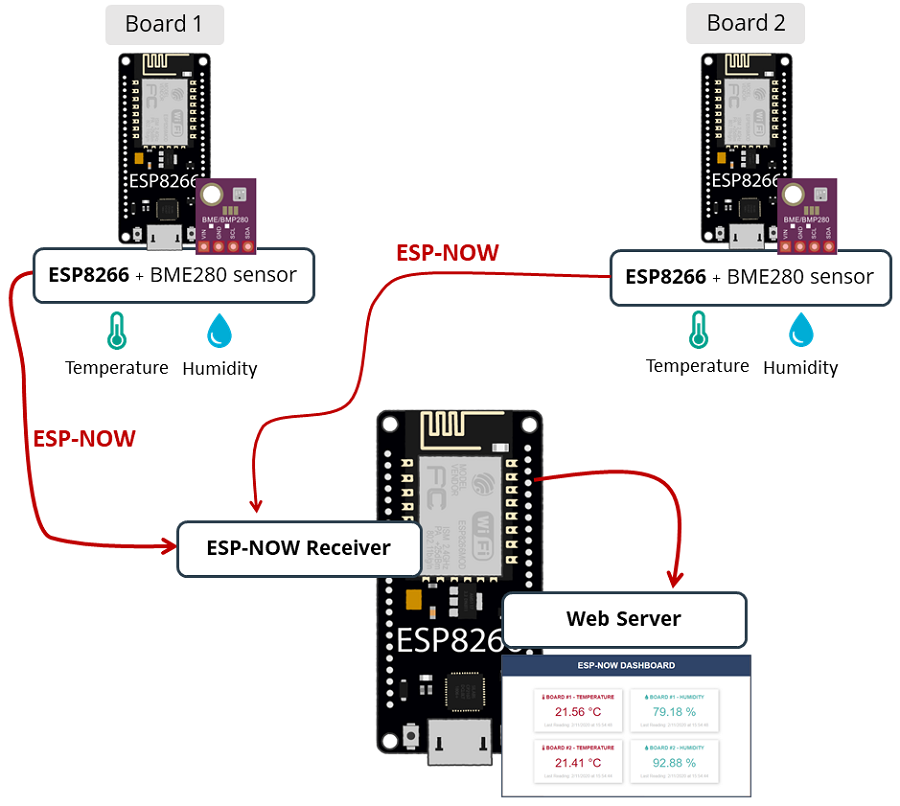
- Two ESP8266 sender boards will transmit BME280 temperature and humidity readings via ESP-NOW to a single ESP8266 receiver board (configured in a many-to-one setup).
- The ESP8266 receiver board will receive these packets and showcase the readings on a web server.
- The web page will automatically update every time it receives a new reading using Server-Sent Events (SSE).
- Additionally, JavaScript will display the timestamp of the last update.
Arduino IDE
Programming for the ESP8266 boards will be done using the Arduino IDE. Before proceeding, ensure that you have the ESP8266 board properly installed in your Arduino IDE.
BME280 Libraries
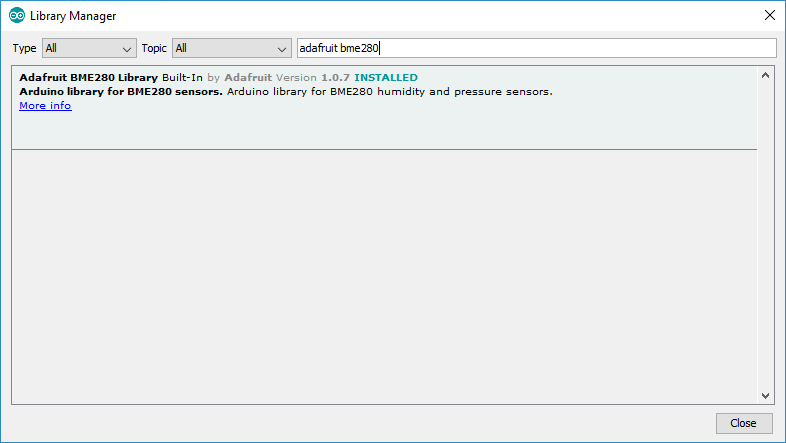
The ESP8266 sender board will transmit temperature and humidity readings from a BME280 sensor. To facilitate this, we’ll utilize the Adafruit_BME280 library. Additionally, you’ll need to install the Adafruit Unified Sensor library. Follow these steps to install both libraries:
Search for “adafruit bme280” in the Library Manager search box and install the library.
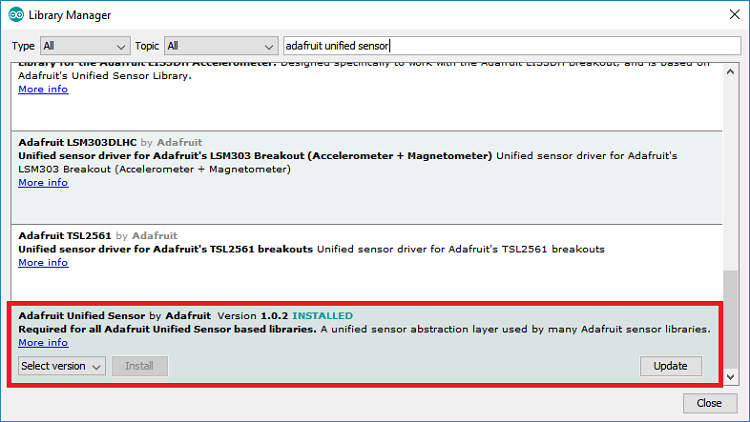
To use the BME280 library, also install the Adafruit_Sensor library. Navigate to Sketch > Include Library > Manage Libraries, then search for “Adafruit Unified Sensor” and install it.
Async Web Server Libraries
For constructing the web server, you’ll require the following libraries:
These libraries are not available for installation through the Arduino Library Manager. You’ll need to manually copy the library files to the Arduino Installation Libraries folder. Alternatively, in the Arduino IDE, navigate to Sketch > Include Library > Add .zip Library and select the downloaded libraries.
Arduino_JSON Library
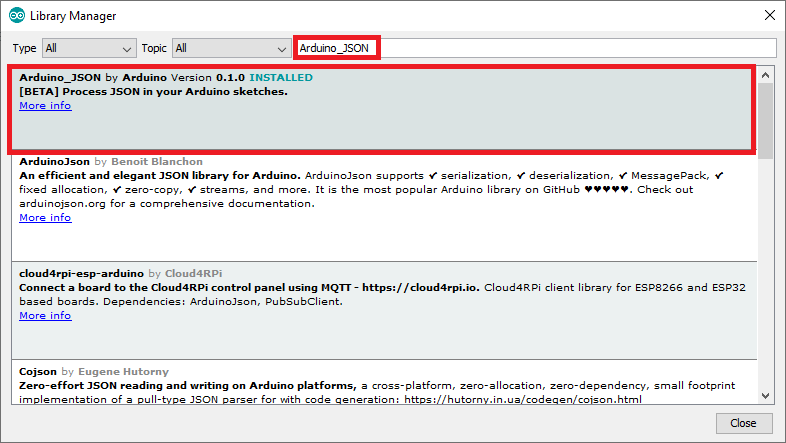
Install the Arduino_JSON library via the Arduino IDE Library Manager. Navigate to Sketch > Include Library > Manage Libraries and search for “Arduino_JSON” to install it.
Obtaining the MAC Address of the Receiver Board
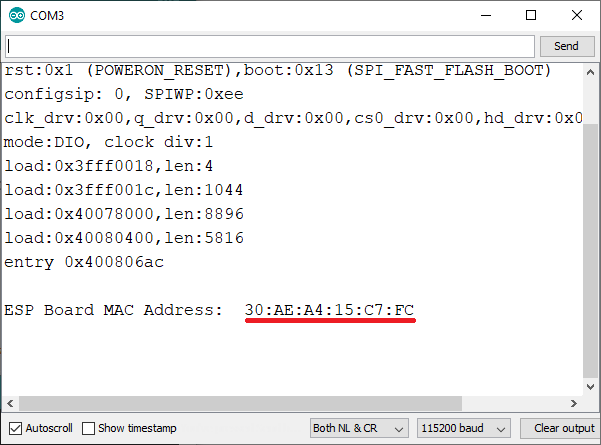
To transmit messages via ESP-NOW, you must obtain the MAC address of the receiver board. Each board possesses a unique MAC address (learn how to Get and Change the ESP8266 MAC Address).
Upload the following code to your ESP8266 receiver board to retrieve its MAC address:
#ifdef ESP32
  #include <WiFi.h>
#else
  #include <ESP8266WiFi.h>
#endif

void setup(){
  Serial.begin(115200);
  Serial.println();
  Serial.print("ESP Board MAC Address:  ");
  Serial.println(WiFi.macAddress());
}

void loop(){

}
After uploading the code, press the RST/EN button, and the MAC address will be displayed on the Serial Monitor.
ESP8266 Receiver (ESP-NOW + Web Server)
The ESP8266 NodeMCU receiver board receives the packets from the sender boards and hosts a web server to display the latest received readings.
Upload the following code to your receiver board – the code is prepared to receive readings from two different boards.
#include <espnow.h>
#include <ESP8266WiFi.h>
#include "ESPAsyncWebServer.h"
#include "ESPAsyncTCP.h"
#include <Arduino_JSON.h>
// Replace with your network credentials (STATION)
const char* ssid = "REPLACE_WITH_YOUR_SSID";
const char* password = "REPLACE_WITH_YOUR_PASSWORD";
// Structure example to receive data
// Must match the sender structure
typedef struct struct_message {
int id;
float temp;
float hum;
unsigned int readingId;
} struct_message;
struct_message incomingReadings;
JSONVar board;
AsyncWebServer server(80);
AsyncEventSource events("/events");
// callback function that will be executed when data is received
void OnDataRecv(uint8_t * mac_addr, uint8_t *incomingData, uint8_t len) {
// Copies the sender mac address to a string
char macStr[18];
Serial.print("Packet received from: ");
snprintf(macStr, sizeof(macStr), "%02x:%02x:%02x:%02x:%02x:%02x",
mac_addr[0], mac_addr[1], mac_addr[2], mac_addr[3], mac_addr[4], mac_addr[5]);
Serial.println(macStr);
memcpy(&incomingReadings, incomingData, sizeof(incomingReadings));
board["id"] = incomingReadings.id;
board["temperature"] = incomingReadings.temp;
board["humidity"] = incomingReadings.hum;
board["readingId"] = String(incomingReadings.readingId);
String jsonString = JSON.stringify(board);
events.send(jsonString.c_str(), "new_readings", millis());
Serial.printf("Board ID %u: %u bytes\n", incomingReadings.id, len);
Serial.printf("t value: %4.2f \n", incomingReadings.temp);
Serial.printf("h value: %4.2f \n", incomingReadings.hum);
Serial.printf("readingID value: %d \n", incomingReadings.readingId);
Serial.println();
}
const char index_html[] PROGMEM = R"rawliteral(
<!DOCTYPE HTML><html>
<head>
<title>ESP-NOW DASHBOARD</title>
<meta name="viewport" content="width=device-width, initial-scale=1">
<link rel="stylesheet" href="https://use.fontawesome.com/releases/v5.7.2/css/all.css" integrity="sha384-fnmOCqbTlWIlj8LyTjo7mOUStjsKC4pOpQbqyi7RrhN7udi9RwhKkMHpvLbHG9Sr" crossorigin="anonymous">
<link rel="icon" href="data:,">
<style>
html {font-family: Arial; display: inline-block; text-align: center;}
h1 { font-size: 2rem;}
body { margin: 0;}
.topnav { overflow: hidden; background-color: #2f4468; color: white; font-size: 1.7rem; }
.content { padding: 20px; }
.card { background-color: white; box-shadow: 2px 2px 12px 1px rgba(140,140,140,.5); }
.cards { max-width: 700px; margin: 0 auto; display: grid; grid-gap: 2rem; grid-template-columns: repeat(auto-fit, minmax(320px, 1fr)); }
.reading { font-size: 2.8rem; }
.timestamp { color: #bebebe; font-size: 1rem; }
.card-title{ font-size: 1.2rem; font-weight : bold; }
.card.temperature { color: #B10F2E; }
.card.humidity { color: #50B8B4; }
</style>
</head>
<body>
<div class="topnav">
<h1>ESP-NOW DASHBOARD</h1>
</div>
<div class="content">
<div class="cards">
<div class="card temperature">
<p class="card-title"><i class="fas fa-thermometer-half"></i> BOARD #1 - TEMPERATURE</p><p><span class="reading"><span id="t1"></span> °C</span></p><p class="timestamp">Last Reading: <span id="rt1"></span></p>
</div>
<div class="card humidity">
<p class="card-title"><i class="fas fa-tint"></i> BOARD #1 - HUMIDITY</p><p><span class="reading"><span id="h1"></span> %</span></p><p class="timestamp">Last Reading: <span id="rh1"></span></p>
</div>
<div class="card temperature">
<p class="card-title"><i class="fas fa-thermometer-half"></i> BOARD #2 - TEMPERATURE</p><p><span class="reading"><span id="t2"></span> °C</span></p><p class="timestamp">Last Reading: <span id="rt2"></span></p>
</div>
<div class="card humidity">
<p class="card-title"><i class="fas fa-tint"></i> BOARD #2 - HUMIDITY</p><p><span class="reading"><span id="h2"></span> %</span></p><p class="timestamp">Last Reading: <span id="rh2"></span></p>
</div>
</div>
</div>
<script>
function getDateTime() {
var currentdate = new Date();
var datetime = currentdate.getDate() + "/"
+ (currentdate.getMonth()+1) + "/"
+ currentdate.getFullYear() + " at "
+ currentdate.getHours() + ":"
+ currentdate.getMinutes() + ":"
+ currentdate.getSeconds();
return datetime;
}
if (!!window.EventSource) {
var source = new EventSource('/events');
source.addEventListener('open', function(e) {
console.log("Events Connected");
}, false);
source.addEventListener('error', function(e) {
if (e.target.readyState != EventSource.OPEN) {
console.log("Events Disconnected");
}
}, false);
source.addEventListener('message', function(e) {
console.log("message", e.data);
}, false);
source.addEventListener('new_readings', function(e) {
console.log("new_readings", e.data);
var obj = JSON.parse(e.data);
document.getElementById("t"+obj.id).innerHTML = obj.temperature.toFixed(2);
document.getElementById("h"+obj.id).innerHTML = obj.humidity.toFixed(2);
document.getElementById("rt"+obj.id).innerHTML = getDateTime();
document.getElementById("rh"+obj.id).innerHTML = getDateTime();
}, false);
}
</script>
</body>
</html>)rawliteral";
void setup() {
// Initialize Serial Monitor
Serial.begin(115200);
// Set the device as a Station and Soft Access Point simultaneously
WiFi.mode(WIFI_AP_STA);
// Set device as a Wi-Fi Station
WiFi.begin(ssid, password);
while (WiFi.status() != WL_CONNECTED) {
delay(1000);
Serial.println("Setting as a Wi-Fi Station..");
}
Serial.print("Station IP Address: ");
Serial.println(WiFi.localIP());
Serial.print("Wi-Fi Channel: ");
Serial.println(WiFi.channel());
// Init ESP-NOW
if (esp_now_init() != 0) {
Serial.println("Error initializing ESP-NOW");
return;
}
// Once ESPNow is successfully Init, we will register for recv CB to
// get recv packer info
esp_now_register_recv_cb(OnDataRecv);
server.on("/", HTTP_GET, [](AsyncWebServerRequest *request){
request->send_P(200, "text/html", index_html);
});
events.onConnect([](AsyncEventSourceClient *client){
if(client->lastId()){
Serial.printf("Client reconnected! Last message ID that it got is: %u\n", client->lastId());
}
// send event with message "hello!", id current millis
// and set reconnect delay to 1 second
client->send("hello!", NULL, millis(), 10000);
});
server.addHandler(&events);
server.begin();
}
void loop() {
static unsigned long lastEventTime = millis();
static const unsigned long EVENT_INTERVAL_MS = 5000;
if ((millis() - lastEventTime) > EVENT_INTERVAL_MS) {
events.send("ping",NULL,millis());
lastEventTime = millis();
}
}
Code Explanation
First, include the necessary libraries.
#include <espnow.h> #include <ESP8266WiFi.h> #include "ESPAsyncWebServer.h" #include "ESPAsyncTCP.h" #include <Arduino_JSON.h>
The Arduino_JSON library is needed because we’ll create a JSON variable with the data received from each board. This JSON variable will be used to send all the needed information to the web page as you’ll see later in this project.
Insert your network credentials on the following lines so that the ESP8266 can connect to your local network.
const char* ssid = "REPLACE_WITH_YOUR_SSID"; const char* password = "REPLACE_WITH_YOUR_PASSWORD";
Data Structure
Then, create a structure that contains the data we’ll receive. We called this structure struct_message and it contains the board ID, temperature and humidity readings, and the reading ID.
typedef struct struct_message {
    int id;
    float temp;
    float hum;
    int readingId;
} struct_message;
Create a new variable of type struct_message that is called incomingReadings that will store the variables values.
struct_message incomingReadings;
Create a JSON variable called board.
JSONVar board;
Create an Async Web Server on port 80.
AsyncWebServer server(80);
Create Event Source
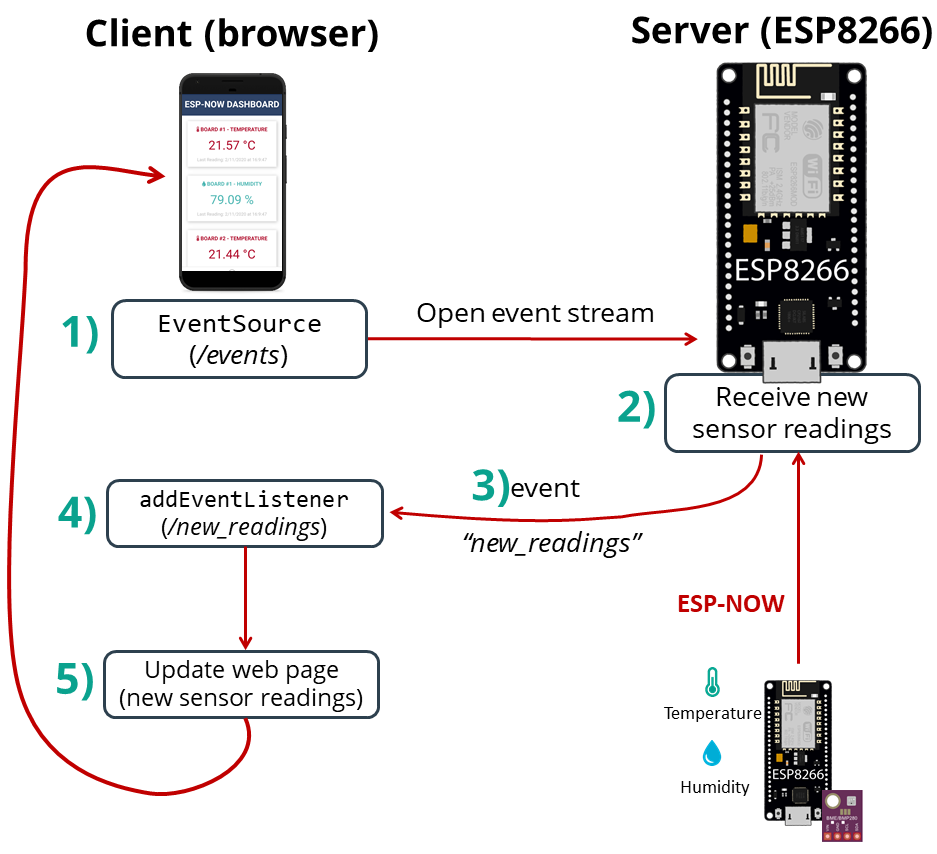
To automatically display the information on the web server when a new reading arrives, we’ll use Server-Sent Events (SSE).
The following line creates a new event source on /events.
AsyncEventSource events("/events");
Server-Sent Events allow a web page (client) to get updates from a server. We’ll use this to automatically display new readings on the web server page when a new ESP-NOW packet arrives.
OnDataRecv() function
The OnDataRecv() function will be executed when you receive a new ESP-NOW packet.
void OnDataRecv(uint8_t * mac_addr, uint8_t *incomingData, uint8_t len) {
Inside that function, print the sender’s MAC address:
char macStr[18];
Serial.print("Packet received from: ");
snprintf(macStr, sizeof(macStr), "%02x:%02x:%02x:%02x:%02x:%02x",
         mac_addr[0], mac_addr[1], mac_addr[2], mac_addr[3], mac_addr[4], mac_addr[5]);
Serial.println(macStr);
Copy the information in the incomingData variable into the incomingReadings structure variable.
memcpy(&incomingReadings, incomingData, sizeof(incomingReadings));
Then, create a JSON String variable with the received information (jsonString variable):
board["id"] = incomingReadings.id;
board["temperature"] = incomingReadings.temp;
board["humidity"] = incomingReadings.hum;
board["readingId"] = String(incomingReadings.readingId);
String jsonString = JSON.stringify(board);
Here’s an example on how the jsonString variable may look like after receiving the readings:
board = {
  "id": "1",
  "temperature": "24.32",
  "humidity" = "65.85",
  "readingId" = "2"
}
After gathering all the received data on the jsonString variable, send that information to the browser as an event (“new_readings”).
events.send(jsonString.c_str(), "new_readings", millis());
Later, we’ll see how to handle these events on the client side.
Finally, print the received information on the Arduino IDE Serial Monitor for debugging purposes:
Serial.printf("Board ID %u: %u bytes\n", incomingReadings.id, len);
Serial.printf("t value: %4.2f \n", incomingReadings.temp);
Serial.printf("h value: %4.2f \n", incomingReadings.hum);
Serial.printf("readingID value: %d \n", incomingReadings.readingId);
Serial.println();
Building the Web Page
The index_html variable contains all the HTML, CSS and JavaScript to build the web page. We won’t go into details on how the HTML and CSS works. We’ll just take a look at how to handle the events sent by the server.
Handle Events
Create a new EventSource object and specify the URL of the page sending the updates. In our case, it’s /events.
if (!!window.EventSource) {
  var source = new EventSource('/events');
Once you’ve instantiated an event source, you can start listening for messages from the server with addEventListener().
These are the default event listeners, as shown here in the AsyncWebServer documentation.
source.addEventListener('open', function(e) {
  console.log("Events Connected");
}, false);
source.addEventListener('error', function(e) {
  if (e.target.readyState != EventSource.OPEN) {
    console.log("Events Disconnected");
  }
}, false);

source.addEventListener('message', function(e) {
  console.log("message", e.data);
}, false);
Then, add the event listener for “new_readings”.
source.addEventListener('new_readings', function(e) {
When the ESP8266 receives a new packet, it sends a JSON string with the readings as an event (“new_readings”) to the client. The following lines handle what happens when the browser receives that event.
console.log("new_readings", e.data);
var obj = JSON.parse(e.data);
document.getElementById("t"+obj.id).innerHTML = obj.temperature.toFixed(2);
document.getElementById("h"+obj.id).innerHTML = obj.humidity.toFixed(2);
document.getElementById("rt"+obj.id).innerHTML = getDateTime();
document.getElementById("rh"+obj.id).innerHTML = getDateTime();
Basically, print the new readings on the browser console, and put the received data into the elements with the corresponding id on the web page. We also update the date and time the readings were received by calling the getDateTime() JavaScript function.
function getDateTime() {
  var currentdate = new Date();
  var datetime = currentdate.getDate() + "/"
  + (currentdate.getMonth()+1) + "/"
  + currentdate.getFullYear() + " at "
  + currentdate.getHours() + ":"
  + currentdate.getMinutes() + ":"
  + currentdate.getSeconds();
  return datetime;
}
setup()
In the setup(), set the ESP8266 receiver as an access point and Wi-Fi station:
WiFi.mode(WIFI_AP_STA);
The following lines connect the ESP8266 to your local network and print the IP address and the Wi-Fi channel:
// Set device as a Wi-Fi Station
WiFi.begin(ssid, password);
while (WiFi.status() != WL_CONNECTED) {
  delay(1000);
  Serial.println("Setting as a Wi-Fi Station..");
}
Serial.print("Station IP Address: ");
Serial.println(WiFi.localIP());
Serial.print("Wi-Fi Channel: ");
Serial.println(WiFi.channel());
Initialize ESP-NOW.
if (esp_now_init() != 0) {
  Serial.println("Error initializing ESP-NOW");
  return;
}
Register for the OnDataRecv callback function, so that it is executed when a new ESP-NOW packet arrives.
esp_now_register_recv_cb(OnDataRecv);
Handle Requests
When you access the ESP8266 IP address on the root / URL, send the text that is stored on the index_html variable to build the web page.
server.on("/", HTTP_GET, [](AsyncWebServerRequest *request){
  request->send_P(200, "text/html", index_html);
});
Server Event Source
Set up the event source on the server.
events.onConnect([](AsyncEventSourceClient *client){
  if(client->lastId()){
    Serial.printf("Client reconnected! Last message ID that it got is: %u\n", client->lastId());
  }
  // send event with message "hello!", id current millis
  // and set reconnect delay to 1 second
  client->send("hello!", NULL, millis(), 10000);
);
server.addHandler(&events);
Finally, start the server.
server.begin();
loop()
In the loop(), send a ping every 5 seconds. This is used to check on the client side, if the server is still running (these lines are not mandatory).
static unsigned long lastEventTime = millis();
static const unsigned long EVENT_INTERVAL_MS = 5000;
if ((millis() - lastEventTime) > EVENT_INTERVAL_MS) {
  events.send("ping",NULL,millis());
  lastEventTime = millis();
}
The following diagram summarizes how the Server-sent Events work on this project and how it updates the values without refreshing the web page.
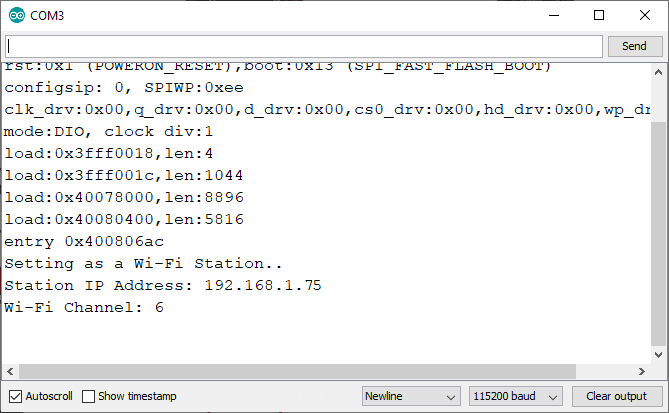
After uploading the code to the receiver board, press the on-board EN/RST button. The ESP8266 IP address should be printed on the Serial Monitor as well as the Wi-Fi channel.
ESP8266 Sender Circuit
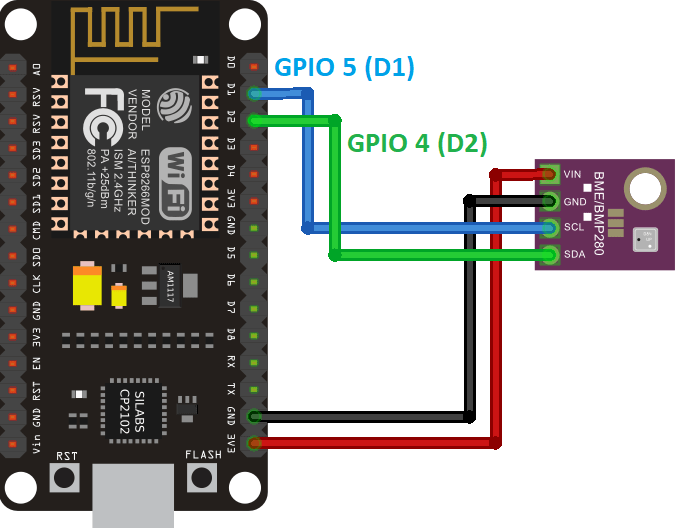
The ESP8266 sender boards are connected to a BME280 sensor. Wire the sensor to the default ESP8266 I2C pins:
GPIO 5(D1) -> SCLGPIO 4(D2) -> SDA
ESP8266 Sender Code (ESP-NOW)
Every sender board will transmit a structure via ESP-NOW, encompassing the board ID (to facilitate identification of the sender), temperature, humidity, and a reading ID. The reading ID serves as an integer to track the number of messages transmitted.
Upload the subsequent code to each of your sender boards. Remember to increment the id number for each sender board and input your SSID into the WIFI_SSID variable.
#include <espnow.h>
#include <ESP8266WiFi.h>
#include <Adafruit_BME280.h>
#include <Adafruit_Sensor.h>

// Set your Board ID (ESP32 Sender #1 = BOARD_ID 1, ESP32 Sender #2 = BOARD_ID 2, etc)
#define BOARD_ID 2

Adafruit_BME280 bme;

//MAC Address of the receiver
uint8_t broadcastAddress[] = {0xFF, 0xFF, 0xFF, 0xFF, 0xFF, 0xFF};

//Structure example to send data
//Must match the receiver structure
typedef struct struct_message {
    int id;
    float temp;
    float hum;
    int readingId;
} struct_message;

//Create a struct_message called myData
struct_message myData;

unsigned long previousMillis = 0;   // Stores last time temperature was published
const long interval = 10000;        // Interval at which to publish sensor readings

unsigned int readingId = 0;

// Insert your SSID
constexpr char WIFI_SSID[] = "REPLACE_WITH_YOUR_SSID";

int32_t getWiFiChannel(const char *ssid) {
  if (int32_t n = WiFi.scanNetworks()) {
    for (uint8_t i=0; i<n; i++) {
      if (!strcmp(ssid, WiFi.SSID(i).c_str())) {
        return WiFi.channel(i);
      }
    }
  }
  return 0;
}

void initBME(){
  if (!bme.begin(0x76)) {
    Serial.println("Could not find a valid BME280 sensor, check wiring!");
    while (1);
  }
}

float readTemperature() {
  float t = bme.readTemperature();
  return t;
}

float readHumidity() {
  float h = bme.readHumidity();
  return h;
}

// Callback when data is sent
void OnDataSent(uint8_t *mac_addr, uint8_t sendStatus) {
  Serial.print("Last Packet Send Status: ");
  if (sendStatus == 0){
    Serial.println("Delivery success");
  }
  else{
    Serial.println("Delivery fail");
  }
}

void setup() {
  //Init Serial Monitor
  Serial.begin(115200);
  initBME();

  // Set device as a Wi-Fi Station and set channel
  WiFi.mode(WIFI_STA);

  int32_t channel = getWiFiChannel(WIFI_SSID);

  WiFi.printDiag(Serial); // Uncomment to verify channel number before
  wifi_promiscuous_enable(1);
  wifi_set_channel(channel);
  wifi_promiscuous_enable(0);
  WiFi.printDiag(Serial); // Uncomment to verify channel change after

  // Init ESP-NOW
  if (esp_now_init() != 0) {
    Serial.println("Error initializing ESP-NOW");
    return;
  }

  // Once ESPNow is successfully Init, we will register for Send CB to
  // get the status of Trasnmitted packet
   esp_now_set_self_role(ESP_NOW_ROLE_CONTROLLER);

  esp_now_register_send_cb(OnDataSent);

  esp_now_add_peer(broadcastAddress, ESP_NOW_ROLE_SLAVE, 1, NULL, 0);
}

void loop() {
  unsigned long currentMillis = millis();
  if (currentMillis - previousMillis >= interval) {
    // Save the last time a new reading was published
    previousMillis = currentMillis;
    //Set values to send
    myData.id = BOARD_ID;
    myData.temp = readTemperature();
    myData.hum = readHumidity();
    myData.readingId = readingId++;

    esp_now_send(broadcastAddress, (uint8_t *) &myData, sizeof(myData));

    Serial.print("loop");
  }
}
Code Explanation
Start by importing the required libraries:
#include <espnow.h>
#include <ESP8266WiFi.h>
#include <Adafruit_BME280.h>
#include <Adafruit_Sensor.h>
Set Board ID
Define the ESP8266 sender board ID, for example set BOARD_ID 1 for ESP8266 Sender #1, etc…
#define BOARD_ID 1
BME280 Sensor
Create an Adafruit_BME280 object called bme.
Adafruit_BME280 bme;
Receiver’s MAC Address
Insert the receiver’s MAC address on the next line (for example):
uint8_t broadcastAddress[] = {0x30, 0xAE, 0xA4, 0x15, 0xC7, 0xFC};
Data Structure
Then, create a structure that contains the data we want to send. The struct_message contains the board ID, temperature reading, humidity reading, and the reading ID.
typedef struct struct_message {
    int id;
    float temp;
    float hum;
    int readingId;
} struct_message;
Create a new variable of type struct_message that is called myData that stores the variables’ values.
struct_message myData;
Timer Interval
Create some auxiliary timer variables to publish the readings every 10 seconds. You can change the delay time on the interval variable.
unsigned long previousMillis = 0; // Stores last time temperature was published
const long interval = 10000; // Interval at which to publish sensor readings
Initialize the readingId variable – it keeps track of the number of readings sent.
unsigned int readingId = 0;
Changing Wi-Fi channel
Now, we’ll get the receiver’s Wi-Fi channel. This is useful because it allows us to automatically assign the same Wi-Fi channel to the sender board.
To do that, you must insert your SSID in the following line:
constexpr char WIFI_SSID[] = "REPLACE_WITH_YOUR_SSID";
Then, the getWiFiChannel() function scans for your network and gets its channel.
int32_t getWiFiChannel(const char *ssid) {
  if (int32_t n = WiFi.scanNetworks()) {
    for (uint8_t i=0; i<n; i++) {
      if (!strcmp(ssid, WiFi.SSID(i).c_str())) {
        return WiFi.channel(i);
      }
    }
  }
  return 0;
}
This snippet of code was proposed by Stephane (one of our readers). You can see his complete example here.
Initialize BME280 Sensor
The initBME() function initializes the BME280 sensor.
void initBME(){
  if (!bme.begin(0x76)) {
    Serial.println("Could not find a valid BME280 sensor, check wiring!");
    while (1);
  }
}
Reading Temperature
The readTemperature() function reads and returns the temperature from the BME280 sensor.
float readTemperature() {
  float t = bme.readTemperature();
  return t;
}
Reading Humidity
The readHumidity() function reads and returns the humidity from the BME280 sensor.
float readHumidity() {
  float h = bme.readHumidity();
  return h;
}
OnDataSent Callback Function
The OnDataSent() callback function will be executed when a message is sent. In this case, this function prints if the message was successfully delivered or not.
void OnDataSent(uint8_t *mac_addr, uint8_t sendStatus) {
  Serial.print("Last Packet Send Status: ");
  if (sendStatus == 0){
    Serial.println("Delivery success");
  }
  else{
    Serial.println("Delivery fail");
  }
}
setup()
Initialize the Serial Monitor.
Serial.begin(115200);
Initialize the BME280 sensor:
initBME();
Set the ESP8266 as a Wi-Fi station.
WiFi.mode(WIFI_STA);
Set its channel to match the receiver’s Wi-Fi channel:
int32_t channel = getWiFiChannel(WIFI_SSID);

WiFi.printDiag(Serial); // Uncomment to verify channel number before
wifi_promiscuous_enable(1);
wifi_set_channel(channel);
wifi_promiscuous_enable(0);
WiFi.printDiag(Serial); // Uncomment to verify channel change after
Initialize ESP-NOW.
// Init ESP-NOW
if (esp_now_init() != 0) {
  Serial.println("Error initializing ESP-NOW");
  return;
}
Set the ESP8266 role:
esp_now_set_self_role(ESP_NOW_ROLE_CONTROLLER);
After successfully initializing ESP-NOW, register the callback function that will be called when a message is sent. In this case, register for the OnDataSent() function created previously.
esp_now_register_send_cb(OnDataSent);
Add peer
To send data to another board (the receiver), you need to pair it as a peer. The following lines register and add the receiver as a peer.
esp_now_add_peer(broadcastAddress, ESP_NOW_ROLE_SLAVE, 1, NULL, 0);
loop()
In the loop(), check if it is time to get and send new readings.
unsigned long currentMillis = millis();
if (currentMillis - previousMillis >= interval) {
  // Save the last time a new reading was published
  previousMillis = currentMillis;
Send ESP-NOW Message
Finally, send the message structure via ESP-NOW.
esp_now_send(broadcastAddress, (uint8_t *) &myData, sizeof(myData));
Upload the code to your sender boards. You should notice that the boards change its Wi-Fi channel to the channel of the receiver board.
Demonstration
Once the code has been uploaded to all the boards and everything is functioning as expected, the ESP8266 receiver board should begin receiving sensor readings from the other boards.
Open a web browser on your local network and enter the IP address of the ESP8266.
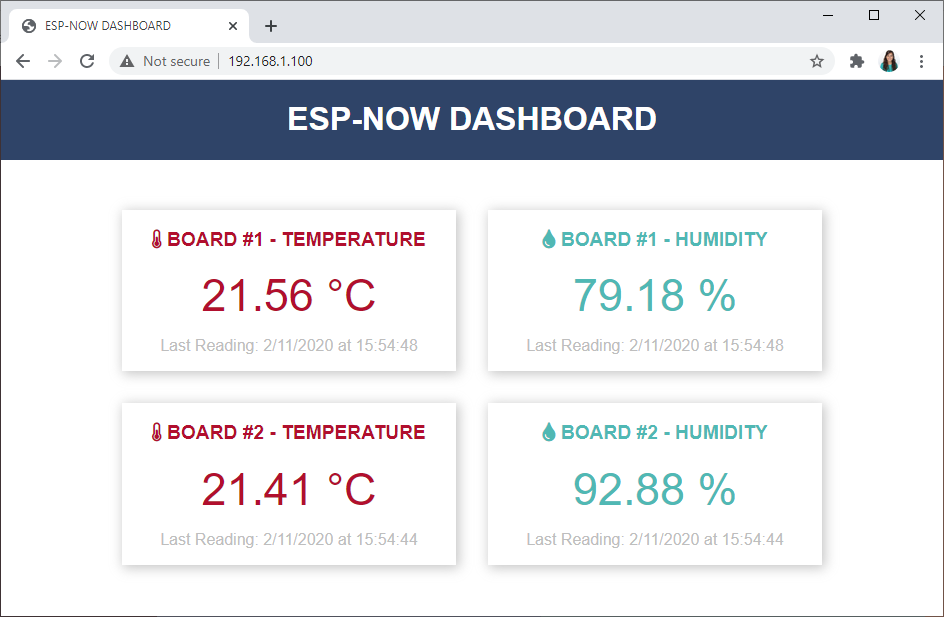
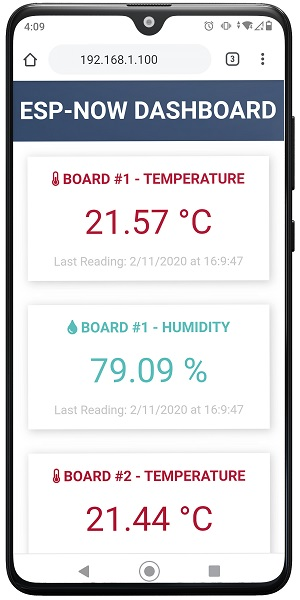
The web page should display the temperature, humidity, and the timestamp of the last update for each board. Whenever a new packet is received, the web page will automatically update without needing to refresh.
Wrapping Up
In this tutorial, you have learned how to utilize ESP-NOW and Wi-Fi to establish a web server capable of receiving ESP-NOW packets from multiple boards (configured in a many-to-one setup) using the ESP8266 NodeMCU board.
Thank you for reading.


