

From time to time, you encounter situations where maintaining precise timing is crucial. Take, for instance, a scenario where a relay needs to be triggered at an exact moment or a data logger requires storing values at specific intervals.
The initial solution that springs to mind is utilizing an RTC (Real Time Clock) chip. However, these chips aren’t infallibly accurate, necessitating regular manual adjustments to keep them in sync.
A preferable alternative is to utilize the Network Time Protocol (NTP). If your ESP8266 project has internet connectivity, you can effortlessly obtain date and time information (with a precision of a few milliseconds of UTC) at no cost. Moreover, no additional hardware is required.
What does NTP stand for?
NTP stands for Network Time Protocol. It serves as a standard Internet Protocol (IP) designed for synchronizing computer clocks across a network.
This protocol ensures that all network-connected devices are synchronized with Coordinated Universal Time (UTC) within a few milliseconds (approximately 50 milliseconds over the public Internet and less than 5 milliseconds in a LAN environment).
Coordinated Universal Time (UTC) serves as a global time standard akin to GMT (Greenwich Mean Time). UTC remains constant worldwide; it does not vary.
The concept behind using NTP is to align computer clocks with UTC and subsequently apply any local time zone offset or daylight saving time adjustments. This approach enables the synchronization of computer clocks irrespective of geographical location or time zone disparities.
NTP Architecture
NTP operates using a hierarchical structure where each tier is referred to as a “stratum.”
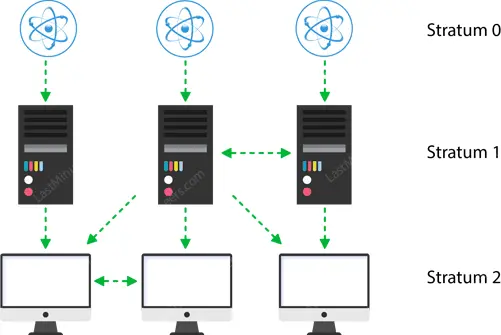
At the pinnacle are exceptionally precise timekeeping instruments like atomic clocks, GPS, or radio clocks, categorized as stratum 0 hardware clocks.
Stratum 1 servers establish a direct link to a stratum 0 hardware clock, offering the highest level of time accuracy.
Every stratum within the hierarchy synchronizes with the tier above it and functions as a server for devices in lower strata.
How NTP Works?
NTP can function in various modes, with the most common being client-server mode.
The basic operational principle is as follows:
- The client device, like the ESP8266, connects to the NTP server using the User Datagram Protocol (UDP) on port 123.
- The client then transmits a request packet to the NTP server.
- In response to this request, the NTP server sends a time stamp packet containing various data such as a UNIX timestamp, accuracy, delay, or timezone.
- The client can then extract the current date and time from this packet.
Setting up the Arduino IDE
Before proceeding with this tutorial, ensure that you have installed the ESP8266 add-on in your Arduino IDE. If not, refer to the tutorial below for guidance.
Installing the NTP Client Library
The NTP Client Library streamlines the process of obtaining time and date information from an NTP server. Follow the steps below to integrate this library into your Arduino IDE:
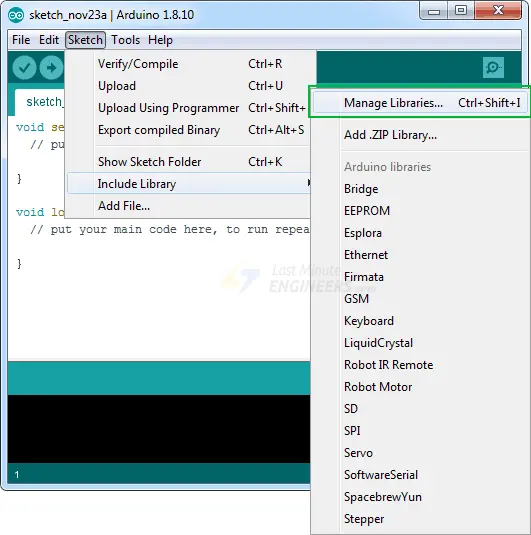
- Navigate to Sketch > Include Library > Manage Libraries…
- Allow the Library Manager to download the libraries index and update the list of installed libraries.
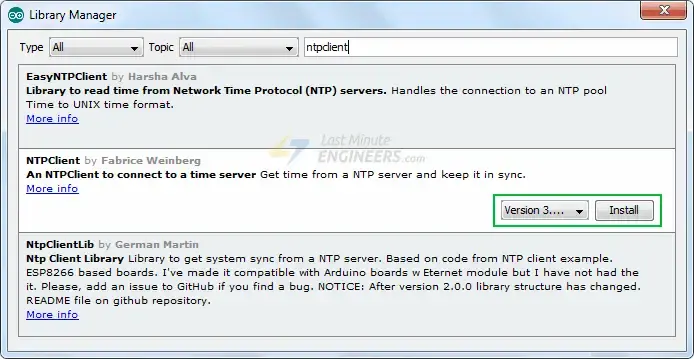
- Filter your search by typing ‘ntpclient’. Locate NTPClient by Fabrice Weinberg in the list of results. Click on that entry and select Install.
Retrieving Date and Time from NTP Server
The provided sketch illustrates how to fetch the date and time from the NTP Server:
#include <NTPClient.h>
#include <ESP8266WiFi.h>
#include <WiFiUdp.h>

const char *ssid     = "YOUR_SSID";
const char *password = "YOUR_PASS";

const long utcOffsetInSeconds = 3600;

char daysOfTheWeek[7][12] = {"Sunday", "Monday", "Tuesday", "Wednesday", "Thursday", "Friday", "Saturday"};

// Define NTP Client to get time
WiFiUDP ntpUDP;
NTPClient timeClient(ntpUDP, "pool.ntp.org", utcOffsetInSeconds);

void setup(){
  Serial.begin(115200);

  WiFi.begin(ssid, password);

  while ( WiFi.status() != WL_CONNECTED ) {
    delay ( 500 );
    Serial.print ( "." );
  }

  timeClient.begin();
}

void loop() {
  timeClient.update();

  Serial.print(daysOfTheWeek[timeClient.getDay()]);
  Serial.print(", ");
  Serial.print(timeClient.getHours());
  Serial.print(":");
  Serial.print(timeClient.getMinutes());
  Serial.print(":");
  Serial.println(timeClient.getSeconds());
  //Serial.println(timeClient.getFormattedTime());

  delay(1000);
}
Before uploading the sketch, make the following adjustments to ensure it functions properly:
- Replace the ssid and password variables with your network credentials so the ESP8266 can connect to your network: const char* ssid = “YOUR_SSID”; const char* password = “YOUR_PASS”;
- Modify the UTC offset for your timezone (in seconds). Refer to the list of UTC time offsets. Below are examples for various time zones:
- For UTC -5.00 : -5 * 60 * 60 : -18000
- For UTC +1.00 : 1 * 60 * 60 : 3600
- For UTC +0.00 : 0 * 60 * 60 : 0
const long utcOffsetInSeconds = 3600;
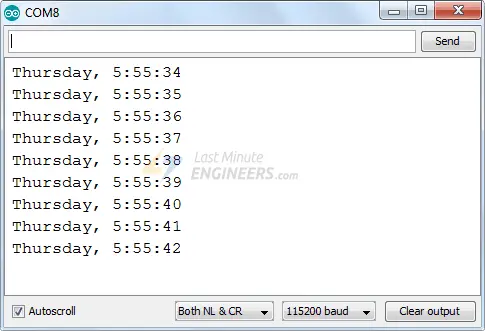
- After uploading the sketch, press the RST button on your NodeMCU. The serial monitor should display the date and time every second.
Code Explanation
Let’s delve into the code to understand its functionality. Initially, we include the necessary libraries for the project:
- NTPClient.h is a time library responsible for handling NTP server synchronization seamlessly.
- ESP8266WiFi.h is a library containing ESP8266-specific WiFi methods used for network connection.
- WiFiUdp.h library manages UDP protocol tasks, such as opening a UDP port, sending and receiving UDP packets, and so on.
#include <NTPClient.h>
#include <ESP8266WiFi.h>
#include <WiFiUdp.h>
Several constants are defined, including the SSID, WiFi password, and UTC offset. Additionally, a 2D array called daysOfTheWeek is defined to hold the names of the days.
const char *ssid     = "YOUR_SSID";
const char *password = "YOUR_PASS";
const long utcOffsetInSeconds = 3600;
char daysOfTheWeek[7][12] = {"Sunday", "Monday", "Tuesday", "Wednesday", "Thursday", "Friday", "Saturday"};
Furthermore, the address of the NTP Server is specified. Using pool.ntp.org, an open NTP project, ensures access to nearby time servers.
WiFiUDP ntpUDP;
NTPClient timeClient(ntpUDP, "pool.ntp.org", utcOffsetInSeconds);
pool.ntp.org automatically selects nearby time servers. However, if specific servers are preferred, the sub-zones of pool.ntp.org can be utilized.
| Area | HostName |
| Worldwide | pool.ntp.org |
| Asia | asia.pool.ntp.org |
| Europe | europe.pool.ntp.org |
| North America | north-america.pool.ntp.org |
| Oceania | oceania.pool.ntp.org |
| South America | south-america.pool.ntp.org |
In the setup section, serial communication with the PC is established first, followed by connection to the WiFi network using the WiFi.begin() function.
Serial.begin(115200);

WiFi.begin(ssid, password);

while ( WiFi.status() != WL_CONNECTED ) {
  delay ( 500 );
  Serial.print ( "." );
}
Once connected to the network, the NTP client is initialized using the begin() function.
timeClient.begin();
Subsequently, the update() function is called to retrieve the current date and time. This function sends a request packet to an NTP server and parses the received time stamp packet into a readable format.
timeClient.update();
The current date and time can be obtained by invoking methods of the NTP Client object.
Serial.print(daysOfTheWeek[timeClient.getDay()]);
Serial.print(", ");
Serial.print(timeClient.getHours());
Serial.print(":");
Serial.print(timeClient.getMinutes());
Serial.print(":");
Serial.println(timeClient.getSeconds());
Related article
- Complete Tutorial: Setting Up I2C LCD Screen for ESP8266
- Mastering Interrupts and Timers: ESP8266 Development Guide
- ESP8266 Sensor Readings: Web Server Auto-Updates via Server-Sent Events
- Control IoT Devices: ESP8266 NodeMCU Async Web Server Tutorial


You say `Subsequently, the update() function is called to retrieve the current date and time.` and yet your code makes NO mention of date. It seems very weird to me that NTPClient doesn’t include methods for extracting time at ALL levels of granularity (ie.UTC day of month, month & year), in addition to the provided HH:MM:SS, TZ offset, epoch & formattedTime