
One of the advantages of the DS18B20 temperature sensor is its ability to support multiple sensors on the same 1-Wire bus. Each DS18B20 has a unique 64-bit serial code, allowing for easy differentiation between sensors.
In this tutorial, we will demonstrate how to read the temperature from multiple DS18B20 sensors connected to the same bus. This capability is particularly valuable when you need to monitor temperature across a large area using multiple sensors.
Before proceeding with this tutorial, it is recommended that you have a basic understanding of the DS18B20 one-wire temperature sensor. If you are unfamiliar with this sensor, we suggest referring to the tutorial provided below for an introduction.
Now, let’s proceed to connect the DS18B20 sensors to your Arduino.
Wiring Multiple DS18B20 Sensors to Arduino
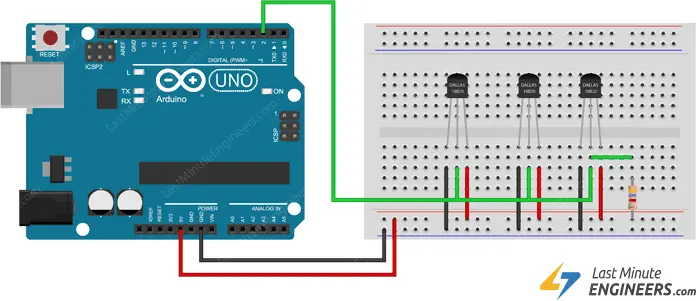
Wiring multiple DS18B20 sensors to an Arduino is a simple process.
Start by connecting all the DS18B20 sensors in parallel, sharing the VDD, GND, and signal pins. Then, connect the VDD pin of the sensors to the 5V output of the Arduino, the GND pin to the ground of the Arduino, and the signal pin to digital pin 2 on the Arduino.
To ensure stable data transfer, add a single 4.7k pull-up resistor for the entire bus between the signal and power pins. Note that the internal pull-ups on the Arduino will not work in this case.
Parts Required
| Component Name | Buy Now |
| Arduino Uno REV3 | Amazon |
| DS18B20 Temperature Sensor | Amazon |
| Breadboard | Amazon |
| BOJACK 1000 Pcs 25 Values Resistor Kit 1 Ohm-1M Ohm with 5% 1/4W | Amazon |
Installing Library For DS18B20
To utilize the DS18B20 sensor with ease, we can make use of the DallasTemperature library. This library simplifies the complex 1-Wire protocol, allowing us to easily retrieve temperature readings from the sensor using simple commands.
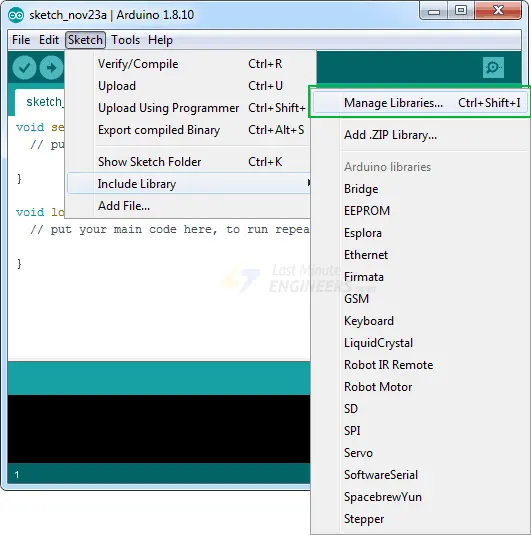
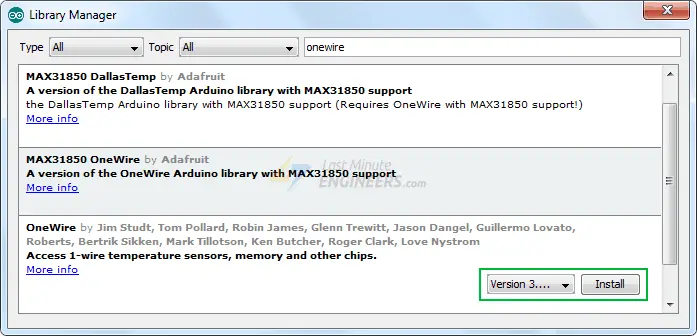
To install the library, follow these steps:
Go to “Sketch > Include Library > Manage Libraries…” in the Arduino IDE.
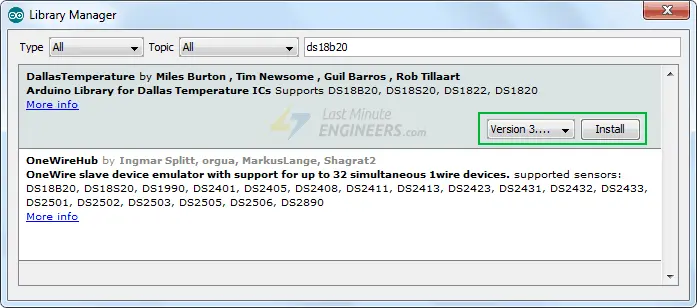
Wait for the Library Manager to download the library index and update the list of installed libraries.
Filter your search by entering “ds18b20”. Multiple entries should appear.
Look for the library named “DallasTemperature” by Miles Burton. Choose the “Install” option to install the library.
Keep in mind that the DallasTemperature library relies on the One Wire Library to communicate with one-wire devices, including the DS18B20. Therefore, it is necessary to install the One Wire Library as well.
Methods for Reading Multiple DS18B20s
There are two ways to read multiple DS18B20 sensors connected to the same bus:
- By Index: In this method, we utilize an index assigned by the library to identify each sensor and retrieve its temperature reading.
- By Address: With this method, we read each sensor individually by leveraging the unique 64-bit address programmed into each sensor.
Let’s explore each method in detail.
Method 1: Reading DS18B20 By Index
In this method, the Dallas Temperature library scans the bus and assigns each sensor an index. We can use this index to identify and read the temperature of each sensor.
Here is an example sketch that demonstrates this method:
#include <OneWire.h>
#include <DallasTemperature.h>

// Data wire is plugged into digital pin 2 on the Arduino
#define ONE_WIRE_BUS 2

// Setup a oneWire instance to communicate with any OneWire device
OneWire oneWire(ONE_WIRE_BUS);

// Pass oneWire reference to DallasTemperature library
DallasTemperature sensors(&oneWire);

int deviceCount = 0;
float tempC;

void setup(void)
{
  sensors.begin();	// Start up the library
  Serial.begin(9600);

  // locate devices on the bus
  Serial.print("Locating devices...");
  Serial.print("Found ");
  deviceCount = sensors.getDeviceCount();
  Serial.print(deviceCount, DEC);
  Serial.println(" devices.");
  Serial.println("");
}

void loop(void)
{
  // Send command to all the sensors for temperature conversion
  sensors.requestTemperatures();

  // Display temperature from each sensor
  for (int i = 0;  i < deviceCount;  i++)
  {
    Serial.print("Sensor ");
    Serial.print(i+1);
    Serial.print(" : ");
    tempC = sensors.getTempCByIndex(i);
    Serial.print(tempC);
    Serial.print((char)176);//shows degrees character
    Serial.print("C  |  ");
    Serial.print(DallasTemperature::toFahrenheit(tempC));
    Serial.print((char)176);//shows degrees character
    Serial.println("F");
  }

  Serial.println("");
  delay(1000);
}
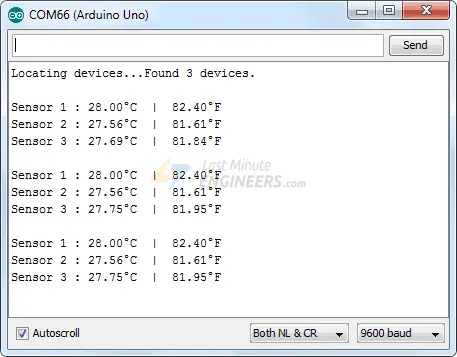
This sketch initializes the Dallas Temperature library, locates all the DS18B20 sensors on the bus, and displays the temperature readings for each sensor.
The result will be displayed in the serial monitor.
Code Explanation:
The sketch begins by including the necessary libraries and defining the pin to which the sensor bus is connected. An instance of the OneWire class is created to communicate with the OneWire devices, and a DallasTemperature object is initialized using the oneWire instance.
#include <OneWire.h>
#include <DallasTemperature.h>

// Data wire is plugged into digital pin 2 on the Arduino
#define ONE_WIRE_BUS 2

// Setup a oneWire instance to communicate with any OneWire device
OneWire oneWire(ONE_WIRE_BUS);

// Pass oneWire reference to DallasTemperature library
DallasTemperature sensors(&oneWire);

int deviceCount = 0;
float tempC;
In the setup section, the begin() function is called to start the DallasTemperature library. Then, the getDeviceCount() function is used to determine the number of DS18B20 devices connected to the bus. The result is printed to the serial monitor.
void setup(void)
{
  sensors.begin();	// Start up the library
  Serial.begin(9600);

  // locate devices on the bus
  Serial.print("Locating devices...");
  Serial.print("Found ");
  deviceCount = sensors.getDeviceCount();
  Serial.print(deviceCount, DEC);
  Serial.println(" devices.");
  Serial.println("");
}
In the loop section, the requestTemperatures() function is called to initiate temperature conversion for all the sensors on the bus. Then, a for loop is used to iterate through the sensors. The temperature of each sensor is retrieved using the getTempCByIndex() function, and the temperature readings in Celsius and Fahrenheit are printed to the serial monitor.
void loop(void)
{
  // Send command to all the sensors for temperature conversion
  sensors.requestTemperatures();

  // Display temperature from each sensor
  for (int i = 0;  i < deviceCount;  i++)
  {
    Serial.print("Sensor ");
    Serial.print(i+1);
    Serial.print(" : ");
    tempC = sensors.getTempCByIndex(i);
    Serial.print(tempC);
    Serial.print((char)176);//shows degrees character
    Serial.print("C  |  ");
    Serial.print(DallasTemperature::toFahrenheit(tempC));
    Serial.print((char)176);//shows degrees character
    Serial.println("F");
  }

  Serial.println("");
  delay(1000);
}
Method 2: Reading DS18B20 By Address
To read each DS18B20 sensor individually, we can use the unique 64-bit address programmed into each sensor. In this method, we will first find and record the address of each sensor, and then use those addresses to read the temperature from each sensor.
Finding the Addresses of DS18B20s on a Bus
The following sketch detects all DS18B20 sensors on the bus and prints their one-wire addresses on the serial monitor. It is recommended to connect only one sensor at a time to find and assign each sensor’s address.
#include <OneWire.h>
#include <DallasTemperature.h>

// Data wire is plugged into port 2 on the Arduino
#define ONE_WIRE_BUS 2

// Setup a oneWire instance to communicate with any OneWire devices
OneWire oneWire(ONE_WIRE_BUS);

// Pass our oneWire reference to Dallas Temperature.
DallasTemperature sensors(&oneWire);

// variable to hold device addresses
DeviceAddress Thermometer;

int deviceCount = 0;

void setup(void)
{
  // start serial port
  Serial.begin(9600);

  // Start up the library
  sensors.begin();

  // locate devices on the bus
  Serial.println("Locating devices...");
  Serial.print("Found ");
  deviceCount = sensors.getDeviceCount();
  Serial.print(deviceCount, DEC);
  Serial.println(" devices.");
  Serial.println("");

  Serial.println("Printing addresses...");
  for (int i = 0;  i < deviceCount;  i++)
  {
    Serial.print("Sensor ");
    Serial.print(i+1);
    Serial.print(" : ");
    sensors.getAddress(Thermometer, i);
    printAddress(Thermometer);
  }
}

void loop(void)
{}

void printAddress(DeviceAddress deviceAddress)
{
  for (uint8_t i = 0; i < 8; i++)
  {
    Serial.print("0x");
    if (deviceAddress[i] < 0x10) Serial.print("0");
    Serial.print(deviceAddress[i], HEX);
    if (i < 7) Serial.print(", ");
  }
  Serial.println("");
}
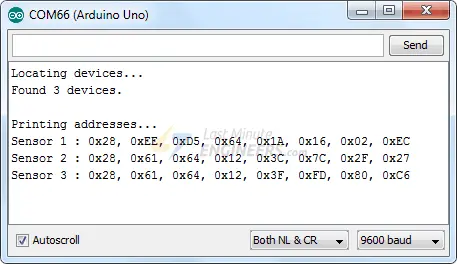
Make a note of all the addresses because we’ll need them in the next sketch.
Reading DS18B20s By Address
The following sketch reads the temperature from each DS18B20 sensor using their addresses. Before uploading the sketch, replace the addresses of the DS18B20 sensors with the ones found in the previous sketch.
#include <OneWire.h>
#include <DallasTemperature.h>

// Data wire is plugged into port 2 on the Arduino
#define ONE_WIRE_BUS 2

// Setup a oneWire instance to communicate with any OneWire devices
OneWire oneWire(ONE_WIRE_BUS);

// Pass our oneWire reference to Dallas Temperature.
DallasTemperature sensors(&oneWire);

// Addresses of 3 DS18B20s
uint8_t sensor1[8] = { 0x28, 0xEE, 0xD5, 0x64, 0x1A, 0x16, 0x02, 0xEC };
uint8_t sensor2[8] = { 0x28, 0x61, 0x64, 0x12, 0x3C, 0x7C, 0x2F, 0x27 };
uint8_t sensor3[8] = { 0x28, 0x61, 0x64, 0x12, 0x3F, 0xFD, 0x80, 0xC6 };

void setup(void)
{
  Serial.begin(9600);
  sensors.begin();
}

void loop(void)
{
  sensors.requestTemperatures();

  Serial.print("Sensor 1: ");
  printTemperature(sensor1);

  Serial.print("Sensor 2: ");
  printTemperature(sensor2);

  Serial.print("Sensor 3: ");
  printTemperature(sensor3);

  Serial.println();
  delay(1000);
}

void printTemperature(DeviceAddress deviceAddress)
{
  float tempC = sensors.getTempC(deviceAddress);
  Serial.print(tempC);
  Serial.print((char)176);
  Serial.print("C  |  ");
  Serial.print(DallasTemperature::toFahrenheit(tempC));
  Serial.print((char)176);
  Serial.println("F");
}
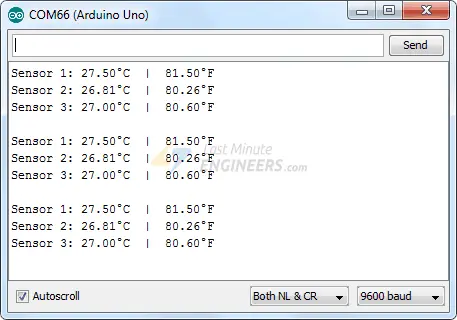
The output of the above sketch will look like this:
Code Explanation:
This sketch demonstrates reading temperature from multiple DS18B20 sensors connected to the same bus using their unique addresses. Let’s go through the code to understand how it works.
The sketch begins by including the necessary libraries: OneWire and DallasTemperature.
#include <OneWire.h>
#include <DallasTemperature.h>
Next, the data wire is defined by specifying the Arduino pin to which the sensor bus is connected.
#define ONE_WIRE_BUS 2
An instance of the OneWire class is created to communicate with any OneWire devices using the specified data wire.
OneWire oneWire(ONE_WIRE_BUS);
The DallasTemperature library object is created, passing the oneWire reference to it.
DallasTemperature sensors(&oneWire);
Now, we define the addresses of the DS18B20 sensors as arrays of 8 bytes each. These addresses were obtained from the previous sketch that detected and printed the addresses of the sensors.
uint8_t sensor1[8] = { 0x28, 0xEE, 0xD5, 0x64, 0x1A, 0x16, 0x02, 0xEC };
uint8_t sensor2[8] = { 0x28, 0x61, 0x64, 0x12, 0x3C, 0x7C, 0x2F, 0x27 };
uint8_t sensor3[8] = { 0x28, 0x61, 0x64, 0x12, 0x3F, 0xFD, 0x80, 0xC6 };
In the setup section, we begin serial communication and initialize the DallasTemperature library.
void setup(void) {
  Serial.begin(9600);
  sensors.begin();
}
The loop function is empty in this sketch because we only need to read the temperature once.
void loop(void) {}
The custom function printTemperature(DeviceAddress deviceAddress) is called for each sensor to read and print the temperature. The function first calls sensors.getTempC(deviceAddress) to get the temperature in Celsius and stores it in the tempC variable. It then prints the temperature in Celsius and Fahrenheit using the Serial.print() function.
void printTemperature(DeviceAddress deviceAddress)
{
  float tempC = sensors.getTempC(deviceAddress);
  Serial.print(tempC);
  Serial.print((char)176);
  Serial.print("C  |  ");
  Serial.print(DallasTemperature::toFahrenheit(tempC));
  Serial.print((char)176);
  Serial.println("F");
}
Finally, the loop function is left empty, and there is a delay of 1 second between each temperature reading.
void loop(void)
{
  sensors.requestTemperatures();

  Serial.print("Sensor 1: ");
  printTemperature(sensor1);

  Serial.print("Sensor 2: ");
  printTemperature(sensor2);

  Serial.print("Sensor 3: ");
  printTemperature(sensor3);

  Serial.println();
  delay(1000);
}
The output of the sketch will display the temperature readings in Celsius and Fahrenheit for each sensor, as shown in the example.
Related article
- Arduino DHT11 Sensor Tutorial: How to Interface and Read Data
- Arduino DHT11 and DHT22 Sensor Interface: Step-by-Step Guide
- Arduino BMP180 Guide: Barometric Pressure and Temperature
- Using TMP36 Temperature Sensor: Arduino Interfacing Guide
- Step-by-Step Guide: LM35 Temperature Sensor Interfacing with Arduino


