

Bluetooth Low Energy (BLE) has become ubiquitous in contemporary times. By activating a scanner on your mobile device and strolling through your surroundings, you’re bound to encounter numerous BLE devices, possibly numbering in the dozens or even hundreds.
For those intrigued and eager to delve into BLE technology, this tutorial serves as an exceptional entry point. It provides a concise introduction to BLE, covering aspects such as data organization within BLE, communication between two BLE devices, and practical guidance on utilizing BLE with the ESP32.
Parts Required
| Component Name | Buy Now |
| ESP32-WROOM-32 Development | Amazon |
Fundamentals of Bluetooth Low Energy
Bluetooth Low Energy (BLE), sometimes known as “Bluetooth Smart,” stands as a streamlined subset of the classic Bluetooth protocol, initially introduced within the Bluetooth 4.0 core specification.
Tailored for devices transmitting small data payloads infrequently, BLE operates efficiently on diminutive batteries. It utilizes the 2.4GHz ISM (industrial, scientific, and medical) band, identical to classic Bluetooth, requiring no licensing. Within this band, BLE operates across 40 channels, employing frequency hopping to circumvent interference.
BLE conserves energy by employing lower transmission power (ranging from 0.01 to 10 mW) in contrast to classic Bluetooth (with class 1 devices reaching up to 100 mW and class 3 devices at 1 mW). Despite utilizing Gaussian Frequency Shift Keying for data transmission, BLE offers a lower data transfer rate, capped at 1 Mb/s, unlike the 24 Mb/s maximum of classic Bluetooth. BLE devices swiftly transition between standby and active modes, further enhancing power efficiency.
In essence, BLE aims to provide comparable functionalities to Bluetooth Classic but prioritizes low power consumption. Consequently, it has emerged as the standard technology for a diverse array of applications, spanning smart lighting, home automation, beacons, fitness tracking, medical devices such as insulin pumps and hearing aids, and other energy-conscious applications.
Bluetooth Profiles
Bluetooth profiles extend the basic Bluetooth standard by introducing additional protocols that specify the type of data transmitted by a Bluetooth module. While Bluetooth specifications outline the inner workings of the technology, profiles delineate its practical applications.
The supported profiles of a Bluetooth device determine its intended use cases. For example, a hands-free Bluetooth headset utilizes the headset profile (HSP), while a wireless keyboard employs the human interface device (HID) profile. These profiles are developed either by the Bluetooth Special Interest Group (Bluetooth SIG) or by peripheral designers. The comprehensive list of officially adopted profiles can be accessed here.
Among the profiles worth noting are GAP and GATT, upon which all standard BLE profiles are based. Let’s delve into them further.
GAP (Generic Access Profile)
GAP governs connections and advertising in Bluetooth. It is responsible for making your device visible to the external environment and facilitating the discovery and establishment of connections between two devices.
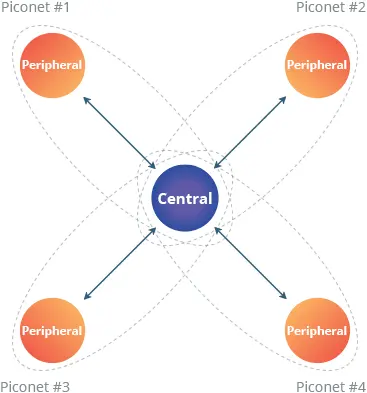
GAP delineates various roles for devices, with two primary concepts to bear in mind: Central devices and Peripheral devices.
Peripheral devices typically encompass small, low-power, resource-limited devices like heart rate monitors or proximity tags, capable of connecting to more potent central devices.
Central devices, on the other hand, generally feature greater processing power and memory, such as mobile phones or tablets, to which peripheral devices connect.
A peripheral device advertises its presence by transmitting advertising packets at predefined intervals, thereby informing nearby central devices of its availability. Once a connection is established between a peripheral and a central device, the advertising process ceases, and GATT comes into play, enabling bidirectional communication.
GATT (Generic ATTribute Profile)
GATT outlines the organization of data and the data-sharing procedures between two BLE devices. Unlike GAP, which focuses on low-level device interactions, GATT specifically addresses data transfer methods and formats.
Data is structured hierarchically into sections known as services, which group together logically related pieces of user data known as characteristics, illustrated below:
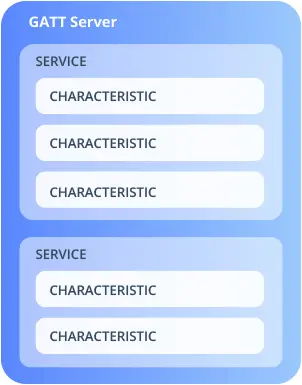
Services
A GATT service comprises a collection of logically related data called characteristics. Each service can contain one or more characteristics and possesses its own unique numeric identifier, or UUID, which can be either 16 bits (for officially adopted BLE Services) or 128 bits (for custom services). Further details on this will be discussed later.
For example, let’s take the Heart Rate Service. This officially adopted service has a 16-bit UUID of 0x180D and encompasses up to 3 characteristics: Heart Rate Measurement, Body Sensor Location, and Heart Rate Control Point. More information on Bluetooth SIG-defined services can be found here.
Characteristics
A GATT characteristic represents a set of information called Attributes, which are the actual data transferred between BLE devices. A typical characteristic comprises the following attributes:
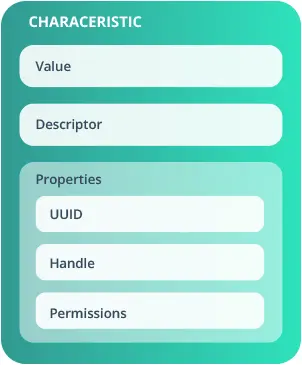
- Value: This represents the actual data stored within the characteristic, which can be of any data type, such as a number, string, or byte array.
- Descriptor: This furnishes additional information or configuration options for the characteristic.
Each characteristic is associated with the following properties:
- Handle: A 16-bit number utilized to access the characteristic on the server device.
- UUID: A 128-bit universally unique identifier indicating the nature of the characteristic.
- Permissions: This specifies which operations on the characteristic are allowed, such as read, write, or notify.
UUID (Universally Unique Identifier)
UUIDs serve the purpose of uniquely identifying services and characteristics, playing a crucial role in defining and accessing data on a BLE device. Within BLE, there exist two types of UUIDs:
- 16-bit UUID: This type is employed for official BLE profiles, services, and characteristics, standardized by the Bluetooth-SIG. For instance, the “Heart Rate Service” possesses a standardized 16-bit UUID of 0x180D, while the “Heart Rate Measurement” characteristic within this service utilizes a UUID of 0x2A37.
- 128-bit UUID: Reserved for custom (vendor-specific) services and characteristics, this type is utilized when a company develops its own service not covered by the official BLE services. A 128-bit UUID appears as follows: 4fafc201-1fb5-459e-8fcc-c5c9c331914b.
GATT Server and GATT Client
Within the framework of GATT, when two devices establish a connection, each takes on one of two roles.
- The GATT server refers to the device that houses the characteristic database.
- The GATT client is the device tasked with reading from or writing data to the GATT server.
The diagram below depicts this relationship in a typical BLE connection, where the peripheral device (an ESP32) acts as the GATT server, while the central device (a smartphone) functions as the GATT client.

It’s imperative to note that the GATT roles of client and server are distinct from the GAP roles of peripheral and central. A peripheral device can adopt the role of either a GATT client or a GATT server, or even both. Similarly, a central device can function as either a GATT client or a GATT server.
Using BLE on the ESP32
Now that you’ve familiarized yourself with the Bluetooth Low Energy (BLE) wireless communication protocol, including its features, profiles, and interaction with devices, it’s time to put it into practice.
The ESP32 comes with several example sketches in the ESP32 BLE library, which is automatically installed when you install the ESP32 core on the Arduino IDE.
To access these example sketches, navigate to File > Examples > ESP32 BLE Arduino.
You’ll find a variety of example sketches to choose from. Select any of them to load the sketch into your IDE. Let’s start with the BLE_server example.
This example sets up the ESP32 as a BLE server with a specific service and characteristic. It then broadcasts this service, making it discoverable and accessible by BLE clients, such as your smartphone.
#include <BLEDevice.h>
#include <BLEUtils.h>
#include <BLEServer.h>

// See the following for generating UUIDs:
// https://www.uuidgenerator.net/

#define SERVICE_UUID        "4fafc201-1fb5-459e-8fcc-c5c9c331914b"
#define CHARACTERISTIC_UUID "beb5483e-36e1-4688-b7f5-ea07361b26a8"

void setup() {
  Serial.begin(115200);
  Serial.println("Starting BLE work!");

  BLEDevice::init("MyESP32");  // set the device name
  BLEServer *pServer = BLEDevice::createServer();
  BLEService *pService = pServer->createService(SERVICE_UUID);
  BLECharacteristic *pCharacteristic = pService->createCharacteristic(
                                         CHARACTERISTIC_UUID,
                                         BLECharacteristic::PROPERTY_READ |
                                         BLECharacteristic::PROPERTY_WRITE
                                       );

  pCharacteristic->setValue("Hello World!");
  pService->start();
  // BLEAdvertising *pAdvertising = pServer->getAdvertising();  // this still is working for backward compatibility
  BLEAdvertising *pAdvertising = BLEDevice::getAdvertising();
  pAdvertising->addServiceUUID(SERVICE_UUID);
  pAdvertising->setScanResponse(true);
  pAdvertising->setMinPreferred(0x06);  // functions that help with iPhone connections issue
  pAdvertising->setMinPreferred(0x12);
  BLEDevice::startAdvertising();
  Serial.println("Characteristic defined! Now you can read it in your phone!");
}

void loop() {
  // put your main code here, to run repeatedly:
  delay(2000);
}
Code Explanation:
Let’s delve into the BLE_server code in detail. It begins by including the essential libraries for BLE operations on the ESP32.
#include <BLEDevice.h>
#include <BLEUtils.h>
#include <BLEServer.h>
Following that, UUIDs for the Service and the Characteristic are defined. UUIDs (Universally Unique Identifiers) serve to uniquely identify services and characteristics in BLE.
#define SERVICE_UUID "4fafc201-1fb5-459e-8fcc-c5c9c331914b"
#define CHARACTERISTIC_UUID "beb5483e-36e1-4688-b7f5-ea07361b26a8"
In the setup section, serial communication is initialized at a baud rate of 115200.
Serial.begin(115200);
Subsequently, a BLE device named MyESP32 is instantiated. You have the liberty to change the name as desired.
// Create the BLE Device
BLEDevice::init("MyESP32");
Following this, our BLE device is configured as a server.
BLEServer *pServer = BLEDevice::createServer();
Then, a new service for our server is created using the previously defined UUID.
BLEService *pService = pServer->createService(SERVICE_UUID);
Afterwards, a new characteristic for the service is created. The properties of the characteristic, in this instance READ and WRITE, are specified as arguments along with the CHARACTERISTIC_UUID.
BLECharacteristic *pCharacteristic = pService->createCharacteristic(
                                     CHARACTERISTIC_UUID,
                                     BLECharacteristic::PROPERTY_READ |
                                     BLECharacteristic::PROPERTY_WRITE
                                     );
Once the characteristic is created, the setValue() method is employed to set its value. In this instance, the value is set to the text “Hello World!”. This text can be modified to suit your needs, whether it’s a sensor reading, button state, or any other data.
pCharacteristic->setValue("Hello World!");
Following this, the service is started to enable it to respond to incoming requests.
pService->start();
Finally, advertising parameters are configured, and the service is advertised. Advertising renders the ESP32 discoverable by other BLE devices.
BLEAdvertising *pAdvertising = BLEDevice::getAdvertising();
pAdvertising->addServiceUUID(SERVICE_UUID);
pAdvertising->setScanResponse(true);
pAdvertising->setMinPreferred(0x06);
pAdvertising->setMinPreferred(0x12);
BLEDevice::startAdvertising();
This serves as a basic example of setting up a BLE server, so no operations are executed within the loop(). However, depending on the application, you can incorporate actions for when a new client connects (refer to the BLE_notify example for guidance).
void loop() {
  delay(2000);
}
Using nRF Connect for Testing
To assess the BLE connection, you’ll need to pair the ESP32 with your smartphone and have a Bluetooth debugging application installed. Among the various options available, one of our preferred choices is Nordic’s nRF Connect, accessible for both iOS and Android devices. It’s a robust tool enabling you to scan, explore, and communicate with your BLE devices.
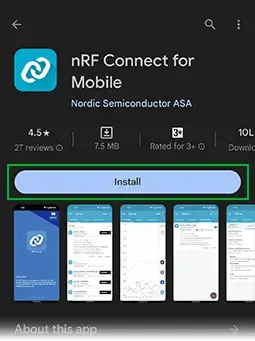
Navigate to the Google Play Store or the Apple App Store and search for “nRF Connect for Mobile”. Install the app and launch it.
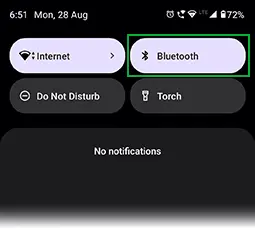
Ensure that your phone’s Bluetooth functionality is activated.
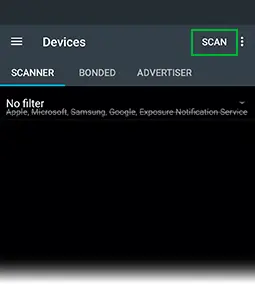
Within the app, tap on the “SCAN” button. The app will commence scanning for nearby BLE devices.
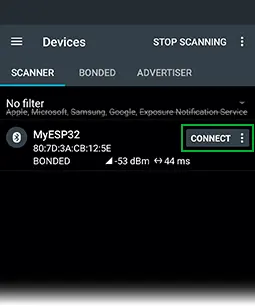
A list of available devices, along with their signal strengths and other details, will populate. Locate “MyESP32” and click the “Connect” button adjacent to it.
You’ll be redirected to the “Services” view, where a roster of accessible services will be displayed. Click on “Unknown Service”—ensuring that the UUID string aligns with SERVICE_UUID in your sample code.
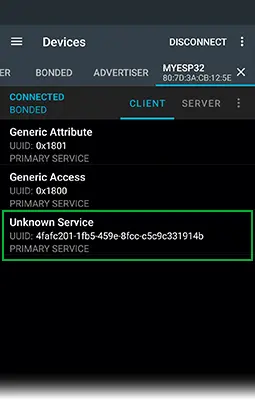
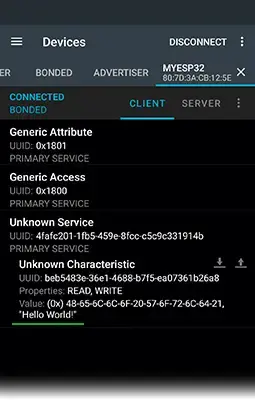
Select a service to view its associated characteristics. Adjacent to each characteristic, two icons will be present. The downward arrow facilitates reading a characteristic, while the upward arrow permits writing to it.
Tap on the downward arrow to read the characteristic. You’ll observe the characteristic’s UUID, READ and WRITE properties, along with the value “Hello World!”, precisely as stipulated in our code.
Related article
- Learn DC Motor Control with ESP32 and L298N Driver
- Step-by-Step Guide: ESP32 Servo Motor Control via Web Server
- Distance Measurement with ESP32: HC-SR04 Ultrasonic Sensor Guide
- ESP32 Essentials: Exploring the Power of Bluetooth Classic
- ESP32 Fundamentals: Delving Into Hall Effect Sensor Technology


