
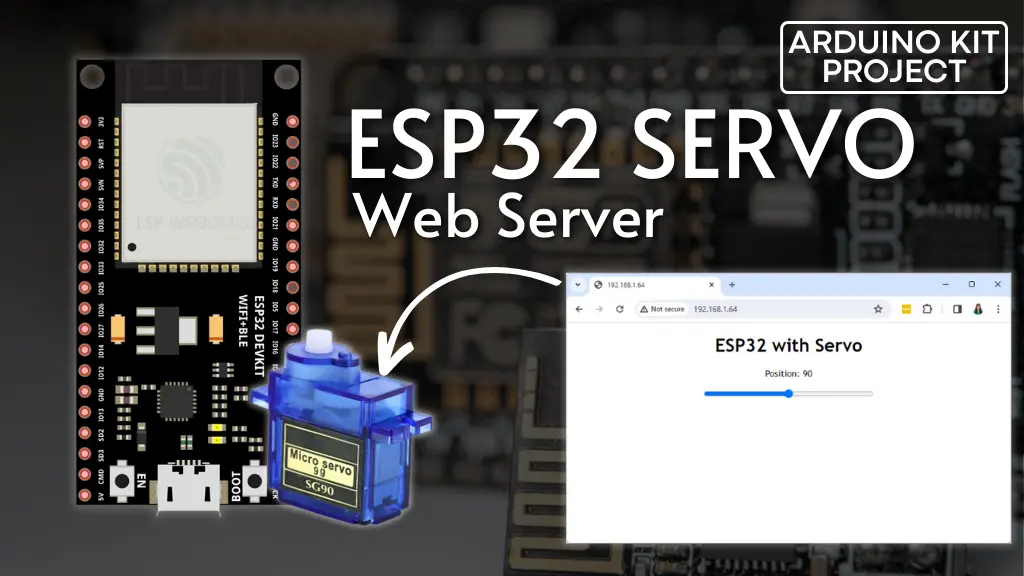
In this instructional guide, you will discover the process of constructing a web server using the ESP32 to regulate the position of a servo motor via a slider. Initially, we’ll provide a brief overview of controlling a servo with the ESP32, followed by the steps to create the web server.
Connecting the Servo Motor to the ESP32
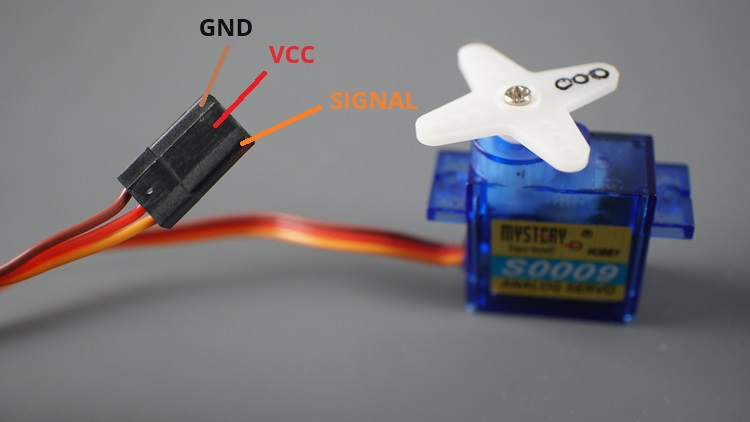
Servo motors typically come with three wires: power, ground, and signal. The power wire is commonly red, while the ground (GND) wire is usually black or brown, and the signal wire tends to be yellow, orange, or white.
| Wire | Color |
| Power | Red |
| GND | Black, or brown |
| Signal | Yellow, orange, or white |
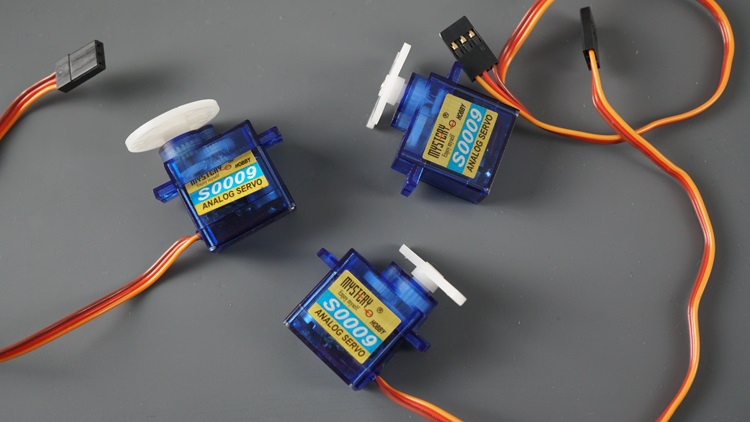
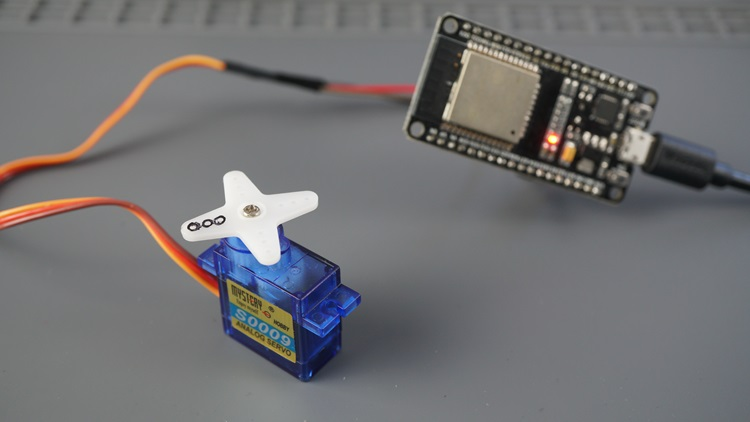
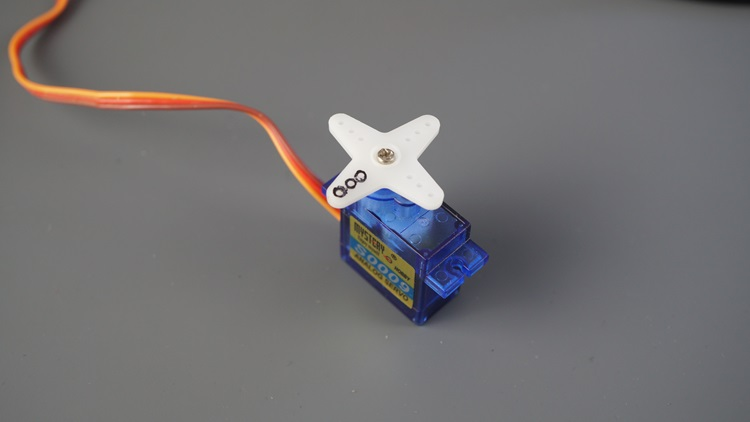
For a small servo such as the S0009 depicted in the figure below, you can directly supply power from the ESP32.
However, if you’re utilizing more than one servo or a different model, it’s likely that you’ll require an external power source to energize your servos.
If you’re employing a small servo like the S0009, the connections should be as follows:
- GND -> ESP32 GND pin;
- Power -> ESP32 VIN pin;
- Signal -> GPIO 13 (or any PWM pin).
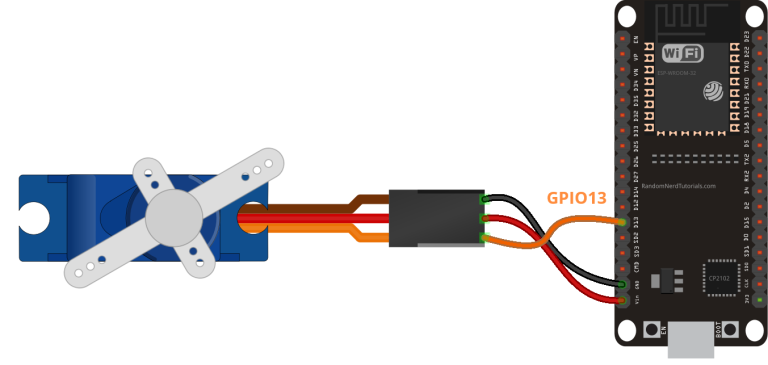
Schematic
In our demonstrations, we’ll connect the signal wire to GPIO 13. You can refer to the following schematic diagram to wire your servo motor accordingly.
Parts Required
How to Operate a Servo Motor?
You can adjust the position of the servo shaft within a range of 0 to 180 degrees. Servos are managed through pulse width modulation (PWM) signals. The duration of the PWM signal dispatched to the motor dictates the position of the shaft.

To regulate the motor, you can utilize the PWM capabilities of the ESP32 by sending a 50Hz signal with the appropriate pulse width. Alternatively, you can employ a library to streamline this process.
Testing an Example
Once you’ve installed the library, navigate to your Arduino IDE. Ensure that you’ve selected the ESP32 board, then proceed to File > Examples > ServoESP32 > Simple Servo. Subsequently, adjust the code to utilize GPIO 13.
static const int servoPin = 13;
#include <Servo.h>

static const int servoPin = 13;

Servo servo1;

void setup() {
  Serial.begin(115200);
  servo1.attach(servoPin);
}

void loop() {
  for(int posDegrees = 0; posDegrees <= 180; posDegrees++) {
    servo1.write(posDegrees);
    Serial.println(posDegrees);
    delay(20);
  }

  for(int posDegrees = 180; posDegrees >= 0; posDegrees--) {
    servo1.write(posDegrees);
    Serial.println(posDegrees);
    delay(20);
  }
}
Understanding the code
This code snippet rotates the servo 180 degrees to one side and then 180 degrees to the other side. Let’s delve into how it functions.
Firstly, you must include the Servo library:
#include <Servo.h>
Define the pin linked to the servo data pin. In this instance, we’re using GPIO 13, but you can opt for any other suitable pins.
static const int servoPin = 13;
Subsequently, you need to instantiate a Servo object, named servo1 in this case.
Servo servo1;
setup()
Within the setup(), you initialize a serial communication for debugging purposes and attach GPIO 13 to the servo object.
void setup() {
    Serial.begin(115200);
    servo1.attach(servoPin);
}
loop()
In the loop(), the motor’s shaft position shifts from 0 to 180 degrees, and then from 180 to 0 degrees. To adjust the shaft to a specific position, you simply utilize the write() method on the Servo object. You provide an integer argument representing the position in degrees.
myservo.write(pos);
Testing the Sketch
Upload the code to your ESP32 servo. Upon completion of the upload, you should observe the motor’s shaft rotating to one side and then to the other.

Creating the ESP32 Web Server
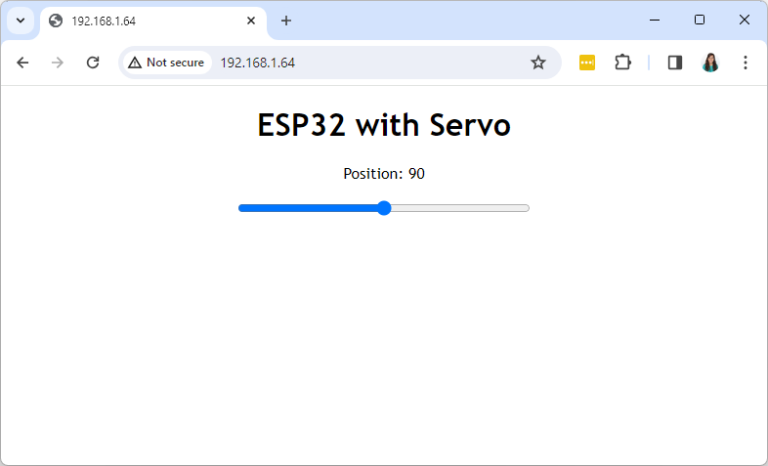
Now that you’ve learned how to control a servo with the ESP32, let’s proceed with creating the web server to manage it. The web server we’re going to construct will have the following features:
- It will feature a slider ranging from 0 to 180, allowing you to adjust and control the servo’s shaft position.
- The current value of the slider will be automatically updated on the web page without requiring a manual refresh. To achieve this, we’ll employ AJAX to send HTTP requests to the ESP32 in the background.
- Refreshing the web page won’t alter the slider value or the position of the shaft.
Creating the HTML Page
To begin, let’s examine the HTML code that the ESP32 needs to transmit to your web browser:
<!DOCTYPE html>
<html>
<head>
  <meta name="viewport" content="width=device-width, initial-scale=1">
  <link rel="icon" href="data:,">
  <style>
    body {
      text-align: center;
      font-family: "Trebuchet MS", Arial;
      margin-left:auto;
      margin-right:auto;
    }
    .slider {
      width: 300px;
    }
  </style>
  <script src="https://ajax.googleapis.com/ajax/libs/jquery/3.3.1/jquery.min.js"></script>
</head>
<body>
  <h1>ESP32 with Servo</h1>
  <p>Position: <span id="servoPos"></span></p>
  <input type="range" min="0" max="180" class="slider" id="servoSlider" onchange="servo(this.value)"/>
  <script>
    var slider = document.getElementById("servoSlider");
    var servoP = document.getElementById("servoPos");
    servoP.innerHTML = slider.value;
    slider.oninput = function() {
      slider.value = this.value;
      servoP.innerHTML = this.value;
    }
    $.ajaxSetup({timeout:1000});
    function servo(pos) {
      $.get("/?value=" + pos + "&");
      {Connection: close};
    }
  </script>
</body>
</html>
Creating a Slider
To implement a slider in the HTML page for this project, you utilize the <input> tag. The <input> tag defines an area where the user can input data.
There are various input types available. To specify a slider, you use the “type” attribute with the value “range”. Within the slider, you also need to set the minimum and maximum range using the “min” and “max” attributes.
<input type="range" min="0" max="180" class="slider" id="servoSlider" onchange="servo(this.value)"/>
Additionally, you need to define other attributes such as:
- the
classfor styling the slider - the
idto update the current position displayed on the web page - Finally, the
onchangeattribute calls theservofunction to send an HTTP request to the ESP32 whenever the slider moves.
Adding JavaScript to the HTML File
Next, you incorporate JavaScript code into your HTML file using the <script> and </script> tags. The following code snippet updates the web page with the current slider position:
var slider = document.getElementById("servoSlider");
    var servoP = document.getElementById("servoPos");
    servoP.innerHTML = slider.value;
    slider.oninput = function() {
      slider.value = this.value;
      servoP.innerHTML = this.value;
    }
The subsequent lines initiate an HTTP GET request to the ESP’s IP address, targeting the specific URL path /?value=[SLIDER_POSITION]&.
$.ajaxSetup({timeout:1000});
function servo(pos) {
  $.get("/?value=" + pos + "&");
}
For instance, when the slider is set to 0, an HTTP GET request is made to the following URL:
http://192.168.1.135/?value=0&
And when the slider is positioned at 180 degrees, the URL would resemble:
http://192.168.1.135/?value=180&
Upon receiving the GET request, the ESP32 can extract the value parameter from the URL and adjust the servo motor accordingly.
Code
Now, let’s incorporate the previous HTML text into the sketch and adjust the servo accordingly. The following code accomplishes this task:
#include <WiFi.h>
#include <Servo.h>
Servo myservo; // create servo object to control a servo
// twelve servo objects can be created on most boards
// GPIO the servo is attached to
static const int servoPin = 13;
// Replace with your network credentials
const char* ssid = "REPLACE_WITH_YOUR_SSID";
const char* password = "REPLACE_WITH_YOUR_PASSWORD";
// Set web server port number to 80
WiFiServer server(80);
// Variable to store the HTTP request
String header;
// Decode HTTP GET value
String valueString = String(5);
int pos1 = 0;
int pos2 = 0;
// Current time
unsigned long currentTime = millis();
// Previous time
unsigned long previousTime = 0;
// Define timeout time in milliseconds (example: 2000ms = 2s)
const long timeoutTime = 2000;
void setup() {
Serial.begin(115200);
myservo.attach(servoPin); // attaches the servo on the servoPin to the servo object
// Connect to Wi-Fi network with SSID and password
Serial.print("Connecting to ");
Serial.println(ssid);
WiFi.begin(ssid, password);
while (WiFi.status() != WL_CONNECTED) {
delay(500);
Serial.print(".");
}
// Print local IP address and start web server
Serial.println("");
Serial.println("WiFi connected.");
Serial.println("IP address: ");
Serial.println(WiFi.localIP());
server.begin();
}
void loop(){
WiFiClient client = server.available(); // Listen for incoming clients
if (client) { // If a new client connects,
currentTime = millis();
previousTime = currentTime;
Serial.println("New Client."); // print a message out in the serial port
String currentLine = ""; // make a String to hold incoming data from the client
while (client.connected() && currentTime - previousTime <= timeoutTime) { // loop while the client's connected
currentTime = millis();
if (client.available()) { // if there's bytes to read from the client,
char c = client.read(); // read a byte, then
Serial.write(c); // print it out the serial monitor
header += c;
if (c == '\n') { // if the byte is a newline character
// if the current line is blank, you got two newline characters in a row.
// that's the end of the client HTTP request, so send a response:
if (currentLine.length() == 0) {
// HTTP headers always start with a response code (e.g. HTTP/1.1 200 OK)
// and a content-type so the client knows what's coming, then a blank line:
client.println("HTTP/1.1 200 OK");
client.println("Content-type:text/html");
client.println("Connection: close");
client.println();
// Display the HTML web page
client.println("<!DOCTYPE html><html>");
client.println("<head><meta name=\"viewport\" content=\"width=device-width, initial-scale=1\">");
client.println("<link rel=\"icon\" href=\"data:,\">");
// CSS to style the on/off buttons
// Feel free to change the background-color and font-size attributes to fit your preferences
client.println("<style>body { text-align: center; font-family: \"Trebuchet MS\", Arial; margin-left:auto; margin-right:auto;}");
client.println(".slider { width: 300px; }</style>");
client.println("<script src=\"https://ajax.googleapis.com/ajax/libs/jquery/3.3.1/jquery.min.js\"></script>");
// Web Page
client.println("</head><body><h1>ESP32 with Servo</h1>");
client.println("<p>Position: <span id=\"servoPos\"></span></p>");
client.println("<input type=\"range\" min=\"0\" max=\"180\" class=\"slider\" id=\"servoSlider\" onchange=\"servo(this.value)\" value=\""+valueString+"\"/>");
client.println("<script>var slider = document.getElementById(\"servoSlider\");");
client.println("var servoP = document.getElementById(\"servoPos\"); servoP.innerHTML = slider.value;");
client.println("slider.oninput = function() { slider.value = this.value; servoP.innerHTML = this.value; }");
client.println("$.ajaxSetup({timeout:1000}); function servo(pos) { ");
client.println("$.get(\"/?value=\" + pos + \"&\"); {Connection: close};}</script>");
client.println("</body></html>");
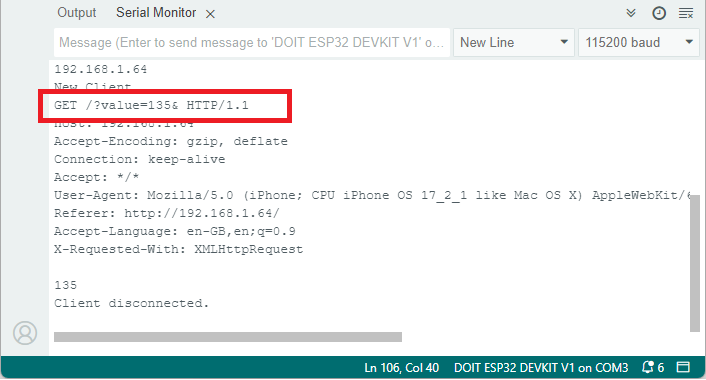
//GET /?value=180& HTTP/1.1
if(header.indexOf("GET /?value=")>=0) {
pos1 = header.indexOf('=');
pos2 = header.indexOf('&');
valueString = header.substring(pos1+1, pos2);
//Rotate the servo
myservo.write(valueString.toInt());
Serial.println(valueString);
}
// The HTTP response ends with another blank line
client.println();
// Break out of the while loop
break;
} else { // if you got a newline, then clear currentLine
currentLine = "";
}
} else if (c != '\r') { // if you got anything else but a carriage return character,
currentLine += c; // add it to the end of the currentLine
}
}
}
// Clear the header variable
header = "";
// Close the connection
client.stop();
Serial.println("Client disconnected.");
Serial.println("");
}
}
Copy the provided code into your Arduino IDE, but refrain from uploading it just yet. First, let’s briefly examine how it operates.
How the Code Works
First, we include the Servo library and create a Servo object named myservo.
#include <Servo.h>
Servo myservo; // create servo object to control a servo
We also define a variable to store the GPIO number the servo is connected to, which in this case is GPIO 13.
const int servoPin = 13;
Ensure to update the following two lines with your network credentials.
const char* ssid     = "REPLACE_WITH_YOUR_SSID";
const char* password = "REPLACE_WITH_YOUR_PASSWORD";
Next, we create variables to extract the slider position from the HTTP request.
// Decode HTTP GET value
String valueString = String(5);
int pos1 = 0;
int pos2 = 0;
setup()
In the setup(), the servo is attached to the designated GPIO using myservo.attach().
myservo.attach(servoPin); // attaches the servo on the servoPin to the servo object
loop()
The first part of the loop() initializes the web server and transmits the HTML text to display the web page, utilizing the same method as in this web server project.
The subsequent portion of the code retrieves the slider value from the HTTP request.
//GET /?value=180& HTTP/1.1
if(header.indexOf("GET /?value=")>=0) {
  pos1 = header.indexOf('=');
  pos2 = header.indexOf('&');
  valueString = header.substring(pos1+1, pos2);
When you adjust the slider, you generate an HTTP request with the slider position between the = and & signs in the URL.
http://your-esp-ip-address/?value=[SLIDER_POSITION]&
The slider position value is stored in the valueString variable.
Then, we set the servo to that specific position using myservo.write() with the valueString variable as an argument. Since valueString is a string, we utilize the toInt() method to convert it into an integer number – the data type accepted by the write() method.
myservo.write(valueString.toInt());
Testing the Web Server
You can now upload the code to your ESP32 – ensure you have selected the correct board and COM port. Also, remember to adjust the code to include your network credentials.
After uploading the code, open the Serial Monitor with a baud rate of 115200. Press the ESP32 EN/RST button to restart the board, and note the ESP32 IP address displayed on the Serial Monitor.
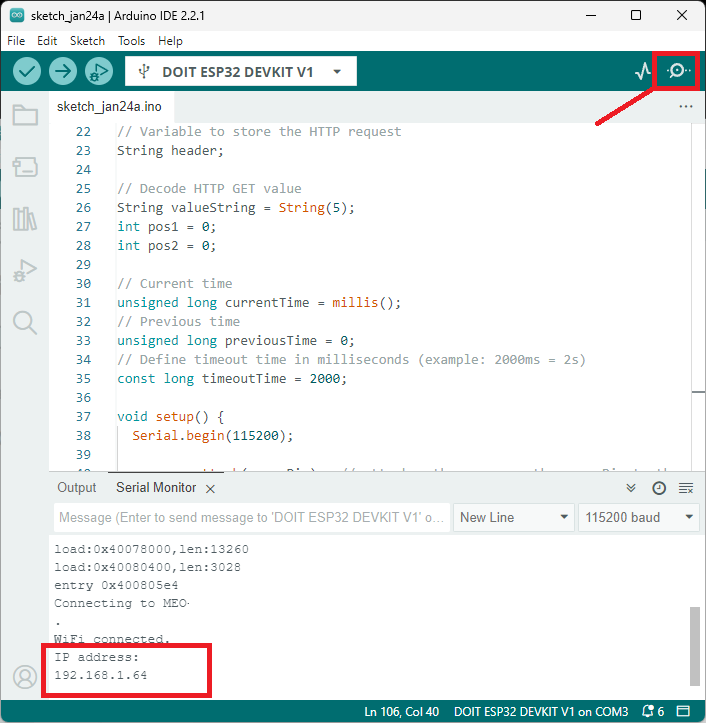
Open your browser, paste the ESP IP address, and you should see the previously created web page. Adjust the slider to control the servo motor.
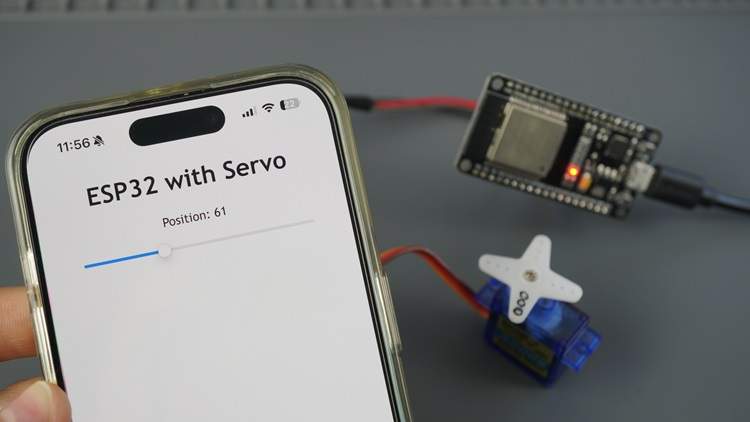
In the Serial Monitor, you can observe the HTTP requests sent to the ESP32 when you adjust the slider.
Spend some time experimenting with your web server to ensure it is functioning correctly.
Wrapping Up
To summarize, in this tutorial, you’ve acquired knowledge on controlling a servo motor using the ESP32 and constructing a web server equipped with a slider for managing its position.
This serves as an illustration of servo motor control. Beyond employing a slider, alternative options include utilizing a text input field, multiple buttons with preset angles, or any other applicable input mechanisms.
Furthermore, we offer tutorials detailing the integration of other motors with the ESP32:
- Distance Measurement with ESP32: HC-SR04 Ultrasonic Sensor Guide
- ESP32 Essentials: Exploring the Power of Bluetooth Classic
- Mastering Light Sensing: ESP32 and BH1750 Integration Guide
- Effortless LED Control: ESP32 and WLED Setup Tips


