

This guide demonstrates how to connect and use an I2C LCD (Liquid Crystal Display) with the ESP32 using the Arduino IDE. We’ll cover wiring the display, installing the necessary library, and running sample code to display text on the LCD, including static text and scrolling messages. This tutorial is also compatible with the ESP8266.
Parts Required
| Component Name | Buy Now |
| ESP32-WROOM-32 Development | Amazon |
| I2C 1602 LCD Display Module 16X2 Character | Amazon |
16×2 I2C Liquid Crystal Display
In this tutorial, we’ll use a 16×2 I2C LCD display, though displays of other sizes should work similarly.
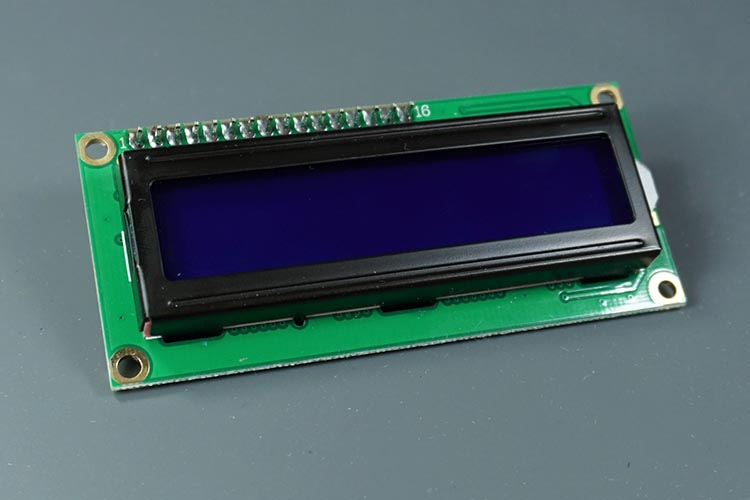
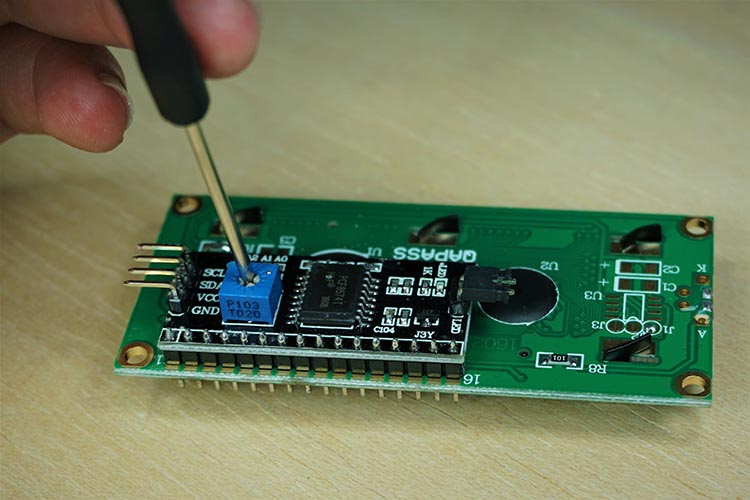
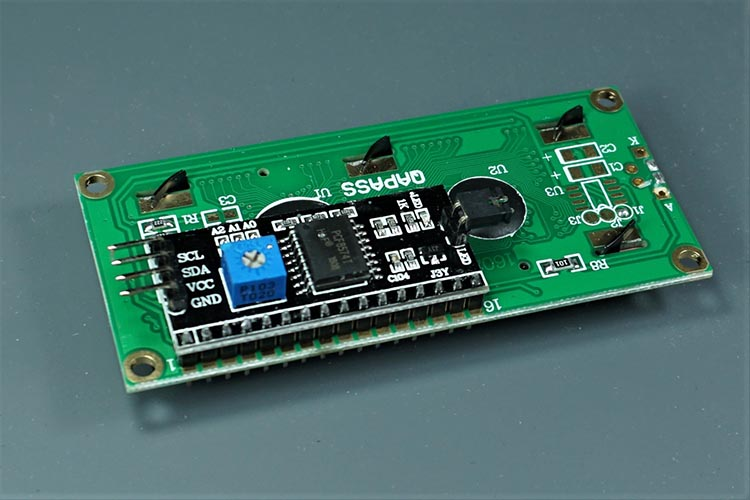
The main benefit of an I2C LCD is the simplified wiring, requiring only connections to the SDA and SCL pins.
Additionally, it includes a built-in potentiometer for adjusting the contrast between the background and the characters on the LCD, whereas a standard LCD requires an external potentiometer for contrast adjustment.
Wiring the LCD to the ESP32
The I2C communication used by this display simplifies the wiring process.
Connect your LCD to the ESP32 according to the following schematic diagram. We’ll use the default I2C pins on the ESP32 (GPIO 21 and GPIO 22).
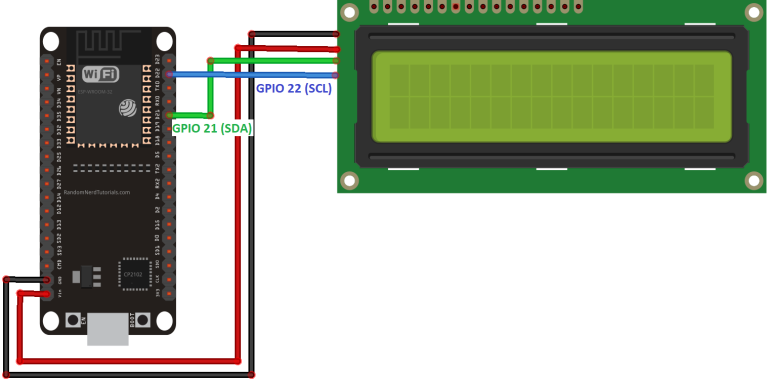
Refer to the table below for further guidance.
| I2C LCD | ESP32 |
| GND | GND |
| VCC | VIN |
| SDA | GPIO 21 |
| SCL | GPIO 22 |
Wiring the LCD to the ESP8266
To connect your LCD to the ESP8266, use the following schematic diagram. The default I2C pins for the ESP8266 are GPIO 4 and GPIO 5.
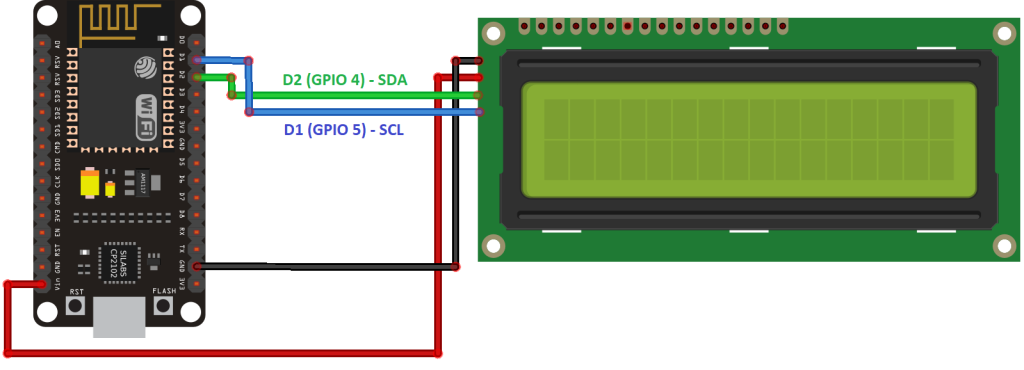
Refer to the table below for additional guidance.
| I2C LCD | ESP8266 |
| GND | GND |
| VCC | VIN |
| SDA | GPIO 4 (D2) |
| SCL | GPIO 5 (D1) |
Installing the LiquidCrystal_I2C Library
There are several libraries available for the I2C LCD, and for this tutorial, we’ll use the library by Marco Schwartz. Follow these steps to install it:
- Download the LiquidCrystal_I2C library.
- You should have a .zip file in your Downloads folder.
- Unzip the .zip file to get the LiquidCrystal_I2C-master folder.
- Rename the folder from LiquidCrystal_I2C-master to LiquidCrystal_I2C.
- Move the LiquidCrystal_I2C folder to the libraries folder in your Arduino IDE installation.
- Re-open your Arduino IDE.
Getting the LCD Address
To display text on the LCD, you need to determine the LCD’s I2C address. With the LCD connected to the ESP32, upload the I2C Scanner sketch below.
#include <Wire.h>

void setup() {
  Wire.begin();
  Serial.begin(115200);
  Serial.println("\nI2C Scanner");
}

void loop() {
  byte error, address;
  int nDevices;
  Serial.println("Scanning...");
  nDevices = 0;
  for(address = 1; address < 127; address++ ) {
    Wire.beginTransmission(address);
    error = Wire.endTransmission();
    if (error == 0) {
      Serial.print("I2C device found at address 0x");
      if (address<16) {
        Serial.print("0");
      }
      Serial.println(address,HEX);
      nDevices++;
    }
    else if (error==4) {
      Serial.print("Unknow error at address 0x");
      if (address<16) {
        Serial.print("0");
      }
      Serial.println(address,HEX);
    }
  }
  if (nDevices == 0) {
    Serial.println("No I2C devices found\n");
  }
  else {
    Serial.println("done\n");
  }
  delay(5000);
}
After uploading, open the Serial Monitor at a baud rate of 115200 and press the ESP32 EN button. The Serial Monitor will display the I2C address.
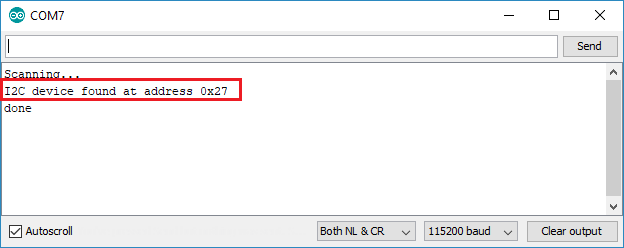
For a similar 16×2 display, the address is likely to be 0x27.
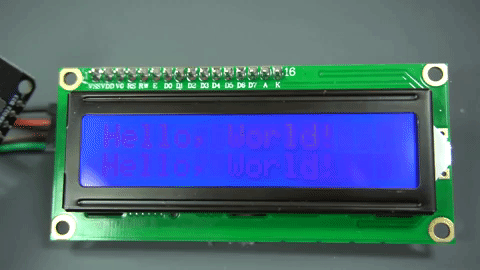
Displaying Static Text on the LCD
Showing static text on the LCD is straightforward. You simply choose the position for your characters on the screen and send the message to the display.
Here’s a basic example sketch that displays “Hello, World!”.
#include <LiquidCrystal_I2C.h>

// set the LCD number of columns and rows
int lcdColumns = 16;
int lcdRows = 2;

// set LCD address, number of columns and rows
// if you don't know your display address, run an I2C scanner sketch
LiquidCrystal_I2C lcd(0x27, lcdColumns, lcdRows);

void setup(){
  // initialize LCD
  lcd.init();
  // turn on LCD backlight
  lcd.backlight();
}

void loop(){
  // set cursor to first column, first row
  lcd.setCursor(0, 0);
  // print message
  lcd.print("Hello, World!");
  delay(1000);
  // clears the display to print new message
  lcd.clear();
  // set cursor to first column, second row
  lcd.setCursor(0,1);
  lcd.print("Hello, World!");
  delay(1000);
  lcd.clear();
}
The message is shown on the first row, followed by the second row.
In this simple sketch, we demonstrate the most useful functions from the LiquidCrystal_I2C library. Let’s quickly review how the code works.
Code Explanation:
First, include the LiquidCrystal_I2C library:
#include <LiquidCrystal_I2C.h>
Next, define the number of columns and rows for your LCD display. If you have a different sized display, adjust these variables accordingly:
int lcdColumns = 16;
int lcdRows = 2;
Then, set the display address, number of columns, and number of rows. Use the address you found in the previous step:
LiquidCrystal_I2C lcd(0x27, lcdColumns, lcdRows);
In the setup(), initialize the display with the init() method:
lcd.init();
Turn on the LCD backlight to make the characters visible:
lcd.backlight();
To display a message, set the cursor to the desired position. The following line places the cursor at the first column, first row:
lcd.setCursor(0, 0);
Note: 0 corresponds to the first column, 1 to the second column, etc.
Then, print your message using the print() method:
lcd.print("Hello, World!");
Wait one second, then clear the display with the clear() method:
lcd.clear();
Set the cursor to a new position, first column, second row:
lcd.setCursor(0,1);
Repeat the process as needed.
Summary of Functions
lcd.init(): Initializes the display.lcd.backlight(): Turns on the LCD backlight.lcd.setCursor(int column, int row): Sets the cursor to the specified column and row.lcd.print(String message): Displays the message on the screen.
This example is suitable for displaying static text no longer than 16 characters.
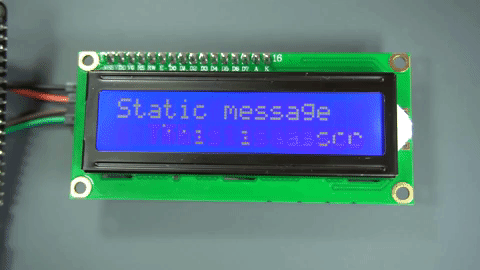
Displaying Scrolling Text on the LCD
Scrolling text on the LCD is particularly useful for displaying messages longer than 16 characters. While the LiquidCrystal_I2C library includes functions for scrolling text, they often cause issues because:
- The function scrolls text on both rows, preventing a fixed row and a scrolling row combination.
- It doesn’t handle messages longer than 16 characters properly.
To address these issues, we’ve created a sample sketch with a custom function to scroll longer messages.
The following sketch shows a static message in the first row and a scrolling message longer than 16 characters in the second row.
#include <LiquidCrystal_I2C.h>

// set the LCD number of columns and rows
int lcdColumns = 16;
int lcdRows = 2;

// set LCD address, number of columns and rows
// if you don't know your display address, run an I2C scanner sketch
LiquidCrystal_I2C lcd(0x27, lcdColumns, lcdRows);

String messageStatic = "Static message";
String messageToScroll = "This is a scrolling message with more than 16 characters";

// Function to scroll text
// The function acepts the following arguments:
// row: row number where the text will be displayed
// message: message to scroll
// delayTime: delay between each character shifting
// lcdColumns: number of columns of your LCD
void scrollText(int row, String message, int delayTime, int lcdColumns) {
  for (int i=0; i < lcdColumns; i++) {
    message = " " + message;
  }
  message = message + " ";
  for (int pos = 0; pos < message.length(); pos++) {
    lcd.setCursor(0, row);
    lcd.print(message.substring(pos, pos + lcdColumns));
    delay(delayTime);
  }
}

void setup(){
  // initialize LCD
  lcd.init();
  // turn on LCD backlight
  lcd.backlight();
}

void loop(){
  // set cursor to first column, first row
  lcd.setCursor(0, 0);
  // print static message
  lcd.print(messageStatic);
  // print scrolling message
  scrollText(1, messageToScroll, 250, lcdColumns);
}
After reading the previous sections, you should understand how this sketch works. Let’s focus on the new function: scrollText().
void scrollText(int row, String message, int delayTime, int lcdColumns) {
  for (int i=0; i < lcdColumns; i++) {
    message = " " + message;
  }
  message = message + " ";
  for (int pos = 0; pos < message.length(); pos++) {
    lcd.setCursor(0, row);
    lcd.print(message.substring(pos, pos + lcdColumns));
    delay(delayTime);
  }
}
To use this function, pass four arguments:
- row: the row number where the text will be displayed.
- message: the message to scroll.
- delayTime: the delay between each character shift. A higher delay time results in slower text movement, while a lower delay time speeds it up.
- lcdColumns: the number of columns on your LCD.
In our code, we use the scrollText() function as follows:
scrollText(1, messageToScroll, 250, lcdColumns);
Here, messageToScroll is displayed in the second row (1 corresponds to the second row), with a delay time of 250 ms.
Displaying Custom Characters
A 16×2 LCD has 32 blocks for displaying characters, each consisting of a 5×8 grid of tiny pixels. You can create custom characters by defining the state of each pixel. To do this, create a byte array to hold the pixel states.
You can use an online tool to generate the byte array for your custom character. For example, to create a heart:

First, copy the byte array to your code (before the setup()). Name it heart:
byte heart[8] = {
  0b00000,
  0b01010,
  0b11111,
  0b11111,
  0b11111,
  0b01110,
  0b00100,
  0b00000
};
In the setup(), create the custom character using the createChar() function. This function takes two arguments: a location to store the character and the byte array:
lcd.createChar(0, heart);
In the loop(), set the cursor to the desired position for the character:
lcd.setCursor(0, 0);
Use the write() method to display the character by passing the location where the character is stored:
lcd.write(0);
Wrapping Up
In summary, this tutorial covered using an I2C LCD display with the ESP32/ESP8266 and the Arduino IDE. We explained how to display static text, scrolling text, and custom characters. This guide is also applicable to Arduino boards, with adjustments to the I2C pin assignments.
Check out our other tutorials for more projects with the ESP32.
- Complete Tutorial: Setting Up I2C LCD Screen for ESP8266
- Exploring I2C: Essential Communication Protocol Basics
- Step-by-Step Guide: Arduino Integration with I2C LCD Screen


