

This guide demonstrates the process of creating an ESP32 web server that features a slider for adjusting LED brightness. Through this tutorial, you will acquire the ability to integrate a slider into your web server projects, retrieve its value, and store it in a variable that the ESP32 can utilize. The obtained value will then be employed to manipulate the duty cycle of a PWM signal, thereby altering the brightness of an LED. While LEDs are used here as an example, the same approach can be adapted to control other components like servo motors.
Furthermore, you can adapt the code presented in this tutorial to introduce sliders into your own projects, enabling you to establish threshold values or incorporate other variables that are essential for your specific coding requirements.
Project Overview
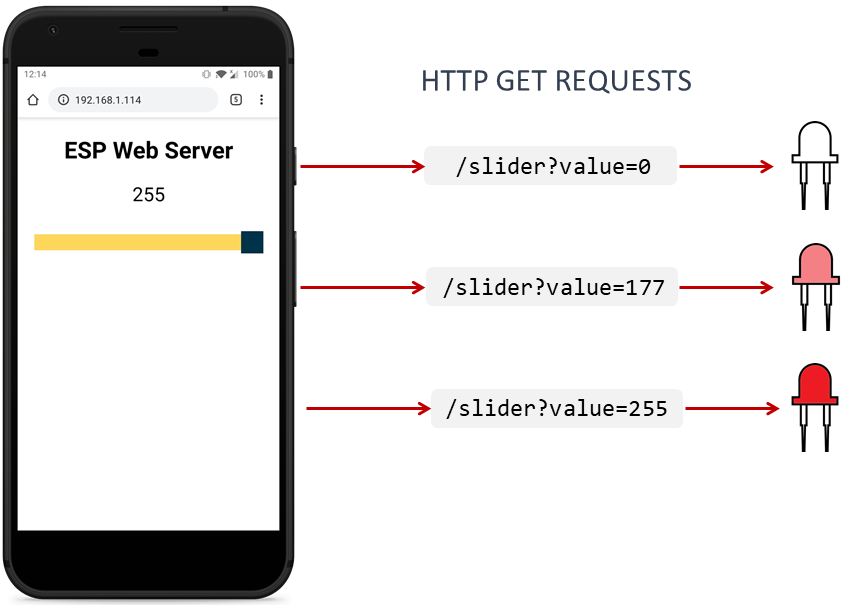
In this project, the ESP32 functions as a host for a web server that showcases a web page featuring an interactive slider element.
Manipulating the slider prompts the generation of an HTTP request directed towards the ESP32. This request conveys the updated value assigned to the slider.
The HTTP request follows a specific structure: GET/slider?value=SLIDERVALUE, where SLIDERVALUE represents a numerical input confined within the range of 0 to 255. It is possible to customize the slider range to accommodate alternative values.
Upon receiving the HTTP request, the ESP32 extracts the present value attributed to the slider.
Subsequently, the ESP32 adapts the duty cycle of the PWM signal in precise alignment with the value derived from the slider.
This functionality proves versatile and practical, particularly for scenarios such as adjusting the luminosity of an LED (as exemplified in this instance), managing a servo motor’s behavior, defining threshold values, or addressing a spectrum of other potential applications.
Parts Required
| Component Name | Buy Now |
| ESP32-WROOM-32 Development | Amazon |
Prerequisites
Before you proceed with this project, please ensure that you fulfill the following prerequisites.
Arduino IDE
We will be using the Arduino IDE to program the ESP32 boards. Therefore, before you begin this tutorial, confirm that you have the ESP32 board installed in your Arduino IDE.
Async Web Server Libraries
For constructing the esp32 async web server, we will utilize the following libraries:
These libraries are not available for direct installation through the Arduino Library Manager. Consequently, you must manually copy the library files to the Libraries folder within your Arduino Installation directory. Alternatively, within your Arduino IDE, you can navigate to Sketch > Include Library > Add .zip Library and select the recently downloaded libraries
Code
The provided code facilitates the control of ESP32’s built-in LED brightness using a slider on a web server. Essentially, this code enables you to adjust the PWM duty cycle through the slider. This feature can be employed to regulate LED brightness or even control devices like a servo motor.
Please copy the code into your Arduino IDE. Insert your network credentials, and the code will function as intended.
/*********
  Rui Santos
  Complete project details at https://RandomNerdTutorials.com/esp32-web-server-slider-pwm/

  Permission is hereby granted, free of charge, to any person obtaining a copy
  of this software and associated documentation files.

  The above copyright notice and this permission notice shall be included in all
  copies or substantial portions of the Software.
*********/

// Import required libraries
#include <WiFi.h>
#include <AsyncTCP.h>
#include <ESPAsyncWebServer.h>

// Replace with your network credentials
const char* ssid = "REPLACE_WITH_YOUR_SSID";
const char* password = "REPLACE_WITH_YOUR_PASSWORD";

const int output = 2;

String sliderValue = "0";

// setting PWM properties
const int freq = 5000;
const int ledChannel = 0;
const int resolution = 8;

const char* PARAM_INPUT = "value";

// Create AsyncWebServer object on port 80
AsyncWebServer server(80);

const char index_html[] PROGMEM = R"rawliteral(
<!DOCTYPE HTML><html>
<head>
  <meta name="viewport" content="width=device-width, initial-scale=1">
  <title>ESP Web Server</title>
  <style>
    html {font-family: Arial; display: inline-block; text-align: center;}
    h2 {font-size: 2.3rem;}
    p {font-size: 1.9rem;}
    body {max-width: 400px; margin:0px auto; padding-bottom: 25px;}
    .slider { -webkit-appearance: none; margin: 14px; width: 360px; height: 25px; background: #FFD65C;
      outline: none; -webkit-transition: .2s; transition: opacity .2s;}
    .slider::-webkit-slider-thumb {-webkit-appearance: none; appearance: none; width: 35px; height: 35px; background: #003249; cursor: pointer;}
    .slider::-moz-range-thumb { width: 35px; height: 35px; background: #003249; cursor: pointer; }
  </style>
</head>
<body>
  <h2>ESP Web Server</h2>
  <p><span id="textSliderValue">%SLIDERVALUE%</span></p>
  <p><input type="range" onchange="updateSliderPWM(this)" id="pwmSlider" min="0" max="255" value="%SLIDERVALUE%" step="1" class="slider"></p>
<script>
function updateSliderPWM(element) {
  var sliderValue = document.getElementById("pwmSlider").value;
  document.getElementById("textSliderValue").innerHTML = sliderValue;
  console.log(sliderValue);
  var xhr = new XMLHttpRequest();
  xhr.open("GET", "/slider?value="+sliderValue, true);
  xhr.send();
}
</script>
</body>
</html>
)rawliteral";

// Replaces placeholder with button section in your web page
String processor(const String& var){
  //Serial.println(var);
  if (var == "SLIDERVALUE"){
    return sliderValue;
  }
  return String();
}

void setup(){
  // Serial port for debugging purposes
  Serial.begin(115200);

  // configure LED PWM functionalitites
  ledcSetup(ledChannel, freq, resolution);

  // attach the channel to the GPIO to be controlled
  ledcAttachPin(output, ledChannel);

  ledcWrite(ledChannel, sliderValue.toInt());

  // Connect to Wi-Fi
  WiFi.begin(ssid, password);
  while (WiFi.status() != WL_CONNECTED) {
    delay(1000);
    Serial.println("Connecting to WiFi..");
  }

  // Print ESP Local IP Address
  Serial.println(WiFi.localIP());

  // Route for root / web page
  server.on("/", HTTP_GET, [](AsyncWebServerRequest *request){
    request->send_P(200, "text/html", index_html, processor);
  });

  // Send a GET request to <ESP_IP>/slider?value=<inputMessage>
  server.on("/slider", HTTP_GET, [] (AsyncWebServerRequest *request) {
    String inputMessage;
    // GET input1 value on <ESP_IP>/slider?value=<inputMessage>
    if (request->hasParam(PARAM_INPUT)) {
      inputMessage = request->getParam(PARAM_INPUT)->value();
      sliderValue = inputMessage;
      ledcWrite(ledChannel, sliderValue.toInt());
    }
    else {
      inputMessage = "No message sent";
    }
    Serial.println(inputMessage);
    request->send(200, "text/plain", "OK");
  });

  // Start server
  server.begin();
}

void loop() {

}
How the Code Functions:
Continue reading to understand the operation of the code or proceed to the next section.
Importing Libraries:
To begin, import the necessary libraries. The code requires the WiFi, ESPAsyncWebServer, and ESPAsyncTCP libraries to establish the esp32 web server.
#include <WiFi.h>
#include <AsyncTCP.h>
#include <ESPAsyncWebServer.h>
Setting Network Credentials:
Insert your network credentials into the provided variables. These credentials enable the ESP32 to connect to your local network.
const char* ssid = "REPLACE_WITH_YOUR_SSID";
const char* password = "REPLACE_WITH_YOUR_PASSWORD";
Variable Definitions:
The code manages the brightness of the ESP32’s built-in LED. The built-in LED corresponds to GPIO 2. Assign the desired GPIO to the “output” variable. The “sliderValue” variable starts with a value of zero.
const int output = 2;
String sliderValue = "0";
Setting PWM Properties:
Define the PWM properties necessary to control the LED brightness. The code employs an 8-bit resolution, allowing control of LED brightness through values ranging from 0 to 255.
const int freq = 5000;
const int ledChannel = 0;
const int resolution = 8;
Input Parameters:
The "PARAM_INPUT" variable is utilized to extract the slider value from the received request. The ESP32 expects an HTTP request of the format "GET/slider?value=SLIDERVALUE," where "SLIDERVALUE" is the slider’s value.
const char* PARAM_INPUT = "value";
Creating the Web Page:
Now, let’s delve into creating the esp32 web server page.
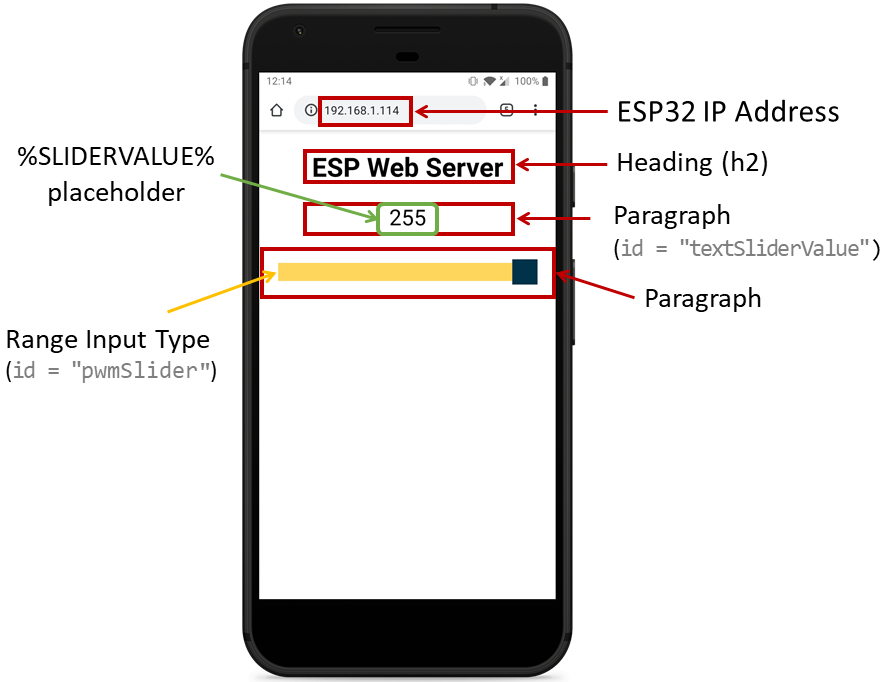
The web page itself is straightforward, comprising a heading, a paragraph, and a range input element. The HTML content, along with included styles, is stored in the “index_html” variable.
To create a responsive web page, the following “meta” tag is included:
<meta name="viewport" content="width=device-width, initial-scale=1">
The page’s title is enclosed within the <title> tags:
<title>ESP Web Server</title>
Styles:
CSS styles are defined within the <style> tags to format the web page’s appearance.
html {font-family: Arial; display: inline-block; text-align: center;}
h2 {font-size: 2.3rem;}
p {font-size: 1.9rem;}
body {max-width: 400px; margin:0px auto; padding-bottom: 25px;}
.slider { -webkit-appearance: none; margin: 14px; width: 360px; height: 25px; background: #FFD65C;
  outline: none; -webkit-transition: .2s; transition: opacity .2s;}
.slider::-webkit-slider-thumb {-webkit-appearance: none; appearance: none; width: 35px; height: 35px; background: #003249; cursor: pointer;}
.slider::-moz-range-thumb { width: 35px; height: 35px; background: #003249; cursor: pointer; }
The specified styles ensure that the HTML content is presented in a centered, block format, using Arial font. Additionally, the styling defines the appearance of the slider element.
HTML Body:
Within the <body> tags, the web page’s content is added.
<h2>ESP Web Server</h2>
<p><span id="textSliderValue">%SLIDERVALUE%</span></p>
<p><input type="range" onchange="updateSliderPWM(this)" id="pwmSlider" min="0" max="255" value="%SLIDERVALUE%" step="1" class="slider"></p>
This content comprises a heading, a paragraph displaying the current slider value, and a range input element. The %SLIDERVALUE% placeholder will be dynamically replaced by the actual slider value when the page is accessed.
JavaScript Addition:
JavaScript code is added within the <script> tags to create the updateSliderPWM() function. This function sends an HTTP request to the ESP32 containing the current slider value.
<script>
function updateSliderPWM(element) {
  var sliderValue = document.getElementById("pwmSlider").value;
  document.getElementById("textSliderValue").innerHTML = sliderValue;
  console.log(sliderValue);
  var xhr = new XMLHttpRequest();
  xhr.open("GET", "/slider?value="+sliderValue, true);
  xhr.send();
}
</script>
Upon slider movement, the function retrieves the slider value, updates the displayed label, and sends an HTTP request to the ESP32.
Processor Function:
A processor() function is created to replace placeholders in the HTML content with the current slider value when the page is initially accessed.
// Replaces placeholder with button section in your web page
String processor(const String& var){
  //Serial.println(var);
  if (var == "SLIDERVALUE"){
    return sliderValue;
  }
  return String();
}
When the page is requested, the function checks for placeholders. If the %SLIDERVALUE% placeholder is found, the function returns the value stored in the “sliderValue” variable.
Setup():
In the setup(), the Serial Monitor is initialized for debugging purposes.
Serial.begin(115200);
The LED PWM properties are configured as defined earlier.
ledcSetup(ledChannel, freq, resolution);
The channel is attached to the desired GPIO.
ledcAttachPin(output, ledChannel);
The PWM duty cycle is set to the value stored in “sliderValue” (initialized to 0).
ledcWrite(ledChannel, sliderValue.toInt());
The ESP32 connects to the local network and prints its IP address.
WiFi.begin(ssid, password);
while (WiFi.status() != WL_CONNECTED) {
  delay(1000);
  Serial.println("Connecting to WiFi..");
}
Serial.println(WiFi.localIP());
Handling Requests:
Lastly, the code manages the esp32 web server.
When a request is made to the root URL (“/”), the stored HTML text in the “index_html” variable is sent. The “processor” function replaces placeholders with appropriate values.
server.on("/", HTTP_GET, [](AsyncWebServerRequest *request){
  request->send_P(200, "text/html", index_html, processor);
});
A handler is set to manage the “/slider” URL. It retrieves the slider value from the request and adjusts the LED brightness accordingly.
server.on("/slider", HTTP_GET, [] (AsyncWebServerRequest *request) {
  String inputMessage;
  if (request->hasParam(PARAM_INPUT)) {
    inputMessage = request->getParam(PARAM_INPUT)->value();
    sliderValue = inputMessage;
    ledcWrite(ledChannel, sliderValue.toInt());
  }
  else {
    inputMessage = "No message sent";
  }
  Serial.println(inputMessage);
  request->send(200, "text/plain", "OK");
});
In the loop(), no action is required for an esp32 async web server.
void loop(){

}
This outlines the primary functioning of the code.
Upload the Code
Proceed to upload the code to your ESP32. Ensure that you have correctly selected the appropriate board and COM port.
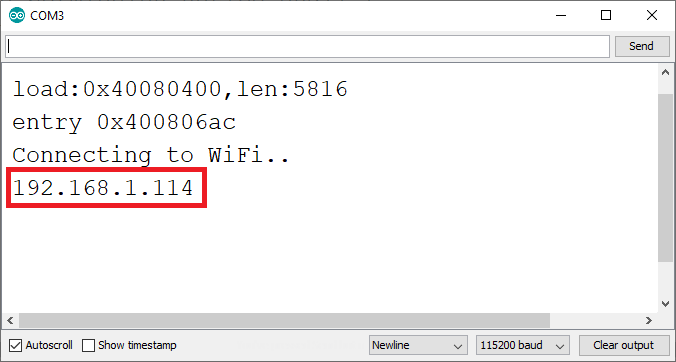
Upon successful uploading, launch the Serial Monitor with a baud rate of 115200. Press the reset button on the ESP32. The ESP32’s IP address should be displayed in the serial monitor.
Web Server Demo:
To begin, launch a web browser and input the IP address of your ESP32. This action should bring up the web server interface, featuring the slider along with its current value.
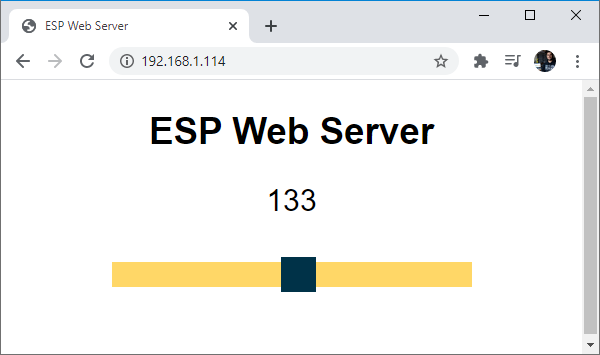
Experiment with moving the slider, and take note of the ESP32’s built-in LED brightness. As you manipulate the slider, you will observe the LED’s brightness changing in response, both ascending and descending according to the slider’s movement.
Conclusion:
Through this tutorial, you’ve gained the knowledge to incorporate a slider into your web server projects and capture its value, storing it in a variable for the ESP32’s utilization. In our illustration, we’ve harnessed a PWM signal to govern LED brightness. Alternatively, this slider mechanism could be employed to govern a servo motor or other devices.
Moreover, this slider functionality could serve to establish thresholds or other vital values, empowering the ESP32 to make decisions based on these parameters.
Related article
- Step-by-Step Guide: ESP32 Servo Motor Control via Web Server
- Effortless LED Control: ESP32 and WLED Setup Tips


