Learn how to use the ESP32 to publish BME680 sensor data (temperature, humidity, pressure, and gas air quality) via MQTT to any platform or client that supports MQTT. For this example, we will publish the sensor data to a Node-RED Dashboard, and the ESP32 will be programmed using the Arduino IDE.
Project Overview
The diagram below illustrates the overall structure of the project.
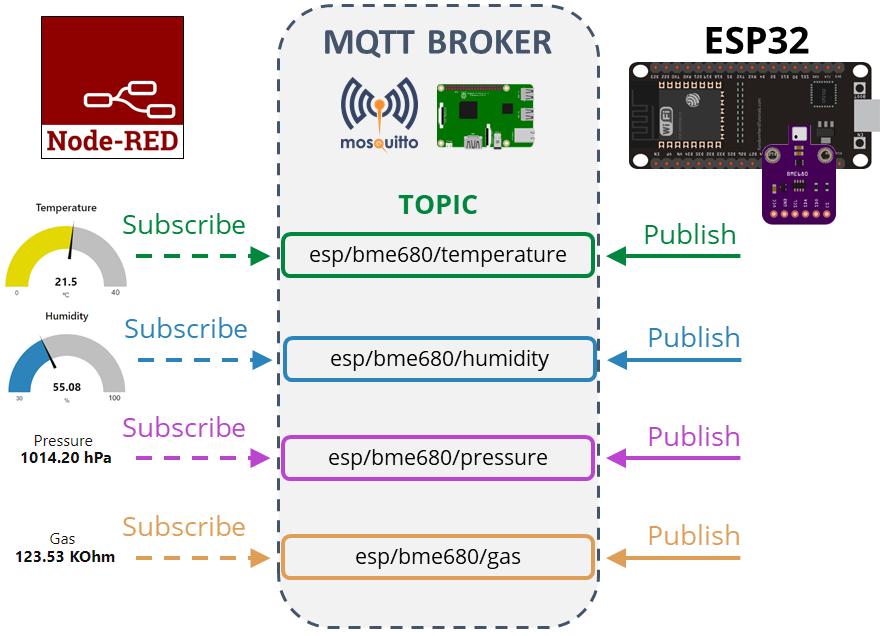
- The ESP32 obtains sensor data from the BME680 sensor.
- Temperature readings are published to the
esp/bme680/temperaturetopic.
- Humidity readings are published to the
esp/bme680/humiditytopic.
- Pressure readings are published to the
esp/bme680/pressuretopic.
- Gas readings are published to the
esp/bme680/gastopic.
- Node-RED subscribes to these topics.
- Node-RED receives the sensor data and displays it on gauges and text fields.
- You can also send the readings to any other platform that supports MQTT and process the data as desired.
Prerequisites
Before starting this tutorial, ensure you have the following prerequisites.
Arduino IDE
We will program the ESP32 using the Arduino IDE, so make sure the ESP32 add-on is installed.
MQTT Broker

To use MQTT, a broker is required. We will use the Mosquitto broker installed on a Raspberry Pi. Refer to the guide on How to Install Mosquitto Broker on Raspberry Pi.
You can also use other MQTT brokers, including cloud-based options. Instructions for this will be provided in the code later.
If you’re unfamiliar with MQTT, read our introductory tutorial: What is MQTT and How It Works.
MQTT Libraries
For MQTT with the ESP32, we will use the Async MQTT Client Library.
Installing the Async MQTT Client Library
- Download the Async MQTT client library. A
.zipfolder will be in your Downloads folder. - Unzip the folder to get
async-mqtt-client-master. - Rename the folder to
async_mqtt_client. - Move the
async_mqtt_clientfolder to your Arduino IDE’s libraries folder. - Restart your Arduino IDE.
Alternatively, go to Sketch > Include Library > Add .ZIP Library and select the downloaded library.
Installing the Async TCP Library
- Download the Async TCP client library. A
.zipfolder will be in your Downloads folder. - Unzip the folder to get
AsyncTCP-master. - Rename the folder to
AsyncTCP. - Move the
AsyncTCPfolder to your Arduino IDE’s libraries folder. - Restart your Arduino IDE.
Alternatively, go to Sketch > Include Library > Add .ZIP Library and select the downloaded library.
BME680 Sensor Libraries
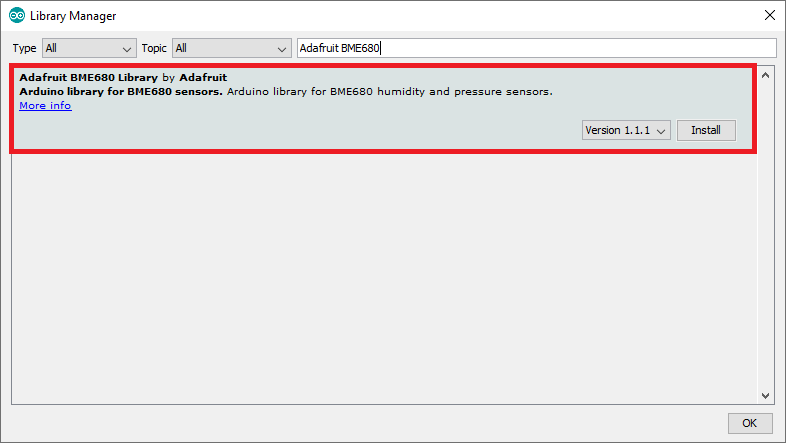
To read data from the BME680 sensor module, install the Adafruit_BME680 library and the Adafruit_Sensor library.
- Open your Arduino IDE and go to Sketch > Include Library > Manage Libraries. The Library Manager will open.
- Search for “adafruit bme680” and install the library.
- Search for “Adafruit Unified Sensor”, scroll down to find the library, and install it.
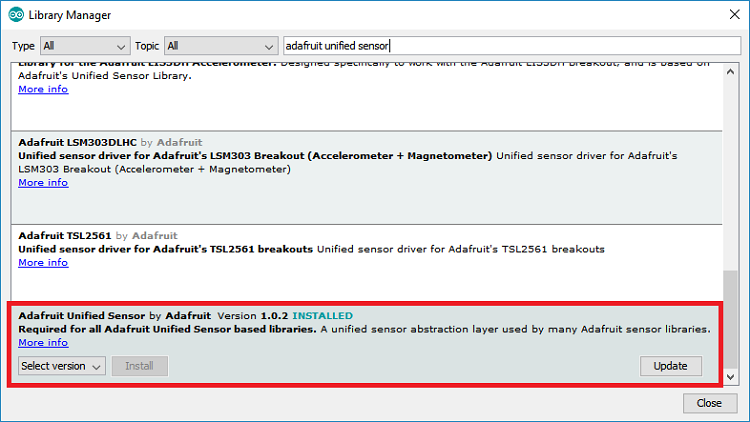
After installing the libraries, restart your Arduino IDE.
Parts Required
| Component Name | Buy Now |
| ESP32-WROOM-32 Development | Amazon |
| BME680 Digital Temperature Humidity Pressure Sensor | Amazon |
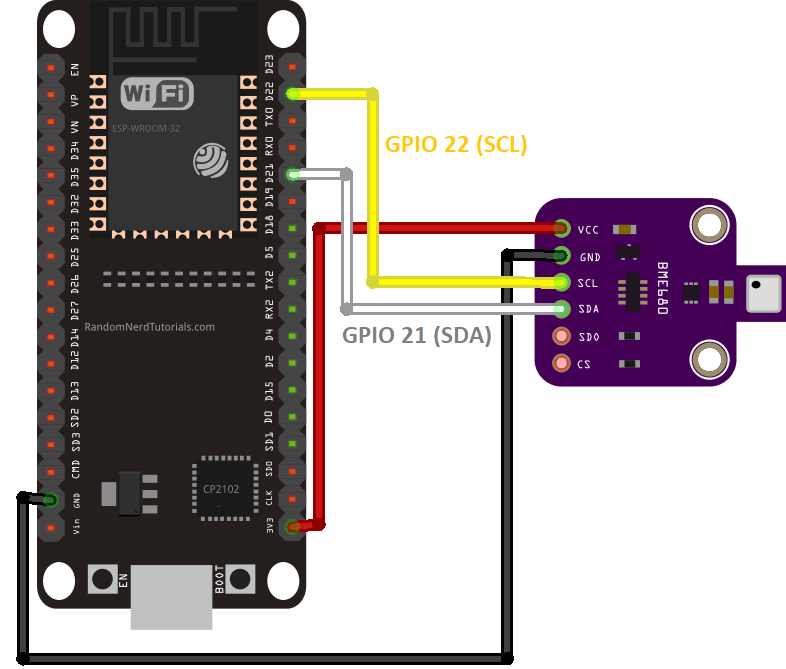
Schematic Diagram
Connect the BME680 sensor to the ESP32 according to the following schematic diagram: connect the SDA pin to GPIO 21 and the SCL pin to GPIO 22.
Code
Copy the code below into your Arduino IDE. Be sure to input your network credentials and MQTT broker details to ensure it functions correctly.
#include <WiFi.h>
extern "C" {
  #include "freertos/FreeRTOS.h"
  #include "freertos/timers.h"
}
#include <AsyncMqttClient.h>
#include <Wire.h>
#include <SPI.h>
#include <Adafruit_Sensor.h>
#include "Adafruit_BME680.h"

#define WIFI_SSID "REPLACE_WITH_YOUR_SSID"
#define WIFI_PASSWORD "REPLACE_WITH_YOUR_PASSWORD"

// Raspberry Pi Mosquitto MQTT Broker
#define MQTT_HOST IPAddress(192, 168, 1, XXX)
// For a cloud MQTT broker, type the domain name
//#define MQTT_HOST "example.com"
#define MQTT_PORT 1883

// Temperature MQTT Topics
#define MQTT_PUB_TEMP "esp/bme680/temperature"
#define MQTT_PUB_HUM  "esp/bme680/humidity"
#define MQTT_PUB_PRES "esp/bme680/pressure"
#define MQTT_PUB_GAS  "esp/bme680/gas"

/*#define BME_SCK 14
#define BME_MISO 12
#define BME_MOSI 13
#define BME_CS 15*/

Adafruit_BME680 bme; // I2C
//Adafruit_BME680 bme(BME_CS); // hardware SPI
//Adafruit_BME680 bme(BME_CS, BME_MOSI, BME_MISO, BME_SCK);

// Variables to hold sensor readings
float temperature;
float humidity;
float pressure;
float gasResistance;

AsyncMqttClient mqttClient;
TimerHandle_t mqttReconnectTimer;
TimerHandle_t wifiReconnectTimer;

unsigned long previousMillis = 0;   // Stores last time temperature was published
const long interval = 10000;        // Interval at which to publish sensor readings

void getBME680Readings(){
  // Tell BME680 to begin measurement.
  unsigned long endTime = bme.beginReading();
  if (endTime == 0) {
    Serial.println(F("Failed to begin reading :("));
    return;
  }
  if (!bme.endReading()) {
    Serial.println(F("Failed to complete reading :("));
    return;
  }
  temperature = bme.temperature;
  pressure = bme.pressure / 100.0;
  humidity = bme.humidity;
  gasResistance = bme.gas_resistance / 1000.0;
}

void connectToWifi() {
  Serial.println("Connecting to Wi-Fi...");
  WiFi.begin(WIFI_SSID, WIFI_PASSWORD);
}

void connectToMqtt() {
  Serial.println("Connecting to MQTT...");
  mqttClient.connect();
}

void WiFiEvent(WiFiEvent_t event) {
  Serial.printf("[WiFi-event] event: %d\n", event);
  switch(event) {
    case SYSTEM_EVENT_STA_GOT_IP:
      Serial.println("WiFi connected");
      Serial.println("IP address: ");
      Serial.println(WiFi.localIP());
      connectToMqtt();
      break;
    case SYSTEM_EVENT_STA_DISCONNECTED:
      Serial.println("WiFi lost connection");
      xTimerStop(mqttReconnectTimer, 0); // ensure we don't reconnect to MQTT while reconnecting to Wi-Fi
      xTimerStart(wifiReconnectTimer, 0);
      break;
  }
}

void onMqttConnect(bool sessionPresent) {
  Serial.println("Connected to MQTT.");
  Serial.print("Session present: ");
  Serial.println(sessionPresent);
}

void onMqttDisconnect(AsyncMqttClientDisconnectReason reason) {
  Serial.println("Disconnected from MQTT.");
  if (WiFi.isConnected()) {
    xTimerStart(mqttReconnectTimer, 0);
  }
}

/*void onMqttSubscribe(uint16_t packetId, uint8_t qos) {
  Serial.println("Subscribe acknowledged.");
  Serial.print("  packetId: ");
  Serial.println(packetId);
  Serial.print("  qos: ");
  Serial.println(qos);
}
void onMqttUnsubscribe(uint16_t packetId) {
  Serial.println("Unsubscribe acknowledged.");
  Serial.print("  packetId: ");
  Serial.println(packetId);
}*/

void onMqttPublish(uint16_t packetId) {
  Serial.print("Publish acknowledged.");
  Serial.print("  packetId: ");
  Serial.println(packetId);
}

void setup() {
  Serial.begin(115200);
  Serial.println();

  if (!bme.begin()) {
    Serial.println(F("Could not find a valid BME680 sensor, check wiring!"));
    while (1);
  }

  mqttReconnectTimer = xTimerCreate("mqttTimer", pdMS_TO_TICKS(2000), pdFALSE, (void*)0, reinterpret_cast<TimerCallbackFunction_t>(connectToMqtt));
  wifiReconnectTimer = xTimerCreate("wifiTimer", pdMS_TO_TICKS(2000), pdFALSE, (void*)0, reinterpret_cast<TimerCallbackFunction_t>(connectToWifi));

  WiFi.onEvent(WiFiEvent);

  mqttClient.onConnect(onMqttConnect);
  mqttClient.onDisconnect(onMqttDisconnect);
  //mqttClient.onSubscribe(onMqttSubscribe);
  //mqttClient.onUnsubscribe(onMqttUnsubscribe);
  mqttClient.onPublish(onMqttPublish);
  mqttClient.setServer(MQTT_HOST, MQTT_PORT);
  // If your broker requires authentication (username and password), set them below
  //mqttClient.setCredentials("REPlACE_WITH_YOUR_USER", "REPLACE_WITH_YOUR_PASSWORD");
  connectToWifi();

  // Set up oversampling and filter initialization
  bme.setTemperatureOversampling(BME680_OS_8X);
  bme.setHumidityOversampling(BME680_OS_2X);
  bme.setPressureOversampling(BME680_OS_4X);
  bme.setIIRFilterSize(BME680_FILTER_SIZE_3);
  bme.setGasHeater(320, 150); // 320*C for 150 ms
}

void loop() {
  unsigned long currentMillis = millis();
  // Every X number of seconds (interval = 10 seconds)
  // it publishes a new MQTT message
  if (currentMillis - previousMillis >= interval) {
    // Save the last time a new reading was published
    previousMillis = currentMillis;

    getBME680Readings();
    Serial.println();
    Serial.printf("Temperature = %.2f ºC \n", temperature);
    Serial.printf("Humidity = %.2f % \n", humidity);
    Serial.printf("Pressure = %.2f hPa \n", pressure);
    Serial.printf("Gas Resistance = %.2f KOhm \n", gasResistance);

    // Publish an MQTT message on topic esp/bme680/temperature
    uint16_t packetIdPub1 = mqttClient.publish(MQTT_PUB_TEMP, 1, true, String(temperature).c_str());
    Serial.printf("Publishing on topic %s at QoS 1, packetId: %i", MQTT_PUB_TEMP, packetIdPub1);
    Serial.printf("Message: %.2f \n", temperature);

    // Publish an MQTT message on topic esp/bme680/humidity
    uint16_t packetIdPub2 = mqttClient.publish(MQTT_PUB_HUM, 1, true, String(humidity).c_str());
    Serial.printf("Publishing on topic %s at QoS 1, packetId %i: ", MQTT_PUB_HUM, packetIdPub2);
    Serial.printf("Message: %.2f \n", humidity);

    // Publish an MQTT message on topic esp/bme680/pressure
    uint16_t packetIdPub3 = mqttClient.publish(MQTT_PUB_PRES, 1, true, String(pressure).c_str());
    Serial.printf("Publishing on topic %s at QoS 1, packetId %i: ", MQTT_PUB_PRES, packetIdPub3);
    Serial.printf("Message: %.2f \n", pressure);

    // Publish an MQTT message on topic esp/bme680/gas
    uint16_t packetIdPub4 = mqttClient.publish(MQTT_PUB_GAS, 1, true, String(gasResistance).c_str());
    Serial.printf("Publishing on topic %s at QoS 1, packetId %i: ", MQTT_PUB_GAS, packetIdPub4);
    Serial.printf("Message: %.2f \n", gasResistance);
  }
}
Code Explanation
The following section imports all the necessary libraries:
#include <WiFi.h>
extern "C" {
  #include "freertos/FreeRTOS.h"
  #include "freertos/timers.h"
}
#include <AsyncMqttClient.h>
#include <Wire.h>
#include <SPI.h>
#include <Adafruit_Sensor.h>
#include "Adafruit_BME680.h"
Next, include your network credentials:
#define WIFI_SSID "REPLACE_WITH_YOUR_SSID"
#define WIFI_PASSWORD "REPLACE_WITH_YOUR_PASSWORD"
Provide the IP address of your Raspberry Pi so the ESP32 can connect to your MQTT broker:
#define MQTT_HOST IPAddress(192, 168, 1, 106)
If you’re using a cloud-based MQTT broker, include the broker’s domain name instead:
#define MQTT_HOST "example.com"
Define the MQTT port.
#define MQTT_PORT 1883
Define the topics for publishing temperature, humidity, pressure, and gas readings:
#define MQTT_PUB_TEMP "esp/bme680/temperature"
#define MQTT_PUB_HUM  "esp/bme680/humidity"
#define MQTT_PUB_PRES "esp/bme680/pressure"
#define MQTT_PUB_GAS  "esp/bme680/gas"
Initialize an Adafruit_BME680 object named bme:
Adafruit_BME680 bme;
Declare variables to store the sensor readings:
float temperature;
float humidity;
float pressure;
float gasResistance;
Create an AsyncMqttClient object named mqttClient to manage the MQTT client, and define timers to reconnect to the MQTT broker and Wi-Fi if disconnected:
AsyncMqttClient mqttClient;
TimerHandle_t mqttReconnectTimer;
TimerHandle_t wifiReconnectTimer;
Set up auxiliary timer variables to publish the sensor readings every 10 seconds. Adjust the interval variable to change the delay time:
unsigned long previousMillis = 0;
const long interval = 10000;
MQTT Functions: Connecting to Wi-Fi, Connecting to MQTT, and Handling Wi-Fi Events
The functions in the following code segment come from the Async MQTT Client library. Their names clearly indicate their purposes.
Connecting to Wi-Fi
The connectToWifi() function connects the ESP32 to your router:
void connectToWifi() {
  Serial.println("Connecting to Wi-Fi...");
  WiFi.begin(WIFI_SSID, WIFI_PASSWORD);
}
Connecting to MQTT
The connectToMqtt() function connects the ESP32 to your MQTT broker:
void connectToMqtt() {
  Serial.println("Connecting to MQTT…");
  mqttClient.connect();
}
Handling Wi-Fi Events
The WiFiEvent() function manages Wi-Fi events. It prints the ESP32 IP address upon successful connection to the router and MQTT broker. If the connection is lost, it initiates a timer to attempt reconnection:
void WiFiEvent(WiFiEvent_t event) {
  Serial.printf("[WiFi-event] event: %d\n", event);
  switch(event) {
    case SYSTEM_EVENT_STA_GOT_IP:
      Serial.println("WiFi connected");
      Serial.println("IP address: ");
      Serial.println(WiFi.localIP());
      connectToMqtt();
      break;
    case SYSTEM_EVENT_STA_DISCONNECTED:
      Serial.println("WiFi lost connection");
      xTimerStop(mqttReconnectTimer, 0);
      xTimerStart(wifiReconnectTimer, 0);
      break;
  }
}
On MQTT Connect
The onMqttConnect() function runs after establishing a session with the MQTT broker:
void onMqttConnect(bool sessionPresent) {
  Serial.println("Connected to MQTT.");
  Serial.print("Session present: ");
  Serial.println(sessionPresent);
}
MQTT Functions: Disconnecting and Publishing
On MQTT Disconnect
If the ESP32 loses connection to the MQTT broker, the onMqttDisconnect function prints a message to the serial monitor and starts a timer to reconnect if Wi-Fi is still connected:
void onMqttDisconnect(AsyncMqttClientDisconnectReason reason) {
  Serial.println("Disconnected from MQTT.");
  if (WiFi.isConnected()) {
    xTimerStart(mqttReconnectTimer, 0);
  }
}
On MQTT Publish
When a message is published to an MQTT topic, the onMqttPublish() function is called, which prints the packet ID to the serial monitor:
void onMqttPublish(uint16_t packetId) {
  Serial.println("Publish acknowledged.");
  Serial.print("  packetId: ");
  Serial.println(packetId);
}
These functions are callback functions, meaning they are executed asynchronously.
setup()
First, let’s initialize the BME680 sensor in the setup() function:
if (!bme.begin()) {
  Serial.println(F("Could not find a valid BME680 sensor, check wiring!"));
  while (1);
}
Next, create timers to reconnect to the MQTT broker and Wi-Fi if the connection is lost:
mqttReconnectTimer = xTimerCreate("mqttTimer", pdMS_TO_TICKS(2000), pdFALSE, (void*)0, reinterpret_cast<TimerCallbackFunction_t>(connectToMqtt));
wifiReconnectTimer = xTimerCreate("wifiTimer", pdMS_TO_TICKS(2000), pdFALSE, (void*)0, reinterpret_cast<TimerCallbackFunction_t>(connectToWifi));
Set a callback function to handle Wi-Fi events, which will execute WiFiEvent() when the ESP32 connects to Wi-Fi:
WiFi.onEvent(WiFiEvent);
Assign callback functions for the MQTT client to handle various events automatically:
mqttClient.onConnect(onMqttConnect);
mqttClient.onDisconnect(onMqttDisconnect);
//mqttClient.onSubscribe(onMqttSubscribe);
//mqttClient.onUnsubscribe(onMqttUnsubscribe);
mqttClient.onPublish(onMqttPublish);
mqttClient.setServer(MQTT_HOST, MQTT_PORT);
Broker Authentication
If your MQTT broker requires authentication, uncomment the following line and enter your credentials:
mqttClient.setCredentials("REPlACE_WITH_YOUR_USER", "REPLACE_WITH_YOUR_PASSWORD");
Connect to Wi-Fi.
connectToWifi();
Configure the sensor’s parameters (oversampling, filter, and gas heater):
bme.setTemperatureOversampling(BME680_OS_8X);
bme.setHumidityOversampling(BME680_OS_2X);
bme.setPressureOversampling(BME680_OS_4X);
bme.setIIRFilterSize(BME680_FILTER_SIZE_3);
bme.setGasHeater(320, 150);
loop()
In the loop(), create a timer to obtain new readings from the BME680 sensor and publish them every 10 seconds:
unsigned long currentMillis = millis();
// Every X number of seconds (interval = 10 seconds)
// it publishes a new MQTT message
if (currentMillis - previousMillis >= interval) {
  // Save the last time a new reading was published
  previousMillis = currentMillis;

  getBME680Readings();
  Serial.println();
  Serial.printf("Temperature = %.2f ºC \n", temperature);
  Serial.printf("Humidity = %.2f % \n", humidity);
  Serial.printf("Pressure = %.2f hPa \n", pressure);
  Serial.printf("Gas Resistance = %.2f KOhm \n", gasResistance);
Publishing to topics
To publish the sensor readings to the corresponding MQTT topics, use the following lines:
uint16_t packetIdPub1 = mqttClient.publish(MQTT_PUB_TEMP, 1, true, String(temperature).c_str());
uint16_t packetIdPub2 = mqttClient.publish(MQTT_PUB_HUM, 1, true, String(humidity).c_str());
uint16_t packetIdPub3 = mqttClient.publish(MQTT_PUB_PRES, 1, true, String(pressure).c_str());
uint16_t packetIdPub4 = mqttClient.publish(MQTT_PUB_GAS, 1, true, String(gasResistance).c_str());
The publish() method on the mqttClient object is used to publish data to a topic. The method accepts the following arguments:
- MQTT topic (const char*)
- QoS (uint8_t): quality of service, which can be 0, 1, or 2
- Retain flag (bool)
- Payload (const char*), which in this case is the sensor reading
MQTT QoS Levels
The QoS (quality of service) ensures the delivery of messages at different levels:
- 0: The message is delivered at most once, without acknowledgment and no possibility of duplication.
- 1: The message is delivered at least once but might be delivered multiple times.
- 2: The message is delivered exactly once.
Uploading the Code
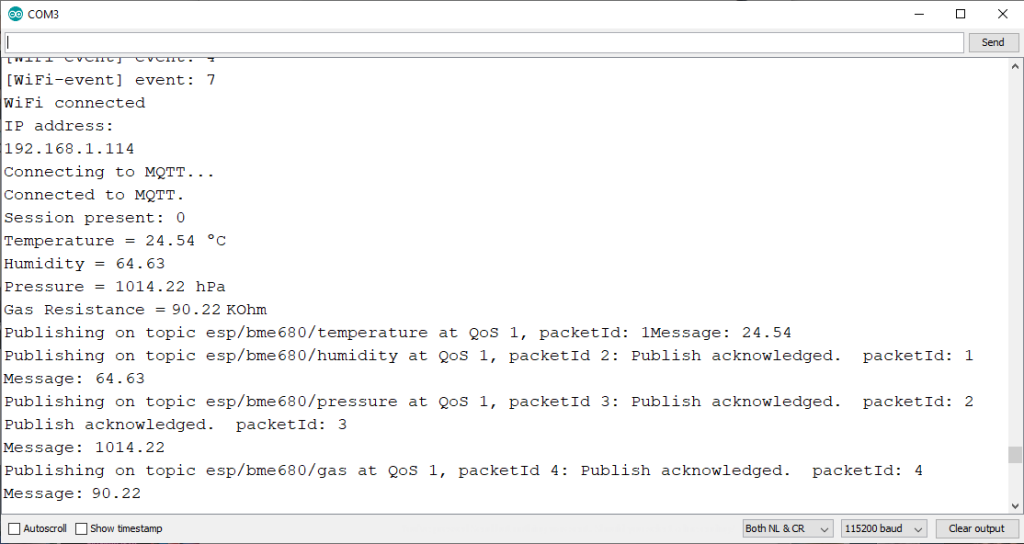
With your Raspberry Pi powered on and running the Mosquitto MQTT broker, upload the code to your ESP32. Open the Serial Monitor at a baud rate of 115200. You should see the ESP32 publishing messages to the predefined MQTT topics.
Preparing the Node-RED Dashboard
The ESP32 publishes sensor readings every 10 seconds to four MQTT topics. You can use any MQTT-compatible dashboard or device to subscribe to these topics and receive the readings.
As an example, we’ll create a simple flow using Node-RED to subscribe to these topics and display the readings on gauges.
Once Node-RED is running on your Raspberry Pi, open a browser and go to:
http://raspberry-pi-ip-address:1880
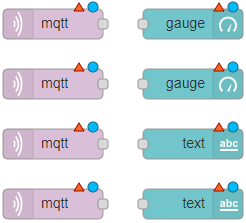
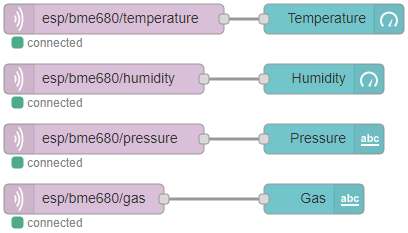
The Node-RED interface should open. Drag four MQTT in nodes, two gauge nodes, and two text field nodes into the flow.
Click on each MQTT node and configure its properties. Set the Server field to the MQTT broker address. For our setup, the MQTT broker is the Raspberry Pi, so the address is localhost:1883. If you are using a cloud MQTT broker, adjust this field accordingly.
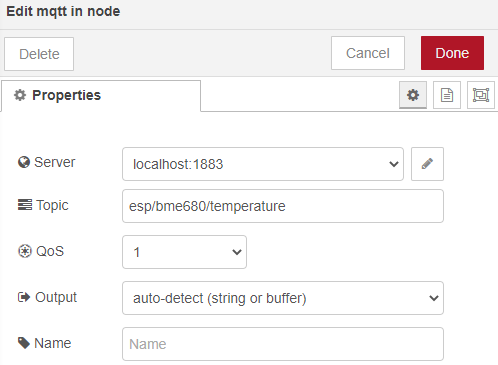
Enter the topic you want to subscribe to and the QoS level. For example, the first MQTT node subscribes to the esp/bme680/temperature topic.
Configure the other MQTT nodes similarly for the esp/bme680/humidity, esp/bme680/pressure, and esp/bme680/gas topics.
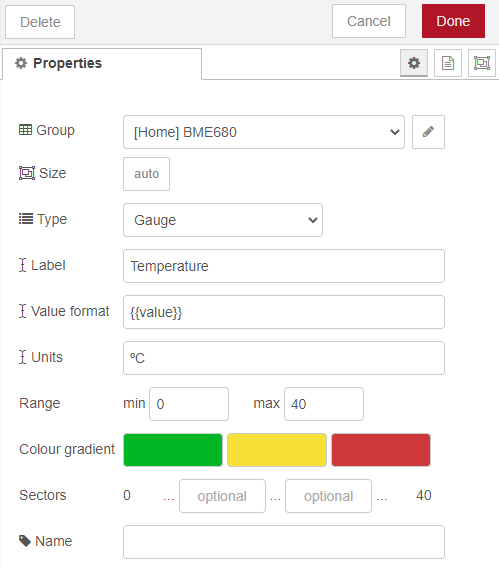
Next, configure the gauge nodes. Set up each gauge node for a specific sensor reading. For instance, one gauge node can be set for temperature readings. Repeat this for the humidity, pressure, and gas readings.
Connect your nodes as shown below.
Finally, deploy your flow by clicking the button in the upper right corner.

Alternatively, you can go to Menu > Import and paste the following code into your Clipboard to create the Node-RED flow.
[{"id":"3b7f947c.9759ec","type":"mqtt in","z":"254c9c97.f85b34","name":"","topic":"esp/bme680/temperature","qos":"1","datatype":"auto","broker":"8db3fac0.99dd48","x":470,"y":2640,"wires":[["b87b21c3.96672"]]},{"id":"b87b21c3.96672","type":"ui_gauge","z":"254c9c97.f85b34","name":"","group":"37de8fe8.46846","order":2,"width":0,"height":0,"gtype":"gage","title":"Temperature","label":"ºC","format":"{{value}}","min":0,"max":"40","colors":["#00b500","#f7df09","#ca3838"],"seg1":"","seg2":"","x":690,"y":2640,"wires":[]},{"id":"f92248f4.545778","type":"mqtt in","z":"254c9c97.f85b34","name":"","topic":"esp/bme680/humidity","qos":"1","datatype":"auto","broker":"8db3fac0.99dd48","x":460,"y":2700,"wires":[["4114a401.5ac69c"]]},{"id":"4114a401.5ac69c","type":"ui_gauge","z":"254c9c97.f85b34","name":"","group":"37de8fe8.46846","order":2,"width":0,"height":0,"gtype":"gage","title":"Humidity","label":"%","format":"{{value}}","min":"30","max":"100","colors":["#53a4e6","#1d78a9","#4e38c9"],"seg1":"","seg2":"","x":680,"y":2700,"wires":[]},{"id":"ad51f895.2c2848","type":"mqtt in","z":"254c9c97.f85b34","name":"","topic":"esp/bme680/pressure","qos":"1","datatype":"auto","broker":"8db3fac0.99dd48","x":460,"y":2760,"wires":[["3a95123b.66405e"]]},{"id":"c074e688.198b78","type":"mqtt in","z":"254c9c97.f85b34","name":"","topic":"esp/bme680/gas","qos":"1","datatype":"auto","broker":"8db3fac0.99dd48","x":440,"y":2820,"wires":[["d3539c06.00a17"]]},{"id":"3a95123b.66405e","type":"ui_text","z":"254c9c97.f85b34","group":"37de8fe8.46846","order":2,"width":0,"height":0,"name":"","label":"Pressure","format":"{{msg.payload}} hPa","layout":"row-spread","x":680,"y":2760,"wires":[]},{"id":"d3539c06.00a17","type":"ui_text","z":"254c9c97.f85b34","group":"37de8fe8.46846","order":3,"width":0,"height":0,"name":"","label":"Gas","format":"{{msg.payload}} KOhm","layout":"row-spread","x":670,"y":2820,"wires":[]},{"id":"8db3fac0.99dd48","type":"mqtt-broker","z":"","name":"","broker":"localhost","port":"1883","clientid":"","usetls":false,"compatmode":false,"keepalive":"60","cleansession":true,"birthTopic":"","birthQos":"0","birthPayload":"","closeTopic":"","closeQos":"0","closePayload":"","willTopic":"","willQos":"0","willPayload":""},{"id":"37de8fe8.46846","type":"ui_group","z":"","name":"BME680","tab":"53b8c8f9.cfbe48","order":1,"disp":true,"width":"6","collapse":false},{"id":"53b8c8f9.cfbe48","type":"ui_tab","z":"","name":"Home","icon":"dashboard","order":5,"disabled":false,"hidden":false}]
Demonstration
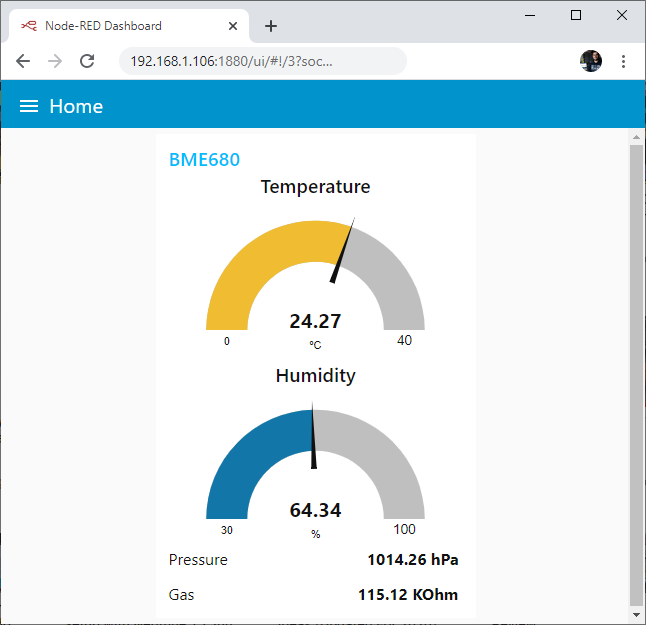
Access your Raspberry Pi’s IP address followed by :1880/ui:
http://raspberry-pi-ip-address:1880/ui
This will take you to the Node-RED Dashboard where you can view the current readings from the BME680 sensor. You can also use other dashboard nodes to display the readings in various formats.
Wrapping Up
MQTT is an excellent protocol for exchanging small data packets between devices. In this tutorial, you learned how to publish temperature, humidity, pressure, and gas resistance readings from a BME680 sensor using the ESP32 to different MQTT topics. Any device or home automation platform can subscribe to these topics to receive the readings.
You can also use other sensors, such as the DS18B20 temperature sensor, DHT22 temperature and humidity sensor, or BME280 temperature, humidity, and pressure sensor, to publish readings in a similar manner.


