

Stepper motor arduino are all around us, hidden in everyday devices such as window blinds, 3D printers, DVD players, security cameras, and CNC machines. Despite their ubiquity, many people are unaware of the presence of stepper motors in these devices.
Stepper motor arduino occupy a unique position between conventional DC motors and servo motors. They possess the ability to rotate continuously, similar to DC motors, while also offering precise positioning in discrete steps, akin to servo motors.
If you’re a beginner exploring the world of dc stepper motor, the 28BYJ-48 model is an excellent starting point. These motors typically come equipped with a driver board based on the ULN2003, making them incredibly user-friendly and straightforward to operate.
Stepper motors operate by utilizing a cogged wheel, also known as a rotor, in conjunction with electromagnets. These electromagnets work by attracting the teeth on the cogged wheel, causing the motor to rotate in fixed and precise angular increments known as steps.
The number of steps required for a complete 360-degree rotation corresponds to the number of teeth on the cogged wheel. This means that the number of steps determines the motor’s level of precision.
The operation of a stepper motor controller through pulsing the electromagnets. The sequence of these pulses determines the direction in which the motor spins. By adjusting the frequency of these pulses, the motor’s speed can be controlled. Furthermore, the number of pulses sent determines the extent to which the motor will turn.
By correctly energizing the electromagnets in the appropriate sequence, the stepper motor arduino can be rotated and positioned with great accuracy.
The 28BYJ-48 Stepper Motor
The 28BYJ-48 is a 5-wire unipolar stepper motor designed to operate on 5V. It is an ideal choice for projects that require precise positioning, such as controlling the opening and closing of a vent.
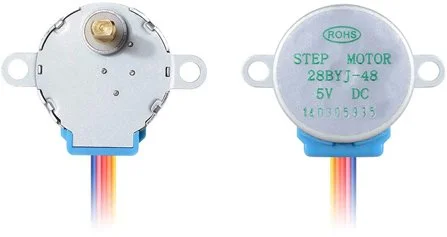
Due to its brushless design, this motor offers relatively accurate movement and high reliability.
Despite its compact size, the 28BYJ-48 delivers a decent torque of 34.3 mN.m at a speed of approximately 15 RPM. It exhibits good torque even when stationary, maintaining it as long as power is supplied.
One minor drawback is its relatively higher power consumption, as it draws energy even in its idle state.
Pinout
The 28BYJ-48 stepper motor consists of five wires with the following pinout:
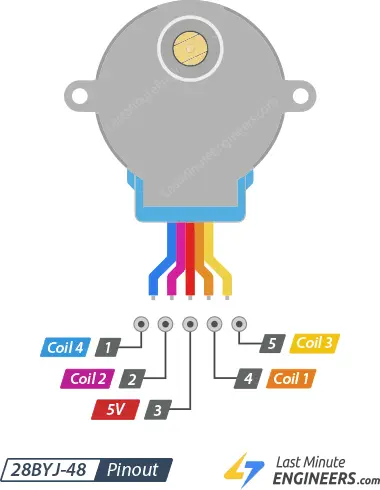
The motor features two coils, each with a center tap. These center taps are internally connected and represented by the 5th wire (red wire).
Combining one end of a coil with the center tap creates a phase. Therefore, the stepper motor 28BYJ-48 has a total of four phases.
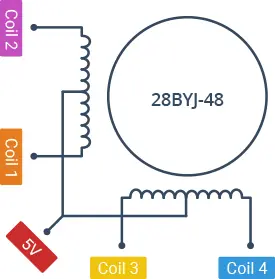
The red wire is constantly set to a high state, and energizing a phase occurs when the other lead is set to a low state.
The motor rotates when the phases are energized in a specific sequence known as a step sequence.
Gear Reduction Ratio
According to the data sheet, the 28BYJ-48 motor operates in full-step mode, where each step corresponds to a rotation of 11.25°. This results in 32 steps per revolution (360°/11.25° = 32).

Additionally, the motor includes a 1/64 reduction gear set (approximately 1/63.68395, but 1/64 is a close enough approximation for practical purposes).
Consequently, the motor effectively has 2038 steps (32 * 63.68395 steps per revolution = 2037.8864, approximately 2038 steps).
Power Consumption
The stepper motor 28BYJ-48 typically draws around 240 mA of current.
Considering its substantial power requirements, it is advisable to power the motor directly from a separate 5V power supply rather than relying on power from the Arduino.
It is worth noting that the motor continues to consume power even when at rest to maintain its position.
Technical Specifications
Here are the specifications:
| Operating Voltage | 5VDC |
| Operating Current | 240mA (typical) |
| Number of phases | 4 |
| Gear Reduction Ratio | 64:1 |
| Step Angle | 5.625°/64 |
| Frequency | 100Hz |
| In-traction Torque | >34.3mN.m(120Hz) |
| Self-positioning Torque | >34.3mN.m |
| Friction torque | 600-1200 gf.cm |
| Pull in torque | 300 gf.cm |
For more information, please refer to the datasheet below.
The ULN2003 Driver Board
The ULN2003 Driver Board is an essential component used to control the 28BYJ-48 stepper motor driver. This motor requires higher power than what a microcontroller like Arduino can directly provide, making the ULN2003 driver board necessary.
The ULN2003 driver board features the ULN2003 integrated circuit, known for its ability to handle high current and voltage. It consists of seven Darlington transistor pairs, with each pair capable of driving loads up to 500mA and 50V. In the case of the stepper motor 28BYJ-48, the driver board utilizes four of these transistor pairs.
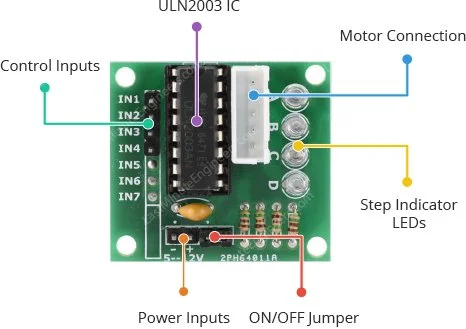
The board provides four control inputs for interfacing with the microcontroller. It also includes a power supply connection to ensure the motor receives the necessary power.
For convenient connectivity, the ULN2003 driver board features a Molex connector that is compatible with the motor’s connector, allowing for easy and secure connection.
To provide visual feedback and aid in troubleshooting, the board is equipped with four LEDs that indicate the activity on the control input lines. These LEDs help monitor the operation of the stepper motor.
Additionally, the board includes an ON/OFF jumper that can be used to enable or disable the stepper motor arduino as needed, providing control over its operation.
ULN2003 Stepper Driver Board Pinout
The ULN2003 stepper driver board has the following pinout:
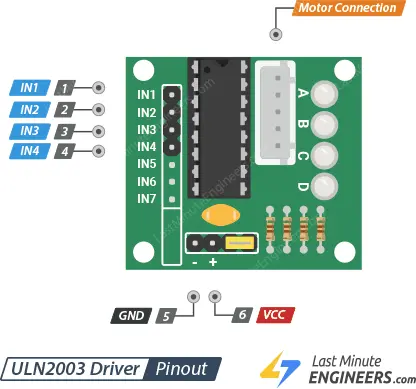
IN1 – IN4: These pins are used for motor control input. Connect them to the corresponding digital output pins on the Arduino.
GND: This pin is the ground connection.
VCC: This pin provides power to the stepper motor. It is recommended to use an external 5V power supply instead of relying on the power from the Arduino, as the motor requires a significant amount of power.
Motor Connector: This is the connector where the arduino stepper motor driver is plugged in. The connector is keyed, ensuring that the motor can only be inserted in one orientation.
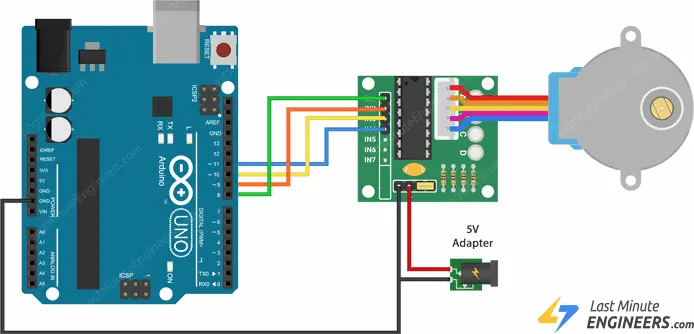
Wiring 28BYJ-48 Stepper Motor and ULN2003 Driver to an Arduino
Let’s proceed with connecting the motor to our Arduino!
The wiring connections are simple. Start by connecting an external 5V power supply to the ULN2003 driver.
Although it is possible to power the stepper motor directly from the Arduino, it is not recommended. The motor may introduce electrical noise on its power supply lines, potentially causing damage to the Arduino.
Connect the IN1, IN2, IN3, and IN4 pins of the driver board to Arduino digital pins 8, 9, 10, and 11, respectively. Then, establish the connection between the stepper motor and the ULN2003 driver.
Lastly, ensure that your circuit and Arduino have a common ground connection.
Refer to the following diagram for a visual representation of the wiring setup.
Parts Required
| Component Name | Buy Now |
| Arduino Uno REV3 | Amazon |
| 28BYJ-48 ULN2003 5V Stepper Motor + ULN2003 Driver Board | Amazon |
| Taiss 40PCS Potentiometer Kit with Rotary knobs | Amazon |
| Breadboard | Amazon |
| BOJACK 1000 Pcs 25 Values Resistor Kit 1 Ohm-1M Ohm with 5% 1/4W | Amazon |
Arduino Example Code 1 – Using Built-in Stepper Library
For our initial experiment, we will utilize the Arduino Stepper Library, which is included with the Arduino IDE.
The Arduino Stepper Library simplifies the process of controlling both unipolar and bipolar stepper motor arduino by handling the stepping sequence.
Below is a straightforward sketch that gradually rotates the motor in one direction and then rapidly rotates it in the opposite direction.
//Includes the Arduino Stepper Library
#include <Stepper.h>

// Defines the number of steps per rotation
const int stepsPerRevolution = 2038;

// Creates an instance of stepper class
// Pins entered in sequence IN1-IN3-IN2-IN4 for proper step sequence
Stepper myStepper = Stepper(stepsPerRevolution, 8, 10, 9, 11);

void setup() {
    // Nothing to do (Stepper Library sets pins as outputs)
}

void loop() {
	// Rotate CW slowly at 5 RPM
	myStepper.setSpeed(5);
	myStepper.step(stepsPerRevolution);
	delay(1000);

	// Rotate CCW quickly at 10 RPM
	myStepper.setSpeed(10);
	myStepper.step(-stepsPerRevolution);
	delay(1000);
}
Code Explanation:
The provided sketch begins by including the built-in stepper library.
#include <Stepper.h>
Next, a constant variable named stepsPerRevolution is defined, representing the number of steps required for the motor to complete one full revolution. In this case, it is set to 2038.
const int stepsPerRevolution = 2038;
To control the 28BYJ-48 stepper motor with the sequence IN1-IN3-IN2-IN4, an instance of the stepper library named myStepper is created, with the pin sequence 8, 10, 9, and 11.
It is important to ensure the correct pin sequence for the motor to function properly.
Stepper myStepper = Stepper(stepsPerRevolution, 8, 10, 9, 11);
Since the stepper library automatically configures the control pins as outputs, the setup() function is left empty.
void setup() {
}
In the loop() function, the setSpeed() function is used to specify the desired speed of the stepper motor controller, and the step() function determines the number of steps to take.
Passing a negative value to the step() function causes the motor to rotate in the opposite direction.
The first section of code rotates the motor slowly in a clockwise direction at 5 RPM, while the second section rotates it quickly in a counter-clockwise direction at 10 RPM.
void loop() {
	// Rotate CW slowly at 5 RPM
	myStepper.setSpeed(5);
	myStepper.step(stepsPerRevolution);
	delay(1000);

	// Rotate CCW quickly at 10 RPM
	myStepper.setSpeed(10);
	myStepper.step(-stepsPerRevolution);
	delay(1000);
}
step() function is a blocking function. This means that the Arduino will wait for the motor to complete its movement before proceeding to the next line in the sketch. For example, if the motor has 100 steps and the speed is set to 1 RPM, the Arduino will wait for 100 seconds before moving to the next line of code.Arduino Example Code 2 – Using AccelStepper library
If you want to control multiple stepper motors or need advanced features like acceleration and deceleration, the standard Arduino Stepper Library may not be sufficient. In such cases, the AccelStepper library is a powerful alternative.
The AccelStepper library offers several advantages over the standard Arduino Stepper Library:
- Acceleration and deceleration: It allows you to smoothly ramp up and down the speed of the stepper motor arduino, enabling precise control over its movements.
- Half-step driving: It supports half-step driving mode, which provides smoother motion and finer positioning compared to full-step mode.
- Multiple steppers: It allows you to control multiple stepper motors simultaneously, with each motor having its independent stepping sequence.
To use the AccelStepper library, you need to install it separately as it is not included in the default Arduino IDE.
Library Installation
To install the AccelStepper library, follow these steps:
Open the Arduino IDE and go to “Sketch” in the menu.
Select “Include Library” and then click on “Manage Libraries…”.
Wait for the Library Manager to download the libraries index and update the list.
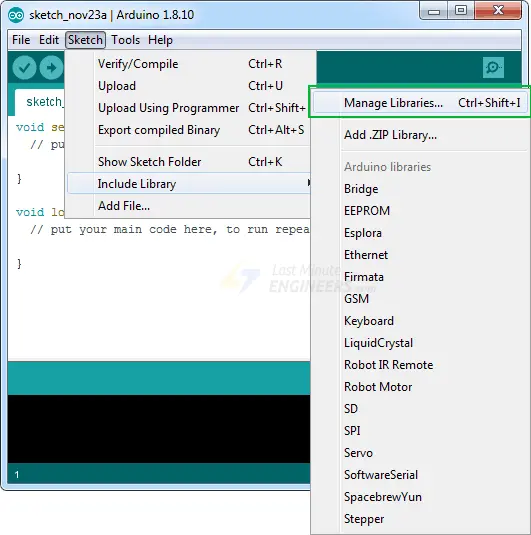
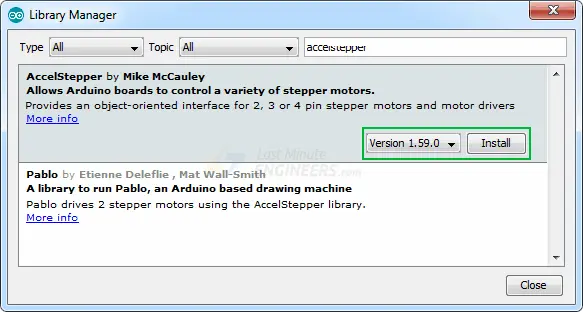
In the search box, type “accelstepper” to filter the library list.
Click on the first entry that appears, which should be the AccelStepper library.
Click the “Install” button to install the library.
Wait for the installation to complete. Once the AccelStepper library is installed, you can start using it in your Arduino projects.
Arduino Code
Here is a simple sketch that accelerates the dc stepper motor in one direction and then decelerates to come to rest. After one revolution, the motor reverses its spinning direction and repeats the process.
// Include the AccelStepper Library
#include <AccelStepper.h>

// Define step constant
#define MotorInterfaceType 4

// Creates an instance
// Pins entered in sequence IN1-IN3-IN2-IN4 for proper step sequence
AccelStepper myStepper(MotorInterfaceType, 8, 10, 9, 11);

void setup() {
	// set the maximum speed, acceleration factor,
	// initial speed and the target position
	myStepper.setMaxSpeed(1000.0);
	myStepper.setAcceleration(50.0);
	myStepper.setSpeed(200);
	myStepper.moveTo(2038);
}

void loop() {
	// Change direction once the motor reaches target position
	if (myStepper.distanceToGo() == 0)
		myStepper.moveTo(-myStepper.currentPosition());

	// Move the motor one step
	myStepper.run();
}
Explanation of Arduino Code:
The code begins by including the AccelStepper library, which provides advanced control of stepper motor arduino.
#include <AccelStepper.h>
A constant, MotorInterfaceType, is defined with a value of 4. This constant specifies the step sequence IN1-IN3-IN2-IN4 for proper motor control.
#define MotorInterfaceType 4
An instance of the AccelStepper class is created with the name myStepper. The four control pins (8, 10, 9, 11) are specified in the constructor to establish the proper step sequence.
AccelStepper myStepper(MotorInterfaceType, 8, 10, 9, 11);
In the setup function, several parameters are set for the stepper motor. The maximum speed is set to 1000.0 steps per second, the acceleration factor is set to 50.0 steps per second squared, the initial speed is set to 200 steps per second, and the target position is set to 2038 steps (corresponding to one full revolution of the motor).
void setup() {
	myStepper.setMaxSpeed(1000.0);
	myStepper.setAcceleration(50.0);
	myStepper.setSpeed(200);
	myStepper.moveTo(2038);
}
The loop function contains the main control logic for the stepper motor. It first checks if the motor has reached its target position by using the distanceToGo() function. If the distanceToGo is 0, indicating that the motor has reached the target, it changes the direction of motion by setting the new target position as the negative value of the current position.
if (myStepper.distanceToGo() == 0)
myStepper.moveTo(-myStepper.currentPosition());
Finally, the motor is moved one step by calling the run() function. This function handles the acceleration, deceleration, and step timing to smoothly control the motor’s motion.
myStepper.run();
The loop function continuously repeats, causing the stepper motor to accelerate, decelerate, change direction, and repeat the process indefinitely.
Arduino Example Code 3 – Control Two 28BYJ-48 Stepper Motors Simultaneously
In this experiment, we will learn how to control two 28BYJ-48 stepper motors simultaneously.
Wiring
To set up the system for two motors, we need to add an additional 28BYJ-48 stepper motor arduino to the existing setup.
First, connect the VCC pin of the ULN2003 driver to the 5V pin of the Arduino, and connect the GND pin to the ground of the Arduino. This will provide power to the driver board.
Next, connect the IN1, IN2, IN3, and IN4 pins of the first ULN2003 driver to Arduino digital pins 8, 9, 10, and 11 respectively, as we did before.
For the second motor, connect the IN1, IN2, IN3, and IN4 pins of the second ULN2003 driver to Arduino digital pins 4, 5, 6, and 7 respectively.
The following diagram illustrates the wiring setup for controlling two 28BYJ-48 stepper motors simultaneously.

Arduino Code
Here’s a sketch that demonstrates the simultaneous control of two 28BYJ-48 stepper motors, with one motor operating in full-step mode and the other in half-step mode. The motors will accelerate, decelerate, and change spinning direction after completing one revolution.
// Include the AccelStepper Library
#include <AccelStepper.h>

// Define step constants
#define FULLSTEP 4
#define HALFSTEP 8

// Creates two instances
// Pins entered in sequence IN1-IN3-IN2-IN4 for proper step sequence
AccelStepper stepper1(HALFSTEP, 8, 10, 9, 11);
AccelStepper stepper2(FULLSTEP, 4, 6, 5, 7);

void setup() {
	// set the maximum speed, acceleration factor,
	// initial speed and the target position for motor 1
	stepper1.setMaxSpeed(1000.0);
	stepper1.setAcceleration(50.0);
	stepper1.setSpeed(200);
	stepper1.moveTo(2038);

	// set the same for motor 2
	stepper2.setMaxSpeed(1000.0);
	stepper2.setAcceleration(50.0);
	stepper2.setSpeed(200);
	stepper2.moveTo(-2038);
}

void loop() {
	// Change direction once the motor reaches target position
	if (stepper1.distanceToGo() == 0)
		stepper1.moveTo(-stepper1.currentPosition());
	if (stepper2.distanceToGo() == 0)
		stepper2.moveTo(-stepper2.currentPosition());

	// Move the motor one step
	stepper1.run();
	stepper2.run();
}
Code Explanation:
Let’s walk through the code and understand its functionality.
The sketch starts by including the AccelStepper library, which provides advanced control over stepper motors.
#include <AccelStepper.h>
Next, two constants are defined to represent the step modes of the motors. FULLSTEP represents the full-step mode (4 steps per revolution), and HALFSTEP represents the half-step mode (8 steps per revolution).
#define FULLSTEP 4
#define HALFSTEP 8
Two instances of the AccelStepper class are created: stepper1 and stepper2. The pin connections for each stepper motor are specified in the constructor.v
AccelStepper stepper1(HALFSTEP, 8, 10, 9, 11);
AccelStepper stepper2(FULLSTEP, 4, 6, 5, 7);
In the setup() function, the maximum speed, acceleration, initial speed, and target position are set for each motor.
void setup() {
    // settings for motor 1
    stepper1.setMaxSpeed(1000.0);
    stepper1.setAcceleration(50.0);
    stepper1.setSpeed(200);
    stepper1.moveTo(2038);

    // settings for motor 2
    stepper2.setMaxSpeed(1000.0);
    stepper2.setAcceleration(50.0);
    stepper2.setSpeed(200);
    stepper2.moveTo(-2038);
}
The loop() function is where the motor control takes place. It first checks if each motor has reached its target position using the distanceToGo() function. If a motor has reached its target position, it is moved to the opposite direction by using the negative value of its current position.
void loop() {
	// Change direction once the motor reaches target position
	if (stepper1.distanceToGo() == 0)
		stepper1.moveTo(-stepper1.currentPosition());
	if (stepper2.distanceToGo() == 0)
		stepper2.moveTo(-stepper2.currentPosition());
Finally, the run() function is called for each motor to make them take one step.
	stepper1.run();
	stepper2.run();
}
This process repeats continuously in the loop() function, resulting in the simultaneous control of both motors, with acceleration, deceleration, and direction reversal after one revolution.
run() function is a non-blocking function, meaning that it allows other operations to run simultaneously.Related article
- Servo Motor Basics: How It Works and Arduino Interface Guide
- Interfacing DC Motors with Arduino using L298N Motor Driver Module
- Stepper Motor Control with Arduino: L298N Motor Driver Interface
- Step-by-Step Guide: Arduino Stepper Motor Control with A4988 Driver
- Step-by-Step Guide: Arduino Stepper Motor Control with DRV8825 Driver
- Arduino Motor Control: DRV8833 Motor Driver for DC Motors
- Arduino Motor Control: L293D Motor Driver for DC Motors
- Step-by-Step Guide: L293D Stepper Motor Driver with Arduino


