

Enhance your upcoming Arduino project’s environmental awareness with the BMP180 sensor.
Tailored for measuring atmospheric pressure, the BMP180 sensor serves two essential functions.
- As we ascend from sea level to higher altitudes, atmospheric pressure decreases, enabling us to gauge altitude by measuring pressure. Hence, the sensor doubles as an altimeter.
- Additionally, since atmospheric pressure fluctuates with weather changes, the sensor proves invaluable for monitoring weather variations.
These sensors are user-friendly, pre-calibrated, and require no additional components, facilitating quick measurement of barometric pressure, altitude, and temperature.
Parts Required
| Component Name | Buy Now |
| Arduino Uno REV3 | Amazon |
| BMP180 I2C IIC Digital Atmospheric Pressure, Temperature | Amazon |
Hardware Overview
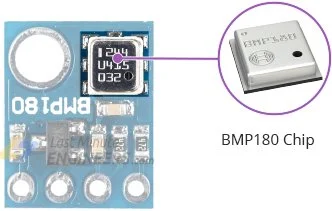
Central to the module lies the BMP180, a cutting-edge digital pressure and temperature sensor crafted by Bosch.
BMP180 Chip
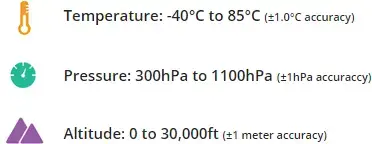
The BMP180 boasts a barometric pressure measurement range spanning from 300 to 1100 hPa (equivalent to altitudes from 9000m to -500m above sea level) and a temperature measurement range from -40°C to 85°C, offering an accuracy of ±1.0°C.
Its precision in pressure measurement is remarkable, with a low altitude noise of 0.25m, rendering it suitable for use as an altimeter with an accuracy of ±1 meter.
Power Requirement
Equipped with an on-board LM6206 3.3V regulator, the module seamlessly interfaces with 5V logic microcontrollers such as Arduino, eliminating compatibility concerns.
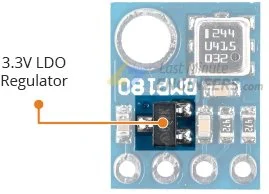
The BMP180 operates on less than 1mA during measurements and a mere 5μA while idle, making it conducive for integration into battery-powered devices.
I2C Interface
Featuring a straightforward two-wire I2C interface, the module effortlessly connects to a variety of microcontrollers.
BMP180 Module Pinout
The BMP180 module features only 4 pins for external connections. Here’s how they are configured:
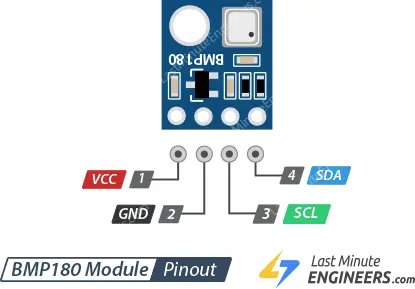
- VCC: This pin serves as the power supply for the module, accepting voltages ranging from 3.3V to 5V.
- GND: Connect this pin to the ground (GND) of the Arduino.
- SCL: This pin functions as the serial clock for the I2C interface.
- SDA: This pin serves as the serial data line for the I2C interface.
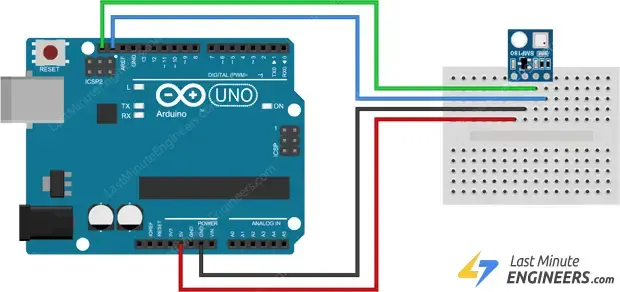
Wiring BMP180 Module to Arduino
Let’s establish the connection between the BMP180 module and the Arduino.
The connections are straightforward. Begin by linking the VIN pin to the 5V output on the Arduino, and connect GND to ground.
Next, focus on the pins designated for I2C communication. It’s important to note that each Arduino Board features different I2C pins, so make sure to connect them accordingly. On Arduino boards with the R3 layout, the SDA (data line) and SCL (clock line) pins are located on the pin headers near the AREF pin. They are also identified as A5 (SCL) and A4 (SDA).
For the Mega, the pin configuration is different. You’ll need to use digital pin 21 for SCL and pin 20 for SDA. Refer to the table below for a quick reference:
| SCL | SDA | |
| Arduino Uno | A5 | A4 |
| Arduino Nano | A5 | A4 |
| Arduino Mega | 21 | 20 |
| Leonardo/Micro | 3 | 2 |
The following diagram shows you how to wire everything.
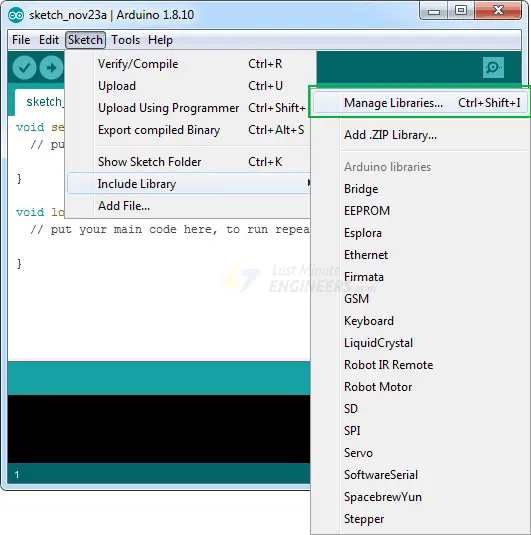
Installing Required Libraries:
For computing altitude and barometric pressure using the BMP180 module, a significant amount of mathematical operations is necessary. Luckily, the Adafruit BMP180 Library was developed to abstract away these complexities, allowing us to issue simple commands to retrieve temperature, barometric pressure, and altitude data.
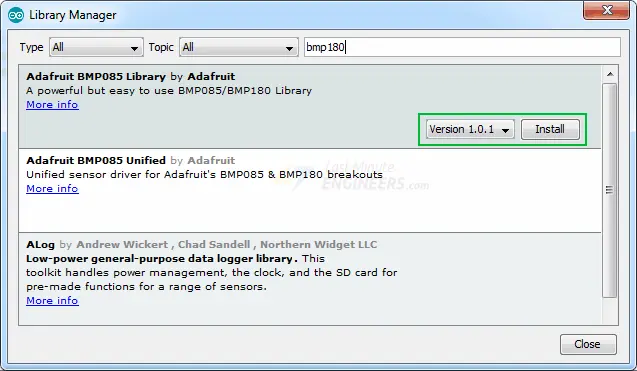
To install the library, navigate to Sketch > Include Library > Manage Libraries… Wait for the Library Manager to download the libraries index and update the list of installed libraries.
Filter your search by typing ‘bmp180’. You should see a couple of entries. Locate the Adafruit BMP085 Library by Adafruit, click on it, and then select Install.
Arduino Code – Reading Temperature and Barometric Pressure
The following sketch provides a comprehensive understanding of how to read temperature and barometric pressure from the BMP180 module. It serves as the foundation for more practical experiments and projects.
#include <Wire.h>
#include <Adafruit_BMP085.h>
#define seaLevelPressure_hPa 1013.25

Adafruit_BMP085 bmp;

void setup() {
  Serial.begin(9600);
  if (!bmp.begin()) {
	Serial.println("Could not find a valid BMP085 sensor, check wiring!");
	while (1) {}
  }
}

void loop() {
    Serial.print("Temperature = ");
    Serial.print(bmp.readTemperature());
    Serial.println(" *C");

    Serial.print("Pressure = ");
    Serial.print(bmp.readPressure());
    Serial.println(" Pa");

    Serial.print("Altitude = ");
    Serial.print(bmp.readAltitude());
    Serial.println(" meters");

    Serial.print("Pressure at sealevel (calculated) = ");
    Serial.print(bmp.readSealevelPressure());
    Serial.println(" Pa");

    Serial.print("Real altitude = ");
    Serial.print(bmp.readAltitude(seaLevelPressure_hPa * 100));
    Serial.println(" meters");

    Serial.println();
    delay(500);
}
Here’s how the output appears in the serial monitor.
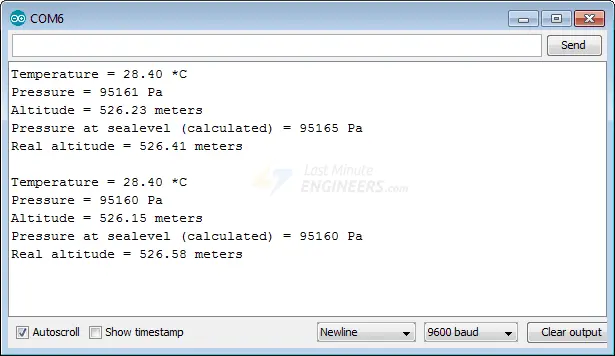
An error of 1hPa in sea level pressure results in approximately 8.5 m of error in altitude calculations. Thus, while the obtained altitude is close, it may not be entirely accurate.
For a more precise altitude measurement, knowledge of the current sea level pressure is essential, as it varies with weather conditions.
This code assumes the current sea level pressure to be 1013.25 millibars, equivalent to 101325 Pascals. Hence, the variable seaLevelPressure_hPa is set to 1013.25.
Code Explanation:
The sketch begins by including four libraries: Wire.h and Adafruit_BMP085.h.
#include <Wire.h>
#include <Adafruit_BMP085.h>
Next, we define the variable seaLevelPressure_hPa, which is necessary for calculating altitude. This should be adjusted to the current sea level pressure at your location.
#define seaLevelPressure_hPa 1013.25
We then create a bmp object to access functions related to the BMP180 module.
Adafruit_BMP085 bmp;
In the setup function of the code, we initialize serial communication with the PC and call the begin() function.
The begin() function initializes the I2C interface and checks if the chip ID is correct. It then resets the chip using soft-reset and waits for the sensor for calibration after wake-up.
Serial.begin(9600);

if (!bmp.begin()) {
    Serial.println("Could not find a valid BMP085 sensor, check wiring!");
    while (1) {}
}
In the loop function, we use the following functions to read temperature, barometric pressure, and altitude from the BMP180 module.
readTemperature()function returns the temperature from the sensor.
readPressure()function returns the barometric pressure from the sensor.
readAltitude(seaLevelPressure_hPa * 100)function calculates the altitude (in meters) from the specified atmospheric pressure (in hPa).
readSealevelPressure()function calculates the sea-level pressure (in hPa).
Serial.print("Temperature = ");
Serial.print(bmp.readTemperature());
Serial.println(" *C");

Serial.print("Pressure = ");
Serial.print(bmp.readPressure());
Serial.println(" Pa");

Serial.print("Altitude = ");
Serial.print(bmp.readAltitude());
Serial.println(" meters");

Serial.print("Pressure at sealevel (calculated) = ");
Serial.print(bmp.readSealevelPressure());
Serial.println(" Pa");

Serial.print("Real altitude = ");
Serial.print(bmp.readAltitude(seaLevelPressure_hPa * 100));
Serial.println(" meters");
Related article
- Interface BME280 with Arduino: Monitor Temp, Humidity, Pressure
- Monitor Indoor Air Quality: Interface BME680 Sensor with Arduino
- Arduino BMP388 Barometric Pressure Sensor Integration Guide
- Step-by-Step: Connecting Reed Switch to Arduino
- Arduino Water Quality Testing: Utilizing the TDS Sensor


