This tutorial will teach you how to utilize the ESP-NOW communication protocol for transmitting data from a single ESP8266 NodeMCU board to multiple ESP8266 boards (configured as a one-to-many setup). Programming will be done using the Arduino IDE.
Project Overview
This guide demonstrates the process of transmitting data from one ESP8266 to multiple ESP8266 boards using ESP-NOW in a one-to-many configuration.
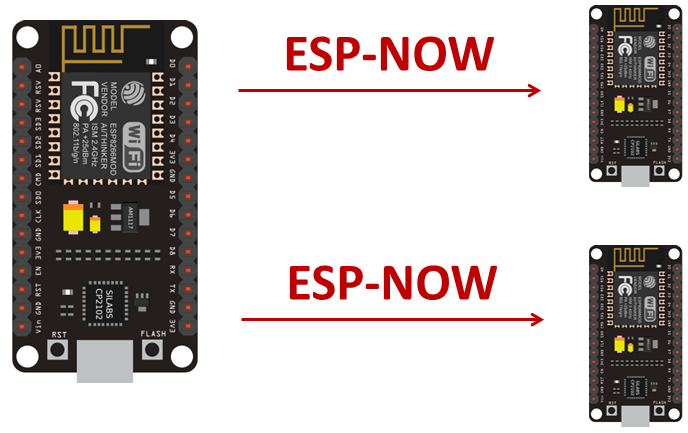
- One ESP8266 functions as the sender.
- Multiple ESP8266 boards serve as receivers. We verified this configuration with two ESP8266 boards concurrently, but you can expand your setup to accommodate more boards.
- The ESP8266 sender receives an acknowledgment message upon successful delivery of the messages. This allows you to identify which boards received the message and which ones did not.
- For instance, we will exchange random values between the boards. You can customize this example to transmit commands or sensor readings.
This tutorial addresses these two scenarios:
- Broadcasting the same message to all boards.
- Sending a distinct message to each board.
Parts Required
| Component Name | Buy Now |
| ESP8266 NodeMCU CP2102 | Amazon |
Getting the Boards MAC Address
In order to transmit messages via ESP-NOW, you must obtain the MAC address of the receiver boards. Each board possesses a unique MAC address (learn how to Obtain and Modify the ESP8266 MAC Address).
Upload the subsequent code to each of your receiver boards to acquire its MAC address.
#ifdef ESP32
  #include <WiFi.h>
#else
  #include <ESP8266WiFi.h>
#endif

void setup(){
  Serial.begin(115200);
  Serial.println();
  Serial.print("ESP Board MAC Address:  ");
  Serial.println(WiFi.macAddress());
}

void loop(){

}
After uploading the code, press the RST/EN button, and the MAC address should be exhibited on the Serial Monitor.
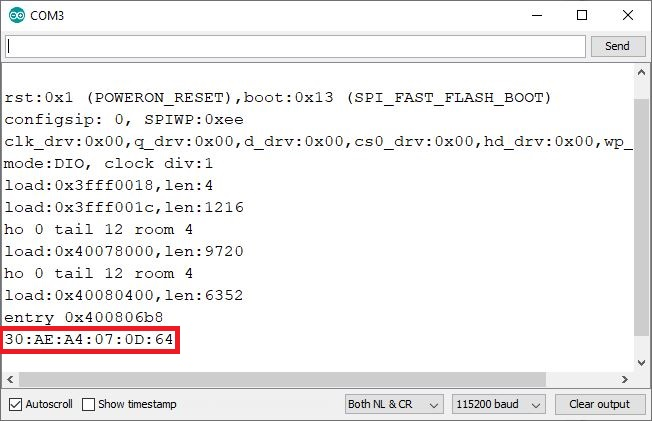
You can note down the MAC address of the boards on a label to distinctly identify each board.
ESP8266 NodeMCU Sender Code (ESP-NOW)
This code sends data to multiple (two) ESP boards via ESP-NOW. You need to customize the code with the MAC addresses of your receiver boards. Additionally, adjust or remove lines of code according to the number of receiver boards.
#include <ESP8266WiFi.h>
#include <espnow.h>

// REPLACE WITH RECEIVER MAC Address
uint8_t broadcastAddress1[] = {0xFF, 0xFF, 0xFF, 0xFF, 0xFF, 0xFF};
uint8_t broadcastAddress2[] = {0xFF, 0xFF, 0xFF, 0xFF, 0xFF, 0xFF};

// Structure example to send data
// Must match the receiver structure
typedef struct test_struct {
    int x;
    int y;
} test_struct;

// Create a struct_message called test to store variables to be sent
test_struct test;

unsigned long lastTime = 0;
unsigned long timerDelay = 2000;  // send readings timer

// Callback when data is sent
void OnDataSent(uint8_t *mac_addr, uint8_t sendStatus) {
  char macStr[18];
  Serial.print("Packet to:");
  snprintf(macStr, sizeof(macStr), "%02x:%02x:%02x:%02x:%02x:%02x",
         mac_addr[0], mac_addr[1], mac_addr[2], mac_addr[3], mac_addr[4], mac_addr[5]);
  Serial.print(macStr);
  Serial.print(" send status: ");
  if (sendStatus == 0){
    Serial.println("Delivery success");
  }
  else{
    Serial.println("Delivery fail");
  }
}

void setup() {
  // Init Serial Monitor
  Serial.begin(115200);

  // Set device as a Wi-Fi Station
  WiFi.mode(WIFI_STA);
  WiFi.disconnect();

  // Init ESP-NOW
  if (esp_now_init() != 0) {
    Serial.println("Error initializing ESP-NOW");
    return;
  }

  esp_now_set_self_role(ESP_NOW_ROLE_CONTROLLER);

  // Once ESPNow is successfully Init, we will register for Send CB to
  // get the status of Trasnmitted packet
  esp_now_register_send_cb(OnDataSent);

  // Register peer
  esp_now_add_peer(broadcastAddress1, ESP_NOW_ROLE_SLAVE, 1, NULL, 0);
  esp_now_add_peer(broadcastAddress2, ESP_NOW_ROLE_SLAVE, 1, NULL, 0);

}

void loop() {
  if ((millis() - lastTime) > timerDelay) {
    // Set values to send
    test.x = random(1, 50);
    test.y = random(1, 50);

    // Send message via ESP-NOW
    esp_now_send(0, (uint8_t *) &test, sizeof(test));

    lastTime = millis();
  }
}
Code Explanation
First, include the espnow.h and ESP8266WiFi.h libraries.
#include <ESP8266WiFi.h>
#include <espnow.h>
Receivers’ MAC Address
Insert the receivers’ MAC address. In our example, we’re sending data to two boards.
uint8_t broadcastAddress1[] = {0x5C, 0xCF, 0x7F, 0x99, 0xA1, 0x70};
uint8_t broadcastAddress2[] = {0x5C, 0xCF, 0x7F, 0x99, 0x9A, 0xEA};
Then, create a structure that contains the data we want to send. We called this structure test_struct and it contains two integer variables. You can change this to send whatever variable types you want.
typedef struct test_struct {
  int x;
  int y;
} test_struct;
Create a new variable of type test_struct that is called test that will store the variables values.
test_struct test;
OnDataSent() callback function
Next, define the OnDataSent() function. This is a callback function that will be executed when a message is sent. In this case, this function prints if the message was successfully delivered or not and for which MAC address. So, you know which boards received the message or and which boards didn’t.
void OnDataSent(uint8_t *mac_addr, uint8_t sendStatus) {
  char macStr[18];
  Serial.print("Packet to:");
  snprintf(macStr, sizeof(macStr), "%02x:%02x:%02x:%02x:%02x:%02x",
          mac_addr[0], mac_addr[1], mac_addr[2], mac_addr[3], mac_addr[4], mac_addr[5]);
  Serial.print(macStr);
  Serial.print(" send status: ");
  if (sendStatus == 0){
    Serial.println("Delivery success");
  }
  else{
    Serial.println("Delivery fail");
  }
}
setup()
In the setup(), initialize the serial monitor for debugging purposes:
Serial.begin(115200);
Set the device as a Wi-Fi station and disconnect Wi-Fi:
WiFi.mode(WIFI_STA);
WiFi.disconnect();
Initialize ESP-NOW:
if (esp_now_init() != 0) {
  Serial.println("Error initializing ESP-NOW");
  return;
}
Set the ESP8266 role. This is a sender board, so set its role to ESP_NOW_ROLE_CONTROLLER
esp_now_set_self_role(ESP_NOW_ROLE_CONTROLLER);
Register the callback function that will be called when a message is sent. In this case, register for the OnDataSent() function created previously.
esp_now_register_send_cb(OnDataSent);
Add peers
After that, we need to pair with other ESP-NOW devices to send data. That’s what we do in the next lines – register peers:
esp_now_add_peer(broadcastAddress1, ESP_NOW_ROLE_SLAVE, 1, NULL, 0);
esp_now_add_peer(broadcastAddress2, ESP_NOW_ROLE_SLAVE, 1, NULL, 0);
If you want to add more peers you just need to duplicate these previous lines and pass the peer MAC address:
loop()
In the loop(), we’ll send a message via ESP-NOW every 2 seconds (you can change this delay time on the timerDelay variable).
Assign a value to each variable:
test.x = random(0,20);
test.y = random(0,20);
Remember that test is a structure. Here assign the values that you want to send inside the structure. In this case, we’re just sending random values. In a practical application these should be replaced with commands or sensor readings, for example.
Send the same data to multiple boards
Finally, send the message as follows:
esp_now_send(0, (uint8_t *) &test, sizeof(test));
The first argument of the esp_now_send() function is the receiver’s MAC address. If you pass 0 as an argument, it will send the same message to all registered peers. If you want to send a different message to each peer, follow the next section.
Check if the message was successfully sent:
The loop() is executed every 2000 milliseconds (2 seconds).
if ((millis() - lastTime) > timerDelay) {
  // Set values to send
  test.x = random(1, 50);
  test.y = random(1, 50);

  // Send message via ESP-NOW
  esp_now_send(0, (uint8_t *) &test, sizeof(test));

  lastTime = millis();
}
Send different data to each board
The code to send a different message to each board is very similar with the previous one. So, we’ll just take a look at the differences.
If you want to send a different message to each board, you need to create a data structure for each of your boards, for example:
test_struct test;
test_struct test2;
In this case we’re sending the same structure type (test_struct). You can send a different structure type as long as the receiver code is prepared to receive that type of structure.
Then, assign different values to the variables of each structure. In this example, we’re just setting them to random numbers.
test.x = random(0,20);
test.y = random(0,20);
test2.x = random(0,20);
test2.y = random(0,20);
Finally, you need to call the esp_now_send() function for each receiver.
For example, send the test structure to the board whose MAC address is broadcastAddress1.
esp_now_send(broadcastAddress1, (uint8_t *) &test, sizeof(test));
Do the same for the other boards. For the second board send the test2 structure:
esp_now_send(broadcastAddress2, (uint8_t *) &test2, sizeof(test2));
Here’s the complete code that sends a different message to each board.
#include <ESP8266WiFi.h>
#include <espnow.h>

// REPLACE WITH RECEIVER MAC Address
uint8_t broadcastAddress1[] = {0xFF, 0xFF, 0xFF, 0xFF, 0xFF, 0xFF};
uint8_t broadcastAddress2[] = {0xFF, 0xFF, 0xFF, 0xFF, 0xFF, 0xFF};

// Structure example to send data
// Must match the receiver structure
typedef struct test_struct {
    int x;
    int y;
} test_struct;

// Create a struct_message called test to store variables to be sent
test_struct test;
test_struct test2;

unsigned long lastTime = 0;
unsigned long timerDelay = 2000;  // send readings timer

// Callback when data is sent
void OnDataSent(uint8_t *mac_addr, uint8_t sendStatus) {
  char macStr[18];
  Serial.print("Packet to:");
  snprintf(macStr, sizeof(macStr), "%02x:%02x:%02x:%02x:%02x:%02x",
         mac_addr[0], mac_addr[1], mac_addr[2], mac_addr[3], mac_addr[4], mac_addr[5]);
  Serial.print(macStr);
  Serial.print(" send status: ");
  if (sendStatus == 0){
    Serial.println("Delivery success");
  }
  else{
    Serial.println("Delivery fail");
  }
}

void setup() {
  // Init Serial Monitor
  Serial.begin(115200);

  // Set device as a Wi-Fi Station
  WiFi.mode(WIFI_STA);
  WiFi.disconnect();

  // Init ESP-NOW
  if (esp_now_init() != 0) {
    Serial.println("Error initializing ESP-NOW");
    return;
  }

  esp_now_set_self_role(ESP_NOW_ROLE_CONTROLLER);

  // Once ESPNow is successfully Init, we will register for Send CB to
  // get the status of Trasnmitted packet
  esp_now_register_send_cb(OnDataSent);

  // Register peer
  esp_now_add_peer(broadcastAddress1, ESP_NOW_ROLE_SLAVE, 1, NULL, 0);
  esp_now_add_peer(broadcastAddress2, ESP_NOW_ROLE_SLAVE, 1, NULL, 0);

}

void loop() {
  if ((millis() - lastTime) > timerDelay) {
    // Set values to send
    test.x = random(1, 50);
    test.y = random(1, 50);
    test2.x = random(1, 50);
    test2.y = random(1, 50);

    // Send message via ESP-NOW
    esp_now_send(broadcastAddress1, (uint8_t *) &test, sizeof(test));
    esp_now_send(broadcastAddress2, (uint8_t *) &test2, sizeof(test2));
    lastTime = millis();
  }
}
ESP8266 NodeMCU Receiver Code (ESP-NOW)
Upload the next code to the receiver boards (in our example, we’ve used two receiver boards).
#include <ESP8266WiFi.h>
#include <espnow.h>

// Structure example to receive data
// Must match the sender structure
typedef struct test_struct {
    int x;
    int y;
} test_struct;

// Create a struct_message called myData
test_struct myData;

// Callback function that will be executed when data is received
void OnDataRecv(uint8_t * mac, uint8_t *incomingData, uint8_t len) {
  memcpy(&myData, incomingData, sizeof(myData));
  Serial.print("Bytes received: ");
  Serial.println(len);
  Serial.print("x: ");
  Serial.println(myData.x);
  Serial.print("y: ");
  Serial.println(myData.y);
  Serial.println();
}

void setup() {
  // Initialize Serial Monitor
  Serial.begin(115200);

  // Set device as a Wi-Fi Station
  WiFi.mode(WIFI_STA);
  WiFi.disconnect();

  // Init ESP-NOW
  if (esp_now_init() != 0) {
    Serial.println("Error initializing ESP-NOW");
    return;
  }

  // Once ESPNow is successfully Init, we will register for recv CB to
  // get recv packer info
  esp_now_set_self_role(ESP_NOW_ROLE_SLAVE);
  esp_now_register_recv_cb(OnDataRecv);
}

void loop() {

}
Code Explanation
Similarly to the sender, start by including the libraries:
#include <ESP8266WiFi.h>
#include <espnow.h>
Create a structure to receive the data. This structure should be the same defined in the sender sketch.
typedef struct test_struct {
    int x;
    int y;
} test_struct;
Create a test_struct variable called myData.
test_struct myData;
Create a callback function that is called when the ESP8266 receives the data via ESP-NOW. The function is called onDataRecv() and should accept several parameters as follows:
void OnDataRecv(uint8_t * mac, uint8_t *incomingData, uint8_t len) {
Copy the content of the incomingData data variable into the myData variable.
memcpy(&myData, incomingData, sizeof(myData));
Now, the myData structure contains several variables inside with the values sent by the sender ESP8266. To access variable x, for example, call myData.x.
In this example, we print the received data, but in a practical application you can print the data on a OLED display, for example.
Serial.print("Bytes received: ");
Serial.println(len);
Serial.print("x: ");
Serial.println(myData.x);
Serial.print("y: ");
Serial.println(myData.y);
Serial.println();
In the setup(), intialize the Serial Monitor.
Serial.begin(115200);
Set the device as a Wi-Fi Station and disconnect Wi-Fi.
WiFi.mode(WIFI_STA);
WiFi.disconnect();
Initialize ESP-NOW:
if (esp_now_init() != 0) {
  Serial.println("Error initializing ESP-NOW");
  return;
}
Set the ESP8266 role. This is a receiver board, so set its role to ESP_NOW_ROLE_SLAVE.
esp_now_set_self_role(ESP_NOW_ROLE_SLAVE);
Register for a callback function that will be called when data is received. In this case, we register for the OnDataRecv() function that was created previously.
esp_now_register_recv_cb(OnDataRecv);
Demonstration
Ensure all your boards are powered on, then open the Arduino IDE Serial Monitor for the COM port connected to the sender.
You should begin receiving “Delivery Success” messages in the Serial Monitor, each accompanied by the corresponding receiver’s MAC address.
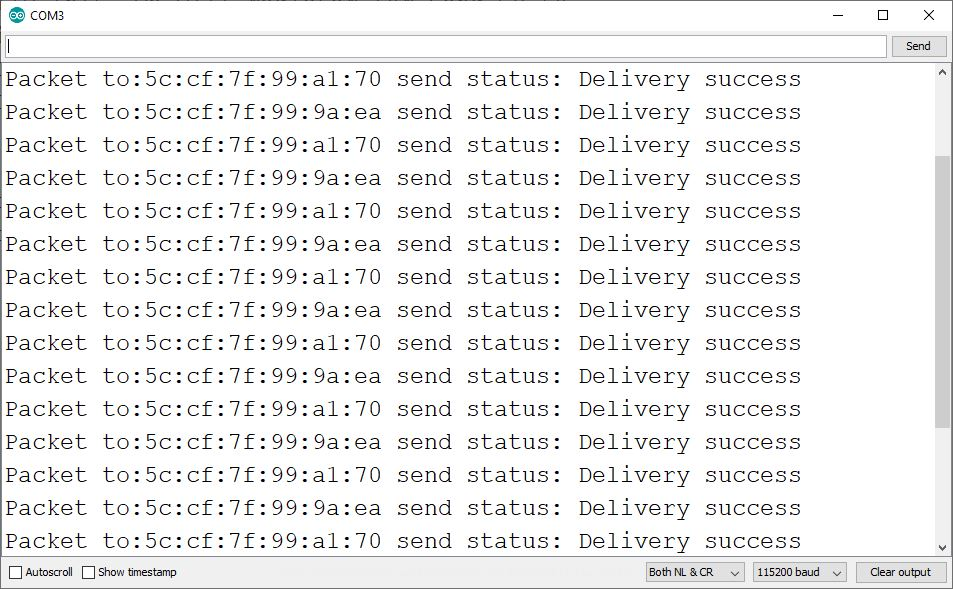
If you power off one of the boards, you’ll receive a “Delivery Fail” message specific to that board. This allows you to quickly identify which board did not receive the message.

To verify if the boards are indeed receiving the messages, you can either open the Serial Monitor for each board’s respective COM port or utilize PuTTY for establishing serial communication with your boards.
When using PuTTY, select Serial communication, specify the COM port number and baud rate (115200), then click Open. You should observe the messages being received.
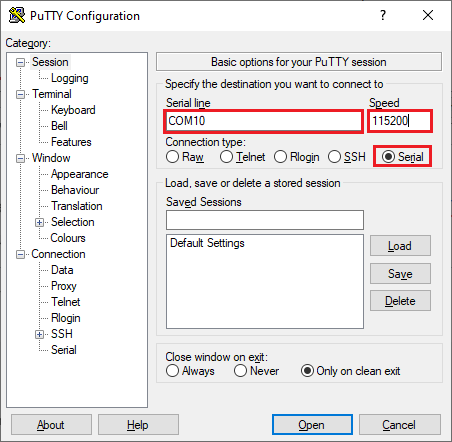
Open a serial communication for each of your boards to confirm that they are receiving the messages.

Wrapping Up
In this tutorial, you’ve learned how to transmit data to multiple ESP8266 boards from a single ESP8266 using ESP-NOW (one-to-many communication). A similar approach can be applied to ESP32 boards (ESP32 ESP-NOW: One-to-many).
We trust you’ve found this tutorial beneficial. We also offer other ESP-NOW tutorials that you may find helpful:
- ESP8266 NodeMCU Email Tutorial: SMTP Server Setup for HTML, Text, and Attachments (Arduino)
- Ultimate Guide: Crafting an ESP8266 Weather Station Using BME280
- Firebase Data Logging: ESP8266 NodeMCU Sensor Integration
- Beginner’s Guide to ESP8266 NodeMCU and Firebase (Realtime Database)
- Enhance Connectivity: Two-Way ESP-NOW with ESP8266 NodeMCU
- Beginner’s Guide: ESP-NOW Setup for ESP8266 NodeMCU
- Enhanced Monitoring: Multiple DS18B20s on ESP8266 Web Server

