
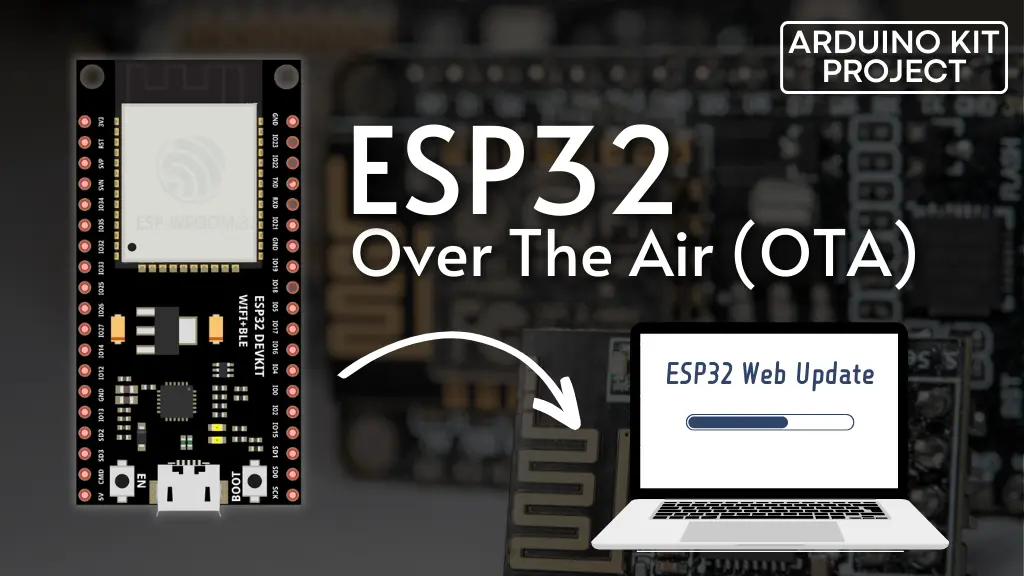
The ESP32 offers the convenience of wireless firmware updates, a process known as “Over-The-Air” (OTA) programming.
Parts Required
| Component Name | Buy Now |
| ESP32-WROOM-32 Development | Amazon |
What is OTA programming in ESP32?
OTA programming enables users to update or upload new programs to the ESP32 via Wi-Fi, eliminating the need for USB connections to a computer.
This functionality proves particularly useful when physical access to the ESP module is limited, and it speeds up the updating process during maintenance.
A significant benefit of OTA is its ability to centrally send updates from one location to multiple ESPs within the same network.
However, a drawback is that OTA functionality requires inclusion of OTA code in each sketch uploaded for subsequent updates.
Ways To Implement OTA In ESP32
Implementing OTA in ESP32 can be achieved through two methods:
- Basic OTA: This method utilizes the Arduino IDE for delivering updates.
- Web Updater OTA: Updates are delivered through a web browser.
Each approach has its own advantages, allowing you to choose the most suitable one for your project.
This tutorial focuses on implementing the Web Updater OTA method. For those interested in Basic OTA, please refer to the corresponding tutorial.
3 Simple Steps for Using Web Updater OTA with the ESP32
- Serially Upload OTA Routine: Initially, the sketch containing OTA firmware must be serially uploaded. This step is essential for subsequent over-the-air updates.
- Access the Web Server: The OTA sketch establishes a web server in STA mode, accessible through a web browser. Once logged in to the web server, new sketches can be uploaded.
- Upload New Sketch Over-The-Air: With the web server active, you can upload new sketches to the ESP32 by generating and uploading a compiled .bin file through the web interface.
Step 1: Serially Upload OTA Routine
To enable OTA upgrade capability on the ESP32, the OTA firmware must be initially loaded onto the device through a serial interface.
This firmware update is a prerequisite for conducting subsequent over-the-air updates.
Within the Arduino IDE’s ESP32 add-on, you’ll find an OTA library along with an OTAWebUpdater example. Access it via File > Examples > ArduinoOTA > OTAWebUpdater.
Although the user interface of the OTA Web Updater may seem unattractive, we’ve customized the code to enhance its appearance. Start by connecting your ESP32 to your computer and uploading the provided sketch.
Before initiating the sketch upload, ensure you modify two variables with your network credentials, enabling the ESP32 to connect to your existing network.
const char* ssid = "---";
const char* password = "----";
When you’re finished, go ahead and upload the sketch.
#include <WiFi.h>
#include <WiFiClient.h>
#include <WebServer.h>
#include <ESPmDNS.h>
#include <Update.h>

const char* host = "esp32";
const char* ssid = "---";
const char* password = "----";

WebServer server(80);

/* Style */
String style =
"<style>#file-input,input{width:100%;height:44px;border-radius:4px;margin:10px auto;font-size:15px}"
"input{background:#f1f1f1;border:0;padding:0 15px}body{background:#3498db;font-family:sans-serif;font-size:14px;color:#777}"
"#file-input{padding:0;border:1px solid #ddd;line-height:44px;text-align:left;display:block;cursor:pointer}"
"#bar,#prgbar{background-color:#f1f1f1;border-radius:10px}#bar{background-color:#3498db;width:0%;height:10px}"
"form{background:#fff;max-width:258px;margin:75px auto;padding:30px;border-radius:5px;text-align:center}"
".btn{background:#3498db;color:#fff;cursor:pointer}</style>";

/* Login page */
String loginIndex =
"<form name=loginForm>"
"<h1>ESP32 Login</h1>"
"<input name=userid placeholder='User ID'> "
"<input name=pwd placeholder=Password type=Password> "
"<input type=submit onclick=check(this.form) class=btn value=Login></form>"
"<script>"
"function check(form) {"
"if(form.userid.value=='admin' && form.pwd.value=='admin')"
"{window.open('/serverIndex')}"
"else"
"{alert('Error Password or Username')}"
"}"
"</script>" + style;

/* Server Index Page */
String serverIndex =
"<script src='https://ajax.googleapis.com/ajax/libs/jquery/3.2.1/jquery.min.js'></script>"
"<form method='POST' action='#' enctype='multipart/form-data' id='upload_form'>"
"<input type='file' name='update' id='file' onchange='sub(this)' style=display:none>"
"<label id='file-input' for='file'>   Choose file...</label>"
"<input type='submit' class=btn value='Update'>"
"<br><br>"
"<div id='prg'></div>"
"<br><div id='prgbar'><div id='bar'></div></div><br></form>"
"<script>"
"function sub(obj){"
"var fileName = obj.value.split('\\\\');"
"document.getElementById('file-input').innerHTML = '   '+ fileName[fileName.length-1];"
"};"
"$('form').submit(function(e){"
"e.preventDefault();"
"var form = $('#upload_form')[0];"
"var data = new FormData(form);"
"$.ajax({"
"url: '/update',"
"type: 'POST',"
"data: data,"
"contentType: false,"
"processData:false,"
"xhr: function() {"
"var xhr = new window.XMLHttpRequest();"
"xhr.upload.addEventListener('progress', function(evt) {"
"if (evt.lengthComputable) {"
"var per = evt.loaded / evt.total;"
"$('#prg').html('progress: ' + Math.round(per*100) + '%');"
"$('#bar').css('width',Math.round(per*100) + '%');"
"}"
"}, false);"
"return xhr;"
"},"
"success:function(d, s) {"
"console.log('success!') "
"},"
"error: function (a, b, c) {"
"}"
"});"
"});"
"</script>" + style;

/* setup function */
void setup(void) {
  Serial.begin(115200);

  // Connect to WiFi network
  WiFi.begin(ssid, password);
  Serial.println("");

  // Wait for connection
  while (WiFi.status() != WL_CONNECTED) {
    delay(500);
    Serial.print(".");
  }
  Serial.println("");
  Serial.print("Connected to ");
  Serial.println(ssid);
  Serial.print("IP address: ");
  Serial.println(WiFi.localIP());

  /*use mdns for host name resolution*/
  if (!MDNS.begin(host)) { //http://esp32.local
    Serial.println("Error setting up MDNS responder!");
    while (1) {
      delay(1000);
    }
  }
  Serial.println("mDNS responder started");
  /*return index page which is stored in serverIndex */
  server.on("/", HTTP_GET, []() {
    server.sendHeader("Connection", "close");
    server.send(200, "text/html", loginIndex);
  });
  server.on("/serverIndex", HTTP_GET, []() {
    server.sendHeader("Connection", "close");
    server.send(200, "text/html", serverIndex);
  });
  /*handling uploading firmware file */
  server.on("/update", HTTP_POST, []() {
    server.sendHeader("Connection", "close");
    server.send(200, "text/plain", (Update.hasError()) ? "FAIL" : "OK");
    ESP.restart();
  }, []() {
    HTTPUpload& upload = server.upload();
    if (upload.status == UPLOAD_FILE_START) {
      Serial.printf("Update: %s\n", upload.filename.c_str());
      if (!Update.begin(UPDATE_SIZE_UNKNOWN)) { //start with max available size
        Update.printError(Serial);
      }
    } else if (upload.status == UPLOAD_FILE_WRITE) {
      /* flashing firmware to ESP*/
      if (Update.write(upload.buf, upload.currentSize) != upload.currentSize) {
        Update.printError(Serial);
      }
    } else if (upload.status == UPLOAD_FILE_END) {
      if (Update.end(true)) { //true to set the size to the current progress
        Serial.printf("Update Success: %u\nRebooting...\n", upload.totalSize);
      } else {
        Update.printError(Serial);
      }
    }
  });
  server.begin();
}

void loop(void) {
  server.handleClient();
  delay(1);
}
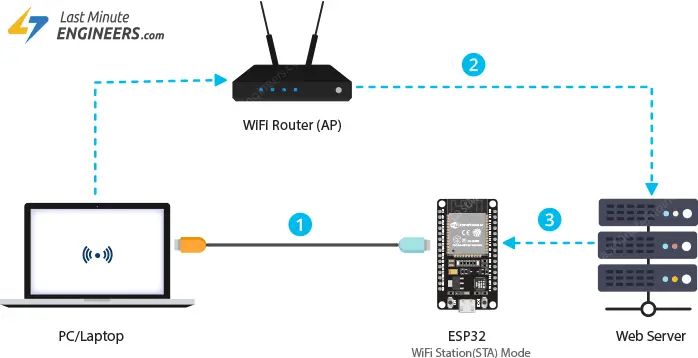
Step 2: Accessing the Web Server
The OTA Web Updater sketch establishes a web server in STA mode, accessible via a web browser, facilitating the uploading of new sketches to your ESP32 over-the-air.
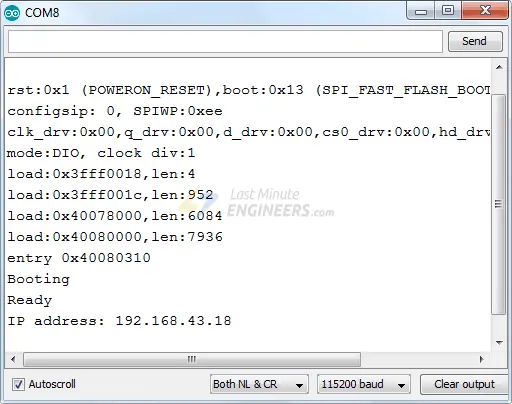
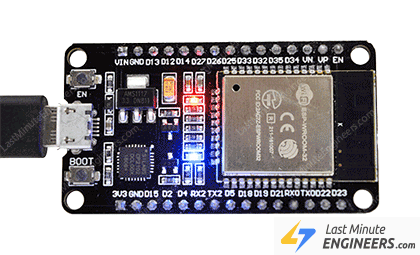
To access the web server, open the Serial Monitor set to 115200 baud rate and press the EN button on the ESP32. Upon successful operation, it will display the dynamically assigned IP address obtained from your router.
Subsequently, open a web browser and navigate to the IP address shown on the serial monitor. The ESP32 will present a webpage prompting for login credentials.

Enter the following User ID and Password:
User ID: admin
Password: admin
To modify the User ID and Password, edit the following code in your sketch:
"if(form.userid.value=='admin' && form.pwd.value=='admin')"
Once logged in, you’ll be directed to the /serverIndex page. Here, you can upload new sketches to your ESP32 over-the-air.
Note: The new sketch intended for upload must be in the .bin (compiled binary) format. Instructions for generating the .bin file of your sketch will be provided in the subsequent step.
The /serverIndex page lacks protection from unauthorized access. This vulnerability could potentially enable users to access the system without proper authentication.
Step 3: Uploading a New Sketch Over-The-Air
Now, let’s proceed with uploading a new sketch over-the-air.
Keep in mind that it’s crucial to include the OTA code in each sketch you upload. Failure to do so will result in the loss of OTA capability, rendering subsequent over-the-air uploads impossible. Therefore, it’s advisable to integrate your new code into the existing code.
As an illustration, we’ll incorporate a basic Blink sketch into the OTA web updater code. Remember to update the SSID and password variables with your network credentials.
#include <WiFi.h>
#include <WiFiClient.h>
#include <WebServer.h>
#include <ESPmDNS.h>
#include <Update.h>

const char* host = "esp32";
const char* ssid = "---";
const char* password = "----";

//variabls for blinking an LED with Millis
const int led = 2; // ESP32 Pin to which onboard LED is connected
unsigned long previousMillis = 0;  // will store last time LED was updated
const long interval = 1000;  // interval at which to blink (milliseconds)
int ledState = LOW;  // ledState used to set the LED
WebServer server(80);

/* Style */
String style =
"<style>#file-input,input{width:100%;height:44px;border-radius:4px;margin:10px auto;font-size:15px}"
"input{background:#f1f1f1;border:0;padding:0 15px}body{background:#3498db;font-family:sans-serif;font-size:14px;color:#777}"
"#file-input{padding:0;border:1px solid #ddd;line-height:44px;text-align:left;display:block;cursor:pointer}"
"#bar,#prgbar{background-color:#f1f1f1;border-radius:10px}#bar{background-color:#3498db;width:0%;height:10px}"
"form{background:#fff;max-width:258px;margin:75px auto;padding:30px;border-radius:5px;text-align:center}"
".btn{background:#3498db;color:#fff;cursor:pointer}</style>";

/* Login page */
String loginIndex =
"<form name=loginForm>"
"<h1>ESP32 Login</h1>"
"<input name=userid placeholder='User ID'> "
"<input name=pwd placeholder=Password type=Password> "
"<input type=submit onclick=check(this.form) class=btn value=Login></form>"
"<script>"
"function check(form) {"
"if(form.userid.value=='admin' && form.pwd.value=='admin')"
"{window.open('/serverIndex')}"
"else"
"{alert('Error Password or Username')}"
"}"
"</script>" + style;

/* Server Index Page */
String serverIndex =
"<script src='https://ajax.googleapis.com/ajax/libs/jquery/3.2.1/jquery.min.js'></script>"
"<form method='POST' action='#' enctype='multipart/form-data' id='upload_form'>"
"<input type='file' name='update' id='file' onchange='sub(this)' style=display:none>"
"<label id='file-input' for='file'>   Choose file...</label>"
"<input type='submit' class=btn value='Update'>"
"<br><br>"
"<div id='prg'></div>"
"<br><div id='prgbar'><div id='bar'></div></div><br></form>"
"<script>"
"function sub(obj){"
"var fileName = obj.value.split('\\\\');"
"document.getElementById('file-input').innerHTML = '   '+ fileName[fileName.length-1];"
"};"
"$('form').submit(function(e){"
"e.preventDefault();"
"var form = $('#upload_form')[0];"
"var data = new FormData(form);"
"$.ajax({"
"url: '/update',"
"type: 'POST',"
"data: data,"
"contentType: false,"
"processData:false,"
"xhr: function() {"
"var xhr = new window.XMLHttpRequest();"
"xhr.upload.addEventListener('progress', function(evt) {"
"if (evt.lengthComputable) {"
"var per = evt.loaded / evt.total;"
"$('#prg').html('progress: ' + Math.round(per*100) + '%');"
"$('#bar').css('width',Math.round(per*100) + '%');"
"}"
"}, false);"
"return xhr;"
"},"
"success:function(d, s) {"
"console.log('success!') "
"},"
"error: function (a, b, c) {"
"}"
"});"
"});"
"</script>" + style;

/* setup function */
void setup(void) {

pinMode(led,  OUTPUT);
  Serial.begin(115200);

  // Connect to WiFi network
  WiFi.begin(ssid, password);
  Serial.println("");

  // Wait for connection
  while (WiFi.status() != WL_CONNECTED) {
    delay(500);
    Serial.print(".");
  }
  Serial.println("");
  Serial.print("Connected to ");
  Serial.println(ssid);
  Serial.print("IP address: ");
  Serial.println(WiFi.localIP());

  /*use mdns for host name resolution*/
  if (!MDNS.begin(host)) { //http://esp32.local
    Serial.println("Error setting up MDNS responder!");
    while (1) {
      delay(1000);
    }
  }
  Serial.println("mDNS responder started");
  /*return index page which is stored in serverIndex */
  server.on("/", HTTP_GET, []() {
    server.sendHeader("Connection", "close");
    server.send(200, "text/html", loginIndex);
  });
  server.on("/serverIndex", HTTP_GET, []() {
    server.sendHeader("Connection", "close");
    server.send(200, "text/html", serverIndex);
  });
  /*handling uploading firmware file */
  server.on("/update", HTTP_POST, []() {
    server.sendHeader("Connection", "close");
    server.send(200, "text/plain", (Update.hasError()) ? "FAIL" : "OK");
    ESP.restart();
  }, []() {
    HTTPUpload& upload = server.upload();
    if (upload.status == UPLOAD_FILE_START) {
      Serial.printf("Update: %s\n", upload.filename.c_str());
      if (!Update.begin(UPDATE_SIZE_UNKNOWN)) { //start with max available size
        Update.printError(Serial);
      }
    } else if (upload.status == UPLOAD_FILE_WRITE) {
      /* flashing firmware to ESP*/
      if (Update.write(upload.buf, upload.currentSize) != upload.currentSize) {
        Update.printError(Serial);
      }
    } else if (upload.status == UPLOAD_FILE_END) {
      if (Update.end(true)) { //true to set the size to the current progress
        Serial.printf("Update Success: %u\nRebooting...\n", upload.totalSize);
      } else {
        Update.printError(Serial);
      }
    }
  });
  server.begin();
}

void loop(void) {
  server.handleClient();
  delay(1);

//loop to blink without delay
 unsigned long currentMillis = millis();
 if (currentMillis - previousMillis >= interval) {
 // save the last time you blinked the LED
 previousMillis = currentMillis;
 // if the LED is off turn it on and vice-versa:
 ledState = not(ledState);
 // set the LED with the ledState of the variable:
 digitalWrite(led,  ledState);
 }
}
delay() function for making the LED blink. This decision is because the delay() function pauses the program. If an OTA request occurs while the ESP32 is paused awaiting the completion of delay(), your program will fail to recognize the request.Generate a .bin file in Arduino IDE
To upload a fresh sketch to the ESP32, you need to first create a compiled binary .bin file of your sketch.
To accomplish this, go to Sketch > Export compiled Binary.
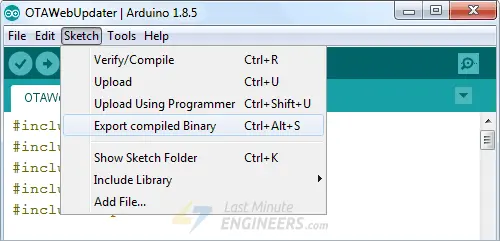
Once the sketch compiles successfully, the .bin file is generated within the Sketch Folder. To access the Sketch folder, choose Sketch > Show Sketch Folder.

Upload new sketch over-the-air to the ESP32
After generating the .bin file, you can upload the new sketch wirelessly to the ESP32.
Open your browser and visit the /serverIndex page. Click on Choose File… Select the recently generated .bin file and click Update.

The new sketch will be uploaded within seconds.
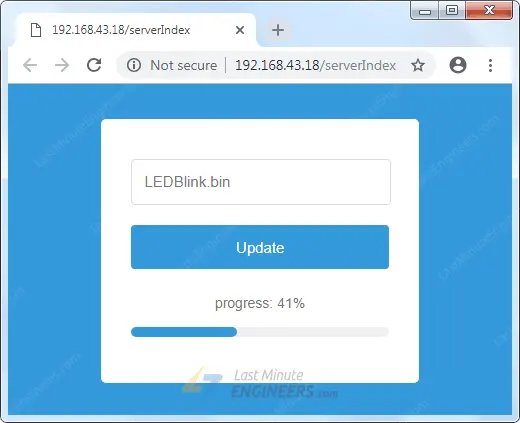
Subsequently, the onboard LED should commence blinking.
Related article
- Distance Measurement with ESP32: HC-SR04 Ultrasonic Sensor Guide
- ESP32 Essentials: Exploring the Power of Bluetooth Classic
- ESP32 Fundamentals: Delving Into Hall Effect Sensor Technology
- Mastering Bluetooth Low Energy with ESP32 (BLE)
- Understanding ESP32 Sleep Modes for Optimal Power Usage


