
One of the simplest and cost-effective methods to incorporate temperature sensing into your Arduino project is by using the LM35 Temperature Sensor. These sensors provide reasonable accuracy and do not require any external components to function. With just a few connections and some Arduino code, you can quickly start sensing temperature.
Parts Required
| Component Name | Buy Now |
| Arduino Uno REV3 | Amazon |
| LM35 Analogue Precision Centigrade Temperature Sensor IC,To-92 | Amazon |
| I2C 1602 LCD Display Module | Amazon |
| Breadboard | Amazon |
LM35 Temperature Sensor
The LM35 Arduino is a precision centigrade temperature sensor manufactured by Texas Instruments. It provides a linear voltage output that corresponds to the temperature in Celsius, making it easy to use with an Arduino.
The LM35 sensor offers several advantages. It is highly accurate and reliable, with no need for external components. It operates effectively in various environmental conditions and does not require calibration. The sensor has a typical accuracy of ±0.5°C at room temperature and ±1°C over a wide temperature range of -55°C to +155°C.
Powered by a 4V to 30V supply, the LM35 consumes minimal current during temperature conversions, resulting in low self-heating. It is designed to be efficient and consumes less than 60µA. Detailed specifications can be found in the provided datasheet.
| Power supply | 4V to 30V |
| Current draw | 60µA |
| Temperature range | −55°C to +155°C |
| Accuracy | ±0.5°C |
| Output scale factor | 10mV/°C |
| Output at 25°C | 250mV |
However, it’s important to note that the LM35 requires a negative bias voltage to measure negative temperatures. If you intend to measure negative temperatures, it is recommended to use the TMP36 temperature sensor instead. The TMP36, manufactured by Analog Devices, offers accurate temperature measurement from -40°C to 125°C without the need for a negative bias voltage. A dedicated tutorial for the TMP36 is available for reference.
Alternatively, a digital temperature sensor like the DS18B20 can be a better choice. The DS18B20 is housed in the same package as the LM35 Arduino and offers improved noise immunity, making it suitable for use in electrically noisy environments or when the sensor needs to be placed at a distance.
Working Principle
The LM35 temperature sensor operates based on a solid-state technique to measure temperature. It takes advantage of the fact that the voltage drop between the base and emitter (Vbe) of a diode-connected transistor decreases at a known rate as the temperature rises. This temperature-dependent voltage change is accurately amplified, resulting in an analog signal that directly corresponds to the temperature.
The utilization of diode-connected transistors for temperature measurement is due to the linear relationship between forward voltage and temperature. The LM35 simplifies this process by performing all the necessary calculations internally. It generates an output voltage that is linearly proportional to the temperature, eliminating the need for complex calculations or additional circuitry.
The LM35 sensor provides a convenient and straightforward solution for temperature measurement, as it delivers a voltage output that directly represents the temperature being sensed.
How to Measure Temperature
Measuring temperature with the LM35 sensor is a straightforward process. Follow these steps:
- Connect the left pin of the LM35 to the positive power supply, which should be within the range of 4V to 30V.
- Connect the right pin of the LM35 to ground. Ensure that the flat side of the sensor is facing you.
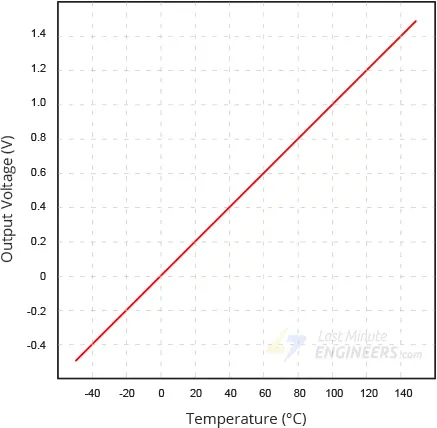
- The middle pin of the LM35 will provide an analog voltage output that is directly proportional (linear) to the temperature in Celsius.
- To convert the analog voltage to temperature, use the basic formula:
Temperature (°C) = Vout * 100.
For example, if the voltage output (Vout) is 0.5V, the temperature can be calculated as 0.5 * 100 = 50°C.
By utilizing the LM35’s linear relationship between output voltage and temperature, you can easily determine the temperature in Celsius based on the measured voltage.
Testing the LM35 Sensor
Testing the LM35 sensor is a simple process. Follow these steps:
- Connect the left pin of the LM35 sensor to a power supply within the range of 4V to 30V. Four AA batteries can work well for this purpose.
- Connect the right pin of the LM35 sensor to the ground. Ensure that the flat side of the sensor is facing you.
- Use a multimeter in DC voltage mode to measure the voltage between the ground and the middle pin of the sensor. At room temperature (around 25°C), the voltage reading should be approximately 0.25V.
To further test the sensor:
Gently squeeze the plastic case of the sensor and observe the temperature rise, reflected in the voltage reading.

Alternatively, touch the sensor with an ice cube (in a plastic bag to prevent water contact with the circuit) and observe the temperature drop, indicated by the voltage reading.

By performing these tests, you can verify the functionality of the LM35 sensor. The voltage changes in response to temperature variations, allowing you to observe the sensor’s sensitivity.
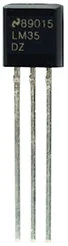
LM35 Sensor Pinout
The LM35 sensor is available in various form factors, but the most commonly used type is the 3-pin TO-92 package, resembling a transistor. Let’s examine its pinout configuration.

+Vs: This pin is used to supply power to the sensor and can be connected to a voltage source ranging from 4V to 30V.
Vout: The Vout pin generates an analog voltage that is linearly proportional to the temperature being measured. It should be connected to an analog input (ADC) of the microcontroller or measurement device.
GND: This pin serves as the ground connection for the sensor, establishing the reference point for the electrical circuit.
Connecting the LM35 Temperature Sensor to an Arduino
Connecting the LM35 temperature sensor to an Arduino board is straightforward. Only three pins need to be connected: two for power and one for reading the sensor’s value.
The sensor can be powered from the 5V supply of the Arduino. The positive voltage connects to the ‘+Vs’ pin, and the ground connects to the ‘GND’ pin. The middle pin, ‘Vout’, outputs the analog signal from the sensor and should be connected to the A0 analog input of the Arduino.
Here is the connection setup for working with the LM35 Arduino:
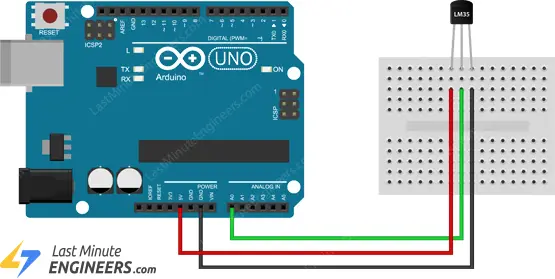
To measure air temperature, place the sensor in the open air or attach it to an object whose temperature you want to measure, such as a heat sink.
Reading the Analog Temperature Data
In the provided wiring diagram, the output of the LM35 is connected to one of the analog inputs on the Arduino. The value of this analog input can be obtained using the analogRead() function.
However, it’s important to note that the analogRead() function does not directly return the output voltage of the sensor. Instead, it maps the input voltage between 0 and the ADC reference voltage (typically 5V or 3.3V) to a 10-bit integer value ranging from 0 to 1023. To convert this value back to the sensor’s output voltage, the following formula can be used:
Vout = (ADC reading) * (5 / 1024)
This formula converts the ADC reading (0-1023) to the corresponding voltage range (0-5V).
To further convert the voltage into temperature, you can utilize the following formula:
Temperature (°C) = Vout * 100
By multiplying the voltage output by 100, you can obtain the temperature in Celsius.
Arduino Code – Simple Thermometer
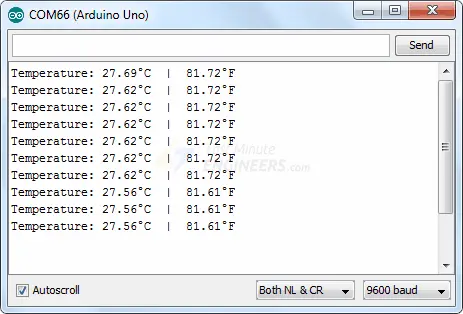
Below is a sketch that demonstrates how to read the LM35 temperature sensor using analog port A0 and display the current temperature in both Celsius and Fahrenheit on the serial monitor. You can upload this sketch to your Arduino for testing and further experimentation.
// Define the analog pin, the LM35's Vout pin is connected to
#define sensorPin A0

void setup() {
  // Begin serial communication at 9600 baud rate
  Serial.begin(9600);
}

void loop() {
  // Get the voltage reading from the LM35
  int reading = analogRead(sensorPin);

  // Convert that reading into voltage
  float voltage = reading * (5.0 / 1024.0);

  // Convert the voltage into the temperature in Celsius
  float temperatureC = voltage * 100;

  // Print the temperature in Celsius
  Serial.print("Temperature: ");
  Serial.print(temperatureC);
  Serial.print("\xC2\xB0"); // shows degree symbol
  Serial.print("C  |  ");

  // Print the temperature in Fahrenheit
  float temperatureF = (temperatureC * 9.0 / 5.0) + 32.0;
  Serial.print(temperatureF);
  Serial.print("\xC2\xB0"); // shows degree symbol
  Serial.println("F");

  delay(1000); // wait a second between readings
}
After uploading the sketch, open the serial monitor in the Arduino IDE to see the temperature readings. The sketch reads the analog value from the LM35 arduino, converts it to voltage, and then calculates the temperature in both Celsius and Fahrenheit using the appropriate formulas. The temperature readings are displayed on the serial monitor with the corresponding units. The sketch also includes a delay of one second between readings to provide a steady stream of temperature updates.
Code Explanation
The code begins by defining the Arduino pin to which the LM35 sensor’s Vout pin is connected.
#define sensorPin A0
In the setup function, the serial connection with the computer is initialized.
void setup() {
  Serial.begin(9600);
}
In the loop function, the analog signal from the LM35 is read using the analogRead() function.
int reading = analogRead(sensorPin);
The analog reading is then converted to voltage and temperature using the formulas discussed earlier in the article.
float voltage = reading * (5.0 / 1024.0);
float temperatureC = voltage * 100;
The temperature in Celsius is printed on the Serial Monitor.
Serial.print("Temperature: ");
Serial.print(temperatureC);
Serial.print("\xC2\xB0"); // shows degree symbol
Serial.print("C  |  ");
The Celsius temperature is then converted to Fahrenheit using the formula and printed on the Serial Monitor.
float temperatureF = (temperatureC * 9.0 / 5.0) + 32.0;
Serial.print(temperatureF);
Serial.print("\xC2\xB0"); // shows degree symbol
Serial.println("F");
The code uses the Serial Monitor to display the temperature readings in both Celsius and Fahrenheit, along with the corresponding degree symbols. The formula for converting temperature from Celsius to Fahrenheit is applied to calculate the Fahrenheit value.
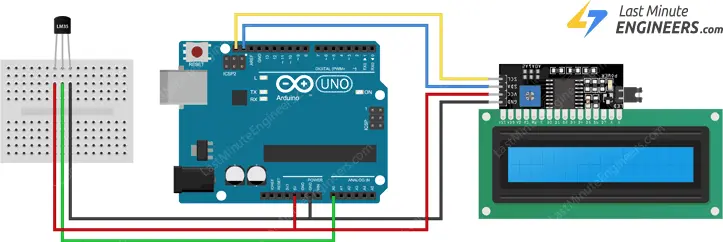
Arduino Project – Standalone Thermometer with LM35 and an I2C LCD
In certain cases, you may have a project idea where real-time temperature readings need to be displayed and an alert should be triggered when the temperature goes beyond a specific range. In such scenarios, using a 16×2 character LCD instead of the serial monitor becomes necessary.
In this example, we will connect an I2C LCD to the Arduino along with the LM35 temperature sensor.
Connecting the I2C LCD is straightforward, as shown in the wiring diagram below. If you are unfamiliar with I2C LCDs, it is recommended to read through the tutorial provided below for a basic understanding.
The following diagram illustrates the wiring connections for the project.
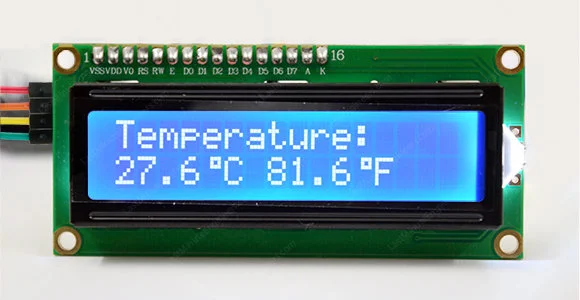
The following code snippet will display the temperature values on the I2C LCD. The code is similar to the previous example, with the difference being that the values are now printed on the I2C LCD.
// Include the LiquidCrystal_I2C library
#include <LiquidCrystal_I2C.h>

// Create a new instance of the LiquidCrystal_I2C class
LiquidCrystal_I2C lcd(0x3F, 16, 2);

// Define a custom degree character
byte Degree[] = {
  B00111,
  B00101,
  B00111,
  B00000,
  B00000,
  B00000,
  B00000,
  B00000
};

// Define the analog pin, the LM35's Vout pin is connected to
#define sensorPin A0

void setup() {
  // Start the LCD and turn on the backlight
  lcd.init();
  lcd.backlight();

  // Create a custom character
  lcd.createChar(0, Degree);
}

void loop() {
  // Get the voltage reading from the LM35
  int reading = analogRead(sensorPin);

  // Convert that reading into voltage
  // Replace 5.0 with 3.3, if you are using a 3.3V Arduino
  float voltage = reading * (5.0 / 1024.0);

  // Convert the voltage into the temperature in Celsius
  float temperatureC = voltage * 100;

  // Print the temperature on the LCD;
  lcd.setCursor(0, 0);
  lcd.print("Temperature:");
  lcd.setCursor(0, 1);
  lcd.print(temperatureC, 1);
  lcd.write(0); // print the custom degree character
  lcd.print("C ");

  // Print the temperature in Fahrenheit
  float temperatureF = (temperatureC * 9.0 / 5.0) + 32.0;
  lcd.print(temperatureF, 1);
  lcd.write(0); // print the custom degree character
  lcd.print("F ");

  delay(1000); // wait a second between readings
}
You should see the following output on the LCD:
Related article
- Using TMP36 Temperature Sensor: Arduino Interfacing Guide
- Arduino DHT11 Sensor Tutorial: How to Interface and Read Data
- Arduino DHT11 and DHT22 Sensor Interface: Step-by-Step Guide
- MAX6675 Thermocouple Module: Seamless Integration with Arduino
- Arduino Soil NPK Sensor: Maximizing Plant Nutrition


