
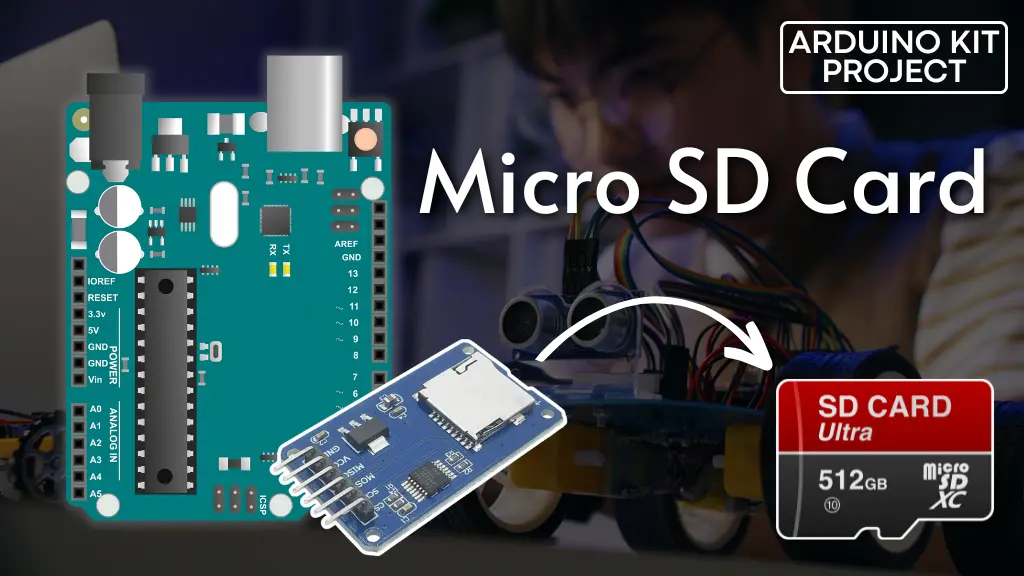
Sometimes, you come up with an Arduino project that requires storing extensive log data, like a GPS or temperature logger.
A great solution is to use flash cards, commonly known as SD or microSD cards, found in digital cameras and MP3 players. Their compact size, yet large storage capacity, makes them invaluable.
Using a microSD card module makes adding data logging to your Arduino project straightforward. Let’s explore how it works.
Hardware Overview
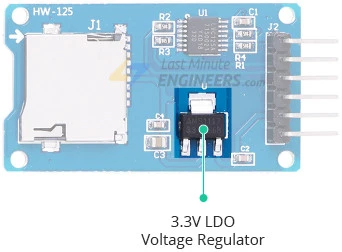
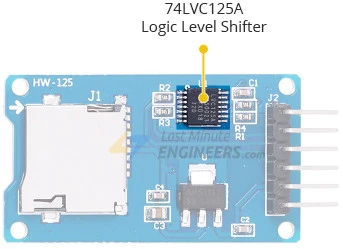
The microSD card module has two main components:
Voltage Regulation: A standard microSD card operates at 3.3V. Since many circuits use 5V logic, directly connecting them would risk damaging the card. The module includes an ultra-low dropout voltage regulator that adjusts the voltage to a safe 3.3V.
Logic Level Shifting: It also features a 74LVC125A logic level shifter, ensuring safe and easy communication between the microSD card and either a 3.3V or 5V microcontroller.
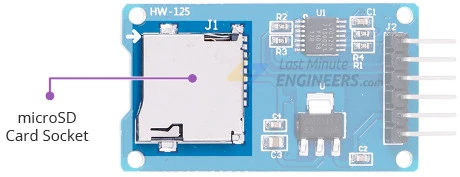
Additionally, the module has a microSD card socket on the front, compatible with any microSD card. The correct insertion direction is typically indicated on the module.
MicroSD cards can interface in two modes: SPI and SDIO.
SDIO mode is faster and used in devices like mobile phones and digital cameras but is complex and requires non-disclosure agreements, making it impractical for hobbyists.
Hence, most SD card modules use the simpler SPI mode, which, despite being slower, is easy to implement with any microcontroller.
MicroSD Card Module Pinout
Connecting the microSD card module is straightforward, featuring six pins:
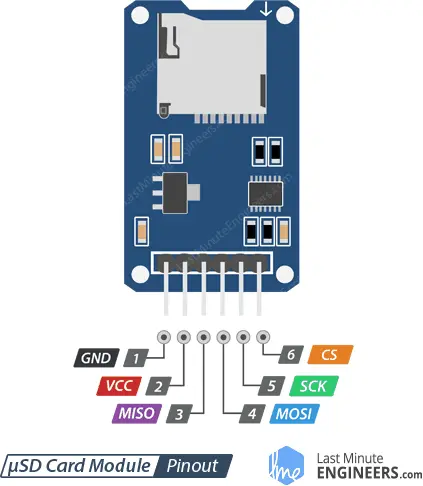
- VCC: Supplies power to the module and should be connected to the 5V pin on the Arduino.
- GND: Ground pin.
- MISO (Master In Slave Out): The SPI output from the microSD card module.
- MOSI (Master Out Slave In): The SPI input to the microSD card module.
- SCK (Serial Clock): Receives clock pulses from the master device (the Arduino) to synchronize data transmission.
- CS (Chip Select): Control pin used to select a specific slave device on the SPI bus.
Preparing the microSD Card
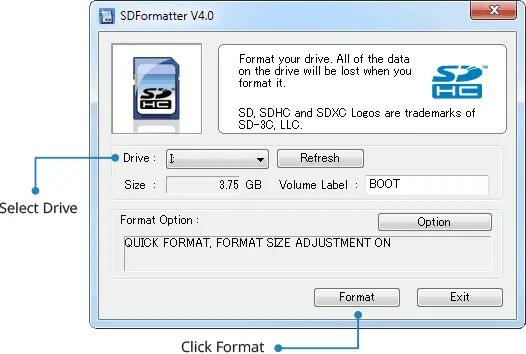
Before using the microSD card with the module and Arduino, it must be formatted to FAT16 or FAT32.
New SD cards are typically pre-formatted with a FAT file system, but the factory formatting may cause issues. Older cards will also need reformatting. Formatting the card before use is a good practice.
Use the official SD card formatter utility from the SD Association to ensure proper formatting. This utility can resolve many formatting-related problems. Download the formatter, run it on your computer, select the correct drive, and click Format.
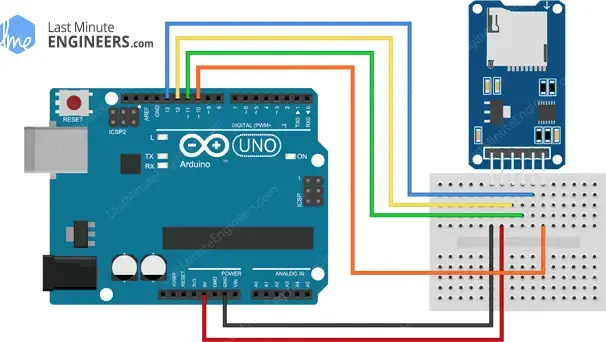
Wiring a microSD Card Module to an Arduino
With your microSD card ready, it’s time to connect the microSD breakout board to an Arduino.
- Connect the VCC pin on the module to the 5V pin on the Arduino.
- Connect the GND pin on the module to a ground pin on the Arduino.
Next, connect the pins used for SPI communication. MicroSD cards require efficient data transfer, so they perform best when connected to the hardware SPI pins of the microcontroller.
Different Arduino boards have different SPI pins, so ensure they are connected correctly. For example, on the Arduino UNO and Nano V3.0, the SPI pins are as follows:
- SCK: Digital pin 13
- MISO: Digital pin 12
- MOSI: Digital pin 11
- CS: Digital pin 10
Here’s a summary of the pin connections:
| Arduino Pin | microSD Pin |
|---|---|
| 5V | VCC |
| GND | GND |
| Digital 13 | SCK |
| Digital 12 | MISO |
| Digital 11 | MOSI |
| Digital 10 | CS |
Parts Required
Arduino Code – Testing the SD Card Module with CardInfo
Working with an SD card can be complex, but the Arduino IDE simplifies this process with the built-in SD library, which facilitates reading and writing to SD cards.
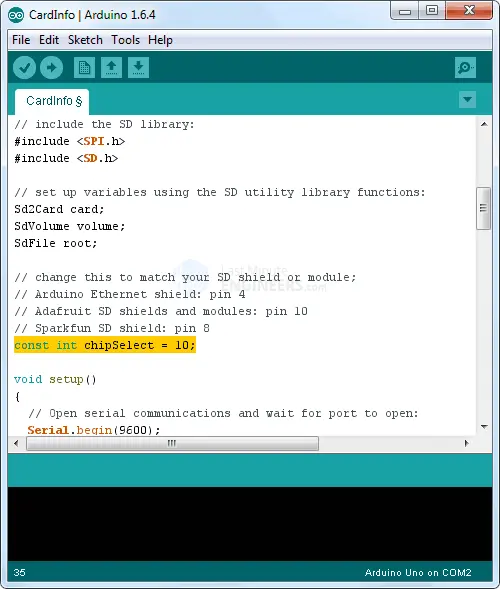
To begin, let’s use the CardInfo example sketch. This sketch doesn’t write any data to the card but instead checks if the card is recognized and provides some information about it. Running this sketch is a good first step to ensure your SD card is supported.
To access the CardInfo example sketch, go to File > Examples > SD > CardInfo in the Arduino IDE.
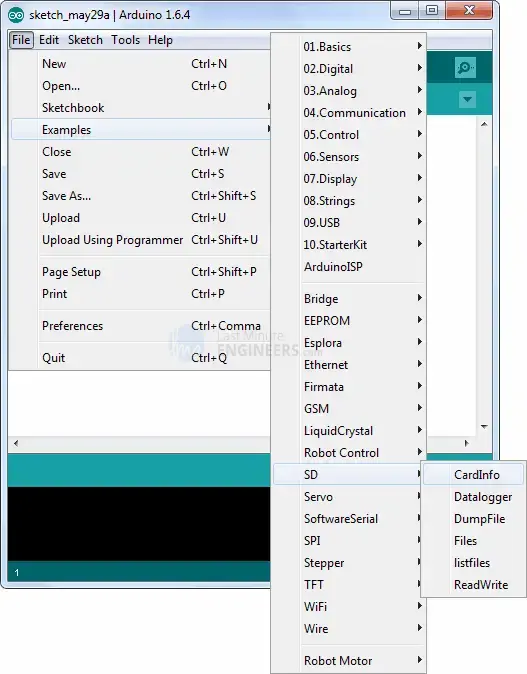
Make sure to initialize the chipSelect line correctly at the beginning of the sketch. For our setup, we’re using digital pin 10, so set it to 10.
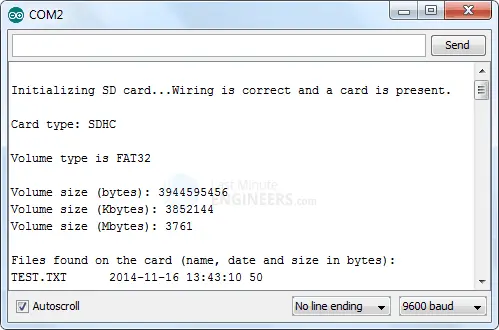
Insert the SD card into the module and upload the sketch. When you open the Serial Monitor, you may encounter different scenarios:
Scenario 1: Everything is fine
If the card is working correctly, you will see information such as:
- Card type (e.g., SDHC)
- Volume type (e.g., FAT32)
- Card size (e.g., 4 GB)
Scenario 2: SD card is corrupt
If the card is corrupt, you might see:
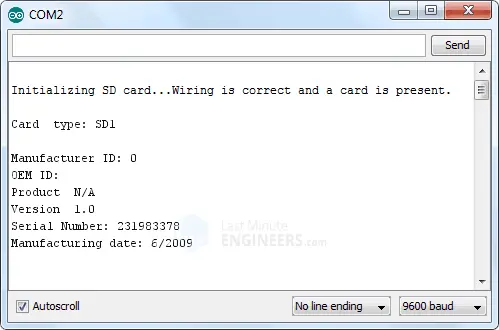
- Missing Manufacturer ID or OEM ID
- Product ID shown as ‘N/A’
- SD errors
Try reformatting the card. If the problem continues, the card may need to be replaced.
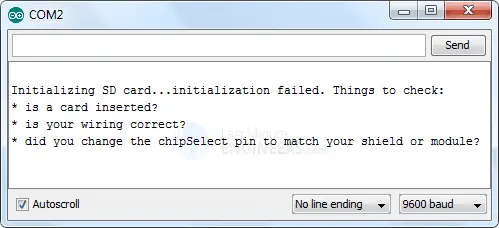
Scenario 3: Wiring error or card is permanently damaged
If there’s a wiring error or the card is damaged, the sketch won’t initialize the SD card. Double-check your wiring and run the sketch again.
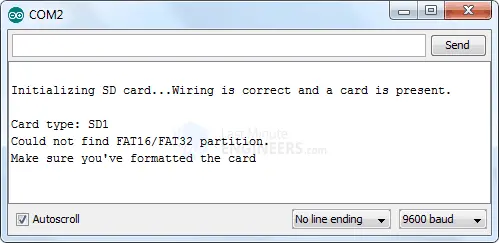
Scenario 4: SD card is not formatted properly
If the wiring is correct but the card isn’t properly formatted, the sketch will indicate this. Reformat the card and try again.
Arduino Code – Reading and Writing Data
Assuming you successfully ran the previous sketch, let’s move on to another experiment. The following sketch demonstrates how to write data to a file and then read it back to verify the contents. Try running the sketch before diving into the details.
#include <SPI.h>
#include <SD.h>

File myFile;

// change this to match your SD shield or module;
const int chipSelect = 10;

void setup()
{
  // Open serial communications and wait for port to open:
  Serial.begin(9600);
  while (!Serial) {
    ; // wait for serial port to connect. Needed for Leonardo only
  }


  Serial.print("Initializing SD card...");

  if (!SD.begin()) {
    Serial.println("initialization failed!");
    return;
  }
  Serial.println("initialization done.");

  // open the file. note that only one file can be open at a time,
  // so you have to close this one before opening another.
  myFile = SD.open("test.txt", FILE_WRITE);

  // if the file opened okay, write to it:
  if (myFile) {
    Serial.print("Writing to test.txt...");
    myFile.println("testing 1, 2, 3.");
    // close the file:
    myFile.close();
    Serial.println("done.");
  } else {
    // if the file didn't open, print an error:
    Serial.println("error opening test.txt");
  }

  // re-open the file for reading:
  myFile = SD.open("test.txt");
  if (myFile) {
    Serial.println("test.txt:");

    // read from the file until there's nothing else in it:
    while (myFile.available()) {
      Serial.write(myFile.read());
    }
    // close the file:
    myFile.close();
  } else {
    // if the file didn't open, print an error:
    Serial.println("error opening test.txt");
  }
}

void loop()
{
  // nothing happens after setup
}
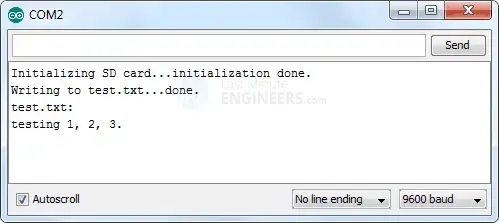
After uploading the code, the serial monitor will display the results.
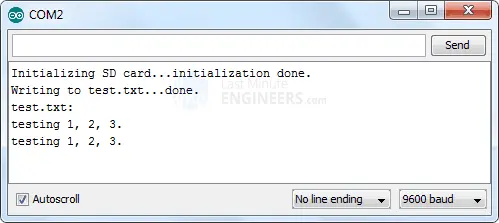
If you reset your Arduino and run the sketch again, new data will be appended to the file without overwriting the existing data.
Code Explanation:
The sketch starts by including the SD and SPI libraries, which enable communication with the SD card using the SPI interface.
#include <SPI.h>
#include <SD.h>
Next, we specify the Arduino pin connected to the SD card module’s CS (Chip Select) pin. Only the CS pin needs to be explicitly declared, as the hardware SPI pins are already defined in the SPI library. We then create a File object named myFile to handle file operations.
const int chipSelect = 10;
File myFile;
In the setup() section, we initialize serial communication and call the SD.begin() function. If the SD card is recognized, “initialization done.” is printed to the serial monitor. If not, “initialization failed!” is printed, and the program stops.
Serial.begin(9600);
Serial.print("Initializing SD card...");
if (!SD.begin(chipSelect)) {
  Serial.println("initialization failed!");
  return;
}
Serial.println("initialization done.");
We then call the open() function to either open an existing file or create a new one. This function takes two parameters: the file name and the mode (either FILE_READ for reading or FILE_WRITE for reading and writing). In this case, we open “test.txt” in write mode.
myFile = SD.open("test.txt", FILE_WRITE);
After opening the file, we use the println() function to write data to it. This function is similar to the println() function used for serial communication, but there is also a print() function if you don’t want to move to a new line. After writing, we close the file to ensure all data is saved.
if (myFile) {
  Serial.print("Writing to test.txt...");
  myFile.println("testing 1, 2, 3.");
  myFile.close();
  Serial.println("done.");
} else {
  Serial.println("error opening test.txt");
}
Next, we read back the contents of “test.txt” to verify the write operation. We reopen the file in read mode and use the myFile.read() function to read data character by character. We use a while loop and myFile.available() to read all characters until the end of the file. Finally, we close the file.
myFile = SD.open("test.txt");
if (myFile) {
  Serial.println("test.txt:");
  while (myFile.available()) {
    Serial.write(myFile.read());
  }
  myFile.close();
} else {
  Serial.println("error opening test.txt");
}
This sketch is a demonstration of reading and writing files, so all the code is placed in the setup() function, which runs once, rather than in the loop() function, which runs continuously.
void loop() {
  // nothing happens after setup
}
Important Things to Note
- You can use the
print()andprintln()functions to write strings, variables, etc., just like you do with Serial objects.
- The
read()function returns one character at a time and does not read an entire line.
- Always use the
close()function when you’re done with a file to ensure all data is written permanently. This also helps free up RAM.
- You can open files in directories. For example, to open a file in a directory, use
SD.open("/myfiles/example.txt"). The file path is relative.
- The SD card library only supports the 8.3 filename format (short filenames). Therefore, keep file names short, like “datalog.txt” instead of “My Sensor log file.text.”
- File names are not case sensitive. For example, “datalog.txt” is treated the same as “DataLog.Txt” and “DATALOG.TXT.”
Useful Functions of the SD Library
SD Object-Specific Functions
exists(filename)checks if a file exists, returning true or false.
remove(filename)deletes a file permanently, so use it with caution.
mkdir("/mynewdir")creates subdirectories, which is useful for organizing many files.
File Object-Specific Functions
seek(position)moves the read/write cursor to a new location. For example,seek(0)moves the cursor to the beginning of the file.
position()returns the current cursor position within the file.
size()returns the size of the file in bytes.
isDirectory()checks if a file is a directory.
openNextFile()allows browsing through all the files in a directory.
name()returns the name of a file as a pointer to an 8.3-formatted character array, which can be printed directly withSerial.print().
Related article
- Interface a 2-Axis Joystick with Arduino: A Processing Tutorial
- Control SMS & Calls with Arduino and A6 GSM Module
- Arduino and GPS: How to Interface NEO-6M Module
- 433MHz RF Tx-Rx Modules: Arduino Interface and Operation Explained


